Billowing Smoke
Fractal Noise works fine to create and animate thin wispy smoke and mist. It will not, however, re-create thick, billowing clouds. When clouds are opaque enough to have their own shape, shading, and topography, built-in After Effects plug-ins will not carry the weight. Luckily, all you need is a good still cloud element and you can animate it in After Effects. And all you need to create the element is a high-resolution reference photoor a bag of cotton puffs.
That's right, cotton puffs, like you get at the pharmacy. I first heard about this trick on a visit to the digital matte department at Industrial Light + Magic about a decade ago (back when the department was made up of four artists), where visionary matte painter Yusei Uesegi was given credit for devising it. He showed me a jaw-dropping shot of a pirate ship in flames, smoke billowing from the masts.
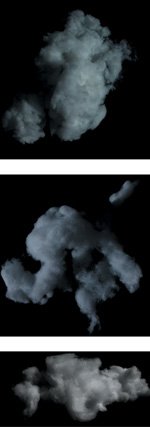
The simplest way to create your basic cloud is to arrange the cotton balls on a large piece of nonreflective black poster board. Take the board outside on a sunny day so you get some nice highlights and shadows. When you photograph it at different angles to the light, the results look like puffy white clouds already (Figure 13.13). You can also suspend the cotton (without the backboard) against an incandescent light for the feel of sunlight through the clouds.
Figure 13.13. You may have noticed how cotton puffs can be arranged to resemble fluffy clouds. But who knew you could get away with sticking them in a movie?
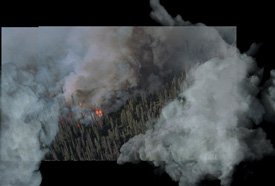
To give clouds shape and contour, open the image in Photoshop, and use the Clone Stamp tool to create a cloud with the shape you want. You can do it directly in After Effects, but this is the kind of job for which Photoshop was designed. Clone in contour layers of highlights (using Linear Dodge, Screen, or Lighten blending modes) and shadows (with Blending set to Multiply or Darken) until the cloud has the look you're after (Figure 13.14).
Figure 13.14. The elements from Figure 13.13 are incorporated into this matte painting, with the shot in the background for reference. The cotton is painted in via a dozen overlapping layers. The topmost use Screen mode (to highlight) or Overlay mode (to darken), bringing out the contours. Can you tell which smoke is made up of cotton?
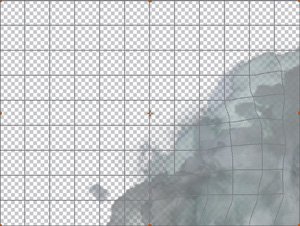
So now you have a good-looking cloud, but it's a still. How do you put it in motion? This is where After Effects' excellent distortion tools come into play, in particular Mesh Warp and Liquify. A project containing just such a cloud animation appears on the disc as 13_smokeCloud.aep.
Mesh Warp
Mesh Warp lays a grid of Bézier handles over the frame; you animate distortion by setting a keyframe for the Distortion Mesh property at frame 0, and then moving the points of the grid, and realigning the Bézier handles associated with each point, to bend to the vertices between points. The image to which this effect is applied follows the shape of the grid.
Tip
Laying cotton on a black card or scanner is not the only way to get a cloud sample, nor is it the easiest in this digital age. Reference images of clouds at high-resolution will obviously work as well. Modeling cotton allows you to be specific and creative: for the effect of light coming through the clouds, the cotton can be suspended over an incandescent light (without the black card).
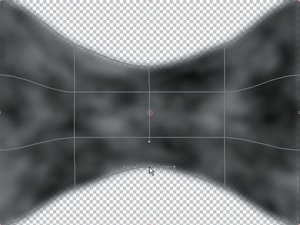
By default, Mesh Warp begins with a seven-by-seven grid. Before you do anything else, make sure that the size of the grid makes sense for your image; you might want to increase its size for a high-resolution project, and you can reduce the number of rows to fit the aspect ratio of your shot, for a grid of squares (Figure 13.15).
Figure 13.15. The Mesh Warp controls are simple, just a grid of points and vectors. You can preset the number and quality, and animate the position of the grid overall (one keyframe controls all grid points). Points can be multiselected and dragged, and each point contains Bezier handles for warping the adjacent vectors.
You can't typically get away with dragging a point more than about halfway toward any other point; watch carefully for artifacts of stretching and tearing as you work, and preview often. If you see stretching, realign adjacent points and handles to compensate. There is no better way to learn about this than to experiment.
Tip
Mesh Warp, like many distortion tools, renders rather slowly. As you rough in the motion, feel free to work at quarter-resolution. When you've finalized your animation, you can save a lot of time by pre-rendering it (see Chapter 4, "Optimizing Your Projects").
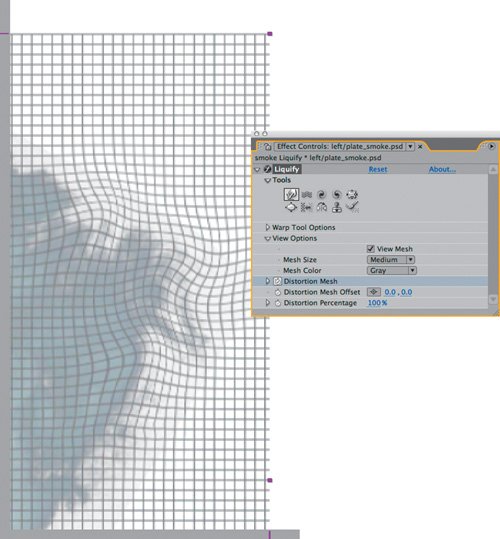
Liquify
Mesh warp is appropriate for gross distortions of an entire element. The Liquify effect is a brush-based system for fine distortions. 13_smokeCloud.aep includes a composition that employs Liquify to swirl a cloud. Following is a brief orientation to this toolset, but as with most brush-based painterly tools, there is no substitute for trying it hands-on.
The principle behind Liquify is actually similar to that of Mesh Warp; enable View Mesh under View Options and you'll see that you're still just manipulating a grid, albeit a finer one that would be cumbersome to adjust point by pointhence the brush interface.
Of the brushes included with Liquify, the first two along the top row, Warp and Turbulence, are most often used (Figure 13.16). Warp has a similar effect to moving a point in Mesh Warp; it simply pushes pixels in the direction you drag the brush. Turbulence scrambles pixels in the path of the brush.
Figure 13.16. Liquify is also a mesh distortion tool, only the mesh is much finer than Mesh Warp's and it is controlled via brushes, allowing more specific distortions.
The Reconstruction brush (rightmost on the bottom row) is like a selective undo, reversing distortions at the default setting; other options for this brush are contained in the Reconstruction Mode menu (which appears only when the brush is selected).
Liquify has the advantage of allowing hold-out areas. Draw a mask around the area you want to leave untouched by Liquify brushes, but set the Mask mode to None, disabling it. Under Warp Tool Options, select the mask name in the Freeze Area Masked menu.
Notes
New to version 7.0, the Liquify effect can extend beyond the boundaries of a layerno need to precompose.
Lest you think the methods described in this section are some crude kludge, inferior to procedural particle dynamic effects created by a technical director in a sophisticated 3D rendering program, here's an anecdote that demonstrates how this generalized approach (refined to a high degree) saved the day on a movie with an eight-figure budget. A few short weeks before the final deadline for all shots to be completed on The Day After Tomorrow, the render pipeline at The Orphanage was slammed, but the "super cell" element for the freezing of New York City sequence (that huge cloud bank swirling around on the horizon) had not been approved by the client other than in matte paintings.
It was clear that even if a technical director could re-create the look in 3Dand no one had done so yetthere wasn't going to be time left to render it. By animating the matte paintings using the techniques outlined in this section, the shots were completed and approved within a couple of weeks. As always, the key was breaking the problem down into component parts. The final super cell rig had over a dozen individual component layers and instances of Mesh Warp and Liquify, along with holdouts, overlays, offsets, and Blending modes built up among them to give the effect the appropriate organic complexity and dimension.
Combining Techniques
Because each project varies, the techniques offered are meant to form only the basis of your finished effect. The goal is to provide you with a few keys that you can combine or piece out on your own, rather than nail you down to specific steps that work only in one context.
So, for example, selling a shot of the smoke plume might involve not only warping effects, but also some thinner, faster-moving smoke nearest the flames or in the foreground of the scene, which could be created with Fractal Noise. Or, if the drifting Fractal Noise smoke needed more specific directionalitysay, to flow around an objectyou could apply a Mesh Warp on top of its animation, or flow it right through the Mesh Warp grid (Figure 13.17).
Figure 13.17. You can get pretty creative with your use for Mesh Warp: Here, Fractal Noise is animated to move left to right through a grid that deforms it as it animates.
Smoke Trails
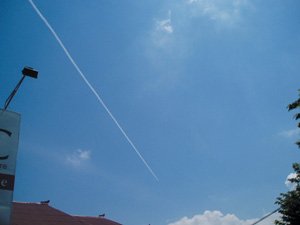
Many effects, including smoke trails, don't require particle generation in order to be re-created faithfully. This section is included less because the need comes up often and more to show how, with a little creativity, you can combine techniques in After Effects to create effects that you might think require a dedicated solution. Check out the reference in Figure 13.18 and you'll notice that smoke trails are essentially just clouds.
Figure 13.18. Clearly, this effect could easily be painted with no external source whatsoever.
Therefore, initial setup of this effect is simply a matter of starting with a clean plate, painting the smoke trails in a separate still layer, and revealing them over time (presumably behind the aircraft that is creating them). The quickest and easiest way to reveal such an element over time is often by animating a mask, or you could use techniques described in Chapter 8 to apply a motion tracker to a brush.
The optional second stage of this effect would be the dissipation of the trail; depending on how much wind is present, the trail might probably drift, spread, and thin out over time. That means that in a wide shot, the back of the trail would be more dissipated than the front.
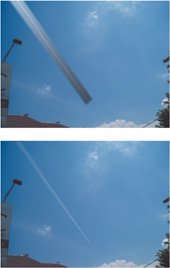
A simple method to achieve this (which could work with a distant shot, at least) would use a black-to-white gradient (created with Ramp) and Compound Blur. The gradient is white at the dissipated end of the trail and black at the source (Figures 13.19a and b); each point can be animated or tracked in. Compound Blur uses this gradient as its Blur Layer, creating more blur as the ramp becomes more white.
Figures 13.19a and b. Getting creative with a quick-and-dirty effect on Figure 13.18: A gradient is created to match the start and end of the plane's trajectory, masked and pre-composed (a). This is then applied via a Compound Blur to the source layer (b)a simple example of building up your own effect with the tools at hand.
Wind |
Section I. Working Foundations
The 7.0 Workflow
- The 7.0 Workflow
- Workspaces and Panels
- Making the Most of the UI
- Settings: Project, Footage, Composition
- Previews and OpenGL
- Effects & Presets
- Output: The Render Queue
- Study a Shot like an Effects Artist
The Timeline
- The Timeline
- Organization
- Animation Methods
- Keyframes and The Graph Editor
- Uber-mastery
- Transform Offsets
- Motion Blur
- Manipulating Time Itself
- In Conclusion
Selections: The Key to Compositing
- Selections: The Key to Compositing
- The Many Ways to Create Selections
- Compositing: Science and Nature
- Alpha Channels and Premultiplication
- Masks
- Combining Multiple Masks
- Putting Masks in Motion
- Blending Modes: The Real Deal
- Track Mattes
Optimizing Your Projects
- Optimizing Your Projects
- Navigating Multiple Compositions
- Precomposing and Nesting
- Adjustment and Guide Layers
- Understanding Rendering Order
- Optimizing After Effects
- Onward to Effects
Section II. Effects Compositing Essentials
Color Correction
Color Keying
- Color Keying
- Good Habits and Best Practices
- Linear Keyers and Hi-Con Mattes
- Blue-Screen and Green-Screen Keying
- Understanding and Optimizing Keylight
- Fixing Typical Problems
- Conclusion
Rotoscoping and Paint
- Rotoscoping and Paint
- Articulated Mattes
- Working Around Limitations
- Morphing
- Paint and Cloning
- Conclusion
Effective Motion Tracking
- Effective Motion Tracking
- The Essentials
- Optimizing Tracking Using 3D
- Extending a Track with Expressions
- Tracking for Rotoscoping
- Using 3D Tracking Data
- Conclusion
Virtual Cinematography
- Virtual Cinematography
- 5D: Pick Up the Camera
- Storytelling and the Camera
- Camera Blur
- The Role of Grain
- Film and Video Looks
- Conclusion
Expressions
- Expressions
- Logic and Grammar
- Muting Keyframes
- Linking Animation Data
- Looping Animations
- Smoothing and Destabilizing
- Offsetting Layers and Time
- Conditionals and Triggers
- Tell Me More
Film, HDR, and 32 Bit Compositing
- Film, HDR, and 32 Bit Compositing
- Details
- Film 101
- Dynamic Range
- Cineon Log Space
- Video Gamma Space
- Battle of the Color Spaces
- Floating Point
- 32 Bits per Channel
- Conclusion
Section III. Creative Explorations
Working with Light
- Working with Light
- Light Source and Direction
- Creating a Look with Color
- Backlighting, Flares, Light Volume
- Shadows and Reflected Light
- HDR Lighting
- Conclusion
Climate: Air, Water, Smoke, Clouds
- Climate: Air, Water, Smoke, Clouds
- Particulate Matter
- Sky Replacement
- The Fog, Smoke, or Mist Rolls In
- Billowing Smoke
- Wind
- Water
- Conclusion
Pyrotechnics: Fire, Explosions, Energy Phenomena
- Pyrotechnics: Fire, Explosions, Energy Phenomena
- Firearms
- Sci-Fi Weaponry
- Heat Distortion
- Fire
- Explosions
- In a Blaze of Glory
Learning to See
Index
EAN: 2147483647
Pages: 157
