Blue-Screen and Green-Screen Keying
Back in the day, if you wanted to go beyond the rather pedestrian Color Difference Key in After Effects you needed a third-party keyer, and for a few years there were two choices: Ultimatte for After Effects (now AdvantEdge, Ultimate Corporation) and Primatte Keyer (Red Giant Software, formerly Pinnacle Systems, and before that, Puffin Designs).
Notes
When I label Color Difference Key "pedestrian," I speak as someone who matted hundreds of shots with it, back before there were alternatives in After Effects. Its methodology is fundamental and can be replicated using basic channel math and Levels controls. It provides the exact methodology that was used for early digital composites (in such blockbuster films as Terminator 2), which itself is the digital equivalent of optical compositing (used in Hollywood classics from The Ten Commandments right through the original Star Wars trilogy).
Debuting with version 6.0 Professional was Keylight, a third well-known software keyer popular among Shake users. It remains part of After Effects 7.0 Professional (but as a separate installation, so make certain that you have it). The other keyers have by no means disappeared, and I personally remain a fan of Primatte, which offers a methodology very different from that of Keylight. Working on The Adventures of Shark Boy and Lava Girl in 3D after the previous edition of this book was released, I decided to use Keylight for all of my shots, however, and I never felt compelled to revert to Primatte. Because Keylight is what you have with After Effects Professional, let's focus on that.
Keylight is useful in many keying situations, not just studio-created blue- or green-screen shots. For example, you can use Keylight for removal of a murky blue sky (Figure 6.11). You wouldn't use Keylight to pull a luminance key, however, or when simply trying to isolate a certain color range within the shot.
Figure 6.11. In one pass, with no adjustments other than selecting the sky color, Keylight does an effective job of knocking out the background even around the motion-blurred bird in flight. The sky is nowhere near a perfect blue screen in this case, other than its uniformity: Blue saturation is around 50% and only about double the amount of red.

Keylight is most typically employed when the plate was shot against a uniform, saturated, primary color background, and when preserving edge detail is of utmost importancein other words, most typically (but not exclusively) when working with footage that was specifically shot to be keyed, against a screen of blue or green.
Generalized Keying Methodology
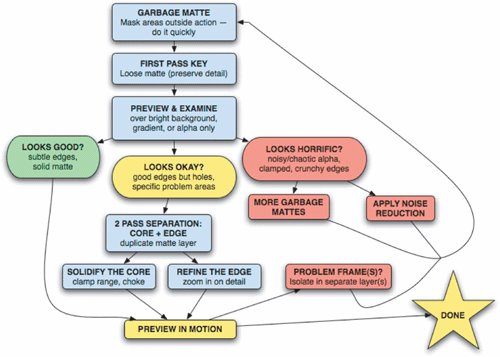
Figure 6.12 shows a process tree that outlines the steps detailed below (also included on the book's disc as keyingFlowchart.pdf). No two complex shots are the same, but something like this approach should help you pull a good matte, regardless of the tools used. The next section reprises these steps, specifically using Keylight.
Figure 6.12. This chart summarizes steps that can yield a successful color key. It is also included as a PDF on the disc.
Tip
Just in case I'm not yet succeeding in beating you over the head with it, my overall message is: Break down plate footage into separate passes when keying. At the very least, a hard "core" matte to fill holes and an overlaid edge matte to recover detail will often improve radically on a single pass. Extra passes are then applied via masked layers to specific problem areas.
The basic steps are
- Garbage matte any areas of the background that can easily be masked out. "Easily" means no articulated matte (don't animate individual mask points). It's whatever you can accomplish in about 20 minutes or less (Figure 6.13).
Figure 6.13. The quick-and-dirty garbage matte is your friend for eliminating unwanted parts of the stage.
- Attempt a first pass quickly, keeping this matte on the loose side (preserving as much edge detail as possible) to be refined later.
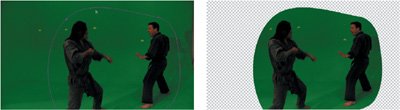
- Preview this at full resolution, in full motion, against a bright primary color. In rare cases, you will be done at this step. Switch to a view that clearly displays the alpha channel. Note any obvious holes in the foreground or areas of the background that have failed to disappear, as well as any noise in the solid areas of the matte (Figure 6.14).
Figure 6.14. A quick diagnosis of Keylight's first pass at this shot: The shadows must be keyed out because they extend outside the garbage matte area (and right off the set). This in turn has an effect on fine detail such as motion blur and hair, so these areas (hands, hair) may require their own holdout mattes.
If things look noisy and chaotic in the alpha channel or the edges are clamped and chewy, you can
- Start over and try a new pass
- Apply noise reduction to the plate, then start over (see "Noise Suppression" later in this chapter)
- Articulate or track garbage/holdout mattes to isolate problem portions of the footage (see "Fixing Typical Problems")
- Decide about separating the core and edge mattes. Fix holes in the foreground by duplicating the matted plate layer. Solo the duplicated layer and clamp the matte to create a solid core matte with no holes. Now choke it far enough in that it does not overlap with the edges defined by the other matted plate layer.
- Refine the edge. Zoom in on a challenging area of the foreground edge (200% to 400%), and refine the key to try to accommodate it, using strategies outlined in the following sections. Challenging areas may include
- Fine detail such as hair
- Motion blurred foreground elements
- Cast shadows
You must also watch out for, and consider rotoscoping, foreground features that can threaten an effective key, such as
- Areas of the foreground that reflect the background color
- Edge areas whose color nearly matches the background
- Areas of poor contrast (typically underlit regions of the shot)
- Preview the shot in full motion. Again, note holes and noise that crop up on individual frames, and now use strategies (outlined in "Fixing Typical Problems") to overcome these problems. Approaches you may employ at this stage are
- Adding holdout mattes (typically masks), either for the purpose of keying elements individually or rotoscoping them out of the shot (Figure 6.15)
Figure 6.15. This is the step too many artists aren't willing to take soon enough. It may seem tedious and cumbersome to create individual holdout mattes for hair, heavy motion blur, and other such detail, but you could waste hours trying to eliminate the shadows while retaining the detail; a quick roto-matte can often be keyframed in 10 or 20 minutes on an average-length shot.

- Holding out the matte edge only, for the purpose of refining or blurring it (see "Edge Matting")
- Adding holdout mattes (typically masks), either for the purpose of keying elements individually or rotoscoping them out of the shot (Figure 6.15)
Close-Up: Holdout Mattes
A holdout matte is an area of an image that is isolated for its own separate treatment. An effective key often involves the combination of two holdout mattes, one for the edge and another for the core.
The question then arises as to how these two mattes should be combined; with this method, it should be a simple matter either of overlapping the two layers or precomposing them so that they make a single alpha channel to be applied as a track matte.
In other compositing programs such as Shake, it's not unusual to employ a third holdout, for the background, but in After Effects this is typically avoided and is hopefully unnecessary. The difficulty is that this third matte must be subtracted, rather than added, and transparency (alpha) information is always combined additively in After Effects.
You can convert all of the alpha channels to RGB (using Shift Channels) and apply the Darken blending mode to the background holdout to subtract, but it is frankly a hassle in After Effects, useful only if no other method of holding out the background proves effective. I have seen ex-Shake users drive themselves completely batty working this way.
This basic approach should work with any tool set. The real underlying point is that the attempt to key a plate in a single pass is typically too lazy. Ironically, it often results in much more work, overall, as you struggle to make all areas of your shot accommodate unified, one-size-fits-all settings.
Using Keylight
The version of Keylight that ships with 7.0 is new, although the changes in version 1.1v1 of Keylight are relatively subtle.
The most significant of the Keylight parameters remains the Screen Colour selection (Keylight reveals its UK origins at Framestore CFC with that u). Choose the color to be keyed wisely, and you have a shot at a one-pass result. Otherwise, you may fight an uphill battle the rest of the way. More about how this selection works is found in "The Inner Workings of Keylight" section.
Notes
You can follow along with the steps using the blueScrn_mcv_HD.mov footage included in this chapter's Pixel Corps folder on the book's disc. Completed versions of several of the examples from this chapter are contained in the 06_colorKey.aep project.
In the best-case scenario, after creating any basic garbage mattes as usual, you will
- Use the Screen Colour eyedropper to sample a pixel that is roughly the median of the plate background. The View setting defaults to Final Result, so you can immediately examine the result of this one choice. To do so, set your background to a bright color and solo the plate layer, or examine the alpha channel (Alt+4/Option+4), or in Keylight, under View, choose the Status (more about that in a moment).
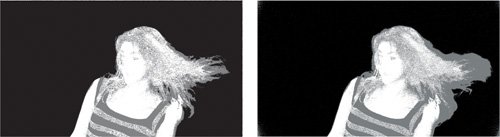
- To try a different initial Screen Colour setting, click Reset at the top of Keylight (instead of using Undo) and try again. Repeat again as needed. Now you have multiple attempts saved in the Undo buffer. Choose the one that seems to have eliminated the most unwanted background (Figures 6.16a, b, and c), examining the alpha channel as needed.
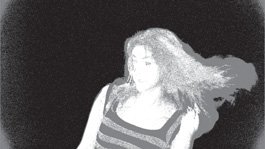
Figures 6.16a, b, and c. Even when you use well-shot, high-definition source (a), it is imperative to get the Screen Colour setting right if you want to preserve all of the transparent detail in this shot. Choosing a darker background color (b) creates a more solid initial background, but a lighter color selection (c) preserves far more detail. (Source footage courtesy Pixel Corps.)
Tip
You can take a snapshot of each attempt (Shift+F5 through F8 to take four individual snapshots; hold down F5 through F8 to see each of them), but the method described holds each pass in the Undo buffer, allowing you to recover the best one.
Close-Up: The Eyedropper and the Info Panel
When you sample a pixel in After Effects, either using an eyedropper, such as the Screen Colour selector in Keylight, or simply by moving your cursor around the viewer and looking at the values in the Info panel, you are seeing the exact value of the exact pixel underneath the selection point of the cursor (the lower-left corner of the eyedropper, the upper-left corner of the pointer). But as with just about everything, there are exceptions.
If you hold the Ctrl/Cmd modifier key, the sample area increases and you get the average of the modified area. By default, this is 5 x 5 pixels, and hackers will even change it by editing the Adobe After Effects 7.0 Prefs file (searching for "Eye Dropper Sample Size With Modifier").
More significantly, in version 7.0 these sampling tools no longer necessarily give you the visible state of the pixel. As in Photoshop CS2, the actual state of the pixel is sampled, which means that with a semi-transparent layer, the value will be sampled as if the layer was opaque (straight transparency values).
Thus, if you sample any pixels in your matted plate, and they are not completely transparent, you get the color values the layer would have with its alpha channel turned off.
Now, as needed, seek out areas that want refining:
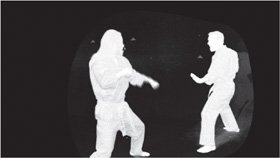
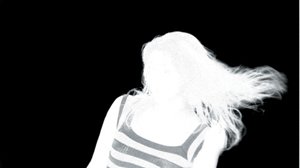
- Switch View to Status. Opaque pixels become white, transparent pixels black, and those with any semi-transparency are gray (Figure 6.17). It's an exaggerated version of the alpha channel that shows where your matte is not solid.
Figure 6.17. Sampling a background pixel near the center of the image yields a good initial key, as seen in the Status matte. The black areas are already completely transparent, the white areas opaque, and the gray pixels constitute the areas of focus; they are the semi-transparent regions.
- Still in Status view, try Screen Balance at settings of 5.0, the default 50.0, and 95.0, and choose whichever one yields the best-looking matte. In this case, a Screen Balance of 95 looks good in Status view, but after switching to the Final Result it seems to generate a matte line (Figure 6.18).
Figure 6.18. This initial result, with a Screen Balance of 95, would be fine but for the ugly black matte line that appears along the arm. Better in this case to stick with the default green-screen setting of 50.

- If the background is not solid black, boost Screen Gain until the gray mostly disappears in Status view. Try to preserve any gray that is at the edges of your foreground. If gray remains in the background, but separate from the foreground such that you can be easily garbage matted, do so (Figures 6.19a and b).
Figures 6.19a and b. Screen Gain is raised to remove the gray in the background. It's tempting to go with a setting of around 120 to remove every last gray speck from the background (a), but a much looser setting (around 105) that leaves some speckling, particularly away from the foreground figure (b), is much preferable for maintaining edge detail. The noise in the corners can be eliminated either via a garbage matte or by raising Clip Black.
This footage is well shot, and although the footage includes flowing hair (a challenge), it does not include the floor, which is usually much more of a challenge.
- Now set the Despill Bias using its eyedropper (a new feature). Sample an area of the foreground that has no spill and should remain looking as is (typically a bright and saturated skin tone area). This shot does not have a lot of green spill, but notice as you try it that the color often appears richer (less contaminated) after this step.
In this ideal scenario, your matte is complete without the need to go beyond these first four controls (Screen Colour, Screen Gain, Screen Balance, and Despill Bias), which comprise the heart of Keylight.
However, a glance at the current alpha channel reveals a problem. The yellow stripes in the shirt are not fully part of the foreground matte (Figure 6.20) because yellow and green are so close to one another on the color wheel.
Figure 6.20. The yellow stripes on the shirt are not easily distinguished from the green matte.
Notes
Also included on the disc is a shot of this same model, wearing the same costume, but taken with a blue-screen background. Try an initial key on that plate (bluScrn_mcu_HD.mov, located on the disc's Pixel Corps folder) and you'll notice that the stripes in the shirt cause no problemyellow and blue are virtual oppositesbut other issues arise with the rim lighting in the hair.
This is the point at which you make the decision to separate out one (or even several) core mattes. Rather than ruining the nice edge detail by trying to get the yellow stripes on the same pass, you now create a separate core matte to take care of the shirt.
Notes
Keylight includes its own controls for adding holdout areas to mattes via the Inside Mask and Outside Mask controls. You draw a mask, set it to None, and then select it under Inside Mask or Outside Mask. This works for garbage mattes, but it's not a substitute for duplicating the layer to combine multiple keys.
- Duplicate the layer with Keylight applied, so that the initial settings are now held by two layers, and solo the duplicate. You can rename the new layer Core and the original layer Edge. Select Coredon't adjust the wrong one or you'll be annoyed.
- On the Core layer and still in Status view, twirl down the Screen Matte parameters. Adjust the Clip White value down until you start to see a matte that consists of entirely black pixels in the background, and turns the gray pixels in the shirt green. Green pixels indicate areas that contained some of the background color; these are not being color-corrected as part of the keying operation (Figure 6.21). For more on Keylight's spill suppression, see the "Spill Suppression" section.
Figure 6.21. The formerly gray pixels in the foreground are now green in Status view. These are the pixels that have been changed by clipping the matte. The spill suppression that occurred as part of the initial keying operation no longer applies to these pixels.

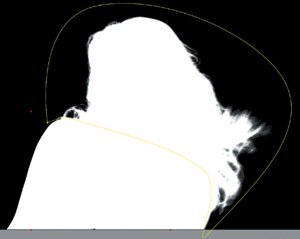
- Turn off soloing and toggle the core matte on and off in RGB and Alpha view. Yowch! The shirt is filled in, but the edges and hair are ruined. Use the Screen Grow/Shrink control to shrink the matte (using positive values) until you can toggle the core matte on and off and see no effect on the edges of the body (a value of around -3 may work); the hair troubles will have to be solved with a mask, as you can see if you try to lower this value to accommodate the hair as well (which doesn't work at all).
- Add a holdout mask for the hair. It will need to be rotoscoped (animated over time) to accommodate the motion of the talent, but that is covered more thoroughly in Chapter 7, "Rotoscoping and Paint." For now just isolate the shirt or hair for one frame. Happily, the result is a good-looking matte (Figure 6.22).
Figure 6.22. In a perfect world, you could create a matte this good without the need for the holdout matte. But you and I don't live in that world, so you may as well be grateful this shot only requires one mask.
Now what? The mask needs animating, and the discoloration to the shirt will have to be dealt with (see the "Color Spill" section). But without too much pain you have a mask that can be used to place this model and her long flowing hair over whatever background you choose.
Understanding and Optimizing Keylight |
Section I. Working Foundations
The 7.0 Workflow
- The 7.0 Workflow
- Workspaces and Panels
- Making the Most of the UI
- Settings: Project, Footage, Composition
- Previews and OpenGL
- Effects & Presets
- Output: The Render Queue
- Study a Shot like an Effects Artist
The Timeline
- The Timeline
- Organization
- Animation Methods
- Keyframes and The Graph Editor
- Uber-mastery
- Transform Offsets
- Motion Blur
- Manipulating Time Itself
- In Conclusion
Selections: The Key to Compositing
- Selections: The Key to Compositing
- The Many Ways to Create Selections
- Compositing: Science and Nature
- Alpha Channels and Premultiplication
- Masks
- Combining Multiple Masks
- Putting Masks in Motion
- Blending Modes: The Real Deal
- Track Mattes
Optimizing Your Projects
- Optimizing Your Projects
- Navigating Multiple Compositions
- Precomposing and Nesting
- Adjustment and Guide Layers
- Understanding Rendering Order
- Optimizing After Effects
- Onward to Effects
Section II. Effects Compositing Essentials
Color Correction
Color Keying
- Color Keying
- Good Habits and Best Practices
- Linear Keyers and Hi-Con Mattes
- Blue-Screen and Green-Screen Keying
- Understanding and Optimizing Keylight
- Fixing Typical Problems
- Conclusion
Rotoscoping and Paint
- Rotoscoping and Paint
- Articulated Mattes
- Working Around Limitations
- Morphing
- Paint and Cloning
- Conclusion
Effective Motion Tracking
- Effective Motion Tracking
- The Essentials
- Optimizing Tracking Using 3D
- Extending a Track with Expressions
- Tracking for Rotoscoping
- Using 3D Tracking Data
- Conclusion
Virtual Cinematography
- Virtual Cinematography
- 5D: Pick Up the Camera
- Storytelling and the Camera
- Camera Blur
- The Role of Grain
- Film and Video Looks
- Conclusion
Expressions
- Expressions
- Logic and Grammar
- Muting Keyframes
- Linking Animation Data
- Looping Animations
- Smoothing and Destabilizing
- Offsetting Layers and Time
- Conditionals and Triggers
- Tell Me More
Film, HDR, and 32 Bit Compositing
- Film, HDR, and 32 Bit Compositing
- Details
- Film 101
- Dynamic Range
- Cineon Log Space
- Video Gamma Space
- Battle of the Color Spaces
- Floating Point
- 32 Bits per Channel
- Conclusion
Section III. Creative Explorations
Working with Light
- Working with Light
- Light Source and Direction
- Creating a Look with Color
- Backlighting, Flares, Light Volume
- Shadows and Reflected Light
- HDR Lighting
- Conclusion
Climate: Air, Water, Smoke, Clouds
- Climate: Air, Water, Smoke, Clouds
- Particulate Matter
- Sky Replacement
- The Fog, Smoke, or Mist Rolls In
- Billowing Smoke
- Wind
- Water
- Conclusion
Pyrotechnics: Fire, Explosions, Energy Phenomena
- Pyrotechnics: Fire, Explosions, Energy Phenomena
- Firearms
- Sci-Fi Weaponry
- Heat Distortion
- Fire
- Explosions
- In a Blaze of Glory
Learning to See
Index
EAN: 2147483647
Pages: 157
