Morphing
Let's talk about morphingthat's right, that crazy craze of the early '90s. Where are you now, Michael Jackson?
Thing is, morphing can come in handy, without being so blatant and obvious, if you think of it as a concealing tool. It's useful when you don't want anyone to notice a transition between two objects or even a transition between one object and itself at a different point in time. Or heck, go crazy morphing together members of your extended family to see if you look anything like the result.
What exactly is a morph? It is, quite simply, a combination of two warps and a dissolve. Given two images, each with a corresponding shape (say, the features of the face), you warp the source image's face shape to the face shape of the target, warp the target from something that matches the source to its face shape, fading the target in over the source.
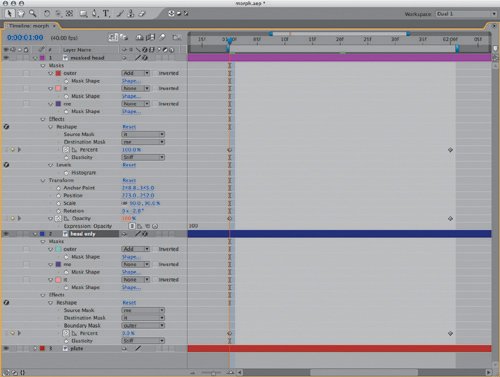
After Effects has no tool called "Morph," and for a long time, the program offered no good way to pull off this effect. After Effects Professional includes Reshape, a warping tool that lays the groundwork for simple morphs. You can build these up into more complex morphs, with separate individual transitions occurring to create an overall transition.
Using Reshape to Morph
Unfortunately, creating a morph with Reshape is nowhere near a one-button process. This book generally steers away from step-by-step recipes in favor of helping you solve larger problems creatively, but in this case, it's easy to get confused. So here is a step-by-step, using a demonstration of my own resemblance transitioning to that of my evil twin (Figure 7.14):
|
1. |
Start with two elements that have some basic similarities in their relative position of features. The subtler the distortion required, the more you can get away with. |
|
2. |
Isolate the two elements you will be morphing from their backgrounds to prevent contamination. If you're working with elements shot against a blue screen, key them out first. Otherwise, mask them. In my example, I have created masks for each layer. |
|
3. |
Ascertain that the two layers are the same size in the X and Y dimensions and as closely aligned as possible. If they are not, precompose one layer to match the other. This step is important because it will make matching the source and target masks much, much simpler. Name the two layers Source and Target (as they are in the example) if it helps you follow along. |
|
4. |
Choose matching sections from your two clips for the duration of your transition (say, 24 frames). If you have still elements, no worries. The closer your moving elements are to still, the more likely you'll get a clean result. |
|
5. |
Draw a mask around the boundary that is going to morph in both layers. Be as precise as possible, erring to the inside if at all (Figure 7.15). This could be the masks created in step 2, if you created masks there. It need not be active; if you don't need it to mask out the background, set it to None. Rename each mask something descriptive like outer (the name used in my example). |
|
6. |
Create a mask around the area of the Source layer that is the focus of the morph. In my example, the focus is facial features: the eyes, nose, and mouth (Figure 7.16). Make this mask as simple as you can; use RotoBeziers and as few points as will work to outline the features in question. |
|
7. |
Set the mask mode to None; this mask is your first shape, you don't need it to influence the layer at all; you will use it for the Reshape effect only. Give it a name (mine is called "me"). |
|
8. |
Copy this mask shape and paste it in the Target layer. If the two layers are the same dimensions, it should be an identical size and position as it was in the Source layer. |
|
9. |
Duplicate the mask. Give it a different color and rename it. In my case, I called the mask "it." |
|
10. |
First scale and rotate, then if necessary move individual points (as little as possible!) so that the it mask surrounds the equivalent area of the Target layer that me does of the source: in my example, the eyes, nose, and mouth. Notes New in version 7.0, mask names are copied along with masks; the copied mask in step 8 remains named "me" in the new layer. |
|
11. |
Copy the resulting it mask shape, and paste it to the Source layer to create a new, third mask. |
|
12. |
You now have three masks for each of the Source and Target layers. Now apply the Reshape effect to each layer. |
|
13. |
Starting with the Source layer, set the Source Mask (me), the Destination Mask (it), and the Boundary Mask (outer). Set Elasticity to Liquid (you can experiment with other settings later if need be). Set Interpolation to Smooth. |
|
14. |
At the first frame of the morph transition, still in Source, set a keyframe for Percent (at the default, 0.0%, meaning no reshaping is occurring). At the last frame, set Percent to, you guessed it, 100.0%. Now sit back and wait for the gruesome transformation. Don't worry about how it looks yet. |
|
15. |
Repeat steps 12 and 13 for the Target layer, with the following changes: Set Source Mask to it and Destination Mask to me. The Percent keyframes should be set to 0.0 at the last frame of the transition (where it is keyframed to 100.0 on the Source layer) and, you guessed it, 100.0 at the first frame. |
|
16. |
You've created the warps, now you just need the cross dissolve. Set an Opacity keyframe for Target at the last frame of the transition (leaving it at the default 100.0%), and then add a 0.0% Opacity keyframe at the first frame. |
Figure 7.14. Me and my evil twin, and that awkward adolescent phase in between.

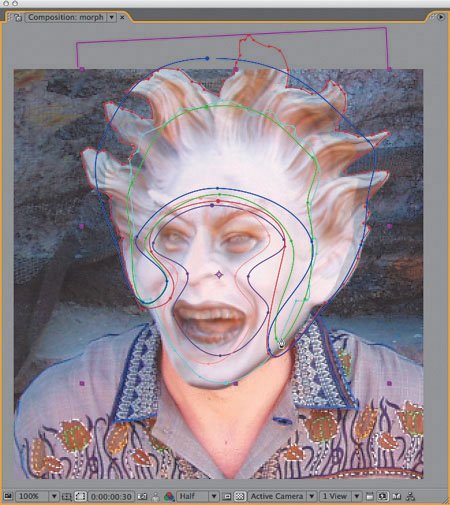
Figures 7.15. The outline of each head is carefully masked. These two masks need not correspond to one another; they are defining the boundary for the Reshape effect and can have differing numbers and orders of points. This mask prevents Reshape from pulling bits of background into the morph region.
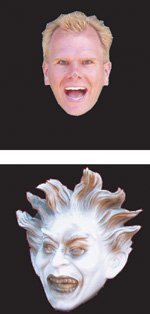
Figure 7.16. The full setup along with the top layer enabled at 100% and color corrected. It begins the final animation at 0% Opacity, reaching 100% at the end of the transition.
Tip
The Correspondence Points in Reshape can be raised from the default of 1 to make the distortion more precise (and in some cases, less twisted). The downside is that this slow effect thus becomes even slower. Better to simplify what you're attempting to do with your masks and fix things there; raise this value only as a last resort.
You should now be ready to preview. The preview may take a long time to build the first frame; subsequent frames render much more quickly, so be patient. The main question to resolve is whether the features line up properly; if not, you must adjust the source and destination mask shapes accordingly, watching the median frame to see whether the changes are improving matters.
At this point my example may be looking good in terms of the face transition (Figure 7.16), but, of course, I've made life hard on myself by transitioning from a head of one size to a larger one, and the edges just kind of fade in. Thereforeand this is where it can get really complicatedI add a second morph, using the same steps as before, but all new masks.
Tip
If at any point during setup it becomes difficult to interact with the UI because After Effects is taking so long updating a frame, enable Caps Lock on your keyboard to prevent any further frame rendering until you're done.
Why complicated? Why new masks? These two questions are interrelated. If you set a second Reshape effect, the key is to avoid influencing the result of the first Reshape effect at all. Therefore, on the second instance the Boundary mask should be the boundary of the object minus the area occupied by the original source and destination masks. My second set of shapes covers the ears and top of the head, but avoids the area of the previous masks completely (Figure 7.17).
Figure 7.17. The full setup to do more than one morph on a single image quickly becomes pretty gnarly. Here are two non-overlapping holdout areas containing two sets of transition curves. This setup also takes exponentially longer to render.
Notes
Because I know this is complicated, I've included the source project and the final result as projects on the book's DVD-ROM. Please do not use the result as the centerpiece of your horror feature.
Now, a quick look at a detail I left out (by having you duplicate the Source and Destination masks in step 9, for example, rather than draw them from scratch).
First Vertex
The Reshape tool relies on a concept that was touched upon already, but now looms more significant: that of the First Vertex that exists on every mask. Look closely at a mask, and you will notice one vertex that is larger than the rest; that's the First Vertex.
Reshape relies on the First Vertex to determine which point on the source mask corresponds to which on the destination mask. Above, it was easiest to duplicate the source mask to create the destination mask, because this automatically satisfies the two criteria that are essential for a smooth Reshape effect:
- Placement of the First Vertex corresponds on both masks
- Each mask has the same number of points
If either of these criteria is not fulfilled, Reshape will execute some not-so-nice compensatory measures, probably deforming the in-between frames in undesirable ways. The easiest solution is usually to duplicate the source mask and edit it, keeping the same number of points. The next easiest method would be to draw a new mask with the same number of points, in the same direction (clockwise or counterclockwise), and to set the First Vertex where you need it (by context-clicking on the mask and choosing Select First Vertex from the menu).
Paint and Cloning |
Section I. Working Foundations
The 7.0 Workflow
- The 7.0 Workflow
- Workspaces and Panels
- Making the Most of the UI
- Settings: Project, Footage, Composition
- Previews and OpenGL
- Effects & Presets
- Output: The Render Queue
- Study a Shot like an Effects Artist
The Timeline
- The Timeline
- Organization
- Animation Methods
- Keyframes and The Graph Editor
- Uber-mastery
- Transform Offsets
- Motion Blur
- Manipulating Time Itself
- In Conclusion
Selections: The Key to Compositing
- Selections: The Key to Compositing
- The Many Ways to Create Selections
- Compositing: Science and Nature
- Alpha Channels and Premultiplication
- Masks
- Combining Multiple Masks
- Putting Masks in Motion
- Blending Modes: The Real Deal
- Track Mattes
Optimizing Your Projects
- Optimizing Your Projects
- Navigating Multiple Compositions
- Precomposing and Nesting
- Adjustment and Guide Layers
- Understanding Rendering Order
- Optimizing After Effects
- Onward to Effects
Section II. Effects Compositing Essentials
Color Correction
Color Keying
- Color Keying
- Good Habits and Best Practices
- Linear Keyers and Hi-Con Mattes
- Blue-Screen and Green-Screen Keying
- Understanding and Optimizing Keylight
- Fixing Typical Problems
- Conclusion
Rotoscoping and Paint
- Rotoscoping and Paint
- Articulated Mattes
- Working Around Limitations
- Morphing
- Paint and Cloning
- Conclusion
Effective Motion Tracking
- Effective Motion Tracking
- The Essentials
- Optimizing Tracking Using 3D
- Extending a Track with Expressions
- Tracking for Rotoscoping
- Using 3D Tracking Data
- Conclusion
Virtual Cinematography
- Virtual Cinematography
- 5D: Pick Up the Camera
- Storytelling and the Camera
- Camera Blur
- The Role of Grain
- Film and Video Looks
- Conclusion
Expressions
- Expressions
- Logic and Grammar
- Muting Keyframes
- Linking Animation Data
- Looping Animations
- Smoothing and Destabilizing
- Offsetting Layers and Time
- Conditionals and Triggers
- Tell Me More
Film, HDR, and 32 Bit Compositing
- Film, HDR, and 32 Bit Compositing
- Details
- Film 101
- Dynamic Range
- Cineon Log Space
- Video Gamma Space
- Battle of the Color Spaces
- Floating Point
- 32 Bits per Channel
- Conclusion
Section III. Creative Explorations
Working with Light
- Working with Light
- Light Source and Direction
- Creating a Look with Color
- Backlighting, Flares, Light Volume
- Shadows and Reflected Light
- HDR Lighting
- Conclusion
Climate: Air, Water, Smoke, Clouds
- Climate: Air, Water, Smoke, Clouds
- Particulate Matter
- Sky Replacement
- The Fog, Smoke, or Mist Rolls In
- Billowing Smoke
- Wind
- Water
- Conclusion
Pyrotechnics: Fire, Explosions, Energy Phenomena
- Pyrotechnics: Fire, Explosions, Energy Phenomena
- Firearms
- Sci-Fi Weaponry
- Heat Distortion
- Fire
- Explosions
- In a Blaze of Glory
Learning to See
Index
EAN: 2147483647
Pages: 157
