Shadows and Reflected Light
Uh-oh, I guess the time has come for shadows. If lighting is complex, shadows are even more so. At least with lights, their placement in the source scene can be re-created. But you could have the full dimensional information of the scene at your disposal, as well as all the lighting, and only a vague notion of how the shadows should behave. Your sole advantage is that the audience doesn't know, either.
The addition of 3D features, including lights and shadow casting, to After Effects 5.0 improved the fakery potential, if only somewhat. The problem remains that you're still basically stuck using a flat 2D plane (or planes) to project a shadow and a flat plane (or planes) to receive it, and the greater the angle of difference between the camera and a given light, the less possible it is for that shadow to be accurate.
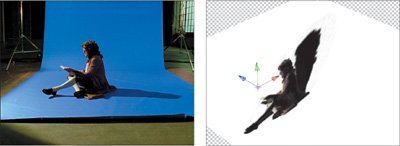
Figure 12.28 illustrates the problem, showing a keyed figure lit from the left side with a spot. Keying to keep the shadow proved difficult. But re-creating it using the silhouette of the character is nearly impossible; clearly, his outline from the side bears almost no resemblance to his outline as seen by the camera. As you saw in Figure 12.6, there's not much possibility of changing his light direction here; it seems pretty evident that all of his lighting is coming from the left.
Figure 12.28. Compare the source shadow taken on set with the type of shadow you can re-create by casting 3D lights onto the 2D keyed figure, and the lack of dimensionality is immediately apparent. Atrocious.
Creating Shadows
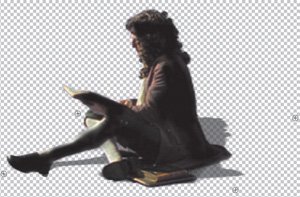
Figure 12.29 shows the classic 2D solution for cast shadows, corner-pinning the matte to an angle that is something like that at which the camera sees the object, with a figure whose outline is complex and lit from an angle more than 10 or 15 degrees off axis from the camera. It doesn't work very well here, but it is certainly possible to pull it off with simpler objects.
Figure 12.29. Sigh. Not much better is the corner pin approach, skewing a duplicate of the matte layer as if lying down. This one would need a lot of hand-painting to get it right at all, and the angle in this case is completely wrong. Dismal.
Tip
You can use the shadow matte itself directly, setting its Outpoint White (in Levels) to 0 and then adjusting its Opacity down to soften the shadow. If you instead apply it as a luma track matte to an adjustment layer, then adjust the shadow using a Levels or Curves control, this gives you a bit of extra control over how the shadow interacts with the background, its effect on highlights versus already dark areas, and so on.
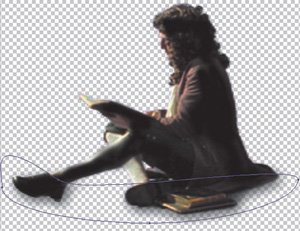
Another 2D trick is one borrowed from the games industry; The Orphanage was actually able to use this one extensively for the Level Four sequence of Spy Kids 3-D because the story of the movie was characters trapped inside a video game. The cheat is that characters only cast a small pool of shadow beneath their feet or where they're sitting, and so on. The simple way to create this one is to mask off part of the matted character and translate only that into position. By feathering the mask and blurring the matte contained inside it quite a lot, you add some subtle interactivity between the character and the ground plane and basically just hope nobody really thinks about it too much (Figure 12.30). Likewise, a contact shadow such as was employed back in Figure 5.38, which is a tighter, less blurred version of the same idea, will help sell a shot such as the one depicted.
Figure 12.30. Almost acceptable only if dialed back to the point of near imperceptibility, a pool of shadow is created by masking the parts of the figure nearest the floor, offsetting and blurring them, then using the result as the alpha channel of an adjustment layer. It's basically a handmade drop shadow. Yeesh.
Close-Up: Using 3D Planes
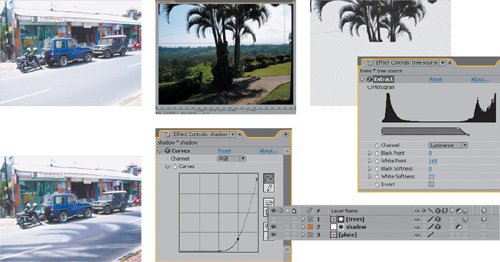
The addition of virtual lights and 3D compositing to After Effects means that you can aim a light at the matted layer and cast a shadow onto a 3D plane that corresponds to an actual surface in the scene (Figure 12.31). This works especially well if a 3D camera match move has been solved for the scene using third-party 3D tracking software. There are still several strong limiting factors, however. Your shadow is still only as good as the matte that casts it, and the surface receiving the shadow is going to be made up of flat planes only (although you can use several of them if you have the patience). As has been demonstrated, this technique has serious limitations if the light angle doesn't match that of the camera that shot the element.
Figure 12.31. With the right source, such as this background and foreground, a 2D shadow will work. The silhouetted trees are luma keyed, then added to the scene as a 3D layer. The final result uses this layer as a track matte for an adjustment layer containing Levels, which creates a more convincing (and better matched) shadow than simply overlaying semi-opaque black. 12_shadow.aep contains the basic setup.
Overall, these examples demonstrate that when there are shadows present on set, it is preferable to do everything possible to recover themeven to rotoscope them for a separate key than to submit to the humiliation of the desperate approaches outlined here. Or better yet, cheat: Design a background environmentsay, a grassy clearingin which the shadows would be mostly obscured.
Reflected and Interactive Light
It's easy to forget the actual physics of what gives an object a certain color, probably because it's strange and even counterintuitive. The color of the surface is made up of the colors of light that it does not absorb. Most of what we see as light and color is the result of reflected light.
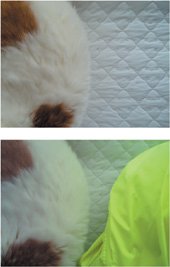
Most surfaces in the natural world are diffuse, and the light that they reflect is sent out softly in all directions. Thus in some subtle way, objects in a shot together light one another, and characters or objects that pass through a scene are relit to some degree as they change position. Two objects composited together are completely missing the light interactions that would be present between them had they been photographed together (Figure 12.32).
Figure 12.32. The color influence of indirect light is not always so evident, yet it is a constant.
Computer software is becoming better at re-creating these types of interactions. Global illumination and radiosity features have been added to 3D rendering programs in recent years to re-create the many effects of reflected light, enhancing the realism of completely synthesized scenes. For the compositor, however, lighting remains more art than science, and the subjective evaluation of observed phenomena will in many cases go farther than the application of objective principles. In other words, the 3D artist can be more like a sculptor, letting the light play over the created work, but the compositor is still more like a painter, observing and artistically interpreting the world without the benefit of realistic physics.
Light that interacts directly with objects in a scene presents an opportunity for a compositor. Nail down appropriate interactive lighting, and the scene is infused with life and realism, helping to tell the story.
HDR Lighting |
Section I. Working Foundations
The 7.0 Workflow
- The 7.0 Workflow
- Workspaces and Panels
- Making the Most of the UI
- Settings: Project, Footage, Composition
- Previews and OpenGL
- Effects & Presets
- Output: The Render Queue
- Study a Shot like an Effects Artist
The Timeline
- The Timeline
- Organization
- Animation Methods
- Keyframes and The Graph Editor
- Uber-mastery
- Transform Offsets
- Motion Blur
- Manipulating Time Itself
- In Conclusion
Selections: The Key to Compositing
- Selections: The Key to Compositing
- The Many Ways to Create Selections
- Compositing: Science and Nature
- Alpha Channels and Premultiplication
- Masks
- Combining Multiple Masks
- Putting Masks in Motion
- Blending Modes: The Real Deal
- Track Mattes
Optimizing Your Projects
- Optimizing Your Projects
- Navigating Multiple Compositions
- Precomposing and Nesting
- Adjustment and Guide Layers
- Understanding Rendering Order
- Optimizing After Effects
- Onward to Effects
Section II. Effects Compositing Essentials
Color Correction
Color Keying
- Color Keying
- Good Habits and Best Practices
- Linear Keyers and Hi-Con Mattes
- Blue-Screen and Green-Screen Keying
- Understanding and Optimizing Keylight
- Fixing Typical Problems
- Conclusion
Rotoscoping and Paint
- Rotoscoping and Paint
- Articulated Mattes
- Working Around Limitations
- Morphing
- Paint and Cloning
- Conclusion
Effective Motion Tracking
- Effective Motion Tracking
- The Essentials
- Optimizing Tracking Using 3D
- Extending a Track with Expressions
- Tracking for Rotoscoping
- Using 3D Tracking Data
- Conclusion
Virtual Cinematography
- Virtual Cinematography
- 5D: Pick Up the Camera
- Storytelling and the Camera
- Camera Blur
- The Role of Grain
- Film and Video Looks
- Conclusion
Expressions
- Expressions
- Logic and Grammar
- Muting Keyframes
- Linking Animation Data
- Looping Animations
- Smoothing and Destabilizing
- Offsetting Layers and Time
- Conditionals and Triggers
- Tell Me More
Film, HDR, and 32 Bit Compositing
- Film, HDR, and 32 Bit Compositing
- Details
- Film 101
- Dynamic Range
- Cineon Log Space
- Video Gamma Space
- Battle of the Color Spaces
- Floating Point
- 32 Bits per Channel
- Conclusion
Section III. Creative Explorations
Working with Light
- Working with Light
- Light Source and Direction
- Creating a Look with Color
- Backlighting, Flares, Light Volume
- Shadows and Reflected Light
- HDR Lighting
- Conclusion
Climate: Air, Water, Smoke, Clouds
- Climate: Air, Water, Smoke, Clouds
- Particulate Matter
- Sky Replacement
- The Fog, Smoke, or Mist Rolls In
- Billowing Smoke
- Wind
- Water
- Conclusion
Pyrotechnics: Fire, Explosions, Energy Phenomena
- Pyrotechnics: Fire, Explosions, Energy Phenomena
- Firearms
- Sci-Fi Weaponry
- Heat Distortion
- Fire
- Explosions
- In a Blaze of Glory
Learning to See
Index
EAN: 2147483647
Pages: 157
