Linking Animation Data
The bread-and-butter role of expressions is to link individual animation properties. Other linking methods all have their place, but have their limitations as well:
- Parenting links translation data between layers, but you can't pick and choose which properties are linked: You always get Position, Rotation, and Scale (plus any offset between the layers). You can't even using parenting to link translation data to other properties, such as brushes and effects positions.
- Precomposing allows you to group layers and animate them as a group, but that's about it.
- Copying and pasting keyframes allows you to copy data from one property over to a completely different property or to create a loop by hand, but this brute force method does not maintain any link should the source data change. Futhermore, you cannot easily scale or offset the result, nor copy from a one-channel to a multiple-channel property or vice versa.
None of these methods allows for more complex relationships, such as a nonlinear relationship between two sets of values (changing existing keyframe values by doubling or scaling them).
The key to easy linking of individual properties is the pickwhip, a nifty tool for grabbing bits of data and turning them effortlessly into useful bits of code (Figure 10.3).
Figure 10.3. The pickwhip in action: Set it by dragging from the pickwhip icon to the target property.
Tracking Brushes and Effects
Chapters 7, "Rotoscoping and Paint," and 8, "Effective Motion Tracking," alluded to a method for combining paint tools and the tracker. The simplest, most flexible solution for attaching a tracker to a paint stroke is to use the pickwhip. To set up a one-to-one relationship between two properties, the pickwhip and some knowledge how to use it are all you need.
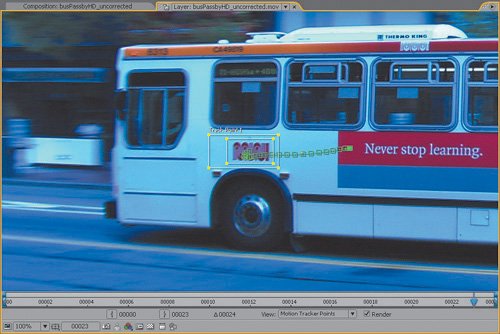
Figure 10.4 shows the passing bus that has appeared in a couple of examples already; suppose that the Muni logos on the side of the bus need to be removed so that the shot isn't clearly taken in San Francisco. The reason to use the clone tool in this case is that the appearance of the side of the bus changes, due to changing light, as it progresses through the shot, and you want to avoid having to match it by hand if at all possible.
Figure 10.4. A raw track of the logo is generated with the attach point (admittedly, difficult to see in a figure) offset to the right.
Notes
To try this, import the busPassbyHD footage into After Effects, or open 10_cloning.aep to see a composition with the following steps already completed.
Begin by tracking one of the logos. Create a new composition with just the footage in it. Now track the logo; for simplicity's sake, move the attach point over to the area being used as source for the clone (say, that empty area to the right of the logo as in Figure 10.4).
Having tracked the logo, return to the first frame (still in the Layer panel) and use the Clone Stamp tool to eliminate the logo. Choose a reasonably large (50 pixel) and hard (75%) brush, then Alt/Option-click in the same place where you see the attach point, to the right, and paint at the center of the track area. Best in this case is to clone out the unwanted object in one stroke, so that you only have to join the tracker to that one Clone brush, but you can repeat this step as needed.
Close-Up: Geek Alert: Unpacking Syntax
If you're the type who's not satisfied until you understand that little piece of code you get for free via the pickwhip, good for you. Take a closer look at the syntax of that brush stroke:
motionTracker("Tracker 1") ("Track Point 1").attachPoint
The basic structure is similar to pathnames in Unix or Windows: Starting at the left, motionTracker contains Tracker 1, which has a Track Point 1, which in turn contains the property you're after, the attach point.
What's up with the parentheses, the quotations, and the dot? Parentheses in JavaScript contain arguments, which are specifics needed to clarify settings, in this case, telling After Effects which point, in which tracker, you're after. The motionTracker property is unusual in that it needs two sets of arguments, each in its own set of parentheses, one for the tracker and one for the specific point. The dot works the same way a forward slash would in Unix (or a back slash in Windows): It identifies the next level down in the hierarchy, like opening a folder. The quotations are there to say that they contain a text string, which should be read as a label rather than a command.
Keywords in expressions use inter-caps, so that a keyword is made of two words with no spaces. For example, motion tracker and attach point, end up as motionTracker and attachPoint, respectively.
With the layer highlighted in the Timeline, press UU to expose the tracker and brush data. Set an expression on the Position of the brush, then drag the pickwhipthe swirl iconto the words "Feature Center." Now set an expression for Clone Position, and pickwhip "Attach Point." Done. The resulting expressions look something like
motionTracker("Tracker 1")("Track Point 1"). attachPoint
and
motionTracker("Tracker 1")( "Track Point 1"). featureCenter
But why sweat the syntax? You've just set up an automatic link between properties without having to type, and with the pickwhip, you can always grab available data in this manner.
Offsetting an Element
In the real world (and quite likely in your attempt at the above example), it is difficult to get tracking data to line up perfectly; you often need to offset tracking data. You could apply the tracker to a null and parent the repositioned element to that, moving the null as needed with all Position keyframes selected, but it's simpler to add a numerical offset to the expression.
Offsets are quite intuitive even to people who don't understand JavaScript very well. Perhaps you want to offset a value by 100. What would you add at the end of the default expression text? That's right, 100. Try it on a Position value and it workskind of. The object moves 100 pixels, but on the X axis only.
Position is an array, a property with multiple values. A 2D Position property has two values, X and Y, and a 3D layer's Position property adds a third (as do Anchor Point and Rotation, which change from one to three values in 3D). So although offsetting and scaling values is simpleyou use the basic math operators (+, -, *, /)things get slightly less straightforward with arraysbut only slightly.
Close-Up: Enter the Matrix
A two-dimensional array, also known as a matrix, is a simple data structure; it is merely a list of values of the same type that are numbered (from "0 through n," because in programming numbering of an arbitrary list begins with 0 and ends with n, or number, the last value 1 in the case of 2D values, 2 for 3D values).
Each member of the list is a single channel of the array.
An array value is written in expressions as [x, y] for a 2D value or [x, y, z] for 3D. So to mute a Position keyframe at the center of a 720, 540 frame, enter [360, 270] (half each value), and to offset each value by negative one hundred (-100), add -[100, 100] after the pickwhip data to add the offset (Figure 10.5).
Figure 10.5. The Position value of a paint stroke is a two-dimensional array; the highlighted text adds a simple offset of such an array.

Admittedly, this is quick and dirty; the goal here is to expose the low-hanging fruit, the things you do all the time with expressions that are easy to pick up. A more elegant way of setting a constant position at the center of the frame would be
[thisComp.width/2, thisComp.height/2]
as this expression would adjust itself to any composition size. There are typically many ways to write any expression; the simplest approach (with the fewest lines or operations) that applies to the greatest number of variables (such as changes in the comp size) is typically optimal.
Tip
You can even mix a positive and negative offset of 100; just add +[-100, 100] or +[100, -100] and so on. "Adding" a negative number is the same as subtracting it.
One Channel Only
Suppose you wish to link a property on one axis only, keeping the value of one axis in a static position, and applying your track to the other axis. This offers opportunity to learn a useful new bit of syntax. You know how to create an array, but how do you identify one portion of it only? Each component is identified like this
[position[0], position[1]]
Notes
When you apply a motion track, you are given the option to apply it to the X or Y axis only, but most of us wish this option and dialog would disappear, given how simple it is to restrict motion to a single axis yourself.
Don't freak out; it's just more brackets. Position is expressed as two values separated by a comma in brackets, and the values themselves are identified by trailing numbers, also in brackets. The numerical order starts at 0, not 1; it's just how programming languages generally work. One of the lead developers of After Effects, Dan Wilk, is even in the habit of emailing numbered steps starting with 0, so stubborn a computer scientist is he.
So, to maintain the existing value on the X axis and pickwhip the Y axis, you would enter position[0] and a comma, then pickwhip the Y value to the Y value of the attach point. Drag the pickwhip to a single value of the target propertythe second one, in this caseand it copies the code for that value alone (Figure 10.6). Once again, the pickwhip has saved you from typing in some gnarly code.
Figure 10.6. You can pickwhip from a single channel of an array (a property with multiple values) to the corresponding single channel of a separate array.

To do the same on the other axis, just reverse the steps, pickwhipping before the comma and entering position[1] following it.
Tip
A typical method for hosting expression controls is to apply them to a null or adjustment layer named Zoom Control or something equally intuitive.
Building Your Own Controls
Here's another cool yet simple thing you can do with expressions: link effects controls to properties that are not part of an existing effect, allowing you to control them in the Effect Control panel.
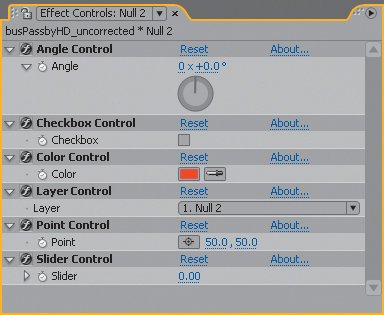
The effects found within the Expression Controls subcategory don't do anything until you attach an expression to them. That's why they exist, to offer you a user interface for adjusting your expressions values interactively. The one you'll most often use is Slider Control, but look carefully at the other five, as each corresponds to a different type of property (Figure 10.7).
Figure 10.7. The full array of available expression controls, all applied to a single layer. Each generates a unique type of data: Angle generates radians and degrees, Checkbox is a Boolean, Color three values between 0 and 255, Layer a layer in the current comp, and Point an array of two values. Only Slider generates a single floating-point number, and it is most used by far.
Suppose you want a zoom control slider for a 3D camera; to try this, open the 09_rackFocus project from the previous chapter. Open the "no expressions" composition. You can't apply any effect directly to a camera, so you must apply the slider to a different layer; it hardly matters which one, because the slider will have no direct effect on the layer hosting it until an expression is linked to it.
Tip
Having difficulty pickwhipping to the Effect Controls panel? When you choose the camera layer instead of the null, it goes blank. To retain the effect panel for Zoom Control, enable the padlock icon beside Effect Controls: Zoom Control.
Create a new null object called Zoom Control (editing the layer name after creating it) and apply Slider Control. Now apply an expression to the Zoom property of the camera, insert a plus sign with spaces around it after the default expression, and pickwhip to the Slider Control property. You can even pickwhip up to the Effects Controls panel instead of revealing it in the Timeline, provided you lock it first.
Rename Slider Control Zoomer after setting the pickwhip and behold, the connection is maintained. Anyone who has worked with expressions in a previous version of After Effects, or in a competing application such as Shake, is now jumping for joy.
Notes
The coolest improvement to expressions in 7.0, hands down, is that you can change the names of layers and effects to which expressions are linked without breaking the expression.
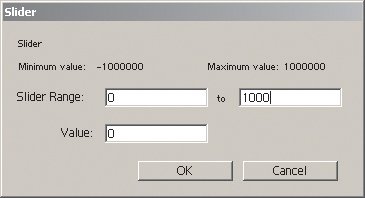
You can raise the slider to zoom in, but the 0 to 100 range is not sufficient for Zoom values, which can range much higher. Context-click on the property, choosing Edit Value, and change the Slider Range values (Figure 10.8).
Figure 10.8. You can set Slider Range values anywhere between the specified maximum and minimum values, not only for the Expression Slider but any effect.
Alternatively, you can make this slider do more within a narrower range; the Zoom values can increase logarithmically, by the square of the Zoomer value. How do you square a value? You multiply it by itself. Take the existing pickwhip path, copy it, add a * symbol directly after the original version, and then paste the copied text. Voila, the zoom control operates more like a real zoom.
Notes
What's up with spaces? Typing "x * x" or "x*x" in an expression has the same result. In fact, you can put as many spaces as you want between the operator (*) and its operands (x). It's purely a matter of what you prefer to look at. Where you get into trouble is in adding spaces where they don't belong, such as in the middle of a name; valueX is not the same as value X. If there are spaces in a name you pickwhip, the name appears in parentheses, for example: motionTracker ("Tracker 1") ("Track Point 1").
Looping Animations |
Section I. Working Foundations
The 7.0 Workflow
- The 7.0 Workflow
- Workspaces and Panels
- Making the Most of the UI
- Settings: Project, Footage, Composition
- Previews and OpenGL
- Effects & Presets
- Output: The Render Queue
- Study a Shot like an Effects Artist
The Timeline
- The Timeline
- Organization
- Animation Methods
- Keyframes and The Graph Editor
- Uber-mastery
- Transform Offsets
- Motion Blur
- Manipulating Time Itself
- In Conclusion
Selections: The Key to Compositing
- Selections: The Key to Compositing
- The Many Ways to Create Selections
- Compositing: Science and Nature
- Alpha Channels and Premultiplication
- Masks
- Combining Multiple Masks
- Putting Masks in Motion
- Blending Modes: The Real Deal
- Track Mattes
Optimizing Your Projects
- Optimizing Your Projects
- Navigating Multiple Compositions
- Precomposing and Nesting
- Adjustment and Guide Layers
- Understanding Rendering Order
- Optimizing After Effects
- Onward to Effects
Section II. Effects Compositing Essentials
Color Correction
Color Keying
- Color Keying
- Good Habits and Best Practices
- Linear Keyers and Hi-Con Mattes
- Blue-Screen and Green-Screen Keying
- Understanding and Optimizing Keylight
- Fixing Typical Problems
- Conclusion
Rotoscoping and Paint
- Rotoscoping and Paint
- Articulated Mattes
- Working Around Limitations
- Morphing
- Paint and Cloning
- Conclusion
Effective Motion Tracking
- Effective Motion Tracking
- The Essentials
- Optimizing Tracking Using 3D
- Extending a Track with Expressions
- Tracking for Rotoscoping
- Using 3D Tracking Data
- Conclusion
Virtual Cinematography
- Virtual Cinematography
- 5D: Pick Up the Camera
- Storytelling and the Camera
- Camera Blur
- The Role of Grain
- Film and Video Looks
- Conclusion
Expressions
- Expressions
- Logic and Grammar
- Muting Keyframes
- Linking Animation Data
- Looping Animations
- Smoothing and Destabilizing
- Offsetting Layers and Time
- Conditionals and Triggers
- Tell Me More
Film, HDR, and 32 Bit Compositing
- Film, HDR, and 32 Bit Compositing
- Details
- Film 101
- Dynamic Range
- Cineon Log Space
- Video Gamma Space
- Battle of the Color Spaces
- Floating Point
- 32 Bits per Channel
- Conclusion
Section III. Creative Explorations
Working with Light
- Working with Light
- Light Source and Direction
- Creating a Look with Color
- Backlighting, Flares, Light Volume
- Shadows and Reflected Light
- HDR Lighting
- Conclusion
Climate: Air, Water, Smoke, Clouds
- Climate: Air, Water, Smoke, Clouds
- Particulate Matter
- Sky Replacement
- The Fog, Smoke, or Mist Rolls In
- Billowing Smoke
- Wind
- Water
- Conclusion
Pyrotechnics: Fire, Explosions, Energy Phenomena
- Pyrotechnics: Fire, Explosions, Energy Phenomena
- Firearms
- Sci-Fi Weaponry
- Heat Distortion
- Fire
- Explosions
- In a Blaze of Glory
Learning to See
Index
EAN: 2147483647
Pages: 157
