Improving the Testing Process
Overview
"The minute you're through changing, you're through."
— Jack Tramiel
"There is nothing more difficult to take in hand, more perilous to conduct, or more uncertain in its success, than to take the lead in the introduction of a new order of things."
— Niccolo Machiavelli
Getting a software testing process on paper is a challenge, but getting the people in the organization to commit to making the required changes is an even bigger challenge. People commit to change for their own reasons, not for someone else's reasons. Therefore, when people are asked to commit to change, their first concern is often "What do I have to gain or lose?" Successful software implementation is predominantly a people management exercise and not an engineering management exercise. Most of us do what we do (whether it's testing software or driving a car) because we feel most comfortable doing things our way. So, it shouldn't be a surprise that persuading people in the software world to do things someone else's way (e.g., the organization's way) can be a daunting challenge full or surprises. The key to success is to make the organization's way "their" way.
The problem that many organizations face is how to identify the areas that could be improved and how to implement the changes (successfully). Figure 11-1 outlines the steps that we typically follow when suggesting and implementing process improvement for our clients.
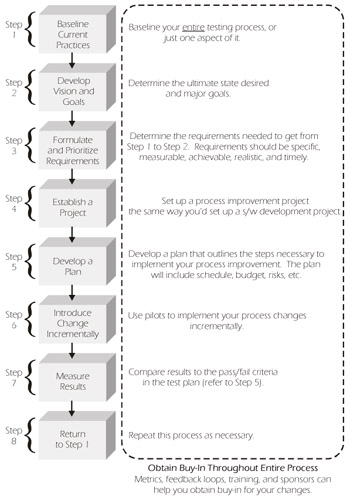
Figure 11-1: Process Improvement Steps
Step 1 Baseline Current Practices
The first step in improving the testing process is to baseline the current practices. This will give you a point of comparison to measure the success of your process improvements. It's possible to baseline the entire software development process (including test), the entire testing process, or a subset of the testing process (e.g., defect tracking, test planning, etc.). We believe that it's generally beneficial for most testing organizations to baseline their entire testing process, rather than just one aspect of it.
| Key Point |
A baseline is a measurement of where your processes are at any given point in time (i.e., a line in the sand). Baselines are used to compare the processes of one group at a given time to the same group at another point in time. |
If your organization is undergoing a formal assessment using ISO Standards or the CMM (Capability Maturity Model), your testing group may be able to piggyback onto these efforts. For a quick baseline of your current testing practices, you can have a questionnaire (refer to Appendix B for a sample) completed by a knowledgeable person or group of people in the testing organization. A word of caution, however, is needed here. The results you get in completing the questionnaire will depend on who fills it out, as you'll learn in Case Study 11-1. The results will be much more accurate if the form is filled out by a cross-section of the entire testing group and others who work alongside testers, such as developers, configuration managers, business representatives, and others.
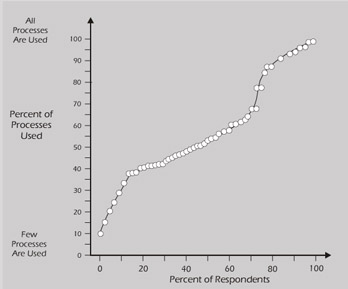
Case Study 11-1: The results of a benchmark study depend on whom you ask.
Benchmark Study of Best Practices
In the early 1990s, Bill Hetzel and I undertook a project to develop a benchmark of best practices in use at leading companies. One of the surprises that I received was the disparity in answers on the level of use of any given process from individual to individual. The graph below shows a percentile plot of processes used from one of the companies in the study.
Each dot on the graph represents a person. You can see that there are people at the bottom of the graph who profess to use very little in the way of formal process and there are people at the top who claim to do almost everything. Obviously, if you're trying to benchmark your processes using a single person (or a small number of people), the results will very much depend on whom you ask. By the way, each questionnaire in the study was confidential, but after interviewing many of the respondents I'm pretty sure that the people at the top were often managers.
— Rick Craig
| Key Point |
A benchmark is a measurement of where your processes are compared directly to other companies or to a static model (e.g., CMM). It's possible that the results of a process assessment might be both a baseline and a benchmark. |
Step 2 Develop Vision and Goals
It's been said that if you don't know where you're going, any road will get you there. The complement to the baseline is a vision of where you want to be or what you want to become sometime in the future. Just as in completing an estimate, it's difficult to know exactly what your testing processes should look like at some point in the future, and it's equally difficult to estimate the return on investment (ROI) of moving from the current state to the desired state. So, be prepared to update your vision as you go.
One way to determine the desired end state is to model your vision after a testing organization that you admire. Of course it's important to remember that every organization has its own unique set of priorities, risks, politics, skill sets, etc., which may require a modification of their model to match your environment. Alternatively, a vision statement can be created based upon achieving a desired level of maturity (i.e., controlled, efficient, optimizing) on a Test Process Improvement (TPI) assessment (refer to Table 11-2). Whatever method you choose to use, the vision statement of the testing organization must support the vision of the corporation that it supports, and the statement itself will typically be supported by a series of high-level goals.
Case Study 11-2: Sample Vision Statement and Goals
Vision Statement and Goals of the System Test Group for ABC Software Company
Vision Statement:
The system testing strategy of the ABC Software Company will employ state-of-the-practice testing techniques and tools in order to effectively and efficiently measure the quality of all systems of the company.
Goals #1:
A regression test bed will be established and maintained that covers all requirements and design attributes.
Goals #2:
The testing organization will achieve a DRE of 80% or greater, and there cannot be any Class 3 (critical) escapes.
Goals #3:
An entire test cycle can be performed in 1 week or less.
Goals #4:
The TPI process maturity level for the system test group will be "efficient" or better (refer to Table 11-1).
Table 11-1: ISO Certification Process Checklists
Pass
Fail
Checklist for Testing
□
□
Are test plans and procedures created and reviewed?
□
□
Are test results recorded?
□
□
Are defects or problems recorded, assigned, and tracked to closure?
□
□
Is there an adequate test process to ensure that areas impacted by changes are retested?
Pass
Fail
Checklist for Measurement
□
□
Is the software validated (tested) as a complete system in an environment as similar as possible to the final operating environment? Is this done prior to delivery and acceptance?
□
□
If field-testing is required, are the responsibilities of the supplier and the purchaser defined? Is the user environment restored following the test?
□
□
Are product metrics collected and used to manage the testing effort?
□
□
Are product defects measured and reported?
□
□
Is corrective action taken if metric levels exceed established target levels?
□
□
Are improvement goals established in terms of metrics
□
□
Are process metrics collected to measure the effectiveness of the testing process in terms of schedule and in terms of fault prevention and detection?
Pass
Fail
Checklist for Tools / Techniques
□
□
Are tools and techniques used to help make testing and management processes more effective?
□
□
Are the used tools and techniques reviewed, as required, and improved upon?
Pass
Fail
Checklist for Training
□
□
Are training needs identified according to a procedure?
□
□
Is training conducted for all personnel performing work related to quality?
□
□
Are personnel who are performing specific tasks qualified on the basis of appropriate education, training, and/or experience?
□
□
Are records kept of personnel training and experience?
Pass
Fail
Checklist for Documentation
□
□
Are test plans, requirements, and other documents revision controlled?
□
□
Do procedures exist to control document approval and issue?
□
□
Are changes to controlled documents reviewed and approved?
□
□
Are current versions of test documents identifiable by a master list or document control procedures?
Pass
Fail
Checklist for Configuration Management
□
□
Is there a Configuration Management (CM) system that identifies and tracks versions of the software under test, software components, build status, and changes? Does the system control simultaneous updates?
□
□
Does the configuration management plan include a list of responsibilities, CM activities, CM tools and techniques, and timing of when items are brought under CM control?
□
□
Is there a mechanism and procedure that enables software, hardware, and files to be uniquely identified throughout the entire software development lifecycle?
□
□
Is there a documented mechanism to identify, record, review, and authorize changes to software items under configuration management? Is this process always followed?
□
□
Are affected personnel notified of software changes?
□
□
Is the status of software items and change requests reported?
| Key Point |
An escape is a defect that is not discovered by the current evaluation activity and is pushed on to the next phase. |
The point of a vision statement and its supporting goals is to keep everyone focused on the same target. Instead of creating a vague and useless vision statement about leveraging synergies and creating a world-class organization, you should focus on concrete goals and formulate a statement that everyone understands and is willing to uphold.
Step 3 Formulate Prioritize Requirements
The baseline establishes where the testing organization is today, and the vision describes the desired end state. The actual requirements to get from point 'A' to point 'B' should be developed next. The requirements should follow all of the basic rules of software requirements. They need to be specific, measurable, achievable, realistic, and timely. The requirements must also support the goals and vision of the organization.

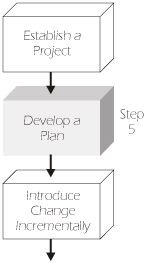
Step 4 Establish a Project
Many process improvement efforts fail due to under-commitment of resources. We frequently encounter a tester or test manager at a training class who has been told to "implement test automation, establish metrics, create a methodology, and implement software metrics in your 'spare' time." Those of you who have tried to implement process changes into your organization in the past know that the scenario described above is largely wishful thinking.
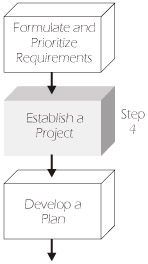
We feel that one way to give a process improvement effort the focus that it needs is to establish a project for the process improvement. This means that a project team needs to be established, a budget formulated, people assigned, and a project plan created. If you're part of a smaller organization, it seems unlikely that you could form an entire team, so the project team will probably be only one or two people or perhaps one person part-time. If this is the case, it's important that this one part-time person actually have some of his or her time allocated specifically to the process improvement project.
| Key Point |
One way to give a process improvement effort the focus that it needs is to establish a project for the process improvement.. |
The team member(s) should ideally be enthusiastic volunteers. (Pointing at someone and saying, "Hey you, you're the project leader" is not a way to get enthusiastic volunteers - with the possible exception of the military.) If there are no enthusiastic volunteers, the project may be in jeopardy from the very beginning. Why are there no volunteers? Was the process change being forced from the top? Do the developers and testers think the change is bad? Or, is this just another "great idea" that will pass? If this is happening, then there's a selling job that must be accomplished before moving on.
It's not enough that the volunteers be enthusiastic, though. Volunteers must also have technical competency and the respect of their peers. Choosing the person who has the most time on his or her hands is not a good approach. Ironically, the person that is always the busiest is often the person that you need. There must be a reason why they're always busy.
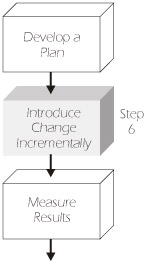
Step 5 Develop a Plan
If you've never written a project plan, we recommend that you use the template for a test plan as a starting point. Everything in this template may not be applicable (e.g., test items), but generally it will work. Figure 11-2 shows what the test plan template might look like if modified for a process improvement project.
Template for Process Improvement
Contents
1.
Test Plan Identifier
2.
Introduction
2.1
Genesis of Process Improvement Initiative
2.2
Scope of Initiative
3.
Planning Risks
3.1
Schedule
3.2
Budget
3.3
Staffing
3.4
Buy-In
4.
Approach
4.1
Major Strategy Decisions
5.
Pass/Fail Criteria
5.1
Describe what constitutes success and how to measure progress and results.
6.
Suspension Criteria
6.1
What should cause us to temporarily suspend our efforts?
7.
Deliverables
7.1
Project Status
7.2
Reports
7.3
Metrics
7.4
Post-Project Review
8.
Environmental Needs
8.1
Hardware and Software
8.2
Tools
8.3
Office Space
9.
Staffing and Training Needs
9.1
In-House
9.2
Contracted
10.
Responsibilities
10.1
Team Members
10.2
Sponsor
10.3
Champion
10.4
Training Department
10.5
Test Environment Group
10.6
Process Group
11.
Schedule
11.1
Project Initiative
11.2
Incremental Milestones
11.3
Post-Project Review
12.
Approvals
12.1
Person(s) Approving the Plan
Figure 11-2: Test Plan Template Modified for Process Improvement
Plan on periodically reviewing the progress of the program. It may be useful to use the organization's quality group to help in the reviews, or groups of peers can be used to review the strengths and weaknesses of the implementation. Certainly, post-project reviews will assist in the evaluation of the effectiveness of the program. Careful collection and analysis of metrics is an absolute must to determine if the program is on track.
Step 6 Introduce Change Incrementally
One sure way to derail a process improvement effort is to try to do too much too soon. Rick says this reminds him of when he gets badly out of shape and tries to get back into shape for his next Marine Physical Fitness Test - virtually overnight! The result is inevitable: he gets so sore and discouraged that it puts his workout regimen in jeopardy.
Implementing multiple changes simultaneously requires a greater concentration of resources, which is one of the problems that many process improvement teams often face. Also, when many different changes are implemented at the same time, it's difficult to assess the impact of each change. For example, if your organization implemented software code inspections and preventive testing techniques on the same project at the same time, it would be difficult to determine how much each of these two changes contributed. That is to say, it would be difficult to know what the ROI is of each of these techniques.
| Key Point |
An influence leader is a person whose example is followed by his or her peers because the influence leader is perceived to be exceptionally innovative, authoritative, or technically astute. |
One possible model that shows the effects of incrementally implementing process improvements is shown in Figure 11-3. Adaptive change is the lowest in complexity, cost, and uncertainty because it involves re-implementation of a change in the same test group at a later time or imitation of a similar change by another group. For example, an adaptive change for a test group would be to institute mandatory 10-hour workdays during the acceptance testing phase. Similarly, the company's engineering department could initiate the same change in work hours during the unit testing phase. Adaptive changes are not particularly threatening to employees because they're familiar changes.
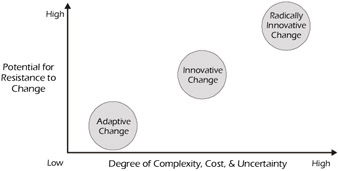
Figure 11-3: Topology for Implementing Process Improvements
Innovative changes fall midway on the horizontal scale of complexity, cost, and uncertainty. An experiment with flexible work schedules by a software development company qualifies as an innovative change if it entails changing to the way that other firms in the industry already operate. Unfamiliarity, and hence greater uncertainty, make fear of change a significant problem when implementing innovative changes.
At the high end of the complexity, cost, and uncertainty scale are radically innovative changes. Changes of this sort are the most difficult to implement and tend to be the most threatening to managerial confidence and employee job security. Changing a development or testing methodology midway through a project, for example, can tear the fabric of a test department's culture. Resistance to change tends to increase as changes go from adaptive to innovative to radically innovative.
Pilots
Pilots are an important vehicle for implementing process improvements. They allow the change team and the project team to more closely control the implementation of the change and assess the impact it had on the project. If the new process turns out to be a disaster, a pilot can help reduce the risk and the damage can be contained within the pilot project.
| Key Point |
|
Pilots also allow multiple changes to be implemented simultaneously, since different pilots can be used for different process improvements. When choosing a pilot, it's important that the team members who are chosen for the project have a sincere desire to participate. As in choosing the process improvement team, unwilling participants can jeopardize the effort. It's also important that the sample project be a real project, not a "toy." The best project for a pilot would be a representative (and real) project on the smaller scale.
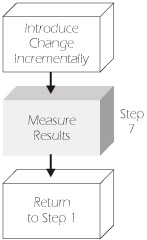
Step 7 Measure Results
In order to determine the partial or total success or failure of a process improvement initiative, it's necessary to compare the results of the initiative to the pass/fail criteria established in the plan. This will let you know if you've met the requirements specified in Step 3.
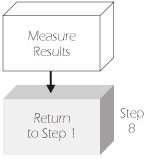
Step 8 Return to Step 1
Process improvement is a continuous process that will never truly be completed. Once the overall vision has been achieved, it's time to re-establish the baseline and start all over again.
Obtain Buy In Throughout the Process
Buy-in is key to success. Without the support of all stakeholders, the process improvement effort will almost always fail. Upper management, line management, and supporting groups must also buy in to the proposed changes. It's sometimes possible to achieve grass-roots change (i.e., bottom up), but it's much more difficult and time-consuming.

Staff buy-in and effective communication are crucial to the success of any testing effort. Team members need to see the seriousness of the efforts being made and have to perceive the importance of the end-goal in their daily work. Project leaders, particularly, have to feel involved in producing procedures and modifying those procedures that they disagree with. It's also very important to get the most senior buy-in that you can in order to improve your chances of getting the resources that you need.
Case Study 11-3: Without achieving buy-in, process improvement initiatives are usually worthless.
The Case of the Bogus Metrics
A few years ago, I had the opportunity to speak at an awards banquet for the software division of a large American company. The banquet began in the normal fashion with cocktails and a hotel-like meal of cold prime rib, rubbery green beans, and chocolate "something." The Director moved to the podium to begin his comments. His comments praised the staff and described in gory detail how the company was benefiting from the hard work of everyone present.
To demonstrate his point, he pontificated at great length about the success of the new corporate software metrics program (that he had implemented). He went on to describe how the collection of project metrics on the expenditure of effort had provided the information necessary to accurately predict the effort required to develop and test new products. It was at this point that the Director introduced me to present awards to the people responsible for this great success.
The first and highest award went to a man whom I'll call "Joe." Joe and his staff, I had been told, had done "great things" in their project. It turns out that the Director's definition of "great things" meant that Joe had supported the Director's metrics program. In fact, Joe's team had a perfect record of reporting all metrics every week right on time.
After describing the feats of Joe and his team, I called him forward to receive his award and say a few words. Joe came forward and rather sheepishly declined to make any comments, which surprised me because Joe was known to be a rather loquacious individual who relished the spotlight.
Later, I learned that Joe met with the Director and returned the award. It seems that Joe thought the Director's entire metrics program was a waste of time and was taking his team away from their primary mission of writing code. So in order to spare his team the anguish of reporting "worthless" metrics, Joe wrote a little program to fill out the weekly metrics form with more or less random (but reasonable) values. Then, these metrics were automatically e-mailed to the Director every Friday exactly at noon when they were due.
As if the story weren't sad enough already, the Director was using Joe's bogus metrics to estimate resource needs and to allocate personnel to projects. The Director even reported that estimation had improved by 30%.
The moral of this story (okay, one moral of this story) is that without buy-in, metrics (and everything else for that matter) are usually worthless.
— Rick Craig
Ask the Practitioners
The first step in achieving buy-in and even enthusiasm from the software developers and testers is to ask them to participate in forming the requirements. If they are not involved until the project is well underway, many will suffer from the "not invented here" syndrome.
Effective Communications
Test managers can communicate to their team members and the entire organization through a variety of media such as face-to-face conversations, phone calls, e-mail, voice mail, written memos and letters, drawings, meetings, computer data, charts, or graphs. Choosing the appropriate media depends on many factors, including the nature of the message, its intended purpose, its audience, its proximity to the audience, and its time frame.
The most important consideration, though, is that the test manager maintain a constant and open dialogue with his or her staff. Staff members who recommend changes to the process must be confident that their recommendations will be seriously considered.
Metrics
One key to achieving buy-in early is to supply metrics that describe the benefits of the proposed change. Early on, these metrics may often be industry metrics or testimonials. For example, if you were trying to implement code inspections into your organization, it would be useful to show what the benefits of such a move had been in other companies or organizations. For detailed information on industry software metrics, refer to Applied Software Measurement by Capers Jones.
| Key Point |
Applied Software Measurement by Capers Jones is an excellent source for industry software metrics. |
Information from the pilots can be used to garner buy-in as well. Once the pilot has completed, the results of the process change may be useful in getting buy-in for widespread implementation of the change (assuming, of course, that the pilot was a success).
Develop Feedback Loops
The practitioners not only need to have the opportunity to participate in the formulation of the requirements, but they must also have the opportunity to provide feedback, on a continuous basis, on what is and is not working. This feedback loop should extend to practitioners on projects other than the pilot, if they will eventually be affected.
| Key Point |
The practitioners not only need to have the opportunity to participate in the formulation of the requirements, but they must also have the opportunity to provide feedback, on a continuous basis, on what is and is not working. |
Just because a developer or tester has provided feedback doesn't mean that every suggestion has to be implemented, but every suggestion does have to be acted on, even if the only action is to explain why the suggestion was not used. If the practitioners don't feel that the feedback loop is truly working, they'll often withdraw their support of the project.
Provide Training
Another key component of buy-in is to provide training on the process improvement process and initiatives. Notice that we said training should be supplied on the process improvement process. All practitioners need to understand how changes were nominated, chosen, and eventually implemented. The new processes that are implemented will also require training. Some of this training may be commercial (e.g., how to use a new tool), but often the training will have to be conducted in-house.
Pick a Champion and Sponsor
It's vital to have a champion and a sponsor for every change that is implemented. The champion should be an influence leader who is willing to serve as the on-site oracle for the new process. For example, if a new defect tracking system is implemented, the champion should be capable of becoming an expert on the system and how it's used; and he or she should have the time and communication skills needed to help other users when asked. A sponsor is usually a senior manger who can help to secure resources and get buy-in from other senior managers.
| Key Point |
The champion should be an influence leader who's willing to serve as the on-site oracle for the new process. A sponsor is usually a senior manager who can help fight for resources and get buy-in. |
Post-Project Reviews
One alternative to Steps 1 and 2 of our process improvement model (baseline current practices and develop goals) described in this chapter is to use a post-project review. The purpose of the post-project review is to identify opportunities for improvement and also to identify any "strengths" or successful processes that need to be repeated on future projects. At the conclusion of the post-project review, the process improvement team can then proceed to Steps 6 through 8.
Post-project reviews can be conducted in many different ways. One of our clients, for example, brings all the participants into a room, where each participant has the opportunity to identify three project strengths and three opportunities for improvement. The most common strengths and opportunities are then reported as the findings of the post-project review. The beauty of this method is that it's done at a single sitting and includes all participants. On the downside, it doesn't really compare the results to the project objectives.
When we conduct project reviews, we administer a questionnaire (similar to the one in the Appendix) to every participant. We then compile the results and compare them to an industry database. This lets us know, in very broad terms, what the participants did before we arrived on site. Upon arrival we personally interview all (or most) project participants (including everyone who wants to be included) and review copies of their work products (i.e., project plans, requirement specifications, test plans, etc.). After analyzing the results of the questionnaires, our interviews, and the documentation review, we present our findings to (1) the project manager, (2) the project participants, and (3) the executive steering committee.
We have conducted many post-project reviews (post-mortems) over the years and have compiled some useful guidelines:
- Conduct the post-project review soon after the conclusion of the project. Don't start on the day that the project ends - give the staff a day or two to relax - but don't wait too long. One to three weeks after the conclusion of the project is an ideal time to begin the review.
- Conduct post-project reviews on every project, or announce at the time of project initiation whether or not a project will be subjected to a review. Waiting until the project is finished and then deciding to do a review makes the whole process look like a "witch hunt."
- Get an outsider to lead the post-project review team. Since the test manager is in the business of evaluating things, the task is often given to him or her. Other organizations assign the responsibility of conducting the review to the project manager. Both of these are bad ideas. The test manager is already evaluating the work of the development team, so having him or her also evaluate the processes can strain even a good working relationship. The project manager is too close to the project and lacks the fresh perspective to do the job right. An ideal candidate might be the project manager from another project, the QA manager, or an outside consultant.
Key Point You should consider getting an outsider to lead the post-project review team. An ideal candidate might be the project manager from another project, the QA manager, or an outside consultant.
- Make sure that all project participants have an opportunity to voice their opinions. It's equally important that participants feel that their opinions are heard and seriously considered. Even if all ideas are not used, they should be considered.
- Keep it objective. Compare the results of the project to the objectives and requirements of the project.
- Don't make it personal. Don't report findings that address individuals and personalities.
- When reporting results, always list the "strengths" of the project first. Every project has something good about it, even if it was only that they all wore "cool t-shirts."
- Report the "weaknesses" of the project as "opportunities for improvement" and limit them to 5 or less (it's unlikely that more than 5 opportunities will be acted on anyway).
- Capture objective data when possible, but remember that perceptions are also important.
- Assign to a team the responsibility of analyzing and prioritizing the results. The team can then use the process improvement flowchart (refer to Figure 11-1) to implement changes, if necessary.
ISO Certification
The International Organization for Standardization (ISO) is a worldwide federation of national standardization bodies from 140 countries. Their mission is to develop standards to facilitate the international exchange of goods and services. ISO standards are documented agreements containing technical specifications or other precise criteria to be used consistently as rules, guidelines, or definitions of characteristics to ensure that materials, products, processes, and services are fit for their purpose.
| Key Point |
Shouldn't the acronym for International Organization for Standardization be "IOS" instead of "ISO?" Yes, if it were an acronym, which it is not. "ISO" is derived from the Greek word isos, which means "equal." |
The ISO 9000 series of standards is used to establish a quality management system. ISO 9000-3 describes how ISO 9001 standards apply to software. TickIt is a certification scheme (primarily used in the United Kingdom) tuned to deal with the special requirements associated with applying ISO 9000 to software development.
| Key Point |
ISO emphasizes the basic elements of quality management and assesses an organization's process using a rigorous auditing model. |
Companies choose to seek ISO registration for a variety of reasons: to improve their quality processes, to baseline improvement efforts, and even to use ISO as a marketing ploy. Becoming ISO certified always warrants a mention in the business news and makes the company look better in the eyes of the stockholders and the business community.
ISO emphasizes the basic elements of quality management and assesses an organization's process using a rigorous auditing model. An ISO 9000 registration effort can be a very involved process that might take a year or more to implement. Periodic reviews by auditors ensure that the outlined processes are being maintained.
| Key Point |
If your company is undergoing ISO certification, it may be possible to use this effort as a springboard to improve the testing processes. |
ISO audits are at a much higher level than this book (i.e., the entire organization versus the testing organization). So why do we bother to mention them here? For this one simple reason: companies that undergo quality audits such as ISO are usually more receptive to process improvement activities throughout the organization. If your company is undergoing ISO certification, it may be possible to use this effort as a springboard to improve the testing processes. One could even argue that improving the testing process could help your organization achieve ISO certification.
ISO Checklists
The following checklists provide typical questions that auditors would ask a test manager during the ISO certification process. The bottom line is, "Do you have a procedure in place to handle each of your daily tasks and is that procedure repeatable?" If you can answer "yes" to all of the questions on the auditor's checklist (and prove compliance), then you'll achieve ISO certification. A sample checklist is shown in Table 11-1.
Pros and Cons of ISO Certification
| Key Point |
Much of the success of the ISO is dependent upon the motivation for achieving the certification in the first place. |
There is considerable controversy throughout the software industry over the value of ISO 9000 certification in determining the ability of an organization to consistently produce "good" software. Many people who have been directly involved in the ISO certification process (including Stefan) have seen the effects years later and often ask themselves, "If we're ISO certified, why does this company still suffer the consequences of quality and delivery problems?" A common answer is, "ISO is just a paper trail that we have to follow in order to maintain our certification and compete in the global marketplace."
Philip Crosby (Quality Is Still Free, Making Quality Certain in Uncertain Times) minces no words in his assessment of the value of ISO certification:
"With a properly run quality management process, there will be no difficulty meeting ISO 9000 requirements. It's really a very old-fashioned Quality Assurance kind of thing. But it is not oriented toward the needs of today and the next century. It's only to provide a living for consultants and for quality people who do not want to think for themselves."
On the other hand, many organizations report successfully using ISO as a valuable tool for improving processes. Much of the success of ISO is dependent upon the motivation for achieving the certification in the first place.
Capability Maturity Model (CMM)
The quality of software systems depends, to some degree, on the quality of the corresponding software engineering processes. A software buyer is usually interested in getting to know the level of maturity of the vendor's software engineering process in order to be able to draw conclusions about the software system's quality.
| Key Point |
Finding out the level of maturity of a vendor's software engineering process can help you draw conclusions about the quality of their testing software. |
The Capability Maturity Model (CMM) was created for the Software Engineering Institute (SEI) based on the vision of Watts Humphrey. The CMM is a framework, distinguished by five different maturity levels, for evaluating the maturity of a company's software engineering process. With the help of an evaluation process, the maturity of a company's software engineering processes can be assigned to one of these levels. The levels are based on each other, which means that if an engineering process fulfills the requirements of a level, it also fulfills all of the requirements of all of the levels below it. With an increase in the CMM level, the development risk can be reduced and the productivity of the development as well as the quality of the product can be increased.
| Key Point |
For more information on the CMM, see The Capability Maturity Model, Guidelines for Improving the Software Process from the Carnegie Mellon University's Software Engineering Institute. |
Figure 11-4 shows the five levels of the CMM. The CMM is only a guide (i.e., not a cookbook) for evolving toward a culture of software engineering excellence. It's a model for organizational improvement because it provides guidelines not only for improving process management, but also for introducing new technology into an organization. In fact, process capability interacts with people, technology, and measurement across all five levels of the CMM.
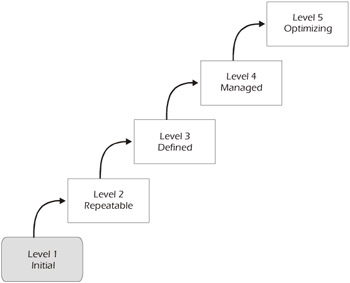
Figure 11-4: Capability Maturity Model (CMM) Five Levels of Software Process Maturity
A frequent complaint of people in the testing business is that the CMM largely ignores testing until Level 3. This is the primary reason why Martin Pol and Tim Koomen created the Test Process Improvement (TPI) model (refer to the section entitled Test Process Improvement [TPI] Model for more information). Others have also addressed this issue.
In his article "Growth of Maturity in the Testing Process" Roger Drabick has outlined testing activities that he feels should be performed at each level of the CMM. His comments are indicated in the shaded boxes within the description of each level of the CMM.
CMM Level 1 - Initial
A Level 1 organization's process capability is unpredictable and often chaotic because the software process is constantly changed as the work progresses. The process is, essentially, ad hoc and generally undisciplined, making the organization an unstable environment for developing software. Level 1 performance depends on the individual capabilities of the staff and managers and varies with their innate skills, knowledge, and motivations. During times of crises, project managers typically abandon planned procedures and revert to ad hoc coding and testing.
CMM Level 2 - Repeatable
Level 2 organizations focus on project management, and their process capabilities are usually elevated by the establishment of disciplined processes under sound management control. Realistic project schedules are developed based on requirements and results observed from previous projects. Software requirements and work products are typically baselined and their integrity controlled. In contrast to a Level 1 organization, a repeatable process exists for software projects at Level 2.
At Level 2, test managers should strive toward developing specific testing and debugging goals and initiate a test planning process for the organization.
CMM Level 3 - Defined
Documentation is the primary focus of organizations at Level 3. Organization-wide processes are established for all management and engineering activities. Level 3 processes evolve from the processes that were developed and the successes that were achieved while at Level 2. At Level 2, one or two projects may have repeatable processes. But at Level 3, all projects have repeatable processes.
| Key Point |
Level 3 is the first level where formal testing processes are introduced. |
This is the first level where formal software testing processes are actually introduced. In his book Software Testing Techniques, Boris Beizer explains, "Although programmers, testers, and programming managers know that code must be designed and tested, many appear to be unaware that tests themselves must be designed and tested - designed by a process no less rigorous and no less controlled than used for code." As an evaluation activity, software testing processes are created at Level 3 in order to verify that requirements are satisfied at each phase of the software development lifecycle. At Level 3, test managers should strive to establish a formal software test organization. Test plans should be integrated into the software development lifecycle, and test processes should be controlled and closely monitored.
CMM Level 4 - Managed
At Level 4, the measurements that were put in place at Levels 2 and 3 are used to understand and control software processes and products quantitatively.
At this level, test managers should strive to establish organization-wide programs for software review, technical training, test measurement, and software quality evaluation.
CMM Level 5 - Optimizing
At Level 5, continuous process improvement is enabled by quantitative process feedback and technology insertion.
At this level, test managers should strive to apply process controls to prevent future defects and focus on quality control activities.
Pros and Cons of the CMM
While the CMM focuses on process improvement and has a high visibility within the software industry, it also has some drawbacks. The CMM does not focus on the practitioner or the customer and, consequently, lacks their input on process improvements. This model also requires the implementation of major process changes in order to introduce mature processes.
One issue, in particular, with the CMM is the idea many people have that there's always a direct correlation between the level of process-use and the quality of the product developed. While we certainly believe that improving processes usually also improves that product (or we wouldn't have written this book), it's not clear to us that all of the processes outlined in the CMM will necessarily be worth implementing in all organizations. We believe that some organizations (especially small entrepreneurial companies) might actually be better off operating at CMM Level 3 or 4, rather than Level 5. Level 5 processes may be too demanding and may require too much control for some groups.
Test Process Improvement (TPI) Model
Unfortunately, the CMM does not (in our opinion) adequately address testing issues at levels 1 and 2 (which is where most companies are today). Martin Pol and Tim Koomen have developed a test process improvement process known as TPI, which provides a roadmap to CMM level 3 (for testing). This process is well documented in their book Test Process Improvement, and a hands-on class on how to use this model is taught by each author.
| Key Point |
Refer to www.iquip.nl/tpi for more information on TPI, downloadable checkpoints, and a survey on worldwide TPI usage. |
The TPI model allows users of the model to determine the current state of their testing process (e.g., baseline), the next logical area for process improvement, and recommended steps to get there.
Case Study 11-4: The TPI model can help most organizations to baseline their processes and determine targets for continuous improvement.
Once We Were Skeptics, But Now We're Believers
Our initial reaction to the TPI model was outright skepticism. We thought that it would be difficult, if not impossible, to create a single model that could recommend next steps for any organization, regardless of the size, skill level, and techniques employed. But after reading Test Process Improvement and attending Mr. Pol's class, we became believers. The model is not perfect, but it will accomplish the goal of helping most organizations to baseline their processes and determine targets for continued process improvement.
For the most part, the TPI model uses CMM-like language. Most of the TPI terms have meanings similar to those used by the CMM, facilitating the use of the TPI model by current CMM advocates. It's not necessary, however, to subscribe to the CMM model in order to use the TPI. Figure 11-5 shows the principal pieces of the TPI model, which include key areas, levels, checkpoints, and improvement suggestions.
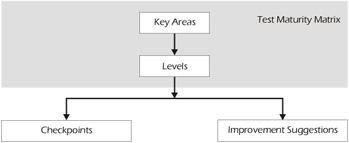
Figure 11-5: Test Process Improvement (TPI) Model
Key Areas of the TPI
The testing process is broken into twenty key areas that need to be addressed by the testing organization. The baseline and improvement suggestions are based on the following twenty key areas:
- Test Strategy
- Lifecycle Model
- Moment of Involvement
- Estimating and Planning
- Test Specification Techniques
- Static Test Techniques
- Metrics
- Test Automation
- Testing Environment
- Office Environment
- Commitment and Motivation
- Test Functions and Training
- Scope of Methodology
- Communication
- Reporting
- Defect Management
- Testware Management
- Test Process Management
- Evaluation
- Low-Level Testing
Levels of Maturity
Examination of each key area leads to classification of the test process into certain levels of maturity. There can be one to four maturity levels for each of the twenty key areas in the TPI model, and each of these maturity levels is represented by an A, B, C, or D. The ascending levels indicate increasingly more mature processes (e.g., 'B' is more mature than 'A').
A value is assigned (by shading in the template) of A, B, C or D for each key area. One key area (office environment) has only one level and the others have up to four. Office environment, for example, has only one level that you can assign because you either have a usable office environment or you don't. Other key areas such as test strategy have up to four levels because there are more "degrees" of process maturity in the area of test strategy.
Checkpoints
Checkpoints are questions (found in Test Process Improvement) that must be answered in order to determine the maturity of each key area. If a key area passes all of the checkpoints of a certain level, then the key area is classified at that level. To make sure that the classification into levels is done objectively, one or more checkpoints are assigned to each level.
Test Maturity Matrix
All of the key areas and levels in the test maturity matrix are not equally important for the performance of the complete test process, and dependencies exist between the different key areas and levels. Consequently, all key areas and levels are mutually linked in a test maturity matrix.
|
Key Area |
Controlled |
Efficient |
Optimizing |
||||||||||||
|---|---|---|---|---|---|---|---|---|---|---|---|---|---|---|---|
|
0 |
1 |
2 |
3 |
4 |
5 |
6 |
7 |
8 |
9 |
10 |
11 |
12 |
13 |
||
|
1 |
Test Strategy |
A |
B |
C |
D |
||||||||||
|
2 |
Lifecycle Model |
A |
B |
||||||||||||
|
3 |
Moment of Involvement |
A |
B |
C |
D |
||||||||||
|
4 |
Estimating and Planning |
A |
B |
||||||||||||
|
5 |
Test Specification Techniques A B |
A |
B |
||||||||||||
|
6 |
Static Test Techniques |
A |
B |
||||||||||||
|
7 |
Metrics |
A |
B |
C |
D |
||||||||||
|
8 |
Test Automation |
A |
B |
C |
|||||||||||
|
9 |
Testing Environment |
A |
B |
D |
|||||||||||
|
10 |
Office Environment |
A |
|||||||||||||
|
11 |
Commitment and Motivation |
A |
B |
C |
|||||||||||
|
12 |
Test Functions and Training |
A |
B |
C |
|||||||||||
|
13 |
Scope of Methodology |
A |
B |
C |
|||||||||||
|
14 |
Communication |
A |
B |
C |
|||||||||||
|
15 |
Reporting |
A |
B |
C |
D |
||||||||||
|
16 |
Defect Management |
A |
B |
C |
|||||||||||
|
17 |
Testware Management |
A |
B |
C |
D |
||||||||||
|
18 |
Test Process Management |
A |
B |
C |
|||||||||||
|
19 |
Evaluation |
A |
B |
||||||||||||
|
20 |
Low-Level Testing |
A |
B |
C |
|||||||||||
|
NOTE: The blank test maturity matrix template shown above is completed based on the answers to the questions or checkpoints. Note that this is a copy of the blank TPI template, not a completed one! The initial reaction of many people is confusion when they see this template, but it really does make sense. |
|||||||||||||||
The levels (A, B, C, and D) do not line up vertically in the model because the first level for one key area may occur naturally before the same level in another key area. For example, level 'A' for Defect Management occurs before level 'A' for Metrics because you need to collect the defect information in order to use the defect metrics.
Improvement Suggestions
Even though the TPI model shows the next logical step for process improvement based on the checkpoints for each key level, the authors of the TPI have also included additional improvement suggestions (refer to Figure 11-5) to facilitate the process.
Example TPI Assessment
Table 11-3 shows the results of a TPI assessment at an organization. The shaded area represents the level of maturity achieved in each key area. A value of '0' for a key area indicates the minimal requirements to achieve level 'A' have not been met.
|
Key Area |
Controlled |
Efficient |
Optimizing |
||||||||||||
|---|---|---|---|---|---|---|---|---|---|---|---|---|---|---|---|
|
0 |
1 |
2 |
3 |
4 |
5 |
6 |
7 |
8 |
9 |
10 |
11 |
12 |
13 |
||
|
1 |
Test Strategy |
A |
B |
C |
D |
||||||||||
|
2 |
Lifecycle Model |
A |
B |
||||||||||||
|
3 |
Moment of Involvement |
A |
B |
C |
D |
||||||||||
|
4 |
Estimating and Planning |
A |
B |
||||||||||||
|
5 |
Test Specification Techniques |
A |
B |
||||||||||||
|
6 |
Static Test Techniques |
A |
B |
||||||||||||
|
7 |
Metrics |
A |
B |
C |
D |
||||||||||
|
8 |
Test Automation |
A |
B |
C |
|||||||||||
|
9 |
Testing Environment |
A |
B |
D |
|||||||||||
|
10 |
Office Environment |
A |
|||||||||||||
|
11 |
Commitment and Motivation |
A |
B |
C |
|||||||||||
|
12 |
Test Functions and Training |
A |
B |
C |
|||||||||||
|
13 |
Scope of Methodology |
A |
B |
C |
|||||||||||
|
14 |
Communication |
A |
B |
C |
|||||||||||
|
15 |
Reporting |
A |
B |
C |
D |
||||||||||
|
16 |
Defect Management |
A |
B |
C |
|||||||||||
|
17 |
Testware Management |
A |
B |
C |
D |
||||||||||
|
18 |
Test Process Management |
A |
B |
C |
|||||||||||
|
19 |
Evaluation |
A |
B |
||||||||||||
|
20 |
Low-Level Testing |
A |
B |
C |
|||||||||||
Notice the three "levels" of maturity at the top of Table 11-3: Controlled, Efficient, and Optimizing. These levels were added to the TPI model to give participants (especially upper management) a feel for their testing maturity level. This is an imprecise measurement because an organization is rated as controlled, efficient, or optimizing based on where most of the shading appears on the chart. This organization, for example, is aiming for better control of their testing process, because the controlled area is still largely unshaded.
The model works left to right. In order to improve the testing process (i.e., expand the shaded area), we must first look at the lowest level (A, B, C, D) that appears in the left-most unshaded box. In our example, Test Strategy and Test Specification Techniques are both unshaded, so you must now look at a dependency chart (refer to Table 11-4) to see if any dependencies exist. The dependency chart shows that level 'A' of the Test Strategy is dependent on 11A (Commitment and Motivation) and 5A (Test Specification Techniques). Notice that 11A is already shaded, so you don't have to worry about it. This means that the next logical area for process improvement is level 'A' for Test Specification Techniques. After addressing Test Specification Techniques, you would then target level 'A' of the Test Strategy.
|
Key Area |
Level A |
Level B |
Level C |
Level D |
|
|---|---|---|---|---|---|
|
1 |
Test Strategy |
Strategy for single high-level test (5A, 11A) |
Combined strategy for high-level tests (2A, 5B, 11B, 14B, 18B) |
Combined strategy for high-level tests plus either low-level tests or evaluation (20C or (3C, 19B)) |
Combined strategy for all test and evaluation levels (3C, 19, 20C) |
|
2 |
Lifecycle Model |
Planning, specification, execution (11A) |
Planning, preparation, specification, execution, and completion (6A, 17A) |
||
|
3 |
Moment of Involvement |
Completion of test basis (2A) |
Start of test basis (2B) |
Start of requirements definition |
Project initiation (11C) |
|
4 |
Estimating and Planning |
Substantial estimating and planning (2A) |
Statistically substantiated estimating and planning (7B, 15B) |
||
|
5 |
Test Specification Techniques |
Informal techniques |
Formal techniques (12A, 17A) |
||
|
6 |
Static Test Techniques |
Inspection of test basis |
Checklists |
||
|
7 |
Metrics |
Project metrics (product) (11B, 15B, 16A, 18B) |
Project metrics (process) (15c, 16b) |
System metrics (13B, 14C, 18C) |
Organization metrics (> 1 system) |
|
8 |
Test Automation |
Use of tools |
Managed test automation (5A or 5B, 12A) |
Optimal test automation |
|
|
9 |
Test Environment |
Managed and controlled test environment (12A) |
Testing in the most suitable environment (1B) |
'Environment on-call' |
|
|
10 |
Office Environment |
Adequate and timely office environment |
|||
|
11 |
Commitment and Motivation |
Assignment of budget and time |
Testing integrated in project organization (2A, 15B, 16A, 18B) |
Test engineering (1C, 3C, 8B, 15C) |
|
|
12 |
Test Functions and Training |
Test manager and testers |
(Formal) methodical, technical, and functional support, management |
Formal internal quality assurance (13A) |
|
|
13 |
Scope of Methodology |
Project specific (2A, 5B, 16A, 17A, 18B) |
Organization generic |
Organization optimizing, R&D activities (11B, 18C) |
|
|
14 |
Communication |
Internal communication |
Project communication (defects, change control) (2A, 15B, 16A) |
Communication in organization about the quality of the test processes (13B) |
|
|
15 |
Reporting |
Defects |
Progress (status of tests and products), activities (costs and time, milestones), defects with priorities (2A, 16A, 18B) |
Risks and recommendations, substantiated with metrics (1A, 5B, 7A, 16B) |
Recommendations have a software process improvement character (1C, 11C) |
|
16 |
Defect Management |
Internal defect management |
Extensive defect management with flexible reporting facilities |
Project defect management |
|
|
17 |
Testware management |
Internal testware management |
External management of test basis and test object |
Reusable testware (5B) |
Traceability of system requirements to test cases |
|
18 |
Test Process Management |
Planning and execution |
Planning, execution, monitoring, and adjusting |
Monitoring and adjusting within organization (13B) |
|
|
19 |
Evaluation |
Evaluation techniques |
Evaluation strategy |
||
|
20 |
Low-Level Testing |
Low-level test lifecycle model (planning, specification, and execution) |
White-box techniques |
Low-level test strategy |
Description for Test Spec. Techniques (5A)
The use of informal techniques means that the person writing the test specification has a lot of freedom in inventing test cases. This causes the test quality to be highly dependent on the (subject matter) skills of the person writing the specification and blurs the level of coverage compared to the test basis. However, this is far better than each tester thinking up test cases for themselves, without worrying about the documentation of these test cases.
Making predictions in the specifications of the test cases is very important, because the judging of test results afterwards under the pressure of time is often insufficiently thorough (e.g., the result is 990; I expected something between 800 and 1,000, so that number is probably correct).
Checkpoints for Test Spec. Techniques (5A)
Test Process Improvement shows that the following checkpoints must be satisfied in order to achieve a maturity level of 'A' for the key area Test Specification Techniques:
- The test cases are specified by means of a described technique.
- The technique requires at least a description of:
- the starting situation.
- the change process and the test actions to be performed.
- the expected end result.
Since the checkpoints for Test Specification Techniques in Table 11-3 were not satisfied, a value of '0' was assigned.
Improvement Suggestions for Test Spec. Techniques (5A)
Based on the results of the TPI assessment example in Table 11-3, the checkpoints along with the following improvement suggestions should be followed to get from maturity level '0' to level 'A' for the key area Test Specification Techniques:
- Make testers aware of the importance of predictions.
- Describe the specification technique. Try to include as many practical instructions as possible, so that the person writing the specification stays focused.
Continuous Improvement
Whether your organization chooses to use the process improvement model described at the beginning of this chapter, CMM, ISO, TPI, or some combination of these, or an entirely different model, it's necessary that you constantly strive to improve the effectiveness of your testing. If you're not improving, you're probably going backwards. Goals must be constantly raised, and when achieved, raised again.
Static organizations become stale and ineffective, and suffer from declining morale. It's unfortunate that organizations that have achieved a pinnacle of success might actually have to work harder to retain their position than they did to achieve it in the first place.
Preface
- An Overview of the Testing Process
- Risk Analysis
- Master Test Planning
- Detailed Test Planning
- Analysis and Design
- Test Implementation
- Test Execution
- The Test Organization
- The Software Tester
- The Test Manager
- Improving the Testing Process
- Some Final Thoughts…
- Appendix A Glossary of Terms
- Appendix B Testing Survey
- Appendix C IEEE Templates
- Appendix D Sample Master Test Plan
- Appendix E Simplified Unit Test Plan
- Appendix F Process Diagrams
EAN: 2147483647
Pages: 114
- Linking the IT Balanced Scorecard to the Business Objectives at a Major Canadian Financial Group
- Technical Issues Related to IT Governance Tactics: Product Metrics, Measurements and Process Control
- Managing IT Functions
- Governing Information Technology Through COBIT
- The Evolution of IT Governance at NB Power
