Workspaces and Panels
When you see After Effects 7.0 for the first time, the most surprising thing is what you don't see, especially if you're familiar with previous versions. Parts of your desktop or other open applications no longer can peek in between various floating windows and palettes; instead, the user interface is unified into a single, coherent environment that is fully customizable.
Notes
How much time and effort was wasted over the years by After Effects artists moving palettes around to see what they needed? We'll never know, but the days of juggling windows are banished to the sands of time for anyone who upgrades to 7.0.
Before we look at how to use this new interface, it is helpful to define what is here. Figure 1.1 shows the Standard workspace that appears when you first open After Effects 7.0. The interface consists of one main application window; on the Mac, this window contains the name of the open project, and on Windows it also includes the menu bar. It is possible to create additional floating windows; more on this in a bit.
Figure 1.1. The Standard workspace layout is all contained in a single application window (A). The frame containing the Project panel (B) is currently active, as indicated by the yellow highlight around the panel's border. Dividers such as the long one (C) between the Composition panel and the smaller panels at the right separate the frames. The tab of the Composition viewer (D) includes a pull-down menu for choosing a particular composition, and a lock icon for keeping that composition forward regardless of what else is clicked.

Both types of windows contain frames, separated by dividers. Each frame contains one or more panels. If a frame contains multiple panels, the tab of each panel can be seen at the top, but only the contents of the forward tab can be seen. To bring a panel forward, you click on its tab.
Some panels are viewers; these include a pull-down menu in the tab that lets you choose the content displayed. These also include a lock option (specified via a small lock icon, also in the tab) that prevents that panel from switching to a different display automatically; more on this feature follows further on.
Now, to put these definitions in context, look more closely at Figure 1.1. The Standard workspace contains the bones of an entire project:
- Project panel: Contains all of the resources used in your compositions (source footage, stills, solids that you create, audio, even the compositions themselves).
- Composition panel: Is the viewer where you perform the predominant visual work of assembling a shot.
- Timeline panel: Organizes the elements that go into the individual composition (otherwise known as a shot).
- Info, Audio, Time Controls, and Effects & Presets panels: Help you work with your compositions.
Notes
All available panels in After Effects are listed under the Window menu; some even list preset keyboard shortcuts for rapid access. These panels used to be actual floating windows, but Adobe decided not to change the name of the menu, as it is standard across many applications.
The basic workflow of After Effects, then, is to create a new composition, typically containing items from the Project panel, and to work with it in the Composition and Timeline viewers.
Notes
Figure 1.1 uses darker user interface colors than are displayed in After Effects by default. The User Interface Brightness control resides in Preferences > User Interface Colors.
To see the full story of the After Effects workflow, however, you can use the Workspace pull-down to switch to the All Panels layout. This reveals lots of little collapsed panels for various tools such as the paint tools (Paint and Brush Tips), the type tools (Character and Paragraph), the motion tracker (Tracker Controls), and so on.
Look closely at the workspace, and you will see the other key pieces of the After Effects workflow: the Effect Controls, for adding specific effects to layers; the Layer and Footage palettes, for working with an individual layer in a composition or viewing source footage; the Flowchart view, which provides a node-based overview of a project; and the Render Queue, where you output your work. All of these are empty now, and so they give you no context for what they do; this chapter will provide that context.
Notes
In this discussion, it is assumed that you have not yet customized any of the After Effects Workspaces. If what you see when you choose a Workspace doesn't match what is described here, you can use Window > Workspace > Reset to bring a given workspace back to its previous settings (although if you have saved over any of the defaults, you will see the saved version).
The All Panels layout is not particularly usefulit's crowded with panels you may never usebut it provides a glimpse of what all is available in the After Effects user interface. Adobe set other default workspaces to anticipate common usages of After Effects: Animation, Effects, Motion Tracking, Paint, and Text. The Minimal workspace consists only of Timeline and Composition panels (where you'll do most of your work).
There is even something of an escape hatch back to the After Effects of old. The Undocked panel floats the three main informational panels, and it is possible to make floating windows of all of the panels in After Effects for those stubborn souls who desperately miss the full 6.5 (and earlier) experience. Before you make a big mess for nostalgia's sake, however, consider what comprises the interface and how you go about customizing it, whether for a tiny laptop or multiple monitors.
Customizing Your Workspace
Workspaces used to be an underused feature in After Effects, but now they have taken center stage. Quite likely, however, you will end up customizing your workspaces to differ, slightly or radically, from what ships with version 7.0. The best way to do this is to mess around with the user interface yourself, but here are some pointers you might miss with such an approach.
Tip
To make any panel a floating window, hold down the Ctrl/Cmd key while dragging its tab away from its host panel.
Docking, Grouping, Rearranging, Resizing Panels
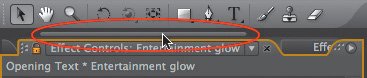
In case you haven't already figured it out, each panel in After Effects is labeled via a tab at the upper left, which contains the title of the panel, an x to close the panel (to the right of the title), and a little grip area at the left of the title (Figure 1.2). At the upper right is a smaller tab with another grip area and a triangular icon for the panel's context menu.
Figure 1.2. The active tab, for the Effect Controls panel, includes grip areas at the left of each tab section for dragging the panel and an x to close it. At the far right is the panel menu icon, which reveals a context menu. Because this panel is used to contain effects for any layer, it includes a pull-down menu (to specify which one) and a lock (to keep the current one active). Also in this frame is the Project panel, which does not contain these extras.

Tip
Although overlooked in the documentation, the four drop zones at the edges of the After Effects window cause the panel being dragged to occupy that entire side of the interface. So if, for example, you want the Timeline to fill the bottom portion of your screen, even below several other panels, move it down to the very bottom of the application window until you see a teal-colored drop zone appear across the bottom edge, and drop it.
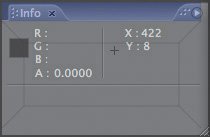
Those grip areas are your target for clicking and dragging a panel to another location in the user interface (UI). In any workspace, try dragging a panel. (Don't worry, instructions to reset your workspace follow.) As you move it over another panel, you see geometric shapes like those in Figure 1.3. These are the drop zones, allowing your panel to occupy the space directly above, below, left, or right of the panel. If you drop at the center or in the zone at the very top, along the tabs, it is grouped with the target panel.
Figure 1.3. Six possible drop areas are shown over the Info panel. Dropping on the center or along the top has the same result: grouping the dropped panel in the same frame as Info; dropping in any of the other four positions the dropped panel just to that side of Info.
If you hold your pointer on the border between two panels, you will see it become a divider dragger (Figure 1.4). This allows you to resize the adjacent panels. But if you want the panel you are working with to take up a much larger amount of space for a moment, there is a better option.
Figure 1.4. The border icon appears to indicate that you can offset the border between sets of frames, causing some panels to expand and others to contract.
The tilde key (~) toggles whichever panel is currently active (indicated by the yellow line around its border) to take over the entire After Effects window. You will use this shortcut a lot as you work with compositions, regardless of your monitor size; its most prominent use is to reveal more of the image in your Composition or Layer view, free of the rest of the interface.
Tip
When too many panels are grouped together in one area to see all of their titles, a slider bar appears above them, allowing you to scroll back and forth among them. It's very small and can easily escape notice (Figure 1.5).
Figure 1.5. Highlighted is the scrollbar, which subtly appears atop a frame that contains too many panels to be displayed together horizontally. There is no vertical equivalent in 7.0.
Floating Panels and Multiple Monitors
Because I typically prefer a multiple-monitor setup for After Effects, I was dismayed (at first) that After Effects is now self-contained in a single window. Two monitors are not always the same dimensions, and even when they are, spanning two displays with a single window usually becomes a real pain.
That's why I was relieved to discover that you can tear off any panel and make it float, the way all of the windows and palettes of After Effects used to do. Holding down the Ctrl/Cmd key as you drag a panel causes it to occupy a floating window.
Notes
When dragged to an area of your desktop beyond the After Effects window, the panel will tear off without the need for any modifier key.
If you are really nostalgic for the way After Effects used to work, you can even tear off every panel, giving each its own floating window. I don't recommend it, but there are bound to be diehards. More useful is to tear off a window that you only use occasionallysay, the Render Queue (Figure 1.6)so that it only appears when you request it (using the keyboard shortcut Ctrl+Alt+0/Cmd+Option+0 in the case of the Render Queue).
Figure 1.6. Even if you are using two monitors of differing sizes, you can smoothly make use of both of them by tearing off one or more panels into a separate floating window that occupies the second monitor. You can also make the Render Queue, which is typically used only when you are done working, its own floating window, closed during normal use.
Close-Up: Full Screenery
When you tear off a panel and move it to a second monitor as a floating window, you may notice that it lacks the Zoom button along the top to send the window to full screen.
The shortcut Ctrl+(Cmd+) can zoom the window instead. If the selected floating window is not occupying the full borders of the screen (or has been moved or offset), pressing the shortcut keys maximizes the window. If you press again, the shortcut toggles off the top menu bar, filling the entire screen with the window. This also works with the main UI window; if you don't like seeing the top of your monitor taken up by the After Effects menu bar, you can use Ctrl+(Cmd+) to maximize the entire UI.
It is not uncommon these days to preview to a monitor that shares at least one dimension with your footage. For example, I often work with HD footage (1920 x 1080) on a set of 1920 x 1200 monitors. To see my Composition panel at 100% on one of those monitors, I make it a floating window and then use this shortcut.
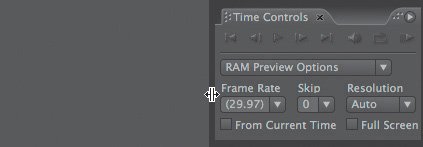
As is noted later, you can always RAM Preview in full-screen mode by checking the Full Screen box in the Time Controls.
Saving and Resetting Workspaces
There is no undo available when you rearrange panels. You can reset any given workspace, however, by choosing the Reset option at the bottom of the Workspace menu.
If you've switched back and forth between custom workspaces, you have probably noticed that all of the changes you make to a given workspace persist with it. If you make a complete mess of Standard and switch to Effects, then back to Standard, it's still the exact mess that you left it. If you're used to the old workspaces of version 6.5 and earlier, this is at first dismaying, until you notice that Reset option.
If you never choose Reset, your customizations will remain, at least until your preferences are reset or you inadvertently change them. For that reason, if you come up with a customization you like, save it (using the New Workspace option in the Workspace menu). You'll probably want to save at least one workspace whose proportions and orientation to your monitor setup suits you best, and if you change your mind, you can always save over it or delete it.
Those are the basics of the new user interface; in other contexts, you will investigate some of the cooler enhancements that have been added to it, such as multiple views in a single composition viewer (Chapter 9, "Virtual Cinematography"), the viewer lock, and "ETLAT" (Chapter 4, "Optimizing Your Projects").
Making the Most of the UI |
Section I. Working Foundations
The 7.0 Workflow
- The 7.0 Workflow
- Workspaces and Panels
- Making the Most of the UI
- Settings: Project, Footage, Composition
- Previews and OpenGL
- Effects & Presets
- Output: The Render Queue
- Study a Shot like an Effects Artist
The Timeline
- The Timeline
- Organization
- Animation Methods
- Keyframes and The Graph Editor
- Uber-mastery
- Transform Offsets
- Motion Blur
- Manipulating Time Itself
- In Conclusion
Selections: The Key to Compositing
- Selections: The Key to Compositing
- The Many Ways to Create Selections
- Compositing: Science and Nature
- Alpha Channels and Premultiplication
- Masks
- Combining Multiple Masks
- Putting Masks in Motion
- Blending Modes: The Real Deal
- Track Mattes
Optimizing Your Projects
- Optimizing Your Projects
- Navigating Multiple Compositions
- Precomposing and Nesting
- Adjustment and Guide Layers
- Understanding Rendering Order
- Optimizing After Effects
- Onward to Effects
Section II. Effects Compositing Essentials
Color Correction
Color Keying
- Color Keying
- Good Habits and Best Practices
- Linear Keyers and Hi-Con Mattes
- Blue-Screen and Green-Screen Keying
- Understanding and Optimizing Keylight
- Fixing Typical Problems
- Conclusion
Rotoscoping and Paint
- Rotoscoping and Paint
- Articulated Mattes
- Working Around Limitations
- Morphing
- Paint and Cloning
- Conclusion
Effective Motion Tracking
- Effective Motion Tracking
- The Essentials
- Optimizing Tracking Using 3D
- Extending a Track with Expressions
- Tracking for Rotoscoping
- Using 3D Tracking Data
- Conclusion
Virtual Cinematography
- Virtual Cinematography
- 5D: Pick Up the Camera
- Storytelling and the Camera
- Camera Blur
- The Role of Grain
- Film and Video Looks
- Conclusion
Expressions
- Expressions
- Logic and Grammar
- Muting Keyframes
- Linking Animation Data
- Looping Animations
- Smoothing and Destabilizing
- Offsetting Layers and Time
- Conditionals and Triggers
- Tell Me More
Film, HDR, and 32 Bit Compositing
- Film, HDR, and 32 Bit Compositing
- Details
- Film 101
- Dynamic Range
- Cineon Log Space
- Video Gamma Space
- Battle of the Color Spaces
- Floating Point
- 32 Bits per Channel
- Conclusion
Section III. Creative Explorations
Working with Light
- Working with Light
- Light Source and Direction
- Creating a Look with Color
- Backlighting, Flares, Light Volume
- Shadows and Reflected Light
- HDR Lighting
- Conclusion
Climate: Air, Water, Smoke, Clouds
- Climate: Air, Water, Smoke, Clouds
- Particulate Matter
- Sky Replacement
- The Fog, Smoke, or Mist Rolls In
- Billowing Smoke
- Wind
- Water
- Conclusion
Pyrotechnics: Fire, Explosions, Energy Phenomena
- Pyrotechnics: Fire, Explosions, Energy Phenomena
- Firearms
- Sci-Fi Weaponry
- Heat Distortion
- Fire
- Explosions
- In a Blaze of Glory
Learning to See
Index
EAN: 2147483647
Pages: 157
