HDR Lighting
Conclusion
So there you have it; once you get used to the extra steps required to set up a linear project and import LDR footage, you are rewarded with a simple, powerful workflow.
This exercise only touched upon what is possible with linear floating point compositing, but it should at least make the point that light behaves much more the way it does in the real world. This is light in its purely natural, "additive" state (where the addition suddenly makes simple sense).
Tip
You can even "subtract" HDR values using the Add Blending mode and a Levels effect with Output White set to 1.0; matching values are darkened to black.
Keep in mind that many Blending modes besides Add and Multiply (as well as Lighten and Darken) will not work correctly with linear blending and HDR overbright values. For example, Screen, Overlay, and most of the "Light" Blending modes will yield strange results. The formula for the Screen operation (Chapter 3)
newPixel = 1((1A) * (1B))
clearly shows that you have a problem if the pixel of the top layer (A) or bottom layer (B) contains a value above 1; subtracting it from 1 yields a negative number. If the value of each pixel is 2.0, the resulting blended pixel is pure black. 12_screenHDR.aep shows this phenomenon in action.
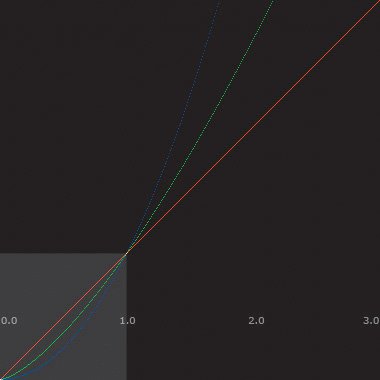
There is no doubt that support for linear floating point compositing will only improve with future versions of After Effects. Clearly, it will help for more effects to be 32 bit compatible, but it would also help if fundamental controls such as Levels and Curves had some way of showing you what is happening outside of monitor range. For example, gamma corrections on individual color channels are tricky in HDR because the gamma curve continues right out of monitor range; a gamma that has been "lowered" in 0.0 to 1.0 space may actually be higher above 1.0 (Figure 12.42). For this reason it is advised by those in the know to apply gamma adjustments last, after all other adjustments have been made.
Figure 12.42. Curves only lets you see monitor range, the area inside the gray box, but what happens to gamma adjustments to individual colors beyond that range is counterintuitive, as this graph shows. This need not be cause for concern as long as you leave gamma adjustments until last, so that what you see is what you get.
The greatest advantage of all of those extra color values is that it is virtually impossible to ever lose color detail in your image to the point where it can't be brought back with another operation. You are encouraged to try "normal" compositing in linear floating point projects in cases where you might want to be able to push color values in and out of monitor range, and you may soon become accustomed to working with light the way that light works in nature.
Climate Air, Water, Smoke, Clouds |
Section I. Working Foundations
The 7.0 Workflow
- The 7.0 Workflow
- Workspaces and Panels
- Making the Most of the UI
- Settings: Project, Footage, Composition
- Previews and OpenGL
- Effects & Presets
- Output: The Render Queue
- Study a Shot like an Effects Artist
The Timeline
- The Timeline
- Organization
- Animation Methods
- Keyframes and The Graph Editor
- Uber-mastery
- Transform Offsets
- Motion Blur
- Manipulating Time Itself
- In Conclusion
Selections: The Key to Compositing
- Selections: The Key to Compositing
- The Many Ways to Create Selections
- Compositing: Science and Nature
- Alpha Channels and Premultiplication
- Masks
- Combining Multiple Masks
- Putting Masks in Motion
- Blending Modes: The Real Deal
- Track Mattes
Optimizing Your Projects
- Optimizing Your Projects
- Navigating Multiple Compositions
- Precomposing and Nesting
- Adjustment and Guide Layers
- Understanding Rendering Order
- Optimizing After Effects
- Onward to Effects
Section II. Effects Compositing Essentials
Color Correction
Color Keying
- Color Keying
- Good Habits and Best Practices
- Linear Keyers and Hi-Con Mattes
- Blue-Screen and Green-Screen Keying
- Understanding and Optimizing Keylight
- Fixing Typical Problems
- Conclusion
Rotoscoping and Paint
- Rotoscoping and Paint
- Articulated Mattes
- Working Around Limitations
- Morphing
- Paint and Cloning
- Conclusion
Effective Motion Tracking
- Effective Motion Tracking
- The Essentials
- Optimizing Tracking Using 3D
- Extending a Track with Expressions
- Tracking for Rotoscoping
- Using 3D Tracking Data
- Conclusion
Virtual Cinematography
- Virtual Cinematography
- 5D: Pick Up the Camera
- Storytelling and the Camera
- Camera Blur
- The Role of Grain
- Film and Video Looks
- Conclusion
Expressions
- Expressions
- Logic and Grammar
- Muting Keyframes
- Linking Animation Data
- Looping Animations
- Smoothing and Destabilizing
- Offsetting Layers and Time
- Conditionals and Triggers
- Tell Me More
Film, HDR, and 32 Bit Compositing
- Film, HDR, and 32 Bit Compositing
- Details
- Film 101
- Dynamic Range
- Cineon Log Space
- Video Gamma Space
- Battle of the Color Spaces
- Floating Point
- 32 Bits per Channel
- Conclusion
Section III. Creative Explorations
Working with Light
- Working with Light
- Light Source and Direction
- Creating a Look with Color
- Backlighting, Flares, Light Volume
- Shadows and Reflected Light
- HDR Lighting
- Conclusion
Climate: Air, Water, Smoke, Clouds
- Climate: Air, Water, Smoke, Clouds
- Particulate Matter
- Sky Replacement
- The Fog, Smoke, or Mist Rolls In
- Billowing Smoke
- Wind
- Water
- Conclusion
Pyrotechnics: Fire, Explosions, Energy Phenomena
- Pyrotechnics: Fire, Explosions, Energy Phenomena
- Firearms
- Sci-Fi Weaponry
- Heat Distortion
- Fire
- Explosions
- In a Blaze of Glory
Learning to See
Index
EAN: 2147483647
Pages: 157
