Transform Offsets
The two most common ways to offset a transform animationto edit its position, rotation, or scale from a point other than its centerare intuitive, easy to use, and well documented. In an individual layer, move the anchor point from the center to a specific point in the frame, typically using the Pan Behind tool (keyboard shortcut: Y). Details can be found in the "Editing the Anchor Point" section.
Notes
Although the transform box in the Graph Editor offers a clear visual method for scaling keyframes in time, you can do this in Layer view as well. Select a set of keyframes, Alt-drag (Option-drag) on a keyframe at either end of the set, and the entire set is scaled proportionally in time (with the opposite end of the selected set acting as the stationary anchor).
You can center several layers around a single layer by parenting them to that layer. The children take on all of the transforms of the parent layer (not Opacity, which, remember, isn't a real transform) plus whatever offsets they already have.
The number-one piece of advice when editing an anchor point or creating a parent-child relationship is to do so before animating, if at all possible. With Transform keyframes already in place, these settings work as offsets, and can change the current Position frame, messing up the animation as a whole.
The After Effects developers are consistent in their design of new features: Activating a feature should not change the appearance of the composition. Therefore editing an anchor point position with the Pan Behind tool triggers an equivalent offset to the Position, in the exact opposite direction. Similarly, when you parent a layer to another layer, the child layer does not move even if the parent layer is not at its default position.
That's all clear. But reset an offset anchor point in the middle of a Position animation, and the Position keyframe at that point in time changes. Or undo parenting at a frame other than the one where you set it, and its Position value changes so that it appears to remain in the same place. Weird.
Tip
You can override the default behavior described here. To adjust an anchor point or undo parenting without changing any dependent Position value, hold down the Alt (Option) key as you make the change.
Editing the Anchor Point
The most straightforward method to edit an anchor point in the Composition panel is to use the Pan Behind tool (Y); doing so offsets Position to maintain current appearance. For a similar result, you can edit anchor point values in the Timeline, but Position data is unaffected.
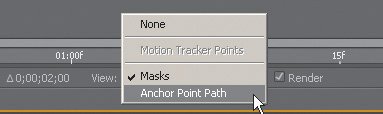
It is difficult to edit animated anchor point data in the Composition panel. Instead, activate the Layer panel. If you have animated the anchor point, change the View pull-down from Masks to Anchor Point Path (Figure 2.26).
Figure 2.26. Masks, not Anchor Point Path, is the default Layer display mode. Change that as needed using this menu at the bottom of the Layer panel. Note that the bouncing ball examples included in 02_graphEditor.aep feature an offset (but not animated) anchor point, allowing squash and stretch animation to occur around the point of contact (at the base of the ball).
Notes
The 02_graphEditor.aep project used for the bouncing ball animation earlier in this chapter includes an anchor point offset to the base of the ball; this allows the scaling involved for squash and stretch in the bounce to occur around the point of contact.
Editing the Parent Hierarchy
To set up a parent-child relationship, you can choose the target parent layer from the pull-down menu in the Parent column of the Timeline. Or, you can use the pickwhip control next to the pull-down menu, dragging it to the target parent layer. Either method will set multiple selected layers to the same parent.
Parenting "sticks" even when you change layer order or duplicate or rename the parent. You can select all of the children of a parent layer by context-clicking it and choosing Select Children. To remove parenting from all selected layers, choose None from the pull-down menu.
If you ever want to move layers relative to a point that is not represented in any current layer, you can add a null object (for the shortcut, go to Layer > New > Null Object. Null objects are actually 100 x100 pixel layers that cannot be seen in a final render. They possess all of the normal transform controls and can contain effects (and Masks for that matter, which are completely useless in null objects). Contained effects can be used by expressions as reference for other settings; more on this in Chapter 10, "Expressions."
Motion Blur |
Section I. Working Foundations
The 7.0 Workflow
- The 7.0 Workflow
- Workspaces and Panels
- Making the Most of the UI
- Settings: Project, Footage, Composition
- Previews and OpenGL
- Effects & Presets
- Output: The Render Queue
- Study a Shot like an Effects Artist
The Timeline
- The Timeline
- Organization
- Animation Methods
- Keyframes and The Graph Editor
- Uber-mastery
- Transform Offsets
- Motion Blur
- Manipulating Time Itself
- In Conclusion
Selections: The Key to Compositing
- Selections: The Key to Compositing
- The Many Ways to Create Selections
- Compositing: Science and Nature
- Alpha Channels and Premultiplication
- Masks
- Combining Multiple Masks
- Putting Masks in Motion
- Blending Modes: The Real Deal
- Track Mattes
Optimizing Your Projects
- Optimizing Your Projects
- Navigating Multiple Compositions
- Precomposing and Nesting
- Adjustment and Guide Layers
- Understanding Rendering Order
- Optimizing After Effects
- Onward to Effects
Section II. Effects Compositing Essentials
Color Correction
Color Keying
- Color Keying
- Good Habits and Best Practices
- Linear Keyers and Hi-Con Mattes
- Blue-Screen and Green-Screen Keying
- Understanding and Optimizing Keylight
- Fixing Typical Problems
- Conclusion
Rotoscoping and Paint
- Rotoscoping and Paint
- Articulated Mattes
- Working Around Limitations
- Morphing
- Paint and Cloning
- Conclusion
Effective Motion Tracking
- Effective Motion Tracking
- The Essentials
- Optimizing Tracking Using 3D
- Extending a Track with Expressions
- Tracking for Rotoscoping
- Using 3D Tracking Data
- Conclusion
Virtual Cinematography
- Virtual Cinematography
- 5D: Pick Up the Camera
- Storytelling and the Camera
- Camera Blur
- The Role of Grain
- Film and Video Looks
- Conclusion
Expressions
- Expressions
- Logic and Grammar
- Muting Keyframes
- Linking Animation Data
- Looping Animations
- Smoothing and Destabilizing
- Offsetting Layers and Time
- Conditionals and Triggers
- Tell Me More
Film, HDR, and 32 Bit Compositing
- Film, HDR, and 32 Bit Compositing
- Details
- Film 101
- Dynamic Range
- Cineon Log Space
- Video Gamma Space
- Battle of the Color Spaces
- Floating Point
- 32 Bits per Channel
- Conclusion
Section III. Creative Explorations
Working with Light
- Working with Light
- Light Source and Direction
- Creating a Look with Color
- Backlighting, Flares, Light Volume
- Shadows and Reflected Light
- HDR Lighting
- Conclusion
Climate: Air, Water, Smoke, Clouds
- Climate: Air, Water, Smoke, Clouds
- Particulate Matter
- Sky Replacement
- The Fog, Smoke, or Mist Rolls In
- Billowing Smoke
- Wind
- Water
- Conclusion
Pyrotechnics: Fire, Explosions, Energy Phenomena
- Pyrotechnics: Fire, Explosions, Energy Phenomena
- Firearms
- Sci-Fi Weaponry
- Heat Distortion
- Fire
- Explosions
- In a Blaze of Glory
Learning to See
Index
EAN: 2147483647
Pages: 157
