Creating a Text Editor with JFace Text
The JFace text framework provides numerous functionalities to enable developers to create, display, and edit text documents. This chapter provides a brief overview of the JFace text framework and then shows you how to create a basic, custom text editor with JFace text. Then you learn how to extend and improve the functionality of the custom text editor by adding two add-ons: content assist and syntax highlighting.
Overview of the JFace Text Framework
This section provides an overview of the JFace text framework. First, it surveys the packages of the JFace text framework. After that, I discuss important classes and show how they fit into the MVC scenario.
JFace Text Package Organization
The classes contained in the JFace text framework are organized into the following packages:
- org.eclipse.jface.text
- org.eclipse.jface.text.contentassist
- org.eclipse.jface.text.formatter
- org.eclipse.jface.text.information
- org.eclipse.jface.text.presentation
- org.eclipse.jface.text.reconciler
- org.eclipse.jface.text.rules
- org.eclipse.jface.text.source
- org.eclipse.ui.editors.text
- org.eclipse.ui.texteditor
The org.eclipse.jface.text package is the main package, which provides a framework for creating, displaying, and manipulating text documents. The org.eclipse.jface.text.contentassist, org.eclipse.jface.text.formatter, org.eclipse.jface.text.information, org.eclipse.jface.text.presentation, and org.eclipse.jface.text.reconciler packages provide various add-ons for a text viewer. The org.eclipse.jface.text.rules package contains classes that handle rule-based text scanning. The org.eclipse.jface.text.source package provides utility classes handling text annotations. Finally, the two subpackages of the org.eclipse.ui package provide many ready-to-use text editors.
When programming JFace text, you need to add the following jar files into your Java path:
- $ECLIPSE_HOME/plugins/org.eclipse.jface.text_x.x.x/jfacetext.jar
- $ECLIPSE_HOME/plugins/org.eclipse.text_x.x.x/text.jar
- $ECLIPSE_HOME/plugins/org.eclipse.ui.editors_x.x.x/editors.jar
- $ECLIPSE_HOME/plugins/org.eclipse.ui.workbench.texteditor_x.x.x/texteditor.jar
Models, Views, and Controllers in JFace Text Framework
As mentioned in Chapter 2, the JFace text framework is model-view-controller based. Within the JFace text framework, a text document is modeled as an IDocument (model). To view or edit an IDocument document, you need an ITextViewer (controller), which turns a StyledText widget (view) into a documentbased text component. Usually, you do not have to implement the IDocument and ITextViewer interfaces from scratch because the framework provides many abstract as well as concrete implementations of these interfaces. Built on ITextViewer and its descendant classes, many editor-related classes in the org.eclipse.ui.texteditor and org.eclipse.ui.editors.text packages also act in the controller role. Such classes include AbstractTextEditor and TextEditor, which act as the controller and manage the view (through ITextViewer) and the model.
All of these classes are illustrated in Figure 20-1.
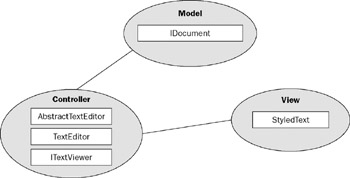
Figure 20-1
Model-Related Classes
Classes used to represent the model in MVC are as follows.
IDocument, AbstractDocument, Document
The IDocument interface represents text providing support for text manipulation, partition, search, and document change event notification. You use the setContent method to set the content of the document:
public void set(String text)
It's very important to understand document partitioning. A partition is a certain part of the document. The whole document can be viewed as a sequence of non-overlapping partitions. The following XML document is a simple example:
Jack Li Guojie
You can partition it into a comment partition and several XML tag partitions. One of the advantages of document partitioning is that you can manipulate partitions in different ways according to their types. For example, you might set different foreground colors for a comment partition and an XML tag partition. The process of dividing a document into non-overlapping partitions is called document partitioning. Usually, you need a document partitioner to perform the task. You use the following method to set a partitioner for a document:
public void setDocumentPartitioner(IDocumentPartitioner partitioner)
You learn more details about document partitioning in the following section.
The JFace text framework provides several classes implementing the IDocument interface — for example, AbstractDocument and Document. These classes provide functions such as text storing and document management.
IDocumentPartitioner, IPartitionTokenScanner, DefaultPartitioner
An IDocumentPartitioner is capable of dividing a document into a set of disjointed partitions. A partition is represented by the ITypedRegion interface. The ITypedRegion interface defines the content type, offset (to the beginning of the document), and the length of a partition. Once the document changes, the document partitioner is invoked to update the partition.
In most cases, a document partitioner uses a scanner to scan the document from the beginning to the end to perform partitioning. Such a scanner is represented by the IPartitionTokenScanner interface. A partition token scanner returns tokens representing partitions. The RuleBasedPartitionScanner class is a concrete implementation of the IPartitionTokenScanner interface. A rule-based partition scanner performs document partitioning according to the specified predicate rules. For example, the following code creates a rule-based partition scanner that is capable of scanning for XML comment partitions:
 String XML_COMMENT = "XML Comment";
 IToken xmlComment = new Token(JNLP_COMMENT);
 IPredicateRule[] rules = new IPredicateRule[1];

 rules[0] = new MultiLineRule("", XML_COMMENT);

 RuleBasedPartitionScanner scanner = new RuleBasedPartitionScanner();
 scanner.setPredicateRules(rules);
Now you can use the scanner to build a document partitioner with the DefaultPartitioner class:
 IDocumentPartitioner partitioner =
 new DefaultPartitioner(scanner, new String[]{XML_COMMENT});
The scanner built before is used as the first argument of the DefaultPartitioner constructor. The second argument specifies all the legal content types supported by the scanner. In our case, the XML comment type is the only content type. Now, you can use the setDocumentPartitioner method of the IDocument interface to set the document partitioner.
Controller-Related Classes
Classes used as the controller in MVC include the following.
ITextViewer, TextViewer
An ITextViewer enables a text widget to support model documents mentioned in the preceding subsection. You can register various listeners on a text viewer to listen for text change events. A text viewer supports a set of plugins: undo manager, double-click behavior, auto indentation, and text hover. Implementing the ITextViewer is complicated and error prone; usually, you should use or extend classes implementing the ITextViewer class in the framework. The TextViewer class is a concrete implementation of the ITextViewer interface.
ISourceViewer, SourceViewer, SourceViewerConfiguration
The ISourceViewer interface extends the ITextViewer interface by providing visual annotation support, visual range indication, and explicit configuration support. The SourceViewer class provides a concrete implementation of the ISourceViewer interface. A SourceViewer uses a small strip shown on the left of the viewer as the annotation presentation area and a small strip shown on the right of the viewer as the overview presentation area.
The SourceViewerConfiguration class bundles all the configuration options for a source viewer. You can pass an instance of this class to the configure method of ISouceViewer to configure a source viewer. Configurations bundled in the SourceViewerConfiguration class include:
- Annotation hover: Represented by IAnnotationHover, provides the information to be displayed on a hover pop-up window that appears over the presentation area of annotations. The default value is null.
- Auto indentation strategy: Represented by IAutoIndentStrategy, specifies how to perform auto indentation when manipulating text of certain type. By default, an instance of DefaultAutoIndentStrategy is returned.
- Content assist: Represented by IContentAssistant, provides support on interactive content completion. The default value is null.
- Content formatter: Represented by IContentFormatter, formats ranges within the document. The default value is null.
- Double-click strategy: Represented by ITextDoubleClickStrategy, defines the reaction of a text viewer to mouse double-click event. By default, an instance of DefaultTextDoubleClickStrategy is returned.
- Information control creator: Represented by IInformationControlCreator, is factorycreating information controls for the given source viewer. By default, an instance of DefaultInformationControl is returned.
- Information presenter: Represented by IInformationPresenter, determines and shows information requested for the current cursor position. The default value is null.
- Overview annotation hover: Represented by IAnnotationHover, provides information to be shown in a hover pop-up window when requested for the overview ruler of the source viewer. By default, the implementation returns the general annotation hover.
- Presentation reconciler: Represented by IPresentationReconciler, defines and maintains the representation of a text viewer's document in the presence of changes applied to the document. The default value is null.
- Model reconciler: Represented by IReconciler, defines and maintains a model of the content in the presence of changes applied to the document. The default value is null.
- Tab width: Defines the visual width of the tab character, and the default value is 4.
- Text hover: Represented by ITextHover, provides the information to be shown in a text hover pop-up window when requested for a certain content type. The default value is null.
- Undo manager: Represented by IUndoManager, monitors the text viewer and keeps a history of the changes applied to the viewer. By default, an instance of DefaultUndoManager with history length equal to 25 is used.
To modify a default configuration, you have to extend the SourceViewerConfiguration class and reimplement the corresponding get method. Later in this chapter, you will see how to equip an editor with a content assistant by configuring a subclass of SourceViewerConfiguration to the editor.
AbstractTextEditor, TextEditor, IDocumentProvider
An AbstractTextEditor controls and manages the source viewer and the document.
The source viewer (represented by SourceViewer) is created and maintained by an AbstractTextEditor. Thus, you cannot set the source viewer for the text editor. However, with the SourceViewerConfiguration class, you can configure the source viewer wrapped by the text editor with the following method:
 protected void setSourceViewerConfiguration(SourceViewerConfiguration
 configuration)
Note that the setSourceViewerConfiguration method is protected; you need to call it in a subclass of the AbstractTextEditor class.
An AbstractTextEditor requests a document through a document provider. A document provider is represented by the IDocumentProvider interface, which maps between domain elements and documents. A text editor employs document providers to bridge the gap between input elements and documents. For example, the FileDocumentProvider is capable of providing documents from file resources. A text editor may request a document from a document provider through the getDocument method of the IDocumentProvider interface:
public IDocument getDocument(Object element)
In the simplest case, a text editor invokes the getDocument method with a file as the argument, and the document provider retrieves the file content and returns a document based on it.
The TextEditor class is a full-fledged implementation of the AbstractTextEditor class. You can easily create your own custom editors by extending the TextEditor class.
So far, you have learned a lot about a number of classes and interfaces. In the next section, you learn how to use those classes to create a custom editor.
Creating a Basic Custom Editor
Here you create a custom editor for Java Network Launching Protocol (JNLP) files. Java Web Start technology relies on JNLP files for application provisioning, runtime configuration, and so on. For more details on Java Web Start and JNLP files, refer to Chapter 3. This JNLP editor enables the user to create and edit JNLP files. Additionally, it supports syntax highlighting, content assist, and content formatting (see Figure 20-2).
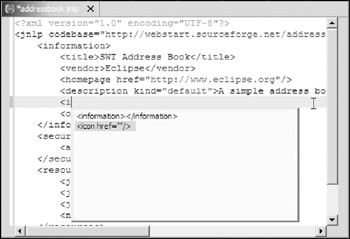
Figure 20-2
First, create the JNLPEditor class by extending the TextEditor class:
 public class JNLPEditor extends TextEditor {

 private ColorManager colorManager;

 public JNLPEditor() {
 super();
 colorManager = new ColorManager();
 // setSourceViewerConfiguration(new JNLPConfiguration(colorManager));
 setDocumentProvider(new JNLPDocumentProvider());
 }

 public void dispose() {
 colorManager.dispose();
 super.dispose();
 }
 }
Note that the ColorManager class is used to manage the creation and disposal of various colors, which will be used when you implement the syntax highlighting feature. For now, because you are implementing only a plain text editor without advanced features such as content assist, you do not need to set a custom SourceViewerConfiguration for the source viewer. The setDocumentProvider method is called to set an instance of JNLPDocumentProvider as the document provider for this editor.
Here is the implementation of the JNLPDocumentProvider class:
 public class JNLPDocumentProvider extends FileDocumentProvider {

 protected IDocument createDocument(Object element) throws CoreException {
 IDocument document = super.createDocument(element);
 if (document != null) {
 IDocumentPartitioner partitioner =
 new DefaultPartitioner(
 new JNLPPartitionScanner(),
 new String[] {
 JNLPPartitionScanner.JNLP_TAG,
 JNLPPartitionScanner.JNLP_COMMENT });
 partitioner.connect(document);
 document.setDocumentPartitioner(partitioner);
 }
 return document;
 }
 }
The JNLPDocumentProvider class extends the FileDocumentProvider class. A FileDocumentProvider loads a file into an IDocument instance through the createDocument method. Next, you set a document partitioner for this document. The document partitioner is created from a scanner, JNLPPartitionScanner.
The following code displays the JNLPPartitionScanner class:
 public class JNLPPartitionScanner extends RuleBasedPartitionScanner {
 public final static String JNLP_COMMENT = "JNLP_COMMENT";
 public final static String JNLP_TAG = "JNLP_TAG";

 public JNLPPartitionScanner() {

 IToken comment = new Token(JNLP_COMMENT);
 IToken tag = new Token(JNLP_TAG);

 IPredicateRule[] rules = new IPredicateRule[2];

 rules[0] = new MultiLineRule("", comment);
 rules[1] = new TagRule(tag);

 setPredicateRules(rules);
 }
 }

 class TagRule extends MultiLineRule {

 public TagRule(IToken token) {
 super("<", ">", token);
 }

 protected boolean sequenceDetected(
 ICharacterScanner scanner,
 char[] sequence,
 boolean eofAllowed) {
 int c = scanner.read();
 if (sequence[0] == '<') {
 if (c == '?') {
 // aborts in case of a processing instruction
 scanner.unread();
 return false;
 }
 if (c == '!') {
 scanner.unread();
 // aborts in case of a comment
 return false;
 }
 } else if (sequence[0] == '>') {
 scanner.unread();
 }
 return super.sequenceDetected(scanner, sequence, eofAllowed);
 }
 }
The JNLPPartitionScanner is created as a subclass of the RuleBasedPartitionScanner. JNLPPartitionScanner is capable of detecting two kinds of partitions: JNLP comments and JNLP tags. A MultipleLineRule detects patterns beginning with a given sequence and ending with another given sequent, which may span multiple lines. The first rule is created with the following statement:
rules[0] = new MultiLineRule("", comment)
This rule means that a comment starts with and ends with –>. As for the tag rule, a tag should begin with < and end with >. However, entries such as and are not valid tags. You extend the MultiLineRule class and override the sequenceDetected method to exclude such invalid tags.
Now you are ready to run the JNLP editor. You can create and edit JNLP files using the editor. Next, you modify the JNLP editor with syntax highlighting.
Syntax Highlighting
The steps to equip the JNLP editor with syntax highlighting are as follows:
- Create a custom source viewer configuration class by extending the SourceViewerConfiguration class.
- Override the getPresentationReconciler method to return a proper IPresentationReconciler object.
- Configure an instance of this custom source viewer configuration to the editor through the setSourceViewerConfiguration method of the TextEditor class.
Step 1 and Step 3 require minimum effort. Let's focus on Step 2. An IPresentationReconciler defines and maintains the representation of a text viewer's document in the presence of changes applied to the document. The presentation reconciler keeps track of changes. It sends each change to presentation damagers to compute damages and passes these damages to presentation repairers to construct text presentations. By applying the newly constructed text presentations, the presentation reconciler maintains the text viewer and the document synchronized.
A presentation damager is represented by the IPresentationDamager interface and a presentation repairer is represented by the IPresentationRepairer interface. The damage can be computed through the getDamageRegion method of the IPresentationDamager interface. To rebuild a damaged region, the presentation reconciler calls the createPresentation method of the IPresentationDamager. A presentation damager and repairer pair is assumed to be specific for a particular document content type (partition type).
The presentation reconciler implementation for the JNLP editor is as follows:
 public class JNLPConfiguration extends SourceViewerConfiguration {
 private ColorManager colorManager = new ColorManager();

 public JNLPConfiguration(ColorManager colorManager) {
 this.colorManager = colorManager;
 }

 PresentationReconciler reconciler;

 public IPresentationReconciler getPresentationReconciler(
 ISourceViewer sourceViewer) {
 if(reconciler != null)
 return reconciler;

 reconciler = new PresentationReconciler();

 // 1) Damager and repairer for JNLP tags.
 RuleBasedScanner scanner = new RuleBasedScanner();

 IToken stringColor =
 new Token(
 new
 TextAttribute(colorManager.getColor(IJNLPColorConstants.STRING)));

 IRule[] rules = new IRule[2];

 // the rule for double quotes
 rules[0] = new SingleLineRule(""", """, stringColor, '\');
 // The white space rule.
 IWhitespaceDetector whitespaceDetector = new IWhitespaceDetector() {
 public boolean isWhitespace(char c) {
 return (c == ' ' || c == '	' || c == '
' || c == '
');
 }
 };

 rules[1] = new WhitespaceRule(whitespaceDetector);

 scanner.setRules(rules);
 scanner.setDefaultReturnToken(
 new Token(
 new TextAttribute(
 colorManager.getColor(IJNLPColorConstants.TAG))));

 DefaultDamagerRepairer dr =
 new DefaultDamagerRepairer(scanner);

 reconciler.setDamager(dr, JNLPPartitionScanner.JNLP_TAG);
 reconciler.setRepairer(dr, JNLPPartitionScanner.JNLP_TAG);

 // 2) Damager and repairer for JNLP default content type.
 IToken procInstr =
 new Token(
 new TextAttribute(
 colorManager.getColor(IJNLPColorConstants.PROC_INSTR)));

 rules = new IRule[2];
 // the rule for processing instructions
 rules[0] = new SingleLineRule("", procInstr);
 // the rule for generic whitespace.
 rules[1] = new WhitespaceRule(whitespaceDetector);

 scanner = new RuleBasedScanner();
 scanner.setRules(rules);
 scanner.setDefaultReturnToken(
 new Token(
 new TextAttribute( colorManager.getColor(IJNLPColorConstants.DEFAULT))));

 dr = new DefaultDamagerRepairer(scanner);
 reconciler.setDamager(dr, IDocument.DEFAULT_CONTENT_TYPE);
 reconciler.setRepairer(dr, IDocument.DEFAULT_CONTENT_TYPE);

 return reconciler;
 }
 ...
 }
First, you construct an instance of PresentationReconciler if it does not exist yet. Then you try to create a damager and repairer pair for the JNLP tag content type. Basically, you want to highlight a tag using the color blue and highlight the strings within the tag using green. A rule-based scanner is created to scan the tag for strings (it should be highlighted in green) and white space (no color). You have seen how a partition scanner returns the partition type as a string. Here the rule-based scanner returns the color (wrapped in a TextAttribute object) used to highlight the text. The following rule
 IToken stringColor = new Token(
 new TextAttribute(colorManager.getColor(IJNLPColorConstants.STRING)));

 rules[0] = new SingleLineRule(""", """, stringColor, '\');
states that the double quoted strings within tags should be highlighted in a certain color (green). After setting rules for the scanner, you set the default return token for the scanner with the setDefaultReturnToken method:
 scanner.setDefaultReturnToken(new Token(
 new TextAttribute(colorManager.getColor(IJNLPColorConstants.TAG))));
The preceding code instructs the presentation that text within a tag (other than strings and white spaces) should appear in a special color to identify the tag (blue).
Now you are ready to create the pair and register the pair to the reconciler:
 DefaultDamagerRepairer dr = new DefaultDamagerRepairer(scanner);

 reconciler.setDamager(dr, JNLPPartitionScanner.JNLP_TAG);
 reconciler.setRepairer(dr, JNLPPartitionScanner.JNLP_TAG);
The DefaultDamagerRepairer class is a standard implementation of a syntax-driven presentation damager and repairer. It uses a token scanner to determine the damage and repair presentation. After an instance of DefaultDamagerRepairer is created with the scanner constructed previously, you register the pair for JNLP tag content type; if a JNLP tag partition changes, the damager and repairer are used to handle the change and rebuild the presentation.
Similarly, you construct a damager and repairer pair and register it to the presentation reconciler for the default content type.
After the getPresentationReconciler method is properly implemented, you set the source viewer configuration for the JNLP editor with an instance of JNLPConfiguration:
 public class JNLPEditor extends TextEditor {
 private ColorManager colorManager;

 public JNLPEditor() {
 super();
 colorManager = new ColorManager();
 setSourceViewerConfiguration(new JNLPConfiguration(colorManager));
 setDocumentProvider(new JNLPDocumentProvider());
 }
 ...
 }
If you run the editor now, you will find that documents are highlighted, and as you change the content, the syntax highlighting changes accordingly.
Providing Content Assistance
In the previous section, you learned how to equip the JNLP editor with syntax highlighting. In this section, you learn how to add another advanced feature to the editor: content assistant. Content assistant increases the user's productivity by automatically inserting appropriate text and reducing typographical errors (typos).
As you saw with syntax highlighting, content assistant is configured through the getContentAssistant method within a subclass of SourceViewerConfiguration. Because you have already created the JNLPConfiguration class, you are going to override the getContentAssistant method in it.
The getContentAssistant method returns an instance of type IContentAssistant. An IContentAssistant provides support on interactive content completion. It is capable of proposing, displaying, and inserting completions of the content at the viewer's cursor position. A content assistant uses a list of IContentAssistantProcessor objects to find appropriate content completion proposals. Each IContentAssistantProcessor is registered for a particular type of document content type. For example, if the cursor is in a certain type, only the corresponding IContentAssistantProcessor will be queried for content completion proposals. Usually, you do not have to implement the IContentAssistant interface; instead, you can use its default implementation — ContentAssistant. You need to implement an IContentAssistantProcessor and register it to the content assistant for the corresponding content type.
The following code shows the implementation of the getContentAssistant method in the JNLPConfiguration class:
 public class JNLPConfiguration extends SourceViewerConfiguration {

 ...

 /*
 * (non-Javadoc)
 * @seeSourceViewerConfiguration#getContentAssistant(ISourceViewer)
 */
 public IContentAssistant getContentAssistant(ISourceViewer sourceViewer) {
 ContentAssistant assistant = new ContentAssistant();

 IContentAssistProcessor processor = new JNLPCAProcessor();

 assistant.setContentAssistProcessor(
 processor,
 JNLPPartitionScanner.JNLP_TAG);

 assistant.setContentAssistProcessor(
 processor,
 IDocument.DEFAULT_CONTENT_TYPE);

 assistant.enableAutoActivation(true);
 assistant.setAutoActivationDelay(500); // 0.5 s.

 return assistant;
 }
 ...
 }
First, you create an instance of ContentAssistant. Then you create an instance of IContentAssistantProcessor and register it to two content types. The enableAutoActivation method is invoked to enable the auto activation. When the user types a certain character (one of the characters in the array returned by the getCompletionProposalAutoActivationCharacters method of IContentAssistantProcessor), after a specified delay, content assistant is activated automatically. The amount of time delay is configured through the setAutoActivationDelay method of the ContentAssistant class.
Here is the implementation of the content assistant processor:
 public class JNLPCAProcessor implements IContentAssistProcessor {

 // Proposed parts before the cursor
 final static String[] PARTS1 =
 {
 "
",
 "",
 "",
 "",
 "",
 "",
 "",
 "",
 "",
 "
",
 "",
 "",
 ""/>",
 "",
 ""/>",
 "
",
 "
",
 ""/>",
 ""/>",
 ""/>" };

 /*
 * (non-Javadoc)
 * @seeIContentAssistProcessor#computeCompletionProposals(ITextViewer, int)
 */
 public ICompletionProposal[] computeCompletionProposals(
 ITextViewer viewer,
 int documentOffset) {

 IDocument document = viewer.getDocument();

 // computes the tag starting part.
 StringBuffer sb = new StringBuffer();
 int offset = documentOffset;
 for (;;) {
 char c;
 try {
 c = document.getChar(--offset);
 } catch (BadLocationException e) {
 sb.setLength(0);
 break;
 }
 if (c == '>' || Character.isWhitespace(c))
 sb.setLength(0);
 break;
 }
 sb.append(c);
 if (c == '<') {
 sb = sb.reverse();
 break;
 }
 }

 String startingPart = sb.toString();
 ArrayList list = new ArrayList();
 if (startingPart.length() > 0) {
 for (int i = 0; i < PARTS1.length; i++) {
 if (PARTS1[i].startsWith(startingPart)) {
 String completeText = PARTS1[i] + PARTS2[i];
 int cursorPos = PARTS1[i].length();
 CompletionProposal proposal =
 new CompletionProposal(
 completeText,
 documentOffset - startingPart.length(),
 startingPart.length(),
 cursorPos);
 list.add(proposal);
 }
 }
 }

 ICompletionProposal[] proposals = new ICompletionProposal[list.size()];
 list.toArray(proposals);

 return proposals;
 }

 /*
 * (non-Javadoc)
 * @see IContentAssistProcessor#computeContextInformation(ITextViewer, int)
 */
 public IContextInformation[] computeContextInformation(
 ITextViewer viewer,
 int documentOffset) {
 return null;
 }

 /*

 * (non-Javadoc)
 * @see IContentAssistProcessor#getCompletionProposalAutoActivationCharacters()
 */
 public char[] getCompletionProposalAutoActivationCharacters() {
 return new char[] { '<' };
 }

 /*
 * (non-Javadoc)
 * @see IContentAssistProcessor#getContextInformationAutoActivationCharacters()
 */
 public char[] getContextInformationAutoActivationCharacters() {
 return null;
 }

 /*
 * (non-Javadoc)
 * @see IContentAssistProcessor#getErrorMessage()
 */
 public String getErrorMessage() {
 return null;
 }

 /*
 * (non-Javadoc)
 *
 * @see IContentAssistProcessor#getContextInformationValidator()
 */
 public IContextInformationValidator getContextInformationValidator() {
 return null;
 }

 }
Two string arrays are defined first. The first string array lists the first parts (which will be inserted before the cursor if the user selects the completion proposal) of all the possible proposals, and the second string array lists the other parts (which will be inserted after the cursor).
When the user presses Ctrl+spacebar or content assistant automatically activates, computeCompletionProposals is invoked to retrieve all the possible proposals. The preceding implementation first checks the existing part of the tag. Strings in the first string array, starting with the existing part, are considered to be suitable completion proposals. A CompletionProposal instance is created for each candidate pair of strings. Finally, the computeCompletionProposals method returns all the completion proposals in an array.
The getCompletionProposalAutoActivationCharacters method returns all characters that, when entered by the user, should automatically trigger the presentation of possible completions. In our case, only the tag opening character < is used with auto activation characters.
Now you can try out the content assistant feature in the JNLP editor.
Running the Editor
You have completed the JNLP editor. Now you are going to deploy it as an Eclipse plug-in. Here is the main plug-in class:
 public class JNLPEditorPlugin extends AbstractUIPlugin {
 //The shared instance.
 private static JNLPEditorPlugin plugin;
 //Resource bundle.
 private ResourceBundle resourceBundle;

 /**
 * The constructor.
 */
 public JNLPEditorPlugin(IPluginDescriptor descriptor) {
 super(descriptor);
 plugin = this;
 try {
 resourceBundle= ResourceBundle.getBundle(
 "com.asprise.books.javaui.ch20.JNLPEditorPluginResources");
 } catch (MissingResourceException x) {
 x.printStackTrace();
 resourceBundle = null;
 }
 }

 /**
 * Returns the shared instance.
 */
 public static JNLPEditorPlugin getDefault() {
 return plugin;
 }

 /**
 * Returns the workspace instance.
 */
 public static IWorkspace getWorkspace() {
 return ResourcesPlugin.getWorkspace();
 }

 /**
 * Returns the string from the plugin's
 * or 'key' if not found.
 */
 public static String getResourceString(String key) {
 ResourceBundle bundle= JNLPEditorPlugin.getDefault().getResourceBundle();
 try {
 return (bundle!=null ? bundle.getString(key) : key);
 } catch (MissingResourceException e) {
 return key;
 }
 }

 /**

 * Returns the plugin's resource bundle,
 */
 public ResourceBundle getResourceBundle() {
 return resourceBundle;
 }
 }
Here is the code for the plug-in descriptor:
By copying the plug-in descriptor and binary code to the appropriate plug-in directory of the Eclipse IDE, you are ready to run the editor. You can double-click a JNLP file from the resource explorer to invoke the JNLP editor.
The editor runs well within Eclipse workbench. What about running the editor in stand-alone mode? Unfortunately, the TextEditor class (directly or indirectly) makes reference to other classes of Eclipse workbench. However, you can spend some time modifying the source code and removing the dependency on Eclipse workbench.
Summary
The JFace text framework is very powerful and complex. This chapter introduced you to essential concepts regarding JFace text, such as document partitioning, presentation damager and repairer, and so forth. The sample JNLP editor project walked you through the process of creating a custom text editor. You learned to create a basic editor, add syntax highlighting, and provide a content assistant. In the next chapter, you learn about another UI framework called Eclipse Forms, which enables you to create flat, web-like user interfaces.
Chapter 21 Eclipse Forms
Part I - Fundamentals
- Overview of Java UI Toolkits and SWT/JFace
- SWT/JFace Mechanisms
- Jump Start with SWT/JFace
- SWT Event Handling, Threading, and Displays
- Basic SWT Widgets
- Layouts
Part II - Design Basics
Part III - Dynamic Controls
- Scales, Sliders, and Progress Bars
- Other Important SWT Components
- SWT Graphics and Image Handling
- Drag and Drop and the Clipboard
- Printing
- JFace Windows and Dialogs
Part IV - Application Development
EAN: 2147483647
Pages: 147
