Introducing the Quartz Web Application
The early developers of the Quartz framework realized that a GUI would be necessary for a certain group of users. Several years ago, a Web application was created that could be used to manage the Quartz framework. There has been quite a bit of development over the years, but, arguably, it has been sporadic.
Lately there has been an increased call for the application to be updated and supported, and it's starting to draw new developers who are willing to work on it and keep it up-to-date. The application is known as the Quartz Web application.
Screenshots of the Quartz Web Application
The upper-left side of the main screen in the Quartz Web application presents a list of features that are available (see Figure 13.4).
Figure 13.4. The main screen of the Quartz Web application

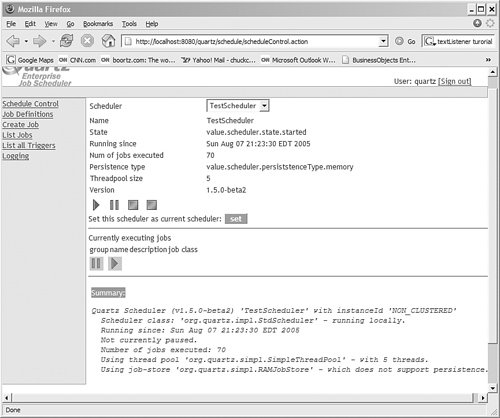
Figure 13.5 shows the Scheduler Control screen, which enables you to start, stop, and pause the Scheduler.
Figure 13.5. The Scheduler Control screen contains Scheduler-management features.
Downloading and Building the Quartz Web Application
The Quartz Web application is part of the Quartz source repository on OpenSymphony. It used to be housed on SourceForge, but it has recently moved over to its new home. The old site was located at http://sourceforge.net/projects/quartz; the new site (including the Quartz Web application) can be found at www.opensymphony.com/quartz/cvs.action.
Currently, there is no binary release of the Web application, and the standard Quartz download does not include the Web application, although the maintainers of the application have said they will have a build set up early 2006. For now, you need to download the Quartz source tree and build the Web application using the Ant build file located in the quartz/webapp directory.
To download Quartz from CVS, you need an account on the java.net site because anonymous access is not permitted. From a command line where you want to download the source tree to, type this:
cvs -d :pserver:[username]@cvs.dev.java.net:/cvs login
cvs -d :pserver:[username]@cvs.dev.java.net:/cvs checkout quartz
cvs -d :pserver:[username]@cvs.dev.java.net:/cvs checkout opensymphony
After you have downloaded the Quartz and OpenSymphony source, you can build Quartz from the quartz directory, but you also can build the Web application from the webapp directory underneath quartz. Change directories to webapp and type ant.
Installing the Quartz Web Application
When you have successfully built the Web application, there should be a quartz.war file created in the webapp/dist directory. Deploy this Web Archive (WAR) file into a container of your choice.
Configuring and Running the Quartz Web Application
Now that the WAR file is deployed, fire it up in your Web browser. For Tomcat, the default URL is http://localhost:8080/quartz/. From the home page, you have options to manage the Scheduler, jobs, triggers, and logging.
All the menu options on the home page are secured. A new security filter was added in the latest release to mimic container-managed security. This means that you can call HttpServletRequest.getRemoteUser() and HttpRequest.isUserInRole() just like you can with container-managed security. Users are defined in the SecurityFilter-config.xml file. By default, it contains one user, quartz, with the password quartz. You can add your users to the SecurityFilter-config.xml file or simply extend org.securityfilter.realm.SecurityRealmInterface to provide a Security Realm to suit your needs.
Start by selecting the Scheduler Control menu item and, when prompted, sign in as user quartz. A test Scheduler is preconfigured with the Quartz Web application, and it is your only choice on this page. Take a look inside quartzwebappconfig esources to see how the Scheduler is configured. There you'll find the now familiar quartz.properties file. The name in the dropdown list on the Scheduler Controller page is the org.quartz.scheduler.instanceName property from quartz.properties.
Click the Job Definitions menu next. There you see three jobs: NativeJob, NoJob, and SendMailJob. If you looked around in the webappconfig esources folder, you've already guessed where jobs are defined: JobDefinitions.xml. This is loaded by the ContextLoaderServlet when the Quartz Web application starts. You can edit the JobDefinitions.xml file or provide your own job-definition files by changing the ContextLoaderServlet in the web.xml file.
If you're ready to run a job, you can select the Create link to the left of NativeJob on the Job Definitions page. You want to pick a native application that makes it very plain to see that your job has run. If you are on the Windows platform, you can use Notepad.exe. Start by giving the job a namepossibly Native Job Test. The name must be unique within the Scheduler. Next, type notepad in the command parameter and click Save. You should now see the Job Detail properties you just created.
Click the List Jobs menu item to see all the JobDetails on the Scheduler. Click the Execute link to the left of your JobDetail. A Notepad window pops opennot very practical, but you can imagine the possibilities. Have you been wondering as you read this book how you could leverage Quartz for non-Java jobs? Now you have your answer.
Now would be a good time to explore the Logging menu. Click Logging and scroll to the bottom of the listing. There you will find an entry for the job you just executed, along with other activity that has been occurring since you started your Scheduler.
Clicking the List all Triggers menu option shows you triggers that the Job Initializer loaded. Notice that there is no option to add a trigger from the Quartz Web application. Triggers must be declared within the job.xml files, which are also in the resources folder. The list of job.xml files is declared in the Job Initializer section of the quartz.properties file.
That's all there is to the Quartz Web application. All that is left to do is add your own jobs and triggers.
Scheduling in the Enterprise
- What Is Job Scheduling?
- Why job Scheduling Is Important
- Uses for Job Schedulers in the Enterprise
- Uses for Job Schedulers in NonEnterprise
- Job scheduling Versus Workflow
- What about Alternative Solutions?
Getting Started with Quartz
- Getting Started with Quartz
- History of the Quartz Framework
- Downloading and Installing Quartz
- Building Quartz from Source
- Getting Help from the Quartz Community
- Whos Using Quartz?
Hello, Quartz
- Hello, Quartz
- The Hello, World Quartz Project
- Scheduling the Quartz ScanDirectoryJob
- Scheduling a Quartz Job Declaratively
- Packaging the Quartz Application
Scheduling Jobs
- Scheduling Jobs
- The Quartz Scheduler
- The Quartz SchedulerFactory
- Managing the Scheduler
- Managing Jobs
- Volatility, Durability, and Recoverability
- Quick Java Thread Overview
- Thread Usage in Quartz
- Understanding Quartz Triggers
Cron Triggers and More
- Cron Triggers and More
- Quick Lesson in Cron
- Using the Quartz CronTrigger
- The Cron Expression Format
- Using Start and End Dates with CronTrigger
- Using TriggerUtils with the CronTrigger
- Using CronTriggers in the JobInitializationPlugin
- Cron Expressions Cookbook
- Creating a Fire-Now Trigger
JobStores and Persistence
- JobStores and Persistence
- Job Storage
- Job Storage in Quartz
- Using Memory to Store Scheduler Information
- Using Persistent JobStores
- Using the Database for Job Storage
- Creating the Quartz Database Structure
- Using JobStoreTX
- Configuring a DataSource for JobStoreTX
- Running Quartz with JobStoreTX
- Using Memory to Store Scheduler Information
- Using the JobStoreCMT
- Configuring Datasources for JobStoreCMT
- Improving Performance with Persistent JobStores
- Creating New JobStores
Implementing Quartz Listeners
- Implementing Quartz Listeners
- Listeners as Extension Points
- Implementing a Listener
- Listening for Job Events
- Listening for Trigger Events
- Listening for Scheduler Events
- Using the FileScanListener
- Implementing Listeners in the quartz_jobs.xml File
- Thread Use in Listeners
- Uses of the Quartz Listeners
Using Quartz Plug-Ins
- Using Quartz Plug-Ins
- What Is a Plug-In?
- Creating a Quartz Plug-In
- Registering Your Plug-Ins
- Using Multiple Plug-Ins
- Quartz Utility Plug-Ins
Using Quartz Remotely
- Using Quartz Remotely
- Why RMI with Quartz?
- Brief Overview of Java RMI
- Requirements of RMI
- Creating a Quartz RMI Server
- Using the RMI Registry
- Creating the RMI Client
- Testing the RMI Server and Client
Using Quartz with J2EE
- Using Quartz with J2EE
- If I Have J2EE, Why Do I Need Quartz?
- Using the J2EE Containers DataSource
- Using Other J2EE Resources
- The EJB 2.1 Specification: Finally Some Light
Clustering Quartz
- Clustering Quartz
- What Does Clustering Mean to Quartz?
- How Clustering Works in Quartz
- Configuring Quartz to Use Clustering
- Running the Quartz Cluster Nodes
- Quartz Clustering Cookbook
Quartz Cookbook
Quartz and Web Applications
- Quartz and Web Applications
- Using Quartz Within a Web Application
- Integrating Quartz
- Using Quartz with the Struts Framework
- The QuartzInitializerServlet to the Rescue
- Using a ServletContextListener
- Introducing the Quartz Web Application
Using Quartz with Workflow
- Using Quartz with Workflow
- What Is Workflow?
- Job Chaining in Quartz
- Quick Introduction to OSWorkflow
- Integration of Quartz with OSWorkflow
- Creating a Workflow Job
- Conclusion
Appendix A. Quartz Configuration Reference
- Appendix A. Quartz Configuration Reference
- The Main Quartz Properties
- Configuring the Quartz ThreadPool
- Configuring Quartz Listeners
- Configuring a TriggerListener
- Configuring Quartz Plug-Ins
- Configuring Quartz RMI Settings
- Configuring JobStore Settings
- Configuring the JobStoreTX JobStore
- Configuring JobStoreCMT
- Configuring Quartz Datasources
- Configuring a Datasource Using a Custom ConnectionProvider
EAN: 2147483647
Pages: 148
