Understanding and Optimizing Keylight
If you're working on your own shot using this methodology, your composite is now either looking pretty good or has at least one obvious problem. If you think it's looking good, focus in on a few details, and note if there are any problems with the following in your full motion preview:
- Hair detail: Are all of the "wispies" coming through?
- Motion blur or, in unusual cases with a defocus, lens blur: Do blurred objects appear chunky or noisy, or do they thin out and partially disappear?
- Screen contamination areas: Do holes remain in the foreground?
- Shadows: Are they keying as desired (typically either all there or all gone)?
Tip
Version 7.0 allows you to switch the viewer containing your RAM Preview to the Alpha Channel view (Alt+4/Option+4) without blowing the cache. Not only that, but the alpha will preview at speed, in full motion.
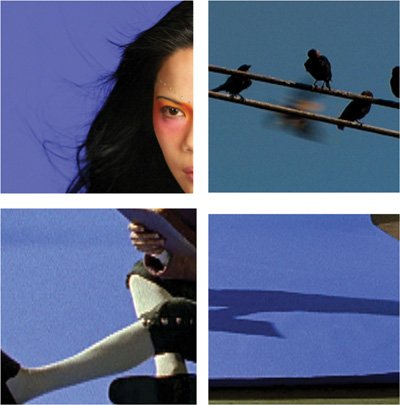
You are, of course, free to find niggling problems of your own and share them with your friends (Figures 6.23a through d).
Figures 6.23a through d. Fun challenges you may encounter when pulling a color key include wispy hair (a), motion blur (b), contamination of foreground elements by the background color (c), and shadows (d).
Alternatively, you may discover something fundamentally wrong with your matte, including
- Ill-defined foreground/background separation or semi-transparency throughout the foreground or background
- Crunchy, chewy, or sizzling edges (these terms are common at The Orphanage; feel free to invent your own)
- Other noise in the matte
- Edge fringing or an overly choked matte
- Errors in the spill suppression
Keylight anticipates these issues, offering specific tools and techniques to address them. Before delving into those (in the "Focusing In" section), take a look under the hood at how Keylight actually works.
The Inner Workings of Keylight
A few decisions are "key" in Keylight, and most of the other controls compensate for how effectively you made those few decisions. This section offers a glimpse into the inner workings of Keylight, which will greatly aid your intuition when pulling a matte.
The core of Keylight involves generating the screen matte, and as has been mentioned, the most essential step is the choice of screen color. From that, Keylight makes weighted comparisons between its saturation and hue and that of each pixel, as detailed in Table 6.1.
|
COMPARED TO SCREEN COLOR, PIXEL IS |
KEYLIGHT WILL |
|---|---|
|
Of a different hue |
Consider it foreground, make it opaque |
|
Of a similar hue and more saturated |
Key it out completely, making it transparent |
|
Of a similar hue, but less saturated |
Subtract a mathematically weighted amount of the screen color and make it semitransparent |
Close-Up: Screen Gain Versus Clip Black
These two controls seem to have a redundant effect; each makes the background more transparent. In many cases you can derive the same result from both. How do you know which one to use?
Screen Strength
- Is part of the basic screen matte calculation and adds no processing load
- Is not affected by edge rollback
- Does not trigger color replacement as the matte is made more or less transparent
Clip Black
- Is a post process requiring extra time and memory
- Is affected by edge rollback
- Triggers color replacement as the matte is made more or less transparent (generating the green pixels in Status view, as in Figure 6.21)
So although it is not crucial to choose one of these over the other at any given time, understanding the differences can certainly help you along.
The lesson contained in Table 6.1 is that a healthy background color is of a reasonably high saturation level and of a distinct hue.
Those sound like vague criteria, not easily metand it's true, they are somewhat vague, and often not met. That's why Keylight adds the Screen Gain, Screen Balance, and Despill and Alpha Bias controls. Screen Gain emphasizes the saturation of the background pixels, and Screen Balance delineates the background hue from the other primary colors. The Bias controls color-correct the foreground.
Screen Gain
One major enemy of a successful color key is muddy, desaturated colors in the background. A clear symptom that the background lacks sufficient intensity is when areas of the background are of a consistent hue, yet fail to key easily. Similarly, a clear symptom that your foreground is contaminated with reflected color from the background is that it appears semi-opaque. In either case, Screen Gain becomes useful.
Notes
These top five controls (from Screen Colour to Alpha Bias) differ from those below them in that they work on the color comparison process itself, rather than the resulting matte. You can adjust them without adding any processing load whatsoever, and they work together to yield the ideal matte; the rest of the controls merely correct the result.
Screen Gain boosts or reduces the saturation of each pixel before comparing it to the screen color. This effectively brings more desaturated background pixels into the keying range if raised or, if lowered, knocks back pixels in the foreground containing the background color.
Screen Balance
That takes care of saturation, but what about hue (the actual green-ness or blue-ness of the background and foreground) how pure is it? Keylight is designed to expect one of the three RGB color values to be far more prevalent than the other two in order to do its basic job. It is even more effective, however, if it knows whether one of the two remaining colors is more prevalent, and which one.
Notes
A Rosco Ultimatte Blue screen contains quite a bit of greenmuch more than red, unless someone has lit it wrong. Ultimatte Green screens, meanwhile, are nearly pure green (Figure 6.24).
Figure 6.24. The Rosco colors: Ultimatte Blue, Ultimatte Green, and Ultimatte Super Blue. The blue colors are not pure blue: Blue is double the amount of green, which in turn is double the amount of red. Ultimatte Green is more pure, with only a quarter the amount of red and no blue whatsoever. Lighting can change their hue (as does converting them for print in this book).

Screen Balance allows you to alert Keylight to this fact.
On this theory, you would employ a balance of 95% with blue screens and leave it at 50% for green screens, and in version 1.1v1 of Keylight, that is exactly how the plug-in sets Screen Balance depending on whether you choose a blue or green Screen Colour setting.
The more generalized recommendation from The Foundry, however, is to set it "near 0, near 100, and compare" these to the default setting of 50 to evaluate which one works best. In other words, imagine there are three settings (instead of 100) and try 5%, 50%, and 95%.
Bias
The Bias settings, Despill Bias and Alpha Bias, color correct the image in the process of keying, by scaling the primary color component up or down (enhancing or reducing its difference from the other two components).
As mentioned, a couple of things have changed with these settings in this new version. They are no longer tied together by default, and The Foundry recommends that in most cases you leave Alpha Bias at the default. They also both now operate via eyedroppers rather than value sliders, and it is recommended that you click the Despill Bias eyedropper on a well-lit skin tone that you wish to preserve; despill pivots around this value.
Tip
I have found, to my dismay, that keyed footage can become significantly granier as the result of adjusting Despill Bias. It is highly recommended that you compare before and after versions of foreground plate footage if you use this feature, and if the result is adding grainy noise to your footage, reset Despill Bias and try a different despill method (see "Spill Suppression").
Focusing In: Clean-Up Tools
Once you are satisfied that you have as good an edge matte as possible, you are ready to zoom in on a detail area and work on solving specific problems.
If you see an area that looks like a candidate for refinement, save (so that you can revert to this as your ultimate undo point), zoom in, and create a region of interest around the area in question.
Tip
Remember that with a scroll wheel on your mouse, you can hold down Alt/Option to zoom around the point where you place the cursor.
Now take a look at some common problems you might encounter and the tools built into Keylight to solve them.
Holes and Edges
The double-matte method (core and edge) shortcuts a lot of the tug of war that otherwise exists between a solid foreground and subtle edges. Even with this advantage, both mattes may require adjustments to the Clip White or Clip Black controls.
Tip
Increment and save your project after creating a good basic matte, should you wish to revert after further changes.
The game is to keep the largest possible difference (or delta, if you prefer) between these two settings. The closer the two numbers approach one another, the closer you are to a bitmap alpha channel, in which each pixel is pure black or whitea very bad thing indeed (Figure 6.25). The delta between the Clip values represents the area where all of your gray, semi-transparent alpha pixels live, so the goal is to offer them as much real estate as possible.
Figure 6.25. Here's how her hair would look if you hadn't separated an edge matte for the hair. This is the very definition of a "chewy" matteyou can see individual, contrasty pixels.

If you push the Clip controls too far and need a way out of that corner without starting over, raise the Clip Rollback value. This control restores detail only to the edge, and only what was there in the original matte operation (with those top five controls). Used in moderation, and with a close eye on the result, it can be effective.
Clip Rollback works as follows: Its value is the number of pixels from the edge that are rolled back. The edge pixels reference the original, unclipped screen matte. So if your edges were looking nice and soft on the first pass and removing noise from the matte hardened them, this tool can restore the subtlety.
Noise Suppression
Are your mattes sizzling? Keylight includes a Screen Pre-blur option that you should apply only in a zoomed-in view (to closely examine the result) and only with footage that has a clearly evident noise problem, such as source shot on miniDV. Essentially, this option blurs your source footage before keying it, so it adds inaccuracy and is something of a desperation move. The footage itself does not appear blurred, but the matte does.
A better alternative for a fundamentally sound matte is Screen Softness, found under the Screen Matte controls. Screen Softness blurs the matte itself after the key has been pulled and the matte created, so it has a much better chance of retaining detail. As was shown in Chapter 3, edges in nature are always slightly soft; so used to a modest degree (considering that it is introducing error into your key), this control can enhance the realism of a matte (Figures 6.26a and b).
Figures 6.26a and b. The softer hair matte and the harder matte around the torso don't line up, and the torso has an unrealistically hard border (a). Adding Screen Softness and a positive Shrink/Grow adjustment can fix this (b).
Close-Up: Chroma Sampling: The 411 on 4:1:1
Most digital video images aren't stored as RGB but Y'CrCb, the digital equivalent of YUV. Y' is the luminance or brightness signal; Cr and Cb are color-difference signals (roughly corresponding to red-cyan and blue-yellow).
The human eye is much better at noticing compression in contrast than in color, a fact compressed digital formats take advantage of by saving fewer chroma samples per line than luma samples. With a 4:2:2 format (employed by DigiBeta and DVCPro50), chroma has half the horizontal resolution of luma; one color pixel for every two brightness pixels. With 4:1:1 (the NTSC DV and PAL DVCPro ratio) the compression is even more drastic: One color pixel spans four brightness pixels.
Unfortunately, as you might imagine, this type of compression is less than ideal for color keying; hence the recommended approach here for softening the effect of color quantization particularly in common formats such as miniDV.
A more drastic approach, when softening and blurring cannot reach larger chunks in the footage, is using the Despot cleanup tools. Crank these up, and you'll definitely notice undesirable blobbiness in your matte. For this reason, I don't trust these controls and usually leave them alone.
A better approach, particularly with miniDV and HDV footage (which, by the way, are both guaranteed to add undesirable noise and are typically not recommended for blue-screen and green-screen shoots), is to
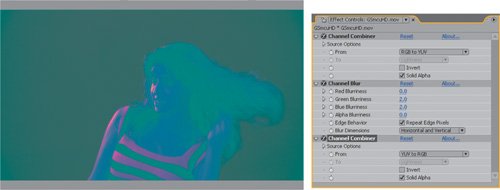
- Convert the footage to YUV using Channel Combiner (the From pull-down). This will make your clip look very strange, because your monitor displays images as RGB. Do not be alarmed (Figure 6.27).
Figures 6.27. This is how an image converted to YUV should look; the monitor was not partially unplugged. Your monitor displays RGB, but those three channels can be set to YUV, just as your alphabet can create other languages. The round-trip around a Channel Blur appears in the Effect controls (but the second Channel Combiner effect is temporarily disabled, hence the strange look).
- Apply Channel Blur to the green and blue channels only, at modest amounts (to gauge this, examine each channel as you workpress Alt+2/Option+2 or Alt+3/Option+3 while zoomed in on a noisy area). Make sure Repeat Edge Pixels is checked.
- Round-trip back from YUV to RGB, using a second instance of Channel Combiner.
- Apply Keylight, and breathe a sigh of relief.
Notes
YUV is the digital version of the broadcast video color space. It is used in component PAL television and is functionally similar to YIQ, the NTSC variant. In After Effects YUV, the red channel displays the luminance value (Y) of the shot, while the green and blue channels display blue and red weighed against green (U and V).
Fringing and Choking
Sometimes, despite all best efforts, your extracted matte contains extra, unwanted edge pixels (fringing), or the keyed subject lacks subtle edge detail because the matte is choked too far.
Keylight does offer the Screen Grow/Shrink control for such situations. On the other hand, if you find yourself having to shrink or expand your matte, it may be a symptom of other problems. Faced with the need to choke or spread a matte (another way of saying shrink or grow), you might first go back and try the initial key again, possibly breaking it down further into more component parts (say, separating the hair) using holdout masks. More information on choking and spreading follows below.
Spill Suppression
Keylight suppresses color spill (foreground pixels contaminated by reflected color from the background) when the matte is initially pulled, as part of the keying operation. Thus spill-kill can be practically automatic if you pull a good initial key.
When is this not what you want? First of all, when it's an unwanted by-product. There are situations when parts of the foreground that you want to keep are close enough in color range to the background that their color is suppressed. Figure 6.28 shows a scene shot with a green screen out the window in which the interior of the set is also meant to be of a greenish cast, all of which was carefully decided and lit on set.
Figure 6.28. A green-lit set with a green screen out the window: Things like this happen all the time. Applying the matte to the plate with spill suppression limited to areas (such as the top of the monitor) that are reflecting the green screen solves this problem.

Adjustments to the matte can also expose areas of the clip that aren't spill suppressed. These areas are indicated by the green pixels in the Status view (as in Figure 6.21); spill suppression of these pixels may now be off. In such cases, you specify a Replace Method setting; Soft Colour set to medium gray is a good choice if the only affected pixels are at the edge. It is a cheat, but it may make your key look better by gently desaturating pixels that might otherwise pop.
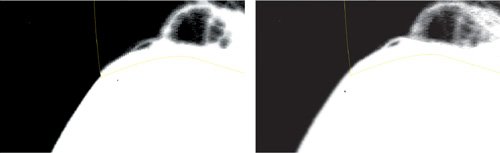
Finally, spill suppression can lead to other undesirable effects on plate footage. In Figure 6.29, notice how the whole shape of the girl's face seems to change due to the removal of highlights via spill suppression. Even worse, as mentioned earlier, something about the spill suppression operation in Keylight also seems to enhance the graininess of footage in many cases.
Figures 6.29. Her face doesn't even look the same without the highlights reflected with the green. Even worse, at this magnification it's easy to see that the amount of grain noise has increased significantly. This is a definite case for pulling the matte on one pass and applying spill suppression separately.

Should Keylight's spill suppression become unwieldy or otherwise useless for any of the above reasons, there is an easy out. Create a nice matte without worrying about spill, precompose the result, and apply it as an alpha matte to the foreground source. Color spill can be removed on a separate pass without adversely affecting the plate footage.
Keylight itself also includes additional spill suppression tools, under the Edge Colour Correction heading (as well as the overall Foreground Colour Correction). Beneath each is a check box to enable it, but nothing changes until you adjust Saturation, Contrast, or Brightness below the check box (or, alternatively, the Colour Suppression and Colour Balancing tools). If necessary, soften or grow the edge to increase the area of influence.
Tip
You can use Keylight for spill suppression only. Follow the same steps as you would to key the footage, but do not adjust any controls below Despill Bias. Change the View setting to Corrected Source; the footage is keyed but the alpha channel remains unaffected.
Fixing Typical Problems |
Section I. Working Foundations
The 7.0 Workflow
- The 7.0 Workflow
- Workspaces and Panels
- Making the Most of the UI
- Settings: Project, Footage, Composition
- Previews and OpenGL
- Effects & Presets
- Output: The Render Queue
- Study a Shot like an Effects Artist
The Timeline
- The Timeline
- Organization
- Animation Methods
- Keyframes and The Graph Editor
- Uber-mastery
- Transform Offsets
- Motion Blur
- Manipulating Time Itself
- In Conclusion
Selections: The Key to Compositing
- Selections: The Key to Compositing
- The Many Ways to Create Selections
- Compositing: Science and Nature
- Alpha Channels and Premultiplication
- Masks
- Combining Multiple Masks
- Putting Masks in Motion
- Blending Modes: The Real Deal
- Track Mattes
Optimizing Your Projects
- Optimizing Your Projects
- Navigating Multiple Compositions
- Precomposing and Nesting
- Adjustment and Guide Layers
- Understanding Rendering Order
- Optimizing After Effects
- Onward to Effects
Section II. Effects Compositing Essentials
Color Correction
Color Keying
- Color Keying
- Good Habits and Best Practices
- Linear Keyers and Hi-Con Mattes
- Blue-Screen and Green-Screen Keying
- Understanding and Optimizing Keylight
- Fixing Typical Problems
- Conclusion
Rotoscoping and Paint
- Rotoscoping and Paint
- Articulated Mattes
- Working Around Limitations
- Morphing
- Paint and Cloning
- Conclusion
Effective Motion Tracking
- Effective Motion Tracking
- The Essentials
- Optimizing Tracking Using 3D
- Extending a Track with Expressions
- Tracking for Rotoscoping
- Using 3D Tracking Data
- Conclusion
Virtual Cinematography
- Virtual Cinematography
- 5D: Pick Up the Camera
- Storytelling and the Camera
- Camera Blur
- The Role of Grain
- Film and Video Looks
- Conclusion
Expressions
- Expressions
- Logic and Grammar
- Muting Keyframes
- Linking Animation Data
- Looping Animations
- Smoothing and Destabilizing
- Offsetting Layers and Time
- Conditionals and Triggers
- Tell Me More
Film, HDR, and 32 Bit Compositing
- Film, HDR, and 32 Bit Compositing
- Details
- Film 101
- Dynamic Range
- Cineon Log Space
- Video Gamma Space
- Battle of the Color Spaces
- Floating Point
- 32 Bits per Channel
- Conclusion
Section III. Creative Explorations
Working with Light
- Working with Light
- Light Source and Direction
- Creating a Look with Color
- Backlighting, Flares, Light Volume
- Shadows and Reflected Light
- HDR Lighting
- Conclusion
Climate: Air, Water, Smoke, Clouds
- Climate: Air, Water, Smoke, Clouds
- Particulate Matter
- Sky Replacement
- The Fog, Smoke, or Mist Rolls In
- Billowing Smoke
- Wind
- Water
- Conclusion
Pyrotechnics: Fire, Explosions, Energy Phenomena
- Pyrotechnics: Fire, Explosions, Energy Phenomena
- Firearms
- Sci-Fi Weaponry
- Heat Distortion
- Fire
- Explosions
- In a Blaze of Glory
Learning to See
Index
EAN: 2147483647
Pages: 157
