Adjustment and Guide Layers
As you may already know, versions 6.0 and 6.5 of After Effects introduced two new layer formsadjustment layers and guide layersthat are easy to use and seem simple enough on the surface. Each has vitally useful applications, however, that might not be immediately apparent.
Close-Up: Maladjusted
There are only a couple of major gotchas to watch out for with adjustment layers. Always keep in mind that their timing and Transform properties still apply.
In other words, make sure that your adjustment layer starts at the first frame of the comp and extends to the last frame of the comp (or the start and end frames of the portion for which you need it), otherwise its effects will pop on and off unexpectedly. And if you set any transforms to the adjustment layer, make sure they are intentional, as the boundaries of these layers are still respected in the rendering process. Finally, if you enlarge a composition you will probably have to resize any adjustment layers as well.
Adjustment Layers
Any layer in your Timeline can become an adjustment layer. An adjustment layer is itself invisible, but the effects applied to it affect all layers below it in the stack; it behaves just like an effect filter node in a node-based compositor such as Shake. This elegant, profound feature is too often overlooked, perhaps because it is fundamentally so simple, yet it has many uses.
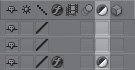
To convert a layer to an adjustment layer, toggle the feature in the Switches column (Figure 4.9). The more typical approach, however, is to create a new layer specified as an adjustment layer from the get-go. Context-click in an empty area of the Timeline, and choose New > Adjustment Layer (or do the same from the Layer menu).
Figure 4.9. You can convert any layer, except a camera, to an adjustment layer by toggling this switch. Creating a new adjustment layer simply creates a white solid the size of the comp with this switch toggled on.
That's easy enough (although, alas, it has no keyboard shortcut). So what's so cool? What can you do with adjustment layers that you can't with normal effects?
For one thing, you can effectively dial back any effect in an adjustment layer using Opacity. An effective quick fix, this is the equivalent of a dissolve operation in a node-based compositing application. Most effects do not include the ability to be dialed back, even though it makes perfect sense to do so in many cases. Colorize your scene using Hue/Saturation, and the supervisor says, "Dial it back 50%." Set the adjustment layer's Opacity to 50%, or even dial it up and down before the supe's very eyes. Impressive.
Notes
Effects that work specifically with the alpha channel have no effect on adjustment layers. This is consistent with the general principle that an adjustment layer contains effects that change layers below the adjustment layer only, rendering no image data of its own.
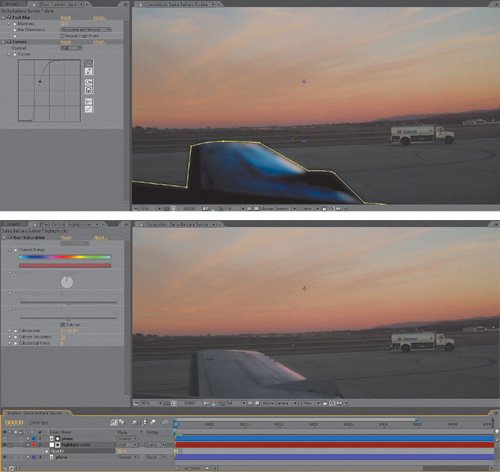
You can also add mattes or masks to adjustment layers, delineating specific holdout areas for effects. This avoids precomposing in situations where it is undesirable. Instead, a track matte layer containing the necessary transparency information will do; the adjusted layers themselves can even serve as the track matte (Figures 4.10a and b).
Figures 4.10a and b. The highlights on the wing of the plane have been bloomed warmer by first creating a luma matte that isolates only them (a). This is then applied as a Luma Track Matte to an adjustment layer containing a colorization effect that makes the highlight areas rosy; this is then dialed back using the Opacity control of the adjustment layer (b).
Guide Layers
Like adjustment layers, guide layers are normal layers that behave differently when toggled on. In this case, a guide layer appears in the current composition but disappears in any subsequent compositions into which it is nested, nor does it render by default. Its visibility setting is not a worry if you want it never to appear in your output.
This feature is useful when you add anything to help your compositing process that you would never want to see in the final render. Examples include custom backgrounds that make it easy to judge edge detail or adjustment layers that "slam" the levels of the composition to see if its layers still match (more on that in Section II).
Tip
There are lots of creative uses of guide layers. Is there something you always forget to do before rendering? Add a text layer with a big note to yourself in the Render Comp and make it a guide layer. Another great usage for guide layers is with intermediate view LUT's, which are discussed beginning in Chapter 11, "Film, HDR, and 32 Bit Compositing."
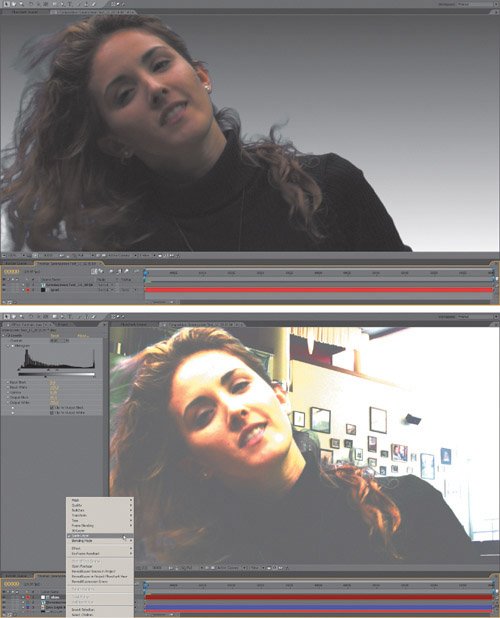
You can toggle any type of layer into a guide layer either by context-clicking it or by choosing Guide Layer from the Layer menu. Within the current comp, you'll notice no difference (Figures 4.11a and b). You can still apply effects to this layer or have other layers refer to it, and it is fully visible. Nest this composition in another composition, however, and the guide layer disappears.
Figures 4.11a and b. Shown are a couple of effective uses for guide layers: displaying a matted element against an gradient, without worrying that the gradient will show up when the element is used (a), and in combination with an adjustment layer to "slam" a composition (b), revealing flaws in the matte edges, whether the blacks match, and so on.
Notes
If you decide you want guide layers to appear at render time, there is a toggle to do so in Render Settings. This does, of course, sort of defeat the whole purpose, but at least the option exists.
Understanding Rendering Order |
Section I. Working Foundations
The 7.0 Workflow
- The 7.0 Workflow
- Workspaces and Panels
- Making the Most of the UI
- Settings: Project, Footage, Composition
- Previews and OpenGL
- Effects & Presets
- Output: The Render Queue
- Study a Shot like an Effects Artist
The Timeline
- The Timeline
- Organization
- Animation Methods
- Keyframes and The Graph Editor
- Uber-mastery
- Transform Offsets
- Motion Blur
- Manipulating Time Itself
- In Conclusion
Selections: The Key to Compositing
- Selections: The Key to Compositing
- The Many Ways to Create Selections
- Compositing: Science and Nature
- Alpha Channels and Premultiplication
- Masks
- Combining Multiple Masks
- Putting Masks in Motion
- Blending Modes: The Real Deal
- Track Mattes
Optimizing Your Projects
- Optimizing Your Projects
- Navigating Multiple Compositions
- Precomposing and Nesting
- Adjustment and Guide Layers
- Understanding Rendering Order
- Optimizing After Effects
- Onward to Effects
Section II. Effects Compositing Essentials
Color Correction
Color Keying
- Color Keying
- Good Habits and Best Practices
- Linear Keyers and Hi-Con Mattes
- Blue-Screen and Green-Screen Keying
- Understanding and Optimizing Keylight
- Fixing Typical Problems
- Conclusion
Rotoscoping and Paint
- Rotoscoping and Paint
- Articulated Mattes
- Working Around Limitations
- Morphing
- Paint and Cloning
- Conclusion
Effective Motion Tracking
- Effective Motion Tracking
- The Essentials
- Optimizing Tracking Using 3D
- Extending a Track with Expressions
- Tracking for Rotoscoping
- Using 3D Tracking Data
- Conclusion
Virtual Cinematography
- Virtual Cinematography
- 5D: Pick Up the Camera
- Storytelling and the Camera
- Camera Blur
- The Role of Grain
- Film and Video Looks
- Conclusion
Expressions
- Expressions
- Logic and Grammar
- Muting Keyframes
- Linking Animation Data
- Looping Animations
- Smoothing and Destabilizing
- Offsetting Layers and Time
- Conditionals and Triggers
- Tell Me More
Film, HDR, and 32 Bit Compositing
- Film, HDR, and 32 Bit Compositing
- Details
- Film 101
- Dynamic Range
- Cineon Log Space
- Video Gamma Space
- Battle of the Color Spaces
- Floating Point
- 32 Bits per Channel
- Conclusion
Section III. Creative Explorations
Working with Light
- Working with Light
- Light Source and Direction
- Creating a Look with Color
- Backlighting, Flares, Light Volume
- Shadows and Reflected Light
- HDR Lighting
- Conclusion
Climate: Air, Water, Smoke, Clouds
- Climate: Air, Water, Smoke, Clouds
- Particulate Matter
- Sky Replacement
- The Fog, Smoke, or Mist Rolls In
- Billowing Smoke
- Wind
- Water
- Conclusion
Pyrotechnics: Fire, Explosions, Energy Phenomena
- Pyrotechnics: Fire, Explosions, Energy Phenomena
- Firearms
- Sci-Fi Weaponry
- Heat Distortion
- Fire
- Explosions
- In a Blaze of Glory
Learning to See
Index
EAN: 2147483647
Pages: 157
