Combining Multiple Masks
By default, all masks are drawn in Add mode, meaning that the contents of the mask are added to the layer selection, and the area outside all of the masks is excluded. There are other options for combining them, however; the five primary mask modes are
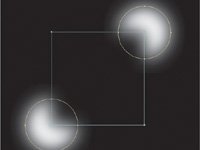
- Add: The default mode; adds the opacity values to the image as a whole, including masks higher in the stack (Figure 3.15)
Figure 3.15. In Add mode, the luminance values of the overlapping masks are combined, increasing the masked area.

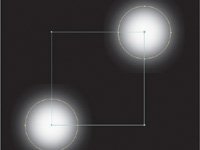
- Subtract: Subtracts opacity values from masks higher in the stack or from the image as a whole if no other masks precede it (Figure 3.16)
Figure 3.16. Subtract mode is the inverse of Add mode.
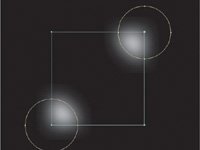
- Intersect: Combines only the areas of opacity that overlap with masks higher in the stack (Figure 3.17)
Figure 3.17. Intersect mode adds only the overlapping areas of opacity.
- Difference: Subtracts overlapping areas (Figure 3.18)
Figure 3.18. The inverse of Intersect, Difference mode subtracts overlapping areas.

- None: Has no effect on the image whatsoever; it can be useful as a placeholder or for effects that use masks (Figure 3.19)
Figure 3.19. With None mode, the mask is effectively deactivated.
Particularly when rotoscoping (masking an animated shape), it is very wise to take advantage of using multiple masks, for one simple reason: The more points you have to keep track of on a given frame, the more likely you'll have to add a keyframe and the more likely you'll lose track of a point. With multiple masks there is far more forgiveness for small errors, and fewer keyframes per mask are needed to complete the job. This topic is explored in greater detail in Chapter 7.
Close-Up: Bug Alert, or Not?
Does a bug still count as a bug if the development team knows about it and has decided to leave it as is to be backward-compatible? I'll let you be the judge. Say there's one part of an overlaid element that you want to mask and reduce to partial opacity, perhaps 50%.
You create a mask for the area to be dialed back, set it to Subtract, and set Mask Opacity to 50%. But instead of the anticipated result, displaying the layer at full opacity and the masked area at 50%, the masked area is subtracted 100% and the rest of the layer displays at 50% opacity!
This is the identical result to applying the same mask in Add mode with Invert checked, although in that case the behavior is at least anticipated.
The workaround is to add a mask at the top of the stack, set to Add mode, giving the mask the dimensions of the entire layer (double-click the Rectangular Mask tool). The Subtract mask will now operate as expected if its opacity is lowered from 100%.
Managing Density
"Density" is traditionally a film term describing how dark (opaque) the frame of film is at a given area of the image. It is therefore the inversion of opacity or alpha values; the higher the density, the less light is transmitted. In the digital world we sometimes speak of masks and alpha channels as having "density," and overlapping semi-transparent areas must be managed to avoid having the densities build up in undesirable ways.
When combining masks that have semi-transparent areas, either because the opacity of the masks is less than 100% or, as in the examples shown here, because the edges are heavily feathered, you may not want densities to have a linear relationship, building them up. That's when Lighten and Darken modes come into play.
Figures 3.20a and b show the result of using each of these modes; they prevent mask densities from building up the way that they do with the other modes. No pixel within the combined masks will have a value that is not already represented in one of the overlapping masks; either the lighter or the darker of the two will be represented.
Figures 3.20a and b. With a Lighten (a) or a Darken (b) mask, the transparency values are chosen either from the mask set to this mode or those overlapping it, depending on which has the lighter (higher) or darker (lower) values.

Keep these in mind when combining multiple feathered or semi-transparent masks. Remember that masks render from top to bottom, so each mask's mode applies to its relationship with the layers above it. Thus applying these modes to the top mask in the stack has no effect.
Managing Multiple Masks
A few features in After Effects exist specifically to help you manage multiple masks in a single layer.
One is Cycle Mask Colors, which is tucked away in the User Interface Colors section of Preferences. When Cycle Mask Colors is off, your masks are created in the same color (the mask itself and its swatch in the Timeline) each time. To change it, you click the swatch. With Cycle Mask Colors checked on, which I recommend, the mask colors vary on their own.
Also, when editing overlapping masks, you may find it helpful to use the context menu to lock and hide other masks. Context-click on the mask, and choose Lock Other Masks; now you can edit the active mask only. Context-click again, and choose Hide Locked Masks; this time your view is uncluttered as well.
Tip
Don't forget that you can name masks by highlighting them in the Timeline, pressing Return, and typing in a new name. Under Preferences > User Interface Colors, you can also check Cycle Mask Colors so that each new mask is created with a unique color.
Putting Masks in Motion |
Section I. Working Foundations
The 7.0 Workflow
- The 7.0 Workflow
- Workspaces and Panels
- Making the Most of the UI
- Settings: Project, Footage, Composition
- Previews and OpenGL
- Effects & Presets
- Output: The Render Queue
- Study a Shot like an Effects Artist
The Timeline
- The Timeline
- Organization
- Animation Methods
- Keyframes and The Graph Editor
- Uber-mastery
- Transform Offsets
- Motion Blur
- Manipulating Time Itself
- In Conclusion
Selections: The Key to Compositing
- Selections: The Key to Compositing
- The Many Ways to Create Selections
- Compositing: Science and Nature
- Alpha Channels and Premultiplication
- Masks
- Combining Multiple Masks
- Putting Masks in Motion
- Blending Modes: The Real Deal
- Track Mattes
Optimizing Your Projects
- Optimizing Your Projects
- Navigating Multiple Compositions
- Precomposing and Nesting
- Adjustment and Guide Layers
- Understanding Rendering Order
- Optimizing After Effects
- Onward to Effects
Section II. Effects Compositing Essentials
Color Correction
Color Keying
- Color Keying
- Good Habits and Best Practices
- Linear Keyers and Hi-Con Mattes
- Blue-Screen and Green-Screen Keying
- Understanding and Optimizing Keylight
- Fixing Typical Problems
- Conclusion
Rotoscoping and Paint
- Rotoscoping and Paint
- Articulated Mattes
- Working Around Limitations
- Morphing
- Paint and Cloning
- Conclusion
Effective Motion Tracking
- Effective Motion Tracking
- The Essentials
- Optimizing Tracking Using 3D
- Extending a Track with Expressions
- Tracking for Rotoscoping
- Using 3D Tracking Data
- Conclusion
Virtual Cinematography
- Virtual Cinematography
- 5D: Pick Up the Camera
- Storytelling and the Camera
- Camera Blur
- The Role of Grain
- Film and Video Looks
- Conclusion
Expressions
- Expressions
- Logic and Grammar
- Muting Keyframes
- Linking Animation Data
- Looping Animations
- Smoothing and Destabilizing
- Offsetting Layers and Time
- Conditionals and Triggers
- Tell Me More
Film, HDR, and 32 Bit Compositing
- Film, HDR, and 32 Bit Compositing
- Details
- Film 101
- Dynamic Range
- Cineon Log Space
- Video Gamma Space
- Battle of the Color Spaces
- Floating Point
- 32 Bits per Channel
- Conclusion
Section III. Creative Explorations
Working with Light
- Working with Light
- Light Source and Direction
- Creating a Look with Color
- Backlighting, Flares, Light Volume
- Shadows and Reflected Light
- HDR Lighting
- Conclusion
Climate: Air, Water, Smoke, Clouds
- Climate: Air, Water, Smoke, Clouds
- Particulate Matter
- Sky Replacement
- The Fog, Smoke, or Mist Rolls In
- Billowing Smoke
- Wind
- Water
- Conclusion
Pyrotechnics: Fire, Explosions, Energy Phenomena
- Pyrotechnics: Fire, Explosions, Energy Phenomena
- Firearms
- Sci-Fi Weaponry
- Heat Distortion
- Fire
- Explosions
- In a Blaze of Glory
Learning to See
Index
EAN: 2147483647
Pages: 157
