Manipulating Time Itself
After Effects has the advantage of being quite flexible when working with time. You can retime footage or mix and match speeds and timing. Because it's not always obvious how to handle situations in which source footage needs retiming, it's worth looking at the overall approach to time in After Effects and the ways in which timing can be edited, highlighting which are useful and for what situations.
Absolute (Not Relative) Time
Here's the key: Internally, After Effects measures time in absolute (not relative) terms, using seconds (rather than frames, whose timing changes according to how many there are per second). If time was measured using the total number of frames, or frames per second, changing the frame rate would pose a problem. Instead, at the very deepest level, After Effects doesn't care what the frame rate is, allowing you to fiddle with the rate as it counts out the seconds.
This means that you can change the frame rate of any comp on the fly, and the keyframes and other timing information will stay accurate relative to the counting of seconds. The timing will not appear to change although the frames play back at a faster (or slower) rate. The keyframes won't even be averaged to the nearest frame; they will rest between frames, if necessary, to hold their position relative to seconds (Figure 2.30).
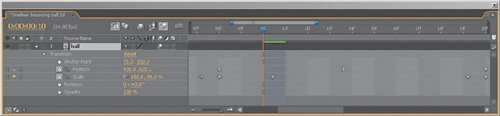
Figure 2.30. This composition has been changed from 29.97 fps to 24 fps. All frames following the first one now fall in between whole frames (visible as alternating light/dark stripes), and After Effects averages the data accordingly.
The same methodology applies to footage (or a composition) whose frame rate does not match that of the main composition; After Effects simply displays the current frame in absolute time (whether it began at the same moment as the other frames or not).
Close-Up: When Blur Is Needed Where None Exists
Motion blur is cool and automatic, if you animated the layer to receive the blur in After Effects. However, if the element comes in already animated but without sufficient bluras can happen with 3D elements or when a scene is retimed to be fasteryou need a different solution, because After Effects has no motion to sample to generate blur.
The painful way to deal with this is to apply directional blur to the elements in question. The problem is that that natural motion blur is rarely unidirectional.
In such cases, and when there's no possibility of reshooting or re-rendering, it's worth considering an investment in Real Smart Motion Blur by RE: Vision Effects (www.revisionfx.com). This plug-in can sample motion from other layers and enhance the amount of blur created by that motion. It's render-intensive and can require some tweaking, but it can be just the thing for such situations. A demo version is available on the book's disc.
This should make sense to musicians: in  time, you can beat 3 against 4, or other polyrhythmic combinations, creating elaborate syncopation. Underneath it all, however, the metronome clicks on at the same rate.
Time Stretch
You may find the need to alter the duration and speed of a source clip; perhaps you need to lengthen and slow it down to cover the duration of the shot, or maybe it must be sped up to match the timing of another element. The solution in either case is Time Stretch, provided you don't need the frame rate to change during the course of the shot (in which case only Time Remap will do).
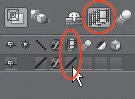
There are several ways to activate retiming, depending on what you want. The third of the three icons at the lower left of the Timeline reveals the In/Out/Duration/Stretch columns (Figure 2.31). You can
- Edit the In or Out point: Ctrl+Shift+comma (Cmd+Shift+comma) stretches the In point to the current frame, Ctrl+Alt+comma (Cmd+Option+comma) stretches the Out point to the current time
- Change the duration of the layer
- Change the stretch value from 100% to an alternate value
Figure 2.31. This icon (highlighted) reveals and conceals the Time Stretch features.
![]()
To display the Time Stretch dialog, you can click the Duration or Stretch value, or you can choose Layer > Time > Time Stretch (Figure 2.32).
Figure 2.32. You can set an alternate Duration or Stretch Factor in the Time Stretch dialog. Here you can also specify the pivot point for the stretch: In point, Out point, or current time.

Frame Blending
There is, of course, a noticeable side effect when lengthening a source clip (and even when shortening it): Frames repeat (or skip). Unless the stretch value factors evenly into 100% (say, 50% or 200%), the repeating or skipping occurs in irregular increments, potentially causing a herky-jerky motion.
Notes
Stretching a layer does not change the timing of any applied keyframes; you can use the Graph Editor to stretch keyframes as needed, or you can precompose the clip prior to Time Stretch, guaranteeing that the animation lines up.
Enable Frame Blending for the layer and the composition, and After Effects averages the frames together. This works not only on layers with time stretching but with any footage that comes in at a frame rate other than that of the composition.
With version 7.0, After Effects offers a more sophisticated method of averaging adjoining frames. Whereas previous versions could only overlay adjoining frames, essentially blurring them together (a mode now known as Frame Mix), the new Pixel Motion mode analyzes and tracks actual pixel data from frame to frame, creating new frames that sort of warp the adjoining frames together.
Figure 2.33 shows the location of the mode, and how the result might appear in each case. Essentially, the result will be acceptable based on a few typical criteria. It may appear too blurry, too distorted, or contain too many noticeable frame artifacts.
Figure 2.33. These toggles allow you to enable Frame Mix, or the new Pixel Motion mode (instead of Whole Frames) for a retimed layer.
In such a case, users of the Professional edition can try for a better result using the new Timewarp effect, explored below.
Time Reversal and Freeze Frame
You can reverse the timing of a layer with a simple shortcut: Highlight the layer, and press Ctrl+Alt+R (Cmd+Option+R) to set the Stretch value to 100%. The layer takes on a stripy appearance to remind you that its time has been set in reverse motion (Figure 2.34). Because you'll probably never remember that command, using it only once in a great while, it has also been added to the Layer > Time menu.
Figure 2.34. The candy striping along the bottom of the layer offers a clear indicator that the Stretch value is negative and the footage runs in reverse.

Also new to version 7.0 is the Layer > Time > Freeze Frame command. This is a one-step shortcut to what used to be a multiple-step process; it applies the Time Remap effect and sets a Hold keyframe at the current time.
Time Stretch and Nested Compositions
If you apply Time Stretch (or Time Remap) to a composition, After Effects, by default, recalculates the source composition's frame rate, re-slicing any keyframe animations to fit the new rate instead of adhering to the old one.
Be aware, therefore, that the frame values on any given frame will be different unless the underlying time values match exactly. After Effects does not round off to the nearest whole frame; again, it works in absolute time, even if that places current time between frames in the subcomposition.
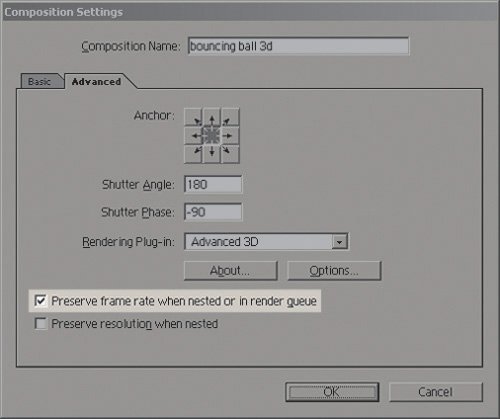
You can override this behavior and force After Effects to round off, however. On the Advanced tab of the Composition Settings panel of the nested comp, toggle Preserve Frame Rate When Nested or in Render Queue (Figure 2.35). This forces After Effects to analyze only whole frame increments in the underlying composition, using its frame rate. If, for example, you ever needed the effect of showing an old movie (which might run at 15 fps) inside a composition with a higher frame rate, this is how you might do it.
Figure 2.35. If you need a subcomposition to run at a different rate than the master composition, checking the highlighted box in the subcomp prevents After Effects from resampling keyframes at the master comp's rate.
Time Remap
You can do away with the Time Stretch feature set altogether if you are comfortable working with Time Remap instead. This feature may require a bit of practice just to wrap your head around it, but once you catch on, your powers increase.
The philosophy behind Time Remap is elusively simple: Time has a value, just like any other property, which means you can keyframe it, ease in and out of it, loop and ping-pong it, and do all of the other things you can do with any other animation data.
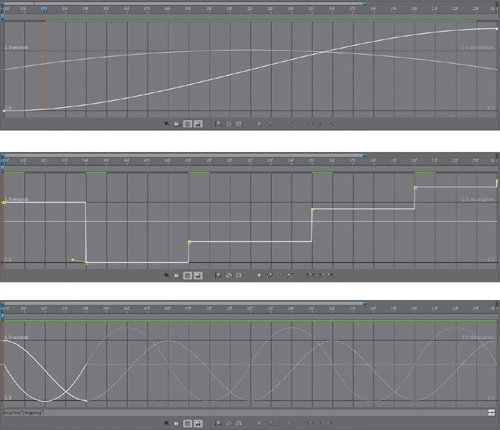
Figures 2.36a, b, and c show sample timelines that contain typical uses for Time Remap in an effects situation. The presumption is that you're not going completely nuts rolling footage back and forth, ramping the frame rate up and down, although you can of course do just that. Its applications for creating realistic effects, however, may be limited.
Figures 2.36a, b, and c. Simple, everyday things you can do with Time Remap, shown with reference curves: speed up the source with eases (a), progress through a series of stills selected from the moving clip using Hold keyframes (b), and loop the source using a simple expression (c).
You can set Time Remap by selecting it under the Layer menu or using the shortcut (Ctrl+Alt+T/Cmd+Option+T). This sets (and reveals) two keyframes, one at the beginning and one at one frame beyond the end of the layer (not the layer In and Out points, should they have been edited).
Notes
If you've edited the layer In or Out points, a logical first step is to add Time Remap keyframes at the In and Out points, and perhaps delete the default ones.
Time remapped layers have a theoretically infinite duration, and when you apply Time Remap to a layer whose duration is shorter than that of the composition, the layer automatically lengthens to the duration of the comp. If the final Time Remap frame has been passed, that frame is held for the remaining layer duration.
Tip
To reverse a clip via Time Remap, highlight all keyframes by clicking on the Time Remap property name. Next, context-click one of the highlighted keyframes, and select Keyframe Assistant > Time-Reverse Keyframes.
Time Remap can take a little while to understand in complex situations, but it is often used for simple eases, holds, loops (discussed in Chapter 10), and the occasional time reversal. If you find yourself in deeper, the same principles apply; you just have to pay closer attention.
Timewarp
New to After Effects 7.0 Professional is Timewarp. This effect allows you to fine-tune the results of frame blending using Pixel Motion (it also includes Frame Mix and even Whole Frames as output modes, but choosing these loses most of the benefits of Timewarp's controls).
Tip
Beware when applying Time Remap to a layer whose duration exceeds that of the composition. Two keyframes are assigned when Time Remap is activated, and the second one can hide beyond the end of the Timeline. To get rid of it, set a new keyframe at the (visible) end of the composition, click Time Remap to highlight all of the keyframes, deselect the ones you can see, and then press Delete to get rid of that hidden final one.
Properly retiming footage can be a complex and processor-intensive procedure; Timewarp helps the process with a few customizations:
- Fine-tuning of motion vectors (within the Tuning section) including a processor-intensive Extreme setting for Filtering for cases in which the normal method creates artifacts. Also processor-intensive is raising the Vector Details setting, but even a setting of 100, which produces one vector per pixel, may not improve the result. With fast motion, a lower setting is actually recommended.
- An Error Threshold setting that controls how much blending occurs between frames. A high setting increases blending and can reduce tearing along edges; a low setting can be helpful with a grainy image so that the grain is ignored.
- Control over what is sampled. You can set the Weighting to sample one color channel more than another. Even more useful, you can specify which portions of the footage are sampled using the Matte Channel, Matte Layer, and Source Crops options; so for example, if you are retiming only figures at the center of frame, you can avoid sampling all of the information in the garbage matte areas at the edges (Figure 2.37).
Figure 2.37. With a tracking shot such as this one, it would be a waste of time and effort to retime the areas of the frame outside of the mask. Timewarp allows you to specify a matte channel within which it will restrict resampling operations. In this case, you would typically garbage matte and then key the footage first, then apply Timewarp using the alpha channel generated by the key as the Matte Channel.
- Ability to sample one layer and apply the result to another using the Warp Layer control to set a target. This is vital if, for example, you are working with linear color footage that would appear very dark to Timewarp; you can apply the effect to a de-linearized layer instead and then send the result to the source linear layer (if that makes no sense, it should be clearer when you look at Chapter 11, "Film, HDR, and 32 Bit Compositing").
- Ability to create motion blur. Footage that moves faster should, naturally, produce more motion blur, and Timewarp can create it with Enable Motion Blur toggled on. With the Manual setting you can specify a Shutter Angle, or Automatic will attempt to choose a blur amount appropriate to the amount of motion being added. This setting increases render time.
Tip
Timewarp operates independently of the other retiming tools (Time Remap and Time Stretch). To warp a clip to half speed, you would set Speed to 50%. However, when you do this, the layer's length is not doubled to make room for the extra frames. To avoid precomposing you can apply Time Remap and leave the default keyframes in place, then change the Out point of the layer as needed.
As an alternative, if you prefer to use Time Remap to retime your clip, set Adjust Time By to be Source Frame, and use Time Remap to actually retime the footage. Now set an expression for Source Frame and use the pickwhip to link it to Time Remap (Chapter 10 covers the expressions pickwhip in detail, should it be an unfamiliar feature).
A re-timing project included in the Chapter02 folder, 02_timewarp.aep, may help illustrate how Timewarp is used. Timewarp overrides any Time Remap settings that might exist on a layer; in the example, they are applied only to make the layer long enough to accommodate the slower motion.
Timewarp replicates a lot of options and settings previously available with Twixtor from ReVision Effects. Whether Timewarp completely obviates the need for Twixtor is dubious, given that the third-party effect is well beyond its third revision as Timewarp makes its debut in After Effects. In other words, if you are not satisfied with the results from Timewarp, you may be happier using Twixtor (a theory that you can test using the demo version of Twixtor).
In Conclusion |
Section I. Working Foundations
The 7.0 Workflow
- The 7.0 Workflow
- Workspaces and Panels
- Making the Most of the UI
- Settings: Project, Footage, Composition
- Previews and OpenGL
- Effects & Presets
- Output: The Render Queue
- Study a Shot like an Effects Artist
The Timeline
- The Timeline
- Organization
- Animation Methods
- Keyframes and The Graph Editor
- Uber-mastery
- Transform Offsets
- Motion Blur
- Manipulating Time Itself
- In Conclusion
Selections: The Key to Compositing
- Selections: The Key to Compositing
- The Many Ways to Create Selections
- Compositing: Science and Nature
- Alpha Channels and Premultiplication
- Masks
- Combining Multiple Masks
- Putting Masks in Motion
- Blending Modes: The Real Deal
- Track Mattes
Optimizing Your Projects
- Optimizing Your Projects
- Navigating Multiple Compositions
- Precomposing and Nesting
- Adjustment and Guide Layers
- Understanding Rendering Order
- Optimizing After Effects
- Onward to Effects
Section II. Effects Compositing Essentials
Color Correction
Color Keying
- Color Keying
- Good Habits and Best Practices
- Linear Keyers and Hi-Con Mattes
- Blue-Screen and Green-Screen Keying
- Understanding and Optimizing Keylight
- Fixing Typical Problems
- Conclusion
Rotoscoping and Paint
- Rotoscoping and Paint
- Articulated Mattes
- Working Around Limitations
- Morphing
- Paint and Cloning
- Conclusion
Effective Motion Tracking
- Effective Motion Tracking
- The Essentials
- Optimizing Tracking Using 3D
- Extending a Track with Expressions
- Tracking for Rotoscoping
- Using 3D Tracking Data
- Conclusion
Virtual Cinematography
- Virtual Cinematography
- 5D: Pick Up the Camera
- Storytelling and the Camera
- Camera Blur
- The Role of Grain
- Film and Video Looks
- Conclusion
Expressions
- Expressions
- Logic and Grammar
- Muting Keyframes
- Linking Animation Data
- Looping Animations
- Smoothing and Destabilizing
- Offsetting Layers and Time
- Conditionals and Triggers
- Tell Me More
Film, HDR, and 32 Bit Compositing
- Film, HDR, and 32 Bit Compositing
- Details
- Film 101
- Dynamic Range
- Cineon Log Space
- Video Gamma Space
- Battle of the Color Spaces
- Floating Point
- 32 Bits per Channel
- Conclusion
Section III. Creative Explorations
Working with Light
- Working with Light
- Light Source and Direction
- Creating a Look with Color
- Backlighting, Flares, Light Volume
- Shadows and Reflected Light
- HDR Lighting
- Conclusion
Climate: Air, Water, Smoke, Clouds
- Climate: Air, Water, Smoke, Clouds
- Particulate Matter
- Sky Replacement
- The Fog, Smoke, or Mist Rolls In
- Billowing Smoke
- Wind
- Water
- Conclusion
Pyrotechnics: Fire, Explosions, Energy Phenomena
- Pyrotechnics: Fire, Explosions, Energy Phenomena
- Firearms
- Sci-Fi Weaponry
- Heat Distortion
- Fire
- Explosions
- In a Blaze of Glory
Learning to See
Index
EAN: 2147483647
Pages: 157
