Music on Hold Resources
The integrated Music on Hold (MoH) feature provides On-Net and Off-Net users with on hold music from a streaming source. The MoH feature has two hold types:
- User hold A user presses the Hold button or Hold softkey.
- Network hold A user activates the transfer, conference, or Call Park feature, which automatically activates the hold feature before performing the operation.
MoH is customizable so that it plays specific recordings, based on the DN that is used to place the caller on hold or the line number that the caller has dialed. Recorded audio or a live audio stream can be configured as audio sources.
The MoH feature requires the use of a server that is part of a Cisco CallManager cluster. You can configure the MoH server in either of the following ways:
- Coresident deployment In a coresident deployment, the MoH feature runs on any server (either publisher or subscriber) in the cluster that is also running the Cisco CallManager software. Because MoH shares server resources with Cisco CallManager in a coresident configuration, this type of configuration drastically reduces the number of simultaneous streams that an MoH server can send.
- Standalone deployment A standalone deployment places the MoH feature on a dedicated server within the Cisco CallManager cluster. The sole function of this dedicated server is to send MoH streams to devices within the network. A standalone deployment allows for the maximum number of streams from a single MoH server.
Table 15-7 provides details on the number of MoH sessions and codecs that are supported for each server platform.
|
Server Platform |
Codecs Supported |
MoH Sessions Supported |
|---|---|---|
|
Cisco MCS 7815 Cisco MCS 782x (all models) Cisco MCS 7830 (all models) Cisco SPE-310 Hewlett-Packard DL320 IBM xSeries 33x (all models) |
G.711 (a-law and mu-law) G.729a Wideband audio |
Coresident server: 20 MoH sessions Standalone MoH server: 50 MoH sessions |
|
Cisco MCS 7835 (all models) Cisco MCS 7845 (all models) Hewlett-Packard DL380 IBM xSeries 34x (all models) |
G.711 (a-law and mu-law) G.729a Wideband audio |
Coresident server: 20 MoH sessions Standalone MoH server: 250 MoH sessions |
The maximum session limits apply to unicast, multicast, or simultaneous unicast and multicast sessions. The limits represent the recommended maximum sessions that a platform can support.
Creating Audio Source Files
Figure 15-6 shows the interactions among the audio translator, default MoH TFTP server, and MoH server. The large boxes in the figure represent cluster components that might reside on a single server or on three separate servers. This figure also shows how the MoH server processes the added audio source file.
Figure 15-6. Creating Audio Source Files
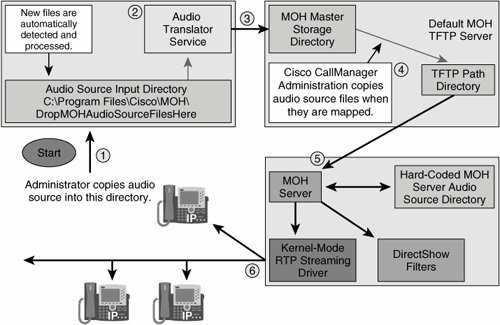
In creating an audio source, the following sequence takes place, as shown in the figure:
|
Step 1. |
The network administrator drops the audio files into the C:Program FilesCiscoMoHDropMoHAudioSourceFilesHere directory path. Standard .wav and MP3 files are valid input. |
Note
It takes approximately 30 seconds to convert a 3-MB MP3 file.
|
Step 2. |
Cisco CallManager automatically detects and translates the files. |
|
Step 3. |
The output and source files are moved into the default MoH TFTP server holding directory. This holding directory is the same as the default TFTPMoHFilePath with MoH appended. |
Note
It is not recommended that the audio translator service be used during production hours because the service will consume 100 percent of the CPU.
|
Step 4. |
The network administrator assigns an audio source number to the audio source file. The corresponding audio source files are then copied to a directory that is one level higher in the directory structure (which is the default TFTP path) to make them available to the MoH servers. |
|
Step 5. |
The MoH servers download the needed audio source files and store them in the hard-coded directory C:Program FilesCiscoMoH. |
|
Step 6. |
The MoH server then streams the files using DirectShow and the kernel-mode RTP driver as needed or requested by Cisco CallManager. |
Configuring MoH
The Cisco CallManager MoH Configuration is a six-step process:
|
Step 1. |
Configure the audio translator. |
|
Step 2. |
Configure the MoH server. |
|
Step 3. |
Add and configure audio source files. |
|
Step 4. |
Set MoH servicewide settings. |
|
Step 5. |
Find and configure the fixed audio source. |
|
Step 6. |
Assign audio source IDs. |
Step 1: Configure the Audio Translator
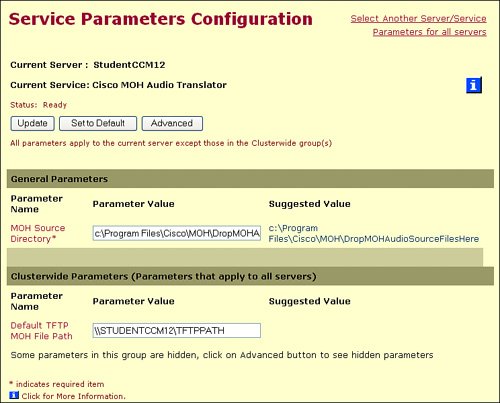
An MoH audio translator service converts administrator-supplied audio sources to the proper format for the MoH server to use. The audio translator uses two parameters, an input directory and an output directory. You can configure the input directory, which defaults to:
C:Program FilesCiscoMoHDropMoHAudioSourceFilesHere, on a per-service basis.
The output directory, a clusterwide parameter, contains a Universal Naming Convention (UNC) name to a shared directory on the default MoH TFTP directory. For whichever directory is specified, append MoH.
To display the Service Parameters Configuration window, choose Service > Service Parameters in Cisco CallManager Administration, choose the server that will provide MoH (typically, the publisher if not a standalone server), and choose Cisco MoH Audio Translator for the service. Figure 15-7 illustrates this configuration.
Figure 15-7. Cisco MoH Audio Translator Service Configuration
After you configure the audio translator service, you can drop your MoH audio source files (in .wav or .mp3 format) into the drop directory you specify. As soon as you copy the files into the directory, the CallManager's audio translator service immediately goes to work converting the files into the various audio codecs compatible with the VoIP network.
Caution
Converting the audio source files into audio codec format can cause massive processor utilization on the CallManager server, potentially keeping it at 100 percent utilization for a short time (depending on the size and number of audio source files you copy). Cisco highly recommends doing this conversion during network off-hours.
Tip
Be sure to copy the MoH audio source files into the drop directory. If you move the files (by dragging and dropping them from a source on the same hard disk partition, such as the desktop), the files retain their original permissions rather than inheriting the permissions of the parent directory. If the permissions are not set correctly, the CallManager will not be able to convert the audio files.
Step 2: Configure the MoH Server
Figure 15-8 shows the MoH Server Configuration window. The MoH server can be configured for unicast or multicast. Multicast MoH conserves system resources. Multicast allows multiple users to use the same audio source stream to provide MoH. Multicast audio sources associate with an IP address. To use multicast audio for MoH, your network must be configured to support multicast traffic. In addition, the audio source is always playing. Users placed on hold will typically join the audio source midstream; if you have announcements that play at the beginning of the audio stream, they might be missed.
Figure 15-8. Cisco MoH Server Configuration
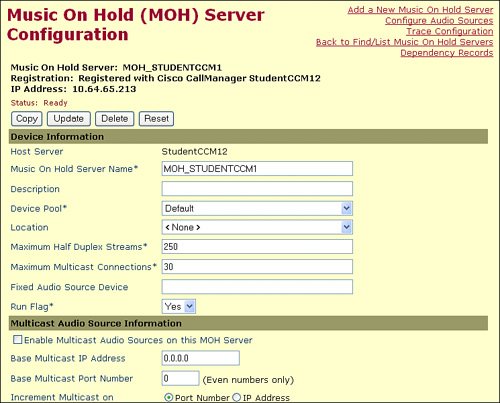
Unicast MoH, the system default, uses a separate source stream for each user or connection. Users connect to a specific device or stream. If your network supports multicast traffic, you can deploy MoH services much more efficiently. Cisco recommends using a locally scoped multicast address (239.x.x.x) to ensure MoH multicast traffic does not stream over the IP WAN unnecessarily.
Choose Service > Media Resource > Music On Hold Server to display the Music On Hold (MoH) Server Configuration window.
Step 3: Add and Configure Audio Source Files
The next step in configuring MoH is to add and configure the audio source files that the CallManager has converted (by adding .wav or .mp3 files to the directory shown in Step 1) to audio source IDs. Choose Service > Media Resource > Music On Hold Audio Source to display the Music On Hold (MoH) Audio Source Configuration window, shown in Figure 15-9.
Figure 15-9. Configuring Audio Source Files
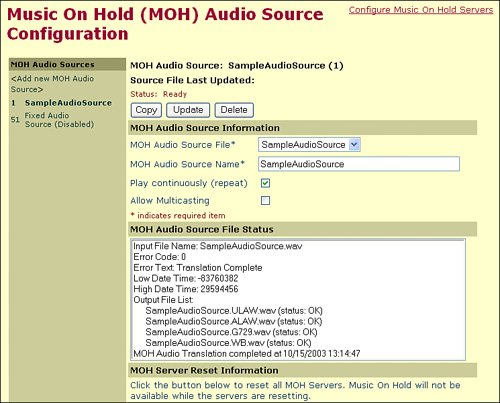
To add audio source files, click the Add New MoH Audio Source link, choose an MoH Audio Stream Number unique in the cluster (numbers range from 1 to 50), assign the MoH Audio Source File to the number, and click Insert. The Play Continuously (Repeat) check box should always be checked to ensure music loops when the end of the file is reached. If multicast capabilities are necessary, you must check the Allow Multicasting check box. If the Play Continuously (Repeat) and Allow Multicasting check boxes are both unchecked, the audio file stops playing when it reaches the end and the network administrator must stop and start the server to reset the MoH server.
The MoH Audio Source File Status window shows the conversion status and indicates whether the audio file translated correctly or had errors.
Step 4: Set MoH Servicewide Settings
To set the MoH servicewide settings, open the Service Parameters Configuration window, choose an MoH server, and choose the Cisco IP Voice Media Streaming App option. The Service Parameters Configuration window for MoH appears, as shown in Figure 15-10.
Figure 15-10. Voice Media Streaming Application Service Parameters

The Supported MoH Codecs field is set to the codecs that are supported by the MoH servers in the cluster. This field defaults to G.711 mu-law during the installation. You can enable multiple codecs by pressing the Ctrl key while selecting the codecs.
The Default TFTPMOH IP Address field is set to the IP address or computer name of the default MoH TFTP server.
Note
Compressed codecs (such as G.729) are designed to handle Latin-based speech patterns. Music on hold audio does not translate well through codecs of this nature and the degradation in music quality is very perceptible.
Step 5: Find and Configure the Fixed Audio Source
One of your options for MoH is a fixed music source (attached via a sound card). This could be an external CD player, jukebox, iPod, or any device that can connect through the Line In or Microphone port of your sound card. You will need the exact name (case sensitive) of the fixed audio source device to complete the fixed audio source configuration in Cisco CallManager.
Note
CallManager MCS servers do not ship with sound cards. A list of supported sound cards can be found in the CallManager SRND available at http://www.cisco.com/go/srnd.
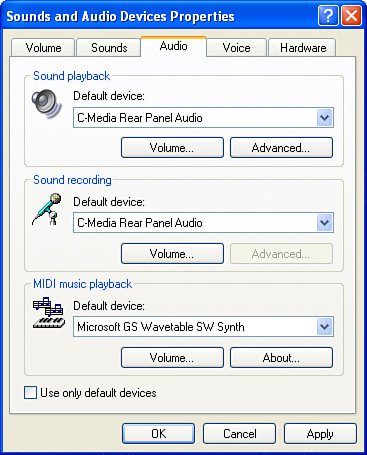
To find the name of the fixed audio source, open Control Panel and choose Sounds and Multimedia. Choose the Audio tab. You can use any sound-recording device name that appears in the Preferred Device menu, shown in Figure 15-11. In addition, be sure to open the Recording Control window, and click the Volume button in the Sound Recoding area. Verify that the Line In, Microphone, or CD Audio check box is checked and the volume has been adjusted to an appropriate level (this might require some testing in your IPT environment).
Figure 15-11. Fixed Audio Source Windows Sound Properties
To allow Cisco CallManager to use the fixed audio source, you must link the CallManager configuration with the Windows sound device. After you have located the sound-recording device name that appears in the Windows Control Panel, you must open the Audio Source File Configuration window (by choosing Service > Media Resource > Music On Hold Audio Source) and select the Fixed Audio Source (this will always be audio source ID 51). The window shown in Figure 15-12 appears.
Figure 15-12. Fixed Audio Source CallManager Configuration
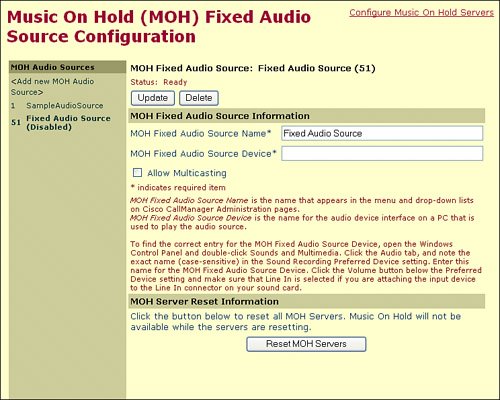
The MoH Fixed Audio Source Device name is case sensitive and must be entered exactly as it appears in the Sounds and Multimedia Properties window, including any spaces or symbols that appear in the name. If the Allow Multicasting check box is checked, and the G.729 codec is enabled, 5 to 7 percent of the CPU resources will be consumed. This setting is global for all MoH servers. If the fixed audio source does not exist on a server, it cannot be used.
The Fixed Audio Source option affects all of the MoH servers that have an MoH fixed audio source device by the selected name.
Note
The FCC considers music on hold a type of broadcasting. Copyrighted music must be licensed for prerecorded and live audio sources. Failure to comply with this law can result in significant fines.
Step 6: Assigning Audio Source IDs
For your users to use the MoH sources you have configured, you must assign the audio source IDs to the IPT devices. An audio source ID represents an audio source on the MoH server. The audio source can be either a file on a disk or a fixed device from which a source stream obtains the streaming data. Each audio source (represented by an audio source ID) can stream in unicast and multicast mode.
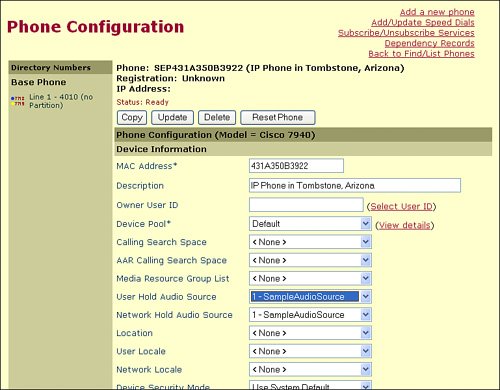
The device that activates the hold will determine which audio source ID the caller will listen to. You can assign the MoH audio source IDs to a group of devices by assigning them through the device pool (choose System > Device Pool), through the individual IP Phones (choose Device > Phone), or for specific directory numbers (choose Device > Phone > Directory Number). If you assign the audio sources at both the device pool and IP Phone levels, the IP Phone settings override the device pool. Likewise, the directory number assignments overrule both the IP Phone and device pool settings. Figure 15-13 illustrates assigning the audio source IDs at the IP Phone level.
Figure 15-13. Assigning Audio Source IDs to an IP Phone
Media Resource Management |
Part I: Cisco CallManager Fundamentals
Introduction to Cisco Unified Communications and Cisco Unified CallManager
Cisco Unified CallManager Clustering and Deployment Options
- Cisco Unified CallManager Clustering and Deployment Options
- The Two Sides of the Cisco Unified CallManager Cluster
- Cluster Redundancy Designs
- Call-Processing Deployment Models
- Summary
- Review Questions
Cisco Unified CallManager Installation and Upgrades
- Cisco Unified CallManager Installation and Upgrades
- Cisco Unified CallManager 4.x Clean Installation Process
- Upgrading Prior Cisco Unified CallManager Versions
- Summary
- Review Questions
Part II: IPT Devices and Users
Cisco IP Phones and Other User Devices
Configuring Cisco Unified CallManager to Support IP Phones
- Configuring Cisco Unified CallManager to Support IP Phones
- Configuring Intracluster IP Phone Communication
- IP Phone Configuration
- Case Study: Device Pool Design
- Summary
- Review Questions
Cisco IP Telephony Users
- Cisco IP Telephony Users
- Cisco CallManager User Database
- Cisco CallManager User Configuration
- User Logon and Device Configuration
- Summary
- Review Questions
Cisco Bulk Administration Tool
- Cisco Bulk Administration Tool
- The Cisco Bulk Administration Tool
- Using the Tool for Auto-Registered Phone Support
- Summary
- Review Questions
Part III: IPT Network Integration and Route Plan
Cisco Catalyst Switches
- Cisco Catalyst Switches
- Catalyst Switch Role in IP Telephony
- Powering the Cisco IP Phone
- Data and Voice VLANs
- Configuring Class of Service
- Summary
- Review Questions
Configuring Cisco Gateways and Trunks
- Configuring Cisco Gateways and Trunks
- Cisco Gateway Concepts
- Configuring Access Gateways
- Cisco Trunk Concepts
- Configuring Intercluster Trunks
- SIP and Cisco CallManager
- Summary
- Review Questions
Cisco Unified CallManager Route Plan Basics
- Cisco Unified CallManager Route Plan Basics
- External Call Routing
- Route Plan Configuration Process
- Summary
- Review Questions
Cisco Unified CallManager Advanced Route Plans
- Cisco Unified CallManager Advanced Route Plans
- Route Filters
- Discard Digit Instructions
- Transformation Masks
- Translation Patterns
- Route Plan Report
- Summary
- Review Questions
Configuring Hunt Groups and Call Coverage
- Configuring Hunt Groups and Call Coverage
- Call Distribution Components
- Configuring Line Groups, Hunt Lists, and Hunt Pilots
- Summary
- Review Questions
Implementing Telephony Call Restrictions and Control
- Implementing Telephony Call Restrictions and Control
- Class of Service Overview
- Partitions and Calling Search Spaces Overview
- Time-of-Day Routing Overview
- Configuring Time-of-Day Routing
- Time-of-Day Routing Usage Scenario
- Summary
- Review Questions
Implementing Multiple-Site Deployments
- Implementing Multiple-Site Deployments
- Call Admission Control
- Survivable Remote Site Telephony
- Summary
- Review Questions
Part IV: VoIP Features
Media Resources
- Media Resources
- Introduction to Media Resources
- Conference Bridge Resources
- Media Termination Point Resources
- Annunciator Resources
- Transcoder Resources
- Music on Hold Resources
- Media Resource Management
- Summary
- Review Questions
Configuring User Features, Part 1
- Configuring User Features, Part 1
- Basic IP Phone Features
- Softkey Templates
- Enhanced IP Phone Features
- Barge and Privacy
- IP Phone Services
- Summary
- Review Questions
Configuring User Features, Part 2
- Configuring User Features, Part 2
- Cisco CallManager Extension Mobility
- Client Matter Codes and Forced Authentication Codes
- Call Display Restrictions
- Malicious Call Identification
- Multilevel Precedence and Preemption
- Summary
- Review Questions
Configuring Cisco Unified CallManager Attendant Console
- Configuring Cisco Unified CallManager Attendant Console
- Introduction to Cisco CallManager Attendant Console
- Call Routing and Call Queuing
- Server and Administration Configuration
- Cisco Attendant Console Features
- Summary
- Review Questions
Configuring Cisco IP Manager Assistant
- Configuring Cisco IP Manager Assistant
- Cisco IP Manager Assistant Overview
- Cisco IP Manager Assistant Architecture
- Configuring Cisco IPMA for Shared-Line Support
- Summary
- Review Questions
Part V: IPT Security
Securing the Windows Operating System
- Securing the Windows Operating System
- Threats Targeting the Operating System
- Security and Hot Fix Policy
- Operating System Hardening
- Antivirus Protection
- Cisco Security Agent
- Administrator Password Policy
- Common Windows Exploits
- Security Taboos
- Summary
- Review Questions
Securing Cisco Unified CallManager Administration
- Securing Cisco Unified CallManager Administration
- Threats Targeting Remote Administration
- Securing CallManager Communications Using HTTPS
- Multilevel Administration
- Summary
- Review Questions
Preventing Toll Fraud
- Preventing Toll Fraud
- Toll Fraud Exploits
- Preventing Call Forward and Voice-Mail Toll Fraud Using Calling Search Spaces
- Blocking Commonly Exploited Area Codes
- Using Time-of-Day Routing
- Using FAC and CMC
- Restricting External Transfers
- Dropping Conference Calls
- Summary
- Review Questions
Hardening the IP Phone
Understanding Cryptographic Fundamentals
- Understanding Cryptographic Fundamentals
- What Is Cryptography?
- Symmetric Encryption
- Asymmetric Encryption
- Hash Functions
- Digital Signatures
- Summary
- Review Questions
Understanding the Public Key Infrastructure
- Understanding the Public Key Infrastructure
- The Need for a PKI
- PKI as a Trusted Third-Party Protocol
- PKI Entities
- PKI Enrollment
- PKI Revocation and Key Storage
- PKI Example
- Summary
- Review Questions
Understanding Cisco IP Telephony Authentication and Encryption Fundamentals
- Understanding Cisco IP Telephony Authentication and Encryption Fundamentals
- Threats Targeting the IP Telephony System
- How CallManager Protects Against Threats
- PKI Topologies in Cisco IP Telephony
- PKI Enrollment in Cisco IP Telephony
- Keys and Certificate Storage in Cisco IP Telephony
- Authentication and Integrity
- Encryption
- Summary
- Review Questions
Configuring Cisco IP Telephony Authentication and Encryption
- Configuring Cisco IP Telephony Authentication and Encryption
- Authentication and Encryption Configuration Overview
- Enabling Services Required for Security
- Using the CTL Client
- Working with Locally Significant Certificates
- Configuring the Device Security Mode
- Negotiating Device Security Mode
- Generating a CAPF Report
- Summary
- Review Questions
Part VI: IP Video
Introducing IP Video Telephony
- Introducing IP Video Telephony
- IP Video Telephony Solution Components
- Video Call Concepts
- Video Protocols Supported in Cisco CallManager
- Bandwidth Management
- Call Admission Control Within a Cluster
- Call Admission Control Between Clusters
- Summary
- Review Questions
Configuring Cisco VT Advantage
- Configuring Cisco VT Advantage
- Cisco VT Advantage Overview
- How Calls Work with Cisco VT Advantage
- Configuring Cisco CallManager for Video
- Configuring Cisco IP Phones for Cisco VT Advantage
- Installing Cisco VT Advantage on a Client
- Summary
- Review Questions
Part VII: IPT Management
Introducing Database Tools and Cisco Unified CallManager Serviceability
- Introducing Database Tools and Cisco Unified CallManager Serviceability
- Database Management Tools
- Cisco CallManager Serviceability Overview
- Tools Overview
- Summary
- Review Questions
Monitoring Performance
- Monitoring Performance
- Performance Counters
- Microsoft Event Viewer
- Microsoft Performance Monitor
- Real-Time Monitoring Tool Overview
- Summary
- Review Questions
Configuring Alarms and Traces
- Configuring Alarms and Traces
- Alarm Overview
- Alarm Configuration
- Trace Configuration
- Trace Analysis
- Trace Collection
- Bulk Trace Analysis
- Additional Trace Tools
- Summary
- Review Questions
Configuring CAR
- Configuring CAR
- CAR Overview
- CAR Configuration
- Report Scheduling
- System Database Configuration
- User Report Configuration
- Summary
- Review Questions
Using Additional Management and Monitoring Tools
- Using Additional Management and Monitoring Tools
- Remote Management Tools
- Dependency Records
- Password Changer Tool
- Cisco Dialed Number Analyzer
- Quality Report Tool
- Summary
- Review Questions
Part VIII: Appendix
Appendix A. Answers to Review Questions
Index
EAN: 2147483647
Pages: 329
