PKI Topologies in Cisco IP Telephony
Unlike classic enterprise PKI deployments, the PKI topology in Cisco IP telephony is not a single PKI system. Instead of having a single Certificate Authority (CA) that issues all certificates, there are several instances issuing certificates:
- Self-signed certificates Cisco CallManager and other servers issue their certificates on their own.
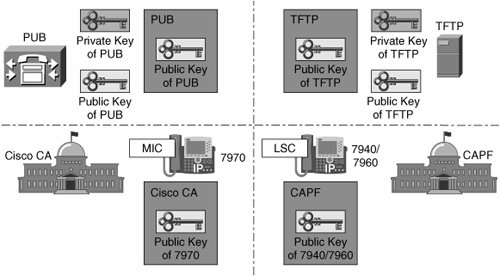
- Certificates signed by the Cisco manufacturing CA Cisco IP Phone 7970 models (and later) have manufacturing installed certificates (MICs).
- Certificates signed by Cisco CallManager Certificate Authority Proxy Function (CAPF) or by an external CA One of these two options is used to issue locally significant certificates (LSCs) to Cisco IP Phone models that support SRTP.
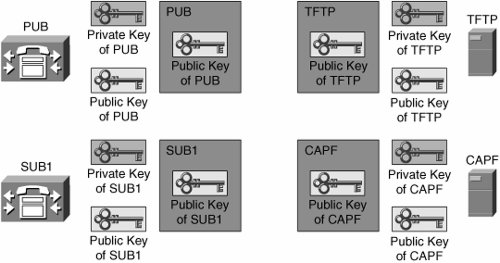
Self-Signed Certificates PKI Topology
Figure 26-3 illustrates several IP telephony services with self-signed certificates. This design requires each server (or server component) have its own self-signed certificate. In the example shown, the Cisco CallManager, TFTP, and CAPF servers all have created their own self-signed certificates. Each one of them act as their own PKI root (they establish their own authority).
Figure 26-3. Self-Signed Certificate PKI Topology
Manufacturing Installed Certificates PKI Topology
Currently, the Cisco 7911, 7941, 7961, 7970, and 7971 IP Phones have a certificate installed by Cisco in nonvolatile memory. This allows the IP phone to be capable of communicating securely with the CallManager out of the box. Cisco highly recommends that you replace these MICs with your own certificate as soon as possible. Figure 26-4 illustrates the keys used when an IP phone comes with an MIC preinstalled.
Figure 26-4. MIC PKI Topology
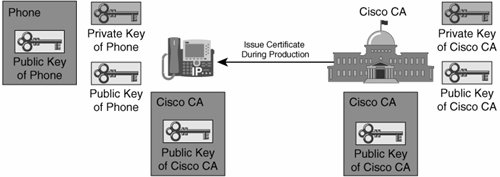
The IP phone with the MIC has its own public and private key pair and a Cisco manufacturing CA certificate installed. The certificate of the IP phone is signed by the Cisco manufacturing CA, which makes the Cisco manufacturing CA the PKI root for all MICs.
Locally Significant Certificates PKI Topology
LSCs are certificates that you install to the IP phone. These can be installed from the CAPF CallManager function or from another CA. When deploying the LSCs to the IP phones, you have a major choice to make:
- Deploy LSCs through a centralized, automated process to all IP phones attached to the network.
- Deploy LSCs manually on a phone-by-phone basis.
Of course, the factor that this decision hinges on is risk. By automatically deploying LSCs to the IP phones, you assume that all the phones that are currently plugged into the network are "friendly." The CallManager will automatically deploy LSCs to all phones. If a hacker has a phone plugged into the network, it will also get an LSC and become a trusted device. The alternate, manual method creates a huge amount of administrative overhead because you must visit each device and manually enter a sequence of digits provided by the CAPF. However, by following this method, you ensure that each IP phone be physically verified before it is considered a trusted device.
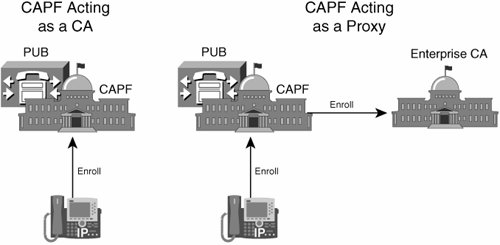
As shown in Figure 26-5, the CAPF can either generate LSCs itself, or it can act as a proxy between the IP phone and some other CA.
Figure 26-5. LSC PKI Topology
Independent, Separated PKI Topology
As illustrated in Figure 26-6, your IP telephony network might have several, coexisting PKI topologies. There is no single root; instead, there are multiple independent PKI topologies. So far, there is no trust relationship among these different PKIs. A trusted introducer is needed, bringing all the different PKI topologies together under one trusted source. The Certificate Trust List (CTL) client provides that function.
Figure 26-6. Multiple PKI Topologies
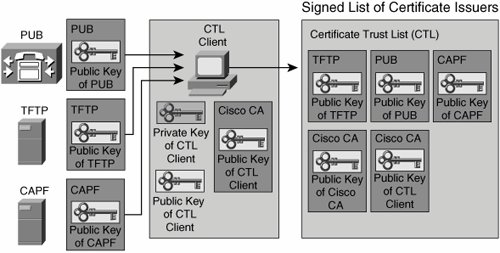
CTL Client
The Cisco CTL client itself has a certificate issued by the Cisco manufacturing CA. The goal of the Cisco CTL client is to obtain the certificates of all entities that issue certificates (self-signed certificates only or certificates for other devices). Then, the Cisco CTL client signs the list of these certificates, the CTL, using its private key. The public and private keys of the Cisco CTL client are stored on a smart token called a security token, which is just a USB key plugged into the PC running the CTL client.
Now there is a single, trusted introducer in the system again: The Cisco CTL client "introduces" trusted devices, not by signing their certificates, but by signing a list of trusted certificates signed by several PKI roots, as shown in Figure 26-7. The CTL can be compared to the root certificate store of Microsoft Internet Explorer. Both are a list of trusted certificate-issuing entities.
Figure 26-7. CTL Client Creating a List of Trusted Certificates
The CTL usually includes these certificates:
- Cisco CallManager certificates Each Cisco CallManager has a self-signed certificate. It allows the Cisco CallManager to authenticate to a device (IP phone) during device registration.
- TFTP server certificate The TFTP server that provides the IP phone with files, such as the IP phone image or the IP phone configuration file, is trusted by the IP phone only if the TFTP server is listed in the CTL of the IP phone.
- CAPF certificate When you are using LSCs, the CAPF issues certificates to the IP phones. The certificate of the CAPF allows the CAPF to authenticate to an IP phone during the enrollment.
- Cisco certificate MICs and the certificate of the security tokens (storing the keys used by the Cisco CTL client) are issued by Cisco manufacturing CA. To allow the phone to verify certificates issued by this Cisco CA, the phone needs the certificate of the Cisco manufacturing CA.
- Cisco CTL client certificate The Cisco CTL client signs the CTL using one of the security tokens. The certificates of the Cisco CTL client (one per security token) have to be known to the IP phone to allow verification of the signature of the CTL.
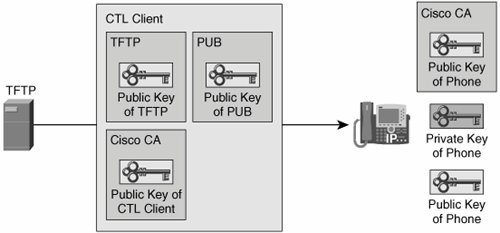
As shown in Figure 26-8, When an IP phone boots, the CTL is downloaded from the TFTP server to the IP phone. It contains all certificates of the entities that issued self-signed certificates. By having this list, the IP phone knows which PKI roots to trust and can trust all certificates that have been issued by any PKI root contained in the CTL.
Figure 26-8. Obtaining the CTL
CTL Client Application
The Cisco CTL client software, available as a plug-in application on Cisco CallManager Administration, is used to create or update the CTL. When the list is accurate, the Cisco CTL client will ensure that the CTL is signed by the keys of the Cisco CTL client. These keys are stored on an external Universal Serial Bus (USB) device, which is called the security token. When the CTL needs to be signed, the Cisco CTL client passes the CTL to the security token, and the security token signs it and then returns the signed CTL to the Cisco CTL client application. The Cisco CTL client itself does not have access to the private key stored on the security token. Therefore, it is not the CTL client application that actually signs the CTL; the CTL client only interacts with the security token requesting the security token to create the signature. The public key of a security token is signed by the Cisco manufacturing CA during production, and the appropriate certificate is also stored on the security token itself.
The CTL file needs to be updated after configuration changes, such as changing or adding IP telephony servers or security tokens to the system.
The CTL also acts as an authorization list because it specifies which certificates belong to which IP telephony function. A TFTP server, for instance, is not allowed to sign a CTL, only IP phone configuration files. The CAPF, as another example, is allowed to sign the LSCs of other IP phones only but not the CTL or any TFTP files.
CTL Verification on the IP Phone
Every time that an IP phone receives a new CTL, the new CTL is verified. It is accepted by the IP phone only if it was signed by the Cisco CTL client using one of the administrator tokens. The phone can verify the signature using the public key (the certificate) of the Cisco CTL client (in fact, the certificate of the appropriate administrator token), which must be included in the currently installed ("old") CTL.
This certificate of the administrator token is signed by the Cisco manufacturing CA. This signature is also validated by using the certificate of the Cisco manufacturing CA, which also must be included in the currently installed CTL. This concept works well as long as the phone already has a CTL.
Initial Deployment Issue
For the first download of a CTL to an IP phone, there is an issue: How does an IP phone know which administrator tokens are trusted without already having a CTL? This problem occurs only at initial deployment, when the phone does not yet have a local CTL. In this case, any administrator token could pretend to be a valid token for the IP telephony system in question. An attacker could either replace the CTL file on the TFTP server with a falsified file or change the CTL file in the path between the IP phone and the TFTP server.
The problem can be solved by downloading the initial CTL over a trusted network to ensure that no falsified initial CTL is loaded to the phone. When the phone has a valid CTL, it will trust new CTLs only if they are signed using a security token that is already known to the IP phone. If the CTL file in the IP phone is erased, the same problem occurs. Again, you must ensure that the next CTL download is done over a trusted network path because the IP phone will blindly accept any CTL.
After the IP phone is deployed, it is usually difficult to trust the network path between the phone and Cisco CallManager. Therefore, a user should not be able to erase the initially installed CTL. There are two ways to remove a CTL from an IP phone: a factory reset or the IP phone Settings menu. A factory reset is not simple, but using the Settings menu is rather easy. To prevent users from using the Settings menu to remove the CTL, you should disable settings access at the phone. When using authentication strings as the authentication method during CAPF phone certificate operations, you have to enable settings access during the enrollment. After successful enrollment, you should then disable settings access again.
PKI Enrollment in Cisco IP Telephony |
Part I: Cisco CallManager Fundamentals
Introduction to Cisco Unified Communications and Cisco Unified CallManager
Cisco Unified CallManager Clustering and Deployment Options
- Cisco Unified CallManager Clustering and Deployment Options
- The Two Sides of the Cisco Unified CallManager Cluster
- Cluster Redundancy Designs
- Call-Processing Deployment Models
- Summary
- Review Questions
Cisco Unified CallManager Installation and Upgrades
- Cisco Unified CallManager Installation and Upgrades
- Cisco Unified CallManager 4.x Clean Installation Process
- Upgrading Prior Cisco Unified CallManager Versions
- Summary
- Review Questions
Part II: IPT Devices and Users
Cisco IP Phones and Other User Devices
Configuring Cisco Unified CallManager to Support IP Phones
- Configuring Cisco Unified CallManager to Support IP Phones
- Configuring Intracluster IP Phone Communication
- IP Phone Configuration
- Case Study: Device Pool Design
- Summary
- Review Questions
Cisco IP Telephony Users
- Cisco IP Telephony Users
- Cisco CallManager User Database
- Cisco CallManager User Configuration
- User Logon and Device Configuration
- Summary
- Review Questions
Cisco Bulk Administration Tool
- Cisco Bulk Administration Tool
- The Cisco Bulk Administration Tool
- Using the Tool for Auto-Registered Phone Support
- Summary
- Review Questions
Part III: IPT Network Integration and Route Plan
Cisco Catalyst Switches
- Cisco Catalyst Switches
- Catalyst Switch Role in IP Telephony
- Powering the Cisco IP Phone
- Data and Voice VLANs
- Configuring Class of Service
- Summary
- Review Questions
Configuring Cisco Gateways and Trunks
- Configuring Cisco Gateways and Trunks
- Cisco Gateway Concepts
- Configuring Access Gateways
- Cisco Trunk Concepts
- Configuring Intercluster Trunks
- SIP and Cisco CallManager
- Summary
- Review Questions
Cisco Unified CallManager Route Plan Basics
- Cisco Unified CallManager Route Plan Basics
- External Call Routing
- Route Plan Configuration Process
- Summary
- Review Questions
Cisco Unified CallManager Advanced Route Plans
- Cisco Unified CallManager Advanced Route Plans
- Route Filters
- Discard Digit Instructions
- Transformation Masks
- Translation Patterns
- Route Plan Report
- Summary
- Review Questions
Configuring Hunt Groups and Call Coverage
- Configuring Hunt Groups and Call Coverage
- Call Distribution Components
- Configuring Line Groups, Hunt Lists, and Hunt Pilots
- Summary
- Review Questions
Implementing Telephony Call Restrictions and Control
- Implementing Telephony Call Restrictions and Control
- Class of Service Overview
- Partitions and Calling Search Spaces Overview
- Time-of-Day Routing Overview
- Configuring Time-of-Day Routing
- Time-of-Day Routing Usage Scenario
- Summary
- Review Questions
Implementing Multiple-Site Deployments
- Implementing Multiple-Site Deployments
- Call Admission Control
- Survivable Remote Site Telephony
- Summary
- Review Questions
Part IV: VoIP Features
Media Resources
- Media Resources
- Introduction to Media Resources
- Conference Bridge Resources
- Media Termination Point Resources
- Annunciator Resources
- Transcoder Resources
- Music on Hold Resources
- Media Resource Management
- Summary
- Review Questions
Configuring User Features, Part 1
- Configuring User Features, Part 1
- Basic IP Phone Features
- Softkey Templates
- Enhanced IP Phone Features
- Barge and Privacy
- IP Phone Services
- Summary
- Review Questions
Configuring User Features, Part 2
- Configuring User Features, Part 2
- Cisco CallManager Extension Mobility
- Client Matter Codes and Forced Authentication Codes
- Call Display Restrictions
- Malicious Call Identification
- Multilevel Precedence and Preemption
- Summary
- Review Questions
Configuring Cisco Unified CallManager Attendant Console
- Configuring Cisco Unified CallManager Attendant Console
- Introduction to Cisco CallManager Attendant Console
- Call Routing and Call Queuing
- Server and Administration Configuration
- Cisco Attendant Console Features
- Summary
- Review Questions
Configuring Cisco IP Manager Assistant
- Configuring Cisco IP Manager Assistant
- Cisco IP Manager Assistant Overview
- Cisco IP Manager Assistant Architecture
- Configuring Cisco IPMA for Shared-Line Support
- Summary
- Review Questions
Part V: IPT Security
Securing the Windows Operating System
- Securing the Windows Operating System
- Threats Targeting the Operating System
- Security and Hot Fix Policy
- Operating System Hardening
- Antivirus Protection
- Cisco Security Agent
- Administrator Password Policy
- Common Windows Exploits
- Security Taboos
- Summary
- Review Questions
Securing Cisco Unified CallManager Administration
- Securing Cisco Unified CallManager Administration
- Threats Targeting Remote Administration
- Securing CallManager Communications Using HTTPS
- Multilevel Administration
- Summary
- Review Questions
Preventing Toll Fraud
- Preventing Toll Fraud
- Toll Fraud Exploits
- Preventing Call Forward and Voice-Mail Toll Fraud Using Calling Search Spaces
- Blocking Commonly Exploited Area Codes
- Using Time-of-Day Routing
- Using FAC and CMC
- Restricting External Transfers
- Dropping Conference Calls
- Summary
- Review Questions
Hardening the IP Phone
Understanding Cryptographic Fundamentals
- Understanding Cryptographic Fundamentals
- What Is Cryptography?
- Symmetric Encryption
- Asymmetric Encryption
- Hash Functions
- Digital Signatures
- Summary
- Review Questions
Understanding the Public Key Infrastructure
- Understanding the Public Key Infrastructure
- The Need for a PKI
- PKI as a Trusted Third-Party Protocol
- PKI Entities
- PKI Enrollment
- PKI Revocation and Key Storage
- PKI Example
- Summary
- Review Questions
Understanding Cisco IP Telephony Authentication and Encryption Fundamentals
- Understanding Cisco IP Telephony Authentication and Encryption Fundamentals
- Threats Targeting the IP Telephony System
- How CallManager Protects Against Threats
- PKI Topologies in Cisco IP Telephony
- PKI Enrollment in Cisco IP Telephony
- Keys and Certificate Storage in Cisco IP Telephony
- Authentication and Integrity
- Encryption
- Summary
- Review Questions
Configuring Cisco IP Telephony Authentication and Encryption
- Configuring Cisco IP Telephony Authentication and Encryption
- Authentication and Encryption Configuration Overview
- Enabling Services Required for Security
- Using the CTL Client
- Working with Locally Significant Certificates
- Configuring the Device Security Mode
- Negotiating Device Security Mode
- Generating a CAPF Report
- Summary
- Review Questions
Part VI: IP Video
Introducing IP Video Telephony
- Introducing IP Video Telephony
- IP Video Telephony Solution Components
- Video Call Concepts
- Video Protocols Supported in Cisco CallManager
- Bandwidth Management
- Call Admission Control Within a Cluster
- Call Admission Control Between Clusters
- Summary
- Review Questions
Configuring Cisco VT Advantage
- Configuring Cisco VT Advantage
- Cisco VT Advantage Overview
- How Calls Work with Cisco VT Advantage
- Configuring Cisco CallManager for Video
- Configuring Cisco IP Phones for Cisco VT Advantage
- Installing Cisco VT Advantage on a Client
- Summary
- Review Questions
Part VII: IPT Management
Introducing Database Tools and Cisco Unified CallManager Serviceability
- Introducing Database Tools and Cisco Unified CallManager Serviceability
- Database Management Tools
- Cisco CallManager Serviceability Overview
- Tools Overview
- Summary
- Review Questions
Monitoring Performance
- Monitoring Performance
- Performance Counters
- Microsoft Event Viewer
- Microsoft Performance Monitor
- Real-Time Monitoring Tool Overview
- Summary
- Review Questions
Configuring Alarms and Traces
- Configuring Alarms and Traces
- Alarm Overview
- Alarm Configuration
- Trace Configuration
- Trace Analysis
- Trace Collection
- Bulk Trace Analysis
- Additional Trace Tools
- Summary
- Review Questions
Configuring CAR
- Configuring CAR
- CAR Overview
- CAR Configuration
- Report Scheduling
- System Database Configuration
- User Report Configuration
- Summary
- Review Questions
Using Additional Management and Monitoring Tools
- Using Additional Management and Monitoring Tools
- Remote Management Tools
- Dependency Records
- Password Changer Tool
- Cisco Dialed Number Analyzer
- Quality Report Tool
- Summary
- Review Questions
Part VIII: Appendix
Appendix A. Answers to Review Questions
Index
EAN: 2147483647
Pages: 329
