Enhanced IP Phone Features
The following features are considered fairly new features to the IP Telephony environment. They are supported in the CallManager 4.x versions and later.
Multiple Calls per Line Appearance
Cisco CallManager Release 4.0 and later enable multiple calls to exist on the same line. This feature eliminates the need to create multiple instances of the same directory number in different partitions to allow users to share a line and still be able to receive and place multiple calls out of the same line. Cisco CallManager will now support up to 200 active calls on a single line and one connected call per telephone at any time.
Two configuration settings enable multiple line appearances and are configured from the Directory Number Configuration window, as shown in Figure 16-8:
- Maximum Number of Calls This setting configures the maximum number of calls inbound or outbound per line appearance. You can configure up to a potential of 200 calls for a line on a device, with the limiting factor being the total number of calls that are configured on the device. As you configure the number of calls for one line, the number of calls that are available for another line decrease. The default specifies 4.
- Busy Trigger This setting, which works in conjunction with Maximum Number of Calls and Call Forward Busy (CFB), determines the maximum number of calls to be presented at the line. If the maximum number of calls is set to 50 and the busy trigger is set to 40, then incoming call 41 is rejected with a busy cause code (and will be forwarded if CFB is set). If this line is shared, all the lines must be busy before incoming calls will be rejected.
Figure 16-8. Multiple Line Appearance Configuration
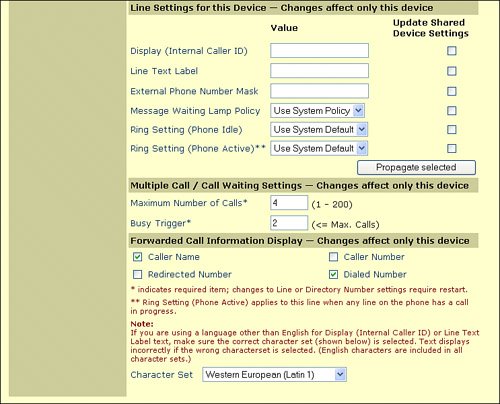
In Figure 16-8, the maximum number of calls is set to 4 and the busy trigger is set to 2. With this configuration, four calls can be active at a given time. If two calls are active, and a third call comes in, it is forwarded to the Call Forward Busy destination. The users, however, can place up to two more outbound calls before the line is at capacity. Keep in mind that multiple lines are needed to use various other features such as call transfer and conference.
Direct Transfer
Direct Transfer, which was introduced in Cisco CallManager 4.0, joins two established calls (defined as a call in the hold or connected state) into one call and drops the feature initiator from the call. Direct Transfer does not initiate a consultation call and does not put the active call on hold.
To implement Direct Transfer, the Direct Transfer initiator selects two calls at the Cisco IP Phone and presses the DirTrfr softkey, shown in Figure 16-9. The two calls are joined immediately and directly, and no conference resources are inserted. The initiating user is not included in the call after the transaction is complete, and the call is released from the IP phone of the initiator.
Figure 16-9. Direct Transfer
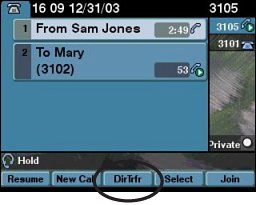
The following steps illustrate the user sequence of events in a typical Direct Transfer call:
|
Step 1. |
Sam and Kim are participating in an active call. |
|
Step 2. |
Sam asks Kim to transfer him to Mary. |
|
Step 3. |
Kim puts Sam on hold. |
|
Step 4. |
Kim calls Mary. |
|
Step 5. |
Kim touches the line that Sam is using (Cisco IP Phone 7970 only) or uses the Select softkey to select that line. |
|
Step 6. |
Kim presses the DirTrfr key, and Sam and Mary are immediately connected. |
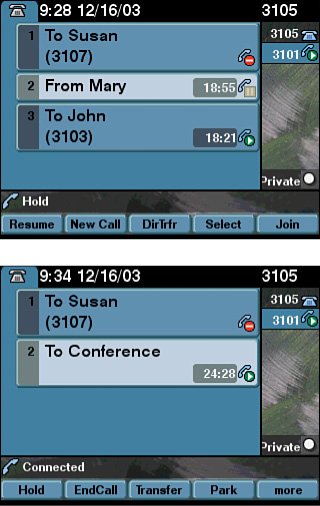
Call Join
Introduced in Cisco CallManager Release 4.0, the Call Join feature enables a user to link up to 15 established calls (for a total of 16) in a conference. Call Join does not create a consultation call (does not put the active call on hold).
To implement Call Join, the user chooses an active or held call and, using either the rocker key (Cisco IP Phones 7960 and 7940) and the Select softkey or the touch screen (Cisco IP Phone 7970), selects the appropriate line and then presses the Call Join softkey so that the selected calls and the join initiator are joined in an ad hoc conference. Figure 16-10 illustrates this process. The initiator can leave the Call Join session at any time, and the conference stays active. Only the initiator of the Call Join session can add participants to the conference or drop them from it.
Figure 16-10. Call Join
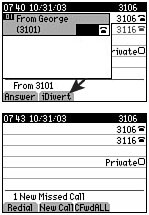
Immediate Divert to Voice Mail
The Immediate Divert feature is a feature that was introduced in Cisco CallManager Release 4.0. This feature allows you to immediately divert a call to a voice-messaging system. When the call is diverted, the line becomes available to make or receive new calls.
Immediate Divert supports an incoming call in the call-offering (ring in), call-on-hold, or call-active state. Immediate Divert supports an outgoing call in the call-on-hold or call-active state.
You can access the Immediate Divert feature by using the iDivert softkey, shown in Figure 16-11. This softkey can be applied to any Cisco IP Phone that can accept softkeys. Configure this softkey by using the Softkey Template Configuration window (discussed in the following section) of Cisco CallManager Administration.
Figure 16-11. Immediate Divert to Voice Mail
Immediate Divert requires the following components:
- Cisco CallManager Release 4.0 or later
- Cisco IP Phones (models 7905, 7912, 7920, 7940, 7960, or 7970)
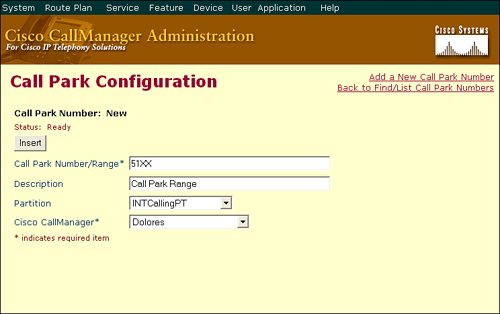
Call Park
The Call Park feature allows you to put a call on hold so that it can be retrieved from another telephone in the Cisco CallManager cluster.
For example, the ABC Department Store, which has an overhead paging system, is using the Call Park feature. A call for an employee on the floor comes in to a cashier desk. The cashier can park the call and announce the Call Park code on the overhead paging system, and the employee on the floor can pick up the call by using the Call Park code on a nearby telephone.
If you are on an active call on your telephone, you can park the call to a Call Park extension by pressing the Park softkey. The Cisco IP Phone will display the Call Park number that it assigned to your active call on the IP phone (the number will display on screen for 10 seconds, by default). Someone (or you) on another phone in your system can then dial the Call Park extension to retrieve the call.
Before the Call Park feature functions in your IPT network, a Call Park number or range must be configured for the cluster. When you invoke the Call Park feature, it is assigned a Call Park code. A user uses this code to pick up the call from another Cisco IP Phone on the same Cisco CallManager to which the original IP Phone is registered. When you assign the Call Park number or range to a partition, you can limit access to the Call Park feature based on the device calling search space. You should ensure that the Call Park number or range is unique throughout the Cisco CallManager cluster.
You can configure the Call Park feature by choosing Feature > Call Park. Select the Add a New Call Park Number hyperlink in the upper-right corner of the screen. The Call Park Configuration window shown in Figure 16-12 appears. Configure the Call Park number or range (CallManager accepts the same wildcards as you can use in a route pattern) and choose Insert.
Figure 16-12. Configuring Call Park
Call Pickup and Group Call Pickup
The purpose of Call Pickup is to enable a group of users who are seated near each other to cover incoming calls as a group. When a member of the group receives a call and is not available to answer it, any other member of the group can pick up the call from their own phone.
Three types of Call Pickup exist:
- Call Pickup Enables users to pick up incoming calls on any telephone within their own group. When the users press the Call Pickup button or PickUp softkey, Cisco CallManager automatically dials the appropriate Call Pickup number.
- Group Call Pickup Enables users to pick up incoming calls on any telephone within their own group or in another group. Users press the Group Call Pickup button or GpickUp softkey and dial the appropriate group number for Call Pickup. (The reason that users manually enter a number with Group Call Pickup but not with Call Pickup is because more than one group can exist and Cisco CallManager needs to know which one to dial. With Call Pickup, in effect, there is only one number corresponding to one group.)
- Other Group Call Pickup Allows users to pick up incoming calls in a group that is associated with their own group. This type of Call Pickup is covered in the next subtopic.
Other Group Call Pickup
Cisco CallManager Release 4.1(3) added support for Other Group Call Pickup. Other Group Call Pickup allows users to pick up incoming calls in a group that is associated with their own group. Cisco CallManager automatically searches for the incoming call in the associated groups to make the call connection when the user activates this feature from a Cisco IP Phone. Use the softkey OPickup for this type of Call Pickup.
When more than one associated group exists, the priority of answering calls for the associated group goes from the first associated group to the last associated group. For example, groups A, B, and C associate with group X, and the priority of answering calls goes to group A, then B, and then C.
Usually, within the same group, the longest alerting call (longest ringing time) is picked up first if multiple incoming calls occur in that group. For Other Group Call Pickup, priority takes precedence over the ringing time if multiple associated pickup groups are configured.
Both the idle and off-hook call states make the three softkeys Pickup, GPickup, and OPickup available.
Call Pickup Configuration
To configure Call Pickup, you must first add and configure the Call Pickup number and then assign the Call Pickup number to the desired DNs. Follow this procedure to add a Call Pickup number and group in Cisco CallManager Administration:
|
Step 1. |
Choose Feature > Call Pickup. |
|
Step 2. |
In the upper-right corner of the window, click the Add a New Call Pickup Number link. |
|
Step 3. |
The Pickup Group Configuration window opens, as shown in Figure 16-13. Figure 16-13. Configuring Call Pickup 
|
|
Step 4. |
Enter a unique pickup group name and unique pickup group number. |
|
Step 5. |
Assign the pickup group to a route partition as desired. |
|
Step 6. |
Click Insert to save the new Call Pickup Group number in the database. |
|
Step 7. |
Access the directory number you want to assign to the Call Pickup Group (Device > Phone > Select DN) and assign the Call Pickup Group, as shown in Figure 16-14. |
Figure 16-14. Assigning DNs to a Call Pickup Group
AutoCall Pickup
You can automate Call Pickup, Group Call Pickup, and Other Group Call Pickup by setting the service parameter Auto Call Pickup Enabled to True (available in CallManager 4.1(3)). (Choose Service > Service Parameters, and choose the publisher server and Cisco CallManager for the service.)
When this parameter is enabled, Cisco CallManager automatically connects users to the incoming call in their own pickup group, in another pickup group, or in a pickup group that is associated with their own group after users press the appropriate softkey on the phone. This action reduces keystrokes.
Automated Call Pickup connects the user to an incoming call in the user's own group. When the user presses the Pickup softkey on the phone, Cisco CallManager locates the incoming call in the group and completes the call connection. If automation is not enabled, the user must press the softkeys Pickup and Answer to make the call connection. You can also use this feature to connect the user to an incoming call in another pickup group. The user presses the GPickup softkey on the phone, and then dials the DN of the other pickup group. Upon receiving the DN, Cisco CallManager completes the call connection. If automation is not enabled, the user must press the softkeys GPickup and Answer and dial the DN of the other pickup group to make the call connection.
Automated Other Group Call Pickup connects the user to an incoming call in a group that is associated with the user's own group. The user presses the OPickup softkey on the phone. The Cisco CallManager automatically searches for the incoming call in the associated groups in the sequence that the administrator entered in the Pickup Group Configuration window and completes the call connection after the call is found. If automation is not enabled, the user must press the softkeys OPickup and Answer to make the call connection.
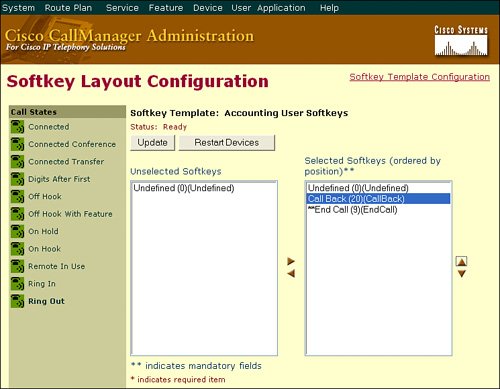
Cisco Call Back
The Cisco Call Back feature allows you to receive call-back notification on your Cisco IP Phone when a called-party line becomes available. To receive call-back notification, a user presses the CallBack softkey upon receiving a busy or ringback tone. You can activate call-back notification on a line on a Cisco IP Phone within the same Cisco CallManager cluster as your telephone. You cannot activate call-back notification if the called party has forwarded all calls to another extension (Call Forward All [CFA] feature).
For example, IP phone user A calls IP phone user B in the same cluster. If IP phone B is busy or there is no answer, IP phone user A activates the Cisco Call Back feature through the CallBack softkey. When IP phone B becomes available, IP Phone A receives an audible alert and visual notification that the DN is available. Cisco CallManager remembers the dialed number, so IP phone user A can then press the Dial softkey to reach IP phone user B.
Note
The Cisco Call Back feature requires Cisco CallManager Release 3.3 or later and a Cisco IP Phone that supports softkeys.
To configure Cisco Call Back, create a new softkey template (or modify one of your existing templates). Next, configure the softkey layout by choosing the On Hook call state and the CallBack option, as shown in Figure 16-15. Then, choose Ring Out, include the CallBack option by making sure that it is at the top of the list, and click Update.
Figure 16-15. Configuring Call Back
Part I: Cisco CallManager Fundamentals
Introduction to Cisco Unified Communications and Cisco Unified CallManager
Cisco Unified CallManager Clustering and Deployment Options
- Cisco Unified CallManager Clustering and Deployment Options
- The Two Sides of the Cisco Unified CallManager Cluster
- Cluster Redundancy Designs
- Call-Processing Deployment Models
- Summary
- Review Questions
Cisco Unified CallManager Installation and Upgrades
- Cisco Unified CallManager Installation and Upgrades
- Cisco Unified CallManager 4.x Clean Installation Process
- Upgrading Prior Cisco Unified CallManager Versions
- Summary
- Review Questions
Part II: IPT Devices and Users
Cisco IP Phones and Other User Devices
Configuring Cisco Unified CallManager to Support IP Phones
- Configuring Cisco Unified CallManager to Support IP Phones
- Configuring Intracluster IP Phone Communication
- IP Phone Configuration
- Case Study: Device Pool Design
- Summary
- Review Questions
Cisco IP Telephony Users
- Cisco IP Telephony Users
- Cisco CallManager User Database
- Cisco CallManager User Configuration
- User Logon and Device Configuration
- Summary
- Review Questions
Cisco Bulk Administration Tool
- Cisco Bulk Administration Tool
- The Cisco Bulk Administration Tool
- Using the Tool for Auto-Registered Phone Support
- Summary
- Review Questions
Part III: IPT Network Integration and Route Plan
Cisco Catalyst Switches
- Cisco Catalyst Switches
- Catalyst Switch Role in IP Telephony
- Powering the Cisco IP Phone
- Data and Voice VLANs
- Configuring Class of Service
- Summary
- Review Questions
Configuring Cisco Gateways and Trunks
- Configuring Cisco Gateways and Trunks
- Cisco Gateway Concepts
- Configuring Access Gateways
- Cisco Trunk Concepts
- Configuring Intercluster Trunks
- SIP and Cisco CallManager
- Summary
- Review Questions
Cisco Unified CallManager Route Plan Basics
- Cisco Unified CallManager Route Plan Basics
- External Call Routing
- Route Plan Configuration Process
- Summary
- Review Questions
Cisco Unified CallManager Advanced Route Plans
- Cisco Unified CallManager Advanced Route Plans
- Route Filters
- Discard Digit Instructions
- Transformation Masks
- Translation Patterns
- Route Plan Report
- Summary
- Review Questions
Configuring Hunt Groups and Call Coverage
- Configuring Hunt Groups and Call Coverage
- Call Distribution Components
- Configuring Line Groups, Hunt Lists, and Hunt Pilots
- Summary
- Review Questions
Implementing Telephony Call Restrictions and Control
- Implementing Telephony Call Restrictions and Control
- Class of Service Overview
- Partitions and Calling Search Spaces Overview
- Time-of-Day Routing Overview
- Configuring Time-of-Day Routing
- Time-of-Day Routing Usage Scenario
- Summary
- Review Questions
Implementing Multiple-Site Deployments
- Implementing Multiple-Site Deployments
- Call Admission Control
- Survivable Remote Site Telephony
- Summary
- Review Questions
Part IV: VoIP Features
Media Resources
- Media Resources
- Introduction to Media Resources
- Conference Bridge Resources
- Media Termination Point Resources
- Annunciator Resources
- Transcoder Resources
- Music on Hold Resources
- Media Resource Management
- Summary
- Review Questions
Configuring User Features, Part 1
- Configuring User Features, Part 1
- Basic IP Phone Features
- Softkey Templates
- Enhanced IP Phone Features
- Barge and Privacy
- IP Phone Services
- Summary
- Review Questions
Configuring User Features, Part 2
- Configuring User Features, Part 2
- Cisco CallManager Extension Mobility
- Client Matter Codes and Forced Authentication Codes
- Call Display Restrictions
- Malicious Call Identification
- Multilevel Precedence and Preemption
- Summary
- Review Questions
Configuring Cisco Unified CallManager Attendant Console
- Configuring Cisco Unified CallManager Attendant Console
- Introduction to Cisco CallManager Attendant Console
- Call Routing and Call Queuing
- Server and Administration Configuration
- Cisco Attendant Console Features
- Summary
- Review Questions
Configuring Cisco IP Manager Assistant
- Configuring Cisco IP Manager Assistant
- Cisco IP Manager Assistant Overview
- Cisco IP Manager Assistant Architecture
- Configuring Cisco IPMA for Shared-Line Support
- Summary
- Review Questions
Part V: IPT Security
Securing the Windows Operating System
- Securing the Windows Operating System
- Threats Targeting the Operating System
- Security and Hot Fix Policy
- Operating System Hardening
- Antivirus Protection
- Cisco Security Agent
- Administrator Password Policy
- Common Windows Exploits
- Security Taboos
- Summary
- Review Questions
Securing Cisco Unified CallManager Administration
- Securing Cisco Unified CallManager Administration
- Threats Targeting Remote Administration
- Securing CallManager Communications Using HTTPS
- Multilevel Administration
- Summary
- Review Questions
Preventing Toll Fraud
- Preventing Toll Fraud
- Toll Fraud Exploits
- Preventing Call Forward and Voice-Mail Toll Fraud Using Calling Search Spaces
- Blocking Commonly Exploited Area Codes
- Using Time-of-Day Routing
- Using FAC and CMC
- Restricting External Transfers
- Dropping Conference Calls
- Summary
- Review Questions
Hardening the IP Phone
Understanding Cryptographic Fundamentals
- Understanding Cryptographic Fundamentals
- What Is Cryptography?
- Symmetric Encryption
- Asymmetric Encryption
- Hash Functions
- Digital Signatures
- Summary
- Review Questions
Understanding the Public Key Infrastructure
- Understanding the Public Key Infrastructure
- The Need for a PKI
- PKI as a Trusted Third-Party Protocol
- PKI Entities
- PKI Enrollment
- PKI Revocation and Key Storage
- PKI Example
- Summary
- Review Questions
Understanding Cisco IP Telephony Authentication and Encryption Fundamentals
- Understanding Cisco IP Telephony Authentication and Encryption Fundamentals
- Threats Targeting the IP Telephony System
- How CallManager Protects Against Threats
- PKI Topologies in Cisco IP Telephony
- PKI Enrollment in Cisco IP Telephony
- Keys and Certificate Storage in Cisco IP Telephony
- Authentication and Integrity
- Encryption
- Summary
- Review Questions
Configuring Cisco IP Telephony Authentication and Encryption
- Configuring Cisco IP Telephony Authentication and Encryption
- Authentication and Encryption Configuration Overview
- Enabling Services Required for Security
- Using the CTL Client
- Working with Locally Significant Certificates
- Configuring the Device Security Mode
- Negotiating Device Security Mode
- Generating a CAPF Report
- Summary
- Review Questions
Part VI: IP Video
Introducing IP Video Telephony
- Introducing IP Video Telephony
- IP Video Telephony Solution Components
- Video Call Concepts
- Video Protocols Supported in Cisco CallManager
- Bandwidth Management
- Call Admission Control Within a Cluster
- Call Admission Control Between Clusters
- Summary
- Review Questions
Configuring Cisco VT Advantage
- Configuring Cisco VT Advantage
- Cisco VT Advantage Overview
- How Calls Work with Cisco VT Advantage
- Configuring Cisco CallManager for Video
- Configuring Cisco IP Phones for Cisco VT Advantage
- Installing Cisco VT Advantage on a Client
- Summary
- Review Questions
Part VII: IPT Management
Introducing Database Tools and Cisco Unified CallManager Serviceability
- Introducing Database Tools and Cisco Unified CallManager Serviceability
- Database Management Tools
- Cisco CallManager Serviceability Overview
- Tools Overview
- Summary
- Review Questions
Monitoring Performance
- Monitoring Performance
- Performance Counters
- Microsoft Event Viewer
- Microsoft Performance Monitor
- Real-Time Monitoring Tool Overview
- Summary
- Review Questions
Configuring Alarms and Traces
- Configuring Alarms and Traces
- Alarm Overview
- Alarm Configuration
- Trace Configuration
- Trace Analysis
- Trace Collection
- Bulk Trace Analysis
- Additional Trace Tools
- Summary
- Review Questions
Configuring CAR
- Configuring CAR
- CAR Overview
- CAR Configuration
- Report Scheduling
- System Database Configuration
- User Report Configuration
- Summary
- Review Questions
Using Additional Management and Monitoring Tools
- Using Additional Management and Monitoring Tools
- Remote Management Tools
- Dependency Records
- Password Changer Tool
- Cisco Dialed Number Analyzer
- Quality Report Tool
- Summary
- Review Questions
Part VIII: Appendix
Appendix A. Answers to Review Questions
Index
EAN: 2147483647
Pages: 329
