Track Mattes
Track mattes allow you to use the alpha or luminance information of one layer as the transparency of another layer (Figure 3.38). This is actually the normal way to apply a matte channel in many compositing applications, which don't have the concept of the alpha channel so firmly integrated into the overall pipeline as After Effects.
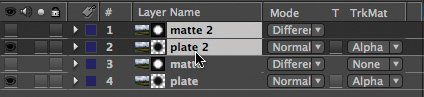
Figure 3.38. A basic alpha track matte setup: The alpha of layer 1 is set as the alpha of layer 2 via the highlighted pull-down menu. The small icons just to the left of the layer names help remind you that this relationship has been set up, and which is the color layer and which is the matte.

The perceptual difference between an alpha channel and a track matte isn't, for the most part, too difficult to grasp. In both cases, you have pixels with a value (in 8-bit color space) between 0 and 255, whether they are color or grayscale alpha pixels. That any image would be interchangeable with the alpha channel shouldn't be too shocking; even if you're using the luminance of a full-color image, After Effects simply averages the 0 to 255 value of the three color channels into one value. The principle doesn't even change in 16-bit colorit's just the same range of values, with finer increments, being sampled.
You set a track matte by placing the layer that contains the transparency data directly above its target layer in the Timeline and choosing one of the four options from the Track Matte pull-down menu:
- Alpha Matte Uses the alpha channel of the track matte layer as if it were the alpha of the underlying target layer
- Alpha Inverted Matte Does the same as Alpha Matte but inverts the result, so that the lighter areas of the alpha are transparent and the darker areas are opaque
- Luma Matte Uses the luminance data of the track matte layer (the relative brightness of the red, green, and blue channels combined) as if it were the alpha of the underlying target layer
- Luma Inverted Matte Does the same as Luma Matte but inverts the result, so that the lighter areas of the alpha are transparent and the darker areas are opaque
By default, the source layer for the track matte (the upper of the two) has its visibility turned off when you set the track matte, which is almost always what you want. This sets the track matte with a single click to the Track Matte pull-down menu. If you need to adjust the source after setting it, you can always temporarily turn it back on; just remember to turn it back off when you're finished.
Why They're Useful
Track mattes are not the only way to apply alpha or luminance data to the transparency of a layer, but they're the clearest and most straightforward way. They help you out of a lot of jams in which creating a selection via other means would be inconvenient or in which mask or matte features constrain you.
For example, it's not possible to track a mask in After Effects. But it is possible to apply the mask to a track matte instead, and then to track that layer (instead of the mask itself). Chapter 8, "Effective Motion Tracking," discusses this in detail.
In Chapter 6 you will learn of the many ways to pull a key, including hi-con mattes. Some of these methods apply their results directly to the alpha channel of the target layer, but others cannot. Additionally, specific operations such as blue-screen keying can change the color of the source (automatically removing blue spill from the foreground); applying the key via a track matte to a duplicate clean source instead is an effective workaround if you want the matte but not the despill.
Why They're Occasionally Tricky
Unlike with parented layers (described in Chapter 2, "The Timeline"), selecting a track matte layer does not lock it to the current layer. In fact, setting a track matte means that no matter which layer is next higher in the stack, that layer is the source of the matte. Thus, accidentally moving a layer in between a layer and its track matte can cause (easily solvable but nonetheless) disastrous results.
When you duplicate a layer with a track matte activated (Ctrl+D/Cmd+D), After Effects automatically duplicates it above the matte layer or two layers above the current layer. If you duplicate the matte layer at the same time, the duplicate will also move up two layers, so that all layers preserve their proper track mattes (Figure 3.39). That's good. What's bad is neglecting to duplicate both layers, because the track matte remains active in the duplicate layer. If it has been duplicated to the top of the stack, you can't even see that it's active, and it waits there like a ticking time bomb for you to position another layer above it, suddenly changing its transparency.
Figure 3.39. Selecting and duplicating the layers from Figure 3.37 creates two new layers that leapfrog above the previous layers to maintain the proper color/matte relationship in the source and duplicate layers.
Notes
If the layer to which the track matte is applied already has an alpha channel, then the new selection area created by the track matte will be opaque only in the areas that are opaque in both mattes. So applying a track matte in this situation is like adding a subselection to the current selection.
Render Order
Occasionally tricky is the render order of track mattes: In most cases, adjustments and effects that you apply to the matte layer are calculated prior to creating the target matte, but in other cases you must first precompose for applied effects and adjustments to activate prior to application of the track matte.
And what happens when you apply a track matte to another track matte? Generally speaking, this will not work and the practice should be avoided. It will work in some cases, however, and the user interface does not prohibit this behavior so you can try it. A better idea is certainly to precompose the first instance of track matting and apply the second track matte to that nested composition.
Notes
If there seems to be some doubt as to whether edits you are applying to the track matte are properly affecting the target, if possible, first crank up the effect applied to the track matte, so it's obvious whether it is applied or not. If it's not, you must precompose the track matte layer; this forces it to render prior to track matting.
The next chapter, "Optimizing Your Project," looks in depth at solving issues related to render order such as these; you'll begin to see how After Effects can be a visual problem-solving tool for such situations.
Optimizing Your Projects |
Section I. Working Foundations
The 7.0 Workflow
- The 7.0 Workflow
- Workspaces and Panels
- Making the Most of the UI
- Settings: Project, Footage, Composition
- Previews and OpenGL
- Effects & Presets
- Output: The Render Queue
- Study a Shot like an Effects Artist
The Timeline
- The Timeline
- Organization
- Animation Methods
- Keyframes and The Graph Editor
- Uber-mastery
- Transform Offsets
- Motion Blur
- Manipulating Time Itself
- In Conclusion
Selections: The Key to Compositing
- Selections: The Key to Compositing
- The Many Ways to Create Selections
- Compositing: Science and Nature
- Alpha Channels and Premultiplication
- Masks
- Combining Multiple Masks
- Putting Masks in Motion
- Blending Modes: The Real Deal
- Track Mattes
Optimizing Your Projects
- Optimizing Your Projects
- Navigating Multiple Compositions
- Precomposing and Nesting
- Adjustment and Guide Layers
- Understanding Rendering Order
- Optimizing After Effects
- Onward to Effects
Section II. Effects Compositing Essentials
Color Correction
Color Keying
- Color Keying
- Good Habits and Best Practices
- Linear Keyers and Hi-Con Mattes
- Blue-Screen and Green-Screen Keying
- Understanding and Optimizing Keylight
- Fixing Typical Problems
- Conclusion
Rotoscoping and Paint
- Rotoscoping and Paint
- Articulated Mattes
- Working Around Limitations
- Morphing
- Paint and Cloning
- Conclusion
Effective Motion Tracking
- Effective Motion Tracking
- The Essentials
- Optimizing Tracking Using 3D
- Extending a Track with Expressions
- Tracking for Rotoscoping
- Using 3D Tracking Data
- Conclusion
Virtual Cinematography
- Virtual Cinematography
- 5D: Pick Up the Camera
- Storytelling and the Camera
- Camera Blur
- The Role of Grain
- Film and Video Looks
- Conclusion
Expressions
- Expressions
- Logic and Grammar
- Muting Keyframes
- Linking Animation Data
- Looping Animations
- Smoothing and Destabilizing
- Offsetting Layers and Time
- Conditionals and Triggers
- Tell Me More
Film, HDR, and 32 Bit Compositing
- Film, HDR, and 32 Bit Compositing
- Details
- Film 101
- Dynamic Range
- Cineon Log Space
- Video Gamma Space
- Battle of the Color Spaces
- Floating Point
- 32 Bits per Channel
- Conclusion
Section III. Creative Explorations
Working with Light
- Working with Light
- Light Source and Direction
- Creating a Look with Color
- Backlighting, Flares, Light Volume
- Shadows and Reflected Light
- HDR Lighting
- Conclusion
Climate: Air, Water, Smoke, Clouds
- Climate: Air, Water, Smoke, Clouds
- Particulate Matter
- Sky Replacement
- The Fog, Smoke, or Mist Rolls In
- Billowing Smoke
- Wind
- Water
- Conclusion
Pyrotechnics: Fire, Explosions, Energy Phenomena
- Pyrotechnics: Fire, Explosions, Energy Phenomena
- Firearms
- Sci-Fi Weaponry
- Heat Distortion
- Fire
- Explosions
- In a Blaze of Glory
Learning to See
Index
EAN: 2147483647
Pages: 157
