Example Five: VoteDialog
Example Five VoteDialog
 |
The last example in this chapter is VoteDialog.java. [1] The main purpose of this example is to illustrate the use of dialogs, but we'll also explain how to set up radio buttons.
|
In this program, the user casts a vote by selecting a radio button and clicking the Vote button. After the button is clicked, a dialog appears with an informational message or a follow-up question. You can close the dialog either by clicking a button in the dialog or explicitly by clicking the close button.
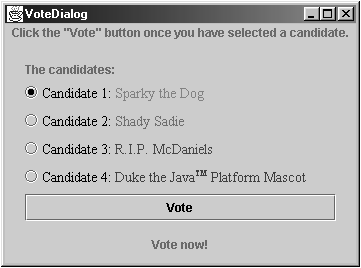
Here's a picture of the VoteDialog application (Figure 107).
Figure 107. The VoteDialog application.
Radio Buttons
This application has one action listener that listens to clicks on the Vote button. Each time the action listener receives an event, the application determines which radio button was selected and displays the appropriate dialog. For each group of radio buttons, you need to create a ButtonGroup instance and add each radio button to it. The ButtonGroup takes care of unselecting the previously selected button when the user selects another button in the group. You should generally initialize a group of radio buttons so that one is selected. However, the API doesn't enforce this rule; a group of radio buttons can have no initial selection. Once the user has made a selection, exactly one button is selected from then on.
Here is the code from VoteDialog.java in which we create the ButtonGroup instance and add four radio buttons to it. The setActionCommand method associates a specific dialog with each radio button item. We use the setSelected method to specify the default selected radio button.
final int numButtons = 4;
JRadioButton[] radioButtons = new JRadioButton[numButtons];

final ButtonGroup group = new ButtonGroup();
...
final String defaultMessageCommand = "default";
final String yesNoCommand = "yesno";
final String yeahNahCommand = "yeahnah";
final String yncCommand = "ync";

radioButtons[0] = new JRadioButton("
Candidate 1: Sparky the Dog
"); radioButtons[0].setActionCommand(defaultMessageCommand); radioButtons[1] = new JRadioButton("
Candidate 2: Shady Sadie
"); radioButtons[1].setActionCommand(yesNoCommand); radioButtons[2] = new JRadioButton("
Candidate 3: R.I.P. McDaniels
"); radioButtons[2].setActionCommand(yeahNahCommand); radioButtons[3] = new JRadioButton("
Candidate 4: Duke the JavaTM Platform Mascot
"); radioButtons[3].setActionCommand(yncCommand); for (int i = 0; i < numButtons; i++) { group.add(radioButtons[i]); } // Select the first button by default. radioButtons[0].setSelected(true);
Note the use of HTML code on the radio buttons. This feature was added to the version 1.3 of the Java 2 platform.
Dialogs
In our previous examples, our top-level container has always been a JFrame. Several classes support dialogswindows that are more limited than frames. To create simple, standard dialogs, you use the JOptionPane [1] class. The dialogs that JOptionPane provides are modal. When a modal dialog is visible, it blocks user input to all other windows in the program.
[1] API documentation for this class is available on this book's CD and online at http://java.sun.com/j2se/1.3/docs/api/javax/swing/JOptionPane.html
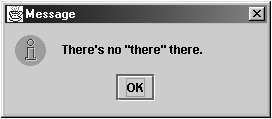
The code for simple dialogs can be minimal. For example, Figure 108 shows an instructive dialog.
Figure 108. A simple dialog.
Here is the code that creates and shows that dialog:
JOptionPane.showMessageDialog(frame, "There's no "there" there.");
Every dialog is dependent on a frame. When that frame is destroyed, so are its dependent dialogs. When the frame is iconified, its dependent dialogs disappear from the screen. When the frame is deiconified, its dependent dialogs return to the screen. The AWT automatically provides this behavior.
JOptionPane Features
Using JOptionPane, you can create and customize several kinds of dialogs. JOptionPane provides support for laying out standard dialogs, providing icons, specifying the dialog's title and text, and customizing the button text. Other features allow you to customize the components the dialog displays and to specify where the dialog should appear on-screen.
JOptionPane's icon support lets you easily specify which icon the dialog displays. You can use a custom icon, no icon at all, or any one of four standard JOptionPane icons (question, information, warning, and error). Each look and feel has its own versions of the four standard icons. The following figure shows the icons used in the Java look and feel.
Figure 109. Icons provided by JOptionPane (Java look and feel shown).

Creating and Showing Simple Dialogs
For most simple modal dialogs, you can use either the showMessageDialog or the showOptionDialog method. The showMessageDialog method displays a simple, one-button dialog. The show-OptionDialog method displays a customized dialogit can display a variety of buttons with customized button text and can contain a standard text message or a collection of components.
showMessageDialog
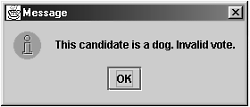
Displays a modal dialog with one button, which is labeled OK (or the localized equivalent). You can easily specify the message, icon, and title that the dialog displays. Table 50 shows an example of the use of showMessageDialog in VoteDialog.java.
Table 50. Examples Using showMessageDialog
showOptionDialog
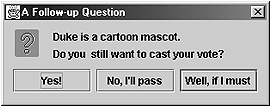
Displays a modal dialog with the specified buttons, icons, message, title, and so on. You can use this method to change the text that appears on the buttons of standard dialogs. You can also perform many other kinds of customization. Table 51 shows an example that uses showOptionDialog.
Table 51. An Example Using showOptionDialog
Object[] options = {"Yes!",
 "No, I'll pass",
 "Well, if I must"};
int n = JOptionPane.showOptionDialog(frame,
 "Duke is a cartoon mascot.
"
 + "Do you still want to cast your vote?",
 "A Follow-up Question",
 JOptionPane.YES_NO_CANCEL_OPTION,
 JOptionPane.QUESTION_MESSAGE,
 null,
 options,
 options[2]);
The arguments to all the showXxxDialog methods and JOptionPane constructors are standardized, although the number of arguments for each method and constructor varies. The following list describes each argument.
Component parentComponent
The first argument to each showXxxDialog method is always the parent component, which must be a frame, a component inside a frame, or null. If you specify a frame, the dialog will appear over the center of the frame and will depend on that frame. If you specify a component inside a frame, the dialog will appear over the center of that component and will depend on that component's frame. If you specify null, the look and feel picks an appropriate position for the dialoggenerally the center of the screenand the dialog doesn't depend on any visible frame.
The JOptionPane constructors do not include this argument. Instead, you specify the parent frame when you create the JDialog that contains the JOptionPane, and you use the JDialog setLocationRelativeTo method to set the dialog's position.
Object message
This required argument specifies what the dialog should display in its main area. Generally you specify a string, which results in the dialog's displaying a label with the specified text.
String title
This is the title of the dialog.
int optionType
This specifies the set of buttons that appears at the bottom of the dialog. You can choose one of the following four standard sets: DEFAULT_OPTION, YES_NO_OPTION, YES_NO_CANCEL_OPTION, OK_CANCEL_OPTION.
int messageType
This argument determines the icon displayed in the dialog. Choose from one of the following values: PLAIN_MESSAGE (no icon), ERROR_MESSAGE, INFORMATION_MESSAGE, WARNING_MESSAGE, QUESTION_MESSAGE.
Icon icon
This specifies the custom icon to display in the dialog.
Object[] options
This further specifies the option buttons to appear at the button of the dialog. Generally, you specify an array of strings for the buttons.
Object initialValue
This specifies the default value to be selected. You can either let the default icon be used or specify the icon, using the messageType or the icon argument. By default, a dialog created with showMessageDialog displays the information icon, and a dialog created with showConfirmDialog displays the question icon. To specify that the dialog display a standard icon or no icon, specify the message type. To specify a custom icon, use the icon argument.
Getting User Input from a Dialog
As the code snippets in Tables 50 and 51 show, the showMessageDialog and showOptionDialog methods return an integer indicating the user's choice. The values for this integer are YES_OPTION, NO_OPTION, CANCEL_OPTION, OK_OPTION, and CLOSED_OPTION. Each option, except for CLOSED_OPTION, corresponds to the button the user clicked. When CLOSED_OPTION is returned, it indicates that the user closed the dialog window explicitly rather than by choosing a button inside the option pane. The following code detects whether the yes or no button was selected or the dialog was closed and then sets the frame's label with the appropriate text.
// yes/no dialog
} else if (command == yesNoCommand) {
 int n = JOptionPane.showConfirmDialog(
 frame, "This candidate is a convicted felon.

 Do you still want to vote for her?",
 "A Follow-up Question",
 JOptionPane.YES_NO_OPTION);
 if (n == JOptionPane.YES_OPTION) {
 setLabel("OK. Keep an eye on your wallet.");
 } else if (n == JOptionPane.NO_OPTION) {
 setLabel("Whew! Good choice.");
 } else {
 setLabel("It is your civic duty to cast your vote.");
 }
...
Even if you change the strings that the standard dialog buttons display, the return value is still one of the predefined integers. For example, a YES_NO_OPTION dialog always returns one of the following values: YES_OPTION, NO_OPTION, or CLOSED_OPTION.
You can get more information on dialogs in the section "How to Make Dialogs" in the book The JFC Swing Tutorial. This section is also available on this book's CD and online at: http://java.sun.com/docs/books/tutorial/uiswing/components/dialog.html
Now that we've finished our progress through the examples in this chapter, it's time to look at two important topics: Layout Management (page 375) and Threads and Swing (page 378).
Getting Started
- About the Java Technology
- How Will Java Technology Change My Life?
- First Steps (Win32)
- First Steps (UNIX/Linux)
- First Steps (MacOS)
- A Closer Look at HelloWorld
- Questions and Exercises
- Code Samples
Object-Oriented Programming Concepts
- What Is an Object?
- What Is a Message?
- What Is a Class?
- What Is Inheritance?
- What Is an Interface?
- How Do These Concepts Translate into Code?
- Summary
- Questions and Exercises
- Code Samples
Language Basics
Object Basics and Simple Data Objects
Classes and Inheritance
Interfaces and Packages
Handling Errors Using Exceptions
- What Is an Exception?
- The Catch or Specify Requirement
- Catching and Handling Exceptions
- Specifying the Exceptions Thrown by a Method
- How to Throw Exceptions
- Runtime Exceptions The Controversy
- Advantages of Exceptions
- Summary of Exceptions
- Questions and Exercises
- Code Samples
Threads: Doing Two or More Tasks at Once
- What Is a Thread?
- Using the Timer and TimerTask Classes
- Customizing a Threads run Method
- The Life Cycle of a Thread
- Understanding Thread Priority
- Synchronizing Thread
- Grouping Threads
- Summary of Threads
- Questions and Exercises
- Code Samples
I/O: Reading and Writing
- Overview of I/O Streams
- Using the Streams
- Object Serialization
- Working with Random Access Files
- And the Rest…
- Summary of Reading and Writing
- Questions and Exercises
- Code Samples
User Interfaces That Swing
- Overview of the Swing API
- Your First Swing Program
- Example Two: SwingApplication
- Example Three: CelsiusConverter
- Example Four: LunarPhases
- Example Five: VoteDialog
- Layout Management
- Threads and Swing
- Visual Index to Swing Components
- Summary
- Questions and Exercises
- Code Samples
Appendix A. Common Problems and Their Solutions
- Appendix A. Common Problems and Their Solutions
- Getting Started Problems
- General Programming Problems
- Applet Problems
- User Interface Problems
Appendix B. Internet-Ready Applets
- Appendix B. Internet-Ready Applets
- Overview of Applets
- AWT Components
- Taking Advantage of the Applet API
- Practical Consideration of Writing Applets
- Finishing an Applet
- Swing-Based Applets
- Code Samples
Appendix C. Collections
- Appendix C. Collections
- Introduction
- Interfaces
- Implementations
- Algorithms
- Custom Implementations
- Interoperability
Appendix D. Deprecated Thread Methods
- Appendix D. Deprecated Thread Methods
- Why Is Thread.stop Deprecated?
- Why Are Thread.suspend and Thread.resume Deprecated?
- What about Thread.destroy?
- Why Is Runtime.runFinalizersOnExit Deprecated?
Appendix E. Reference
EAN: 2147483647
Pages: 125
