Cisco Unified CallManager 4.x Clean Installation Process
A clean installation of Cisco CallManager has always been an extremely simple process. As you perform the Cisco CallManager installation, the automated setup process prompts you for the information that is necessary to build Windows 2000, Microsoft SQL Server 2000, and Cisco CallManager with a base configuration. The entire operating system installation process, excluding preinstallation tasks, takes approximately 25 to 45 minutes per server, depending on your server type. Installing Cisco CallManager, excluding pre- and postinstallation tasks, takes 45 to 90 minutes per server, depending on your server type.
Installation Disks
All Cisco MCSs and customer-provided servers that meet approved Cisco configuration standards ship with a blank hard drive. When you purchase a Cisco IP telephony application, you use the appropriate disks to install or upgrade the operating system and application:
- Disk 1: Cisco IP Telephony Server Operating System Hardware Detection Disk Checks the server and displays an error message if it detects an unsupported server. After you boot the server using the Hardware Detection CD-ROM, the automated installation process prompts for the correct CD-ROMs to use based on the type of hardware platform detected.
- Disk 2: Cisco IP Telephony Server Operating System Installation and Recovery Disk Installs the operating system. Use only one of the server-specific Cisco IP Telephony Server Operating System Installation and Recovery disks that come in your software kit. Depending on your platform, the Operating System disc could be CD-ROM or DVD-based. After the operating system installation, a prompt instructs you to insert the appropriate Cisco CallManager software disk into the drive.
- Disk 3: Cisco CallManager 4.1 Software Disk This disk installs the Cisco CallManager application on the server.
You might also receive a Cisco IP Telephony Server Operating System Upgrade Disk. Use this disk to upgrade the operating system on existing (not new) servers in the cluster. You do not need to use this disk if you are performing a new operating system installation.
Installation Configuration Data
As mentioned previously, the installation process for Cisco CallManager is automated by a step-by-step wizard. You will initially boot off the Hardware Detection CD-ROM, which will walk you through a wizard prompting you for the basic configuration data to get the server running. The process erases all data on the server hard disk. During the installation, you are prompted for the following items:
- New installation or server replacement Choose this option if you are installing the Cisco IP telephony application for the first time, overwriting an existing installation, or replacing a server. To replace the server, you must store the data to a network directory or tape device before the operating system installation. Choosing this setting erases all existing drives.
- Cisco product key Cisco supplies a product key when you purchase a Cisco IP telephony product. The product key is based on a file encryption system that allows you to install only the components that you have purchased. It also prevents you from installing other supplied software for general use. The product key consists of alphabetical characters only.
- Username and organization name The system will prompt you for a username and an organization name to register the software product that you are installing. Do not leave the field blank. You can enter letters, numbers, hyphens (-), and underscores (_).
- Computer name The system will prompt you to assign a unique computer name, using 15 characters or fewer, to each Cisco CallManager server. The computer name can contain alphabetic and numeric characters, hyphens, and underscores, but it must begin with a letter of the alphabet. Follow your local naming conventions, if possible. If you want to change the computer name after the application installation, you must completely reinstall the operating system and the application.
- Workgroup The system will also prompt you for a workgroup name. A workgroup consists of a collection of computers that share the same workgroup name. Computers in the same workgroup can more easily communicate with each other across the network. Ensure that this entry, which must also be 15 characters or fewer, follows the same naming conventions as the computer name.
- Domain suffix When prompted, you must enter the Domain Name System (DNS) suffix in the format "mydomain.com" or "mycompany.mydomain.com." If you are not using DNS, use a fictitious domain suffix, such as fictitioussite.com.
- TCP/IP properties You must assign an IP address, subnet mask, and default gateway when installing a Cisco CallManager server. Changing the Cisco CallManager IP address after you install the software can be a tedious process, so be sure to plan accordingly.
Caution
It is strongly recommended that you choose static IP information, which ensures that the Cisco CallManager server obtains a fixed IP address. With this selection, Cisco IP Phones can register with Cisco CallManager when the telephones are plugged into the network. Using Dynamic Host Configuration Protocol (DHCP) can cause problems, including failure of the telephony system.
- DNS You can identify a primary DNS server for this optional field. By default, the telephones will attempt to connect to Cisco CallManager using DNS. Therefore, you must verify that the DNS server contains a mapping of the IP address and the fully qualified domain name (FQDN) of the Cisco CallManager server. If you do not use DNS, use the server IP address, instead of a server name, to register the telephones with Cisco CallManager.
Note
Before you begin installing multiple servers in a cluster, you must have a name resolution method in place, such as DNS, Windows Internet Naming Service (WINS), or local name resolution using a configured LMHOSTS file. If you use DNS, you must verify that the DNS server contains a mapping of the IP address and the hostname of the server that you are installing. This verification must take place before you begin the installation. If you use local name resolution, ensure that the LMHOSTS file is updated on the existing servers in the cluster before you begin the installation on the new subscriber server. You must add the same information to the LMHOSTS file on the new server during installation.
Tip
Although it might seem tedious, Cisco considers the creation of LMHOST file IP address to hostname mappings on each Cisco CallManager server a better practice. Using DNS services introduces another point of failure for the voice network.
- SNMP community string The Windows 2000 Simple Network Management Protocol (SNMP) agent provides security through the use of community names and authentication traps. Cisco sets the community rights to none for security reasons. If you want to use SNMP with this server, you must configure it.
- Database server You must determine whether you will configure this server as a publisher database server or as a subscriber database server through a radio button selection during the Cisco CallManager installation. This selection is permanent. You must reinstall the Cisco CallManager server if you want to reassign the database server type at a later date.
Note
You must install a Cisco CallManager publisher server before you can install any subscriber servers. When you are configuring a subscriber database server, ensure that the server that you are installing can connect to the publisher database server during the installation. This connection facilitates the copying of the publisher database to the local drive on the subscriber server. You must supply the name of the publisher database server and a username and password with administrator access rights on that server. The installation will be discontinued if, for any reason, the publisher server cannot be authenticated.
- New password for the system administrator Cisco CallManager Releases 3.0 and later support password protection. A prompt at the end of the installation procedure will ask you to supply a new password for the system administrator.
Note
For Cisco CallManager database replication, you must enter the same Administrator account password for the publisher and all of the subscribers in the cluster. The installation wizard will request this password.
Sample Configuration Data Worksheet
Table 3-1 shows the configuration information that you need to install the Cisco CallManager software on your server. You should complete all of the fields in the table, unless otherwise noted. You must gather this information for each Cisco CallManager server that you are installing in the cluster. Make copies of this table, and record your entries for each server in a separate table. Table 3-1 summarizes the data you should have available when you begin the installation.
|
Configuration |
Data |
|---|---|
|
Cisco product key |
|
|
Username |
|
|
Name of your organization |
|
|
Computer name |
|
|
Workgroup |
|
|
Microsoft NT domain (optional) |
|
|
DNS domain suffix |
|
|
Current time zone, date, and time |
|
|
DHCP parameters |
It is recommended that you program a fixed IP address in TCP/IP properties for the server instead of using DHCP. |
|
TCP/IP properties (required if DHCP is not used):
|
|
|
DNS servers (optional):
WINS servers (optional):
|
|
|
Database server (choose one):
If you are configuring a subscriber server, supply the username and password of the publishing database server:
|
|
|
Backup (choose one or both):
|
|
|
New Windows 2000 administrator password |
Postinstallation Procedures
After you complete the Cisco CallManager software installation, the installation wizard will prompt you to change all passwords used in the Cisco CallManager cluster. These passwords should be the same on all servers you install into the cluster. In addition, many supporting services are running on your server that you might be able to stop. The fewer services you have running on your server, the more server resources you will have available to support the IP telephony network. In addition, running more services on the Cisco CallManager server introduces more security vulnerabilities for the underlying Windows operating system. You should stop all of the following services on both the Publisher and Subscriber servers in your cluster and set them to manual-start status unless they are otherwise needed on the system:
- DHCP client
- Fax service
- FTP Publishing Service
- Smart Card (unless using security tokens)
- Smart Card Helper
- Computer browser
- Distributed File System
- License Logging Service
By default, the installation wizard configures all Subscribers with Internet Information Server (IIS) Services running. This allows you to make changes to the cluster by accessing the web interface on your subscriber servers. Even though you are accessing the web interface on the Subscriber server, the changes are actually being made on the Publisher server (because it has the only writable copy of the database). In addition, allowing the web services to run on all Subscriber servers introduces more security risk as there are now multiple points of access for the Cisco CallManager administration interface. Because of this, it is usually best to save the Subscriber resources by stopping the web services on all servers except the Publisher. You can accomplish this by stopping the following services:
- Microsoft Internet Information Server (IIS) Admin Service
- World Wide Web Publishing Service
You can stop all of these services through the Windows 2000 Services console. To open this console, click Start > Programs > Administrative Tools > Services. When the console opens, Windows lists all services in alphabetic order. Right-click on the service you want to disable and choose Properties. In the Properties window shown in Figure 3-1, use the drop-down box to select either a Manual startup or to Disable the service. These will take effect the next time you reboot the Cisco CallManager server. You can also choose to stop the service without restarting the server from this page.
Figure 3-1. Windows 2000 Service Properties

Tip
Because Cisco CallManager requires these services to be active when upgrading to new Cisco CallManager versions, setting them to a state of Manual is suggested.
Activating Cisco Unified CallManager Services
If you are installing Cisco CallManager for the first time, all services that are required to run Cisco CallManager automatically install on the system; however, none of the services are activated at the completion of the installation (except for the Cisco Database Layer Monitor service). Cisco CallManager Serviceability provides a web-based Service Activation tool that is used to activate or deactivate multiple services and to select default services to activate.
It is recommended that you activate only the required components for each server in the cluster. Each component that you activate adds to the server load.
If you are upgrading Cisco CallManager, the services that you have already started on your system will start after the upgrade.
Each service performs specific functions for the IP telephony network. Some services might need to run on a single Cisco CallManager server in a cluster; other services might need to run on all of the Cisco CallManager servers in the cluster.
Caution
Be sure to activate at least the Cisco CallManager service before you apply any configuration to your Cisco CallManager server. Failure to do so can lead to unpredictable results, potentially leading to a server reinstall.
The following information briefly describes each available Cisco CallManager service:
- Cisco CallManager Service Allows the server to participate in telephone registration, call processing, and other Cisco CallManager functions. Cisco CallManager Service is the core service of the Cisco CallManager platform.
- Cisco TFTP Activates a TFTP server on Cisco CallManager. The TFTP service delivers Cisco IP Phone loads and configuration files to IP Phones, along with streamed media files, such as music on hold (MOH) and ring files.
- Cisco Messaging Interface Allows Cisco CallManager to interface with a Simplified Message Desk Interface (SMDI)-compliant, external voice-mail system.
- Cisco IP Voice Media Streaming Application Allows Cisco CallManager to act as a Media Termination Point (MTP), a conference bridge, a music on hold (MOH) server, and an annunciator. The voice network uses these media resources for feature functionality.
- Cisco CTIManager Allows Cisco CallManager to support computer telephony integration (CTI) services and provides Telephony Application Programming Interface (TAPI) or Java Telephony Application Programming Interface (JTAPI) client support. Cisco CTIManager allows you to use applications such as Cisco IP SoftPhone.
- Cisco Telephony Call Dispatcher Distributes calls to multiple telephone numbers (hunt groups). Cisco WebAttendant, Attendant Console, and Auto Attendant require Cisco Telephony Call Dispatcher (TCD).
- Cisco MOH Audio Translator Allows Cisco CallManager to convert MP3 or WAV audio files into voice codec format used for MOH.
- Cisco Real-Time Information Server (RIS) Data Collector Allows Cisco CallManager to write trace and alarm file information to a database, Microsoft Event Viewer, or alert an SNMP server.
- Cisco Database Layer Monitor Monitors aspects of the Microsoft SQL 2000 database, as well as call detail records (CDRs).
- Cisco CDR Insert Allows Cisco CallManager to write CDRs to the local database and replicates CDR files to the Microsoft SQL publisher at a configured interval.
- Cisco CTL Provider Works with the Cisco Certificate Trust List (CTL) client to change the security mode for the cluster from nonsecure to secure (called mixed mode).
- Cisco Extended Functions Provides support for some Cisco CallManager features, including Cisco Call Back and Quality Report Tool (QRT).
- Cisco Serviceability Reporter Generates the following daily reports: Device Statistics, Server Statistics, Service Statistics, Call Activities, and Alert.
- Cisco WebDialer Provides click-to-dial functionality by using a web page or a desktop application.
- Cisco IP Manager Assistant Allows Cisco CallManager to support the Cisco IP Manager Assistant (IPMA), an application designed to allow a receptionist and manager to support special functionality between their phones.
- Cisco CallManager Extension Mobility Allows Cisco CallManager to support extension mobility functions for roaming users. By using extension mobility features, you can assign users roaming phone profiles that activate when they log in to a phone. Works similarly to the roaming profiles in a Windows-based domain environment.
- Cisco Certificate Authority Proxy Function Working in conjunction with the Cisco Certificate Authority Proxy Function (CAPF) application, the Cisco CAPF service can perform the following tasks, depending on your configuration:
- Issues locally significant certificates to supported Cisco IP Phone models
- Requests certificates from third-party certificate authorities on behalf of supported Cisco IP Phone models
- Upgrades existing certificates on the phones
- Retrieves phone certificates for troubleshooting
- Deletes locally significant certificates on the phone
You must activate the Cisco CallManager services from the Service Activation web interface rather than the Windows 2000 Services control panel. To access this interface, perform the following steps:
|
Step 1. |
Open Internet Explorer, and go to https:///ccmadmin. The is the IP address of the Cisco CallManager server that is running IIS web services. Enter the administrative username and password information. |
|
Step 2. |
From the Application menu, choose Cisco CallManager Serviceability. The Cisco CallManager Serviceability interface appears. |
|
Step 3. |
From the Tools menu, choose Service Activation. A window similar to the window shown in Figure 3-2 appears. Figure 3-2. Cisco CallManager Service Activation Interface 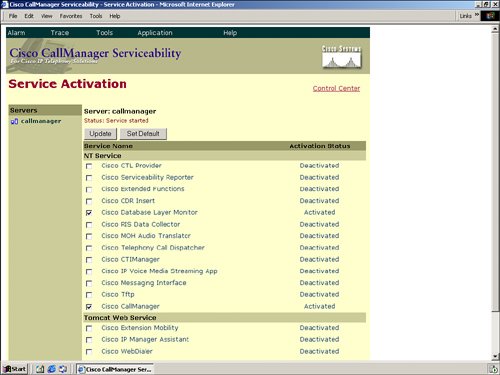
|
|
Step 4. |
Click the server that you want to configure from the Servers column. Next click the services that you want to activate, and click the Update button. (You will experience a slight delay.) The Service Activation window will refresh when the process is complete. |
Tip
The method shown is just one way to access the Cisco CallManager Serviceability pages. If you are working on the Cisco CallManager itself, you can get there quicker by using the Windows 2000 Start menu (Start > Programs > Cisco CallManager > Cisco CallManager Serviceability) or by accessing https:///CCMService.
Caution
Remember to activate the Cisco CallManager services from the Service Activation web interface. Activating the services through the Windows 2000 Services console will produce unpredictable and unstable results.
When you click the Set Default button in the web interface, the Service Activation tool chooses the services required to run Cisco CallManager based on a single-server configuration. This is the bare minimum to have a working Cisco CallManagerbased IP telephony network. Because Cisco highly advises against single-server installations, you will most likely use the Set Default button in a lab environment.
Part I: Cisco CallManager Fundamentals
Introduction to Cisco Unified Communications and Cisco Unified CallManager
Cisco Unified CallManager Clustering and Deployment Options
- Cisco Unified CallManager Clustering and Deployment Options
- The Two Sides of the Cisco Unified CallManager Cluster
- Cluster Redundancy Designs
- Call-Processing Deployment Models
- Summary
- Review Questions
Cisco Unified CallManager Installation and Upgrades
- Cisco Unified CallManager Installation and Upgrades
- Cisco Unified CallManager 4.x Clean Installation Process
- Upgrading Prior Cisco Unified CallManager Versions
- Summary
- Review Questions
Part II: IPT Devices and Users
Cisco IP Phones and Other User Devices
Configuring Cisco Unified CallManager to Support IP Phones
- Configuring Cisco Unified CallManager to Support IP Phones
- Configuring Intracluster IP Phone Communication
- IP Phone Configuration
- Case Study: Device Pool Design
- Summary
- Review Questions
Cisco IP Telephony Users
- Cisco IP Telephony Users
- Cisco CallManager User Database
- Cisco CallManager User Configuration
- User Logon and Device Configuration
- Summary
- Review Questions
Cisco Bulk Administration Tool
- Cisco Bulk Administration Tool
- The Cisco Bulk Administration Tool
- Using the Tool for Auto-Registered Phone Support
- Summary
- Review Questions
Part III: IPT Network Integration and Route Plan
Cisco Catalyst Switches
- Cisco Catalyst Switches
- Catalyst Switch Role in IP Telephony
- Powering the Cisco IP Phone
- Data and Voice VLANs
- Configuring Class of Service
- Summary
- Review Questions
Configuring Cisco Gateways and Trunks
- Configuring Cisco Gateways and Trunks
- Cisco Gateway Concepts
- Configuring Access Gateways
- Cisco Trunk Concepts
- Configuring Intercluster Trunks
- SIP and Cisco CallManager
- Summary
- Review Questions
Cisco Unified CallManager Route Plan Basics
- Cisco Unified CallManager Route Plan Basics
- External Call Routing
- Route Plan Configuration Process
- Summary
- Review Questions
Cisco Unified CallManager Advanced Route Plans
- Cisco Unified CallManager Advanced Route Plans
- Route Filters
- Discard Digit Instructions
- Transformation Masks
- Translation Patterns
- Route Plan Report
- Summary
- Review Questions
Configuring Hunt Groups and Call Coverage
- Configuring Hunt Groups and Call Coverage
- Call Distribution Components
- Configuring Line Groups, Hunt Lists, and Hunt Pilots
- Summary
- Review Questions
Implementing Telephony Call Restrictions and Control
- Implementing Telephony Call Restrictions and Control
- Class of Service Overview
- Partitions and Calling Search Spaces Overview
- Time-of-Day Routing Overview
- Configuring Time-of-Day Routing
- Time-of-Day Routing Usage Scenario
- Summary
- Review Questions
Implementing Multiple-Site Deployments
- Implementing Multiple-Site Deployments
- Call Admission Control
- Survivable Remote Site Telephony
- Summary
- Review Questions
Part IV: VoIP Features
Media Resources
- Media Resources
- Introduction to Media Resources
- Conference Bridge Resources
- Media Termination Point Resources
- Annunciator Resources
- Transcoder Resources
- Music on Hold Resources
- Media Resource Management
- Summary
- Review Questions
Configuring User Features, Part 1
- Configuring User Features, Part 1
- Basic IP Phone Features
- Softkey Templates
- Enhanced IP Phone Features
- Barge and Privacy
- IP Phone Services
- Summary
- Review Questions
Configuring User Features, Part 2
- Configuring User Features, Part 2
- Cisco CallManager Extension Mobility
- Client Matter Codes and Forced Authentication Codes
- Call Display Restrictions
- Malicious Call Identification
- Multilevel Precedence and Preemption
- Summary
- Review Questions
Configuring Cisco Unified CallManager Attendant Console
- Configuring Cisco Unified CallManager Attendant Console
- Introduction to Cisco CallManager Attendant Console
- Call Routing and Call Queuing
- Server and Administration Configuration
- Cisco Attendant Console Features
- Summary
- Review Questions
Configuring Cisco IP Manager Assistant
- Configuring Cisco IP Manager Assistant
- Cisco IP Manager Assistant Overview
- Cisco IP Manager Assistant Architecture
- Configuring Cisco IPMA for Shared-Line Support
- Summary
- Review Questions
Part V: IPT Security
Securing the Windows Operating System
- Securing the Windows Operating System
- Threats Targeting the Operating System
- Security and Hot Fix Policy
- Operating System Hardening
- Antivirus Protection
- Cisco Security Agent
- Administrator Password Policy
- Common Windows Exploits
- Security Taboos
- Summary
- Review Questions
Securing Cisco Unified CallManager Administration
- Securing Cisco Unified CallManager Administration
- Threats Targeting Remote Administration
- Securing CallManager Communications Using HTTPS
- Multilevel Administration
- Summary
- Review Questions
Preventing Toll Fraud
- Preventing Toll Fraud
- Toll Fraud Exploits
- Preventing Call Forward and Voice-Mail Toll Fraud Using Calling Search Spaces
- Blocking Commonly Exploited Area Codes
- Using Time-of-Day Routing
- Using FAC and CMC
- Restricting External Transfers
- Dropping Conference Calls
- Summary
- Review Questions
Hardening the IP Phone
Understanding Cryptographic Fundamentals
- Understanding Cryptographic Fundamentals
- What Is Cryptography?
- Symmetric Encryption
- Asymmetric Encryption
- Hash Functions
- Digital Signatures
- Summary
- Review Questions
Understanding the Public Key Infrastructure
- Understanding the Public Key Infrastructure
- The Need for a PKI
- PKI as a Trusted Third-Party Protocol
- PKI Entities
- PKI Enrollment
- PKI Revocation and Key Storage
- PKI Example
- Summary
- Review Questions
Understanding Cisco IP Telephony Authentication and Encryption Fundamentals
- Understanding Cisco IP Telephony Authentication and Encryption Fundamentals
- Threats Targeting the IP Telephony System
- How CallManager Protects Against Threats
- PKI Topologies in Cisco IP Telephony
- PKI Enrollment in Cisco IP Telephony
- Keys and Certificate Storage in Cisco IP Telephony
- Authentication and Integrity
- Encryption
- Summary
- Review Questions
Configuring Cisco IP Telephony Authentication and Encryption
- Configuring Cisco IP Telephony Authentication and Encryption
- Authentication and Encryption Configuration Overview
- Enabling Services Required for Security
- Using the CTL Client
- Working with Locally Significant Certificates
- Configuring the Device Security Mode
- Negotiating Device Security Mode
- Generating a CAPF Report
- Summary
- Review Questions
Part VI: IP Video
Introducing IP Video Telephony
- Introducing IP Video Telephony
- IP Video Telephony Solution Components
- Video Call Concepts
- Video Protocols Supported in Cisco CallManager
- Bandwidth Management
- Call Admission Control Within a Cluster
- Call Admission Control Between Clusters
- Summary
- Review Questions
Configuring Cisco VT Advantage
- Configuring Cisco VT Advantage
- Cisco VT Advantage Overview
- How Calls Work with Cisco VT Advantage
- Configuring Cisco CallManager for Video
- Configuring Cisco IP Phones for Cisco VT Advantage
- Installing Cisco VT Advantage on a Client
- Summary
- Review Questions
Part VII: IPT Management
Introducing Database Tools and Cisco Unified CallManager Serviceability
- Introducing Database Tools and Cisco Unified CallManager Serviceability
- Database Management Tools
- Cisco CallManager Serviceability Overview
- Tools Overview
- Summary
- Review Questions
Monitoring Performance
- Monitoring Performance
- Performance Counters
- Microsoft Event Viewer
- Microsoft Performance Monitor
- Real-Time Monitoring Tool Overview
- Summary
- Review Questions
Configuring Alarms and Traces
- Configuring Alarms and Traces
- Alarm Overview
- Alarm Configuration
- Trace Configuration
- Trace Analysis
- Trace Collection
- Bulk Trace Analysis
- Additional Trace Tools
- Summary
- Review Questions
Configuring CAR
- Configuring CAR
- CAR Overview
- CAR Configuration
- Report Scheduling
- System Database Configuration
- User Report Configuration
- Summary
- Review Questions
Using Additional Management and Monitoring Tools
- Using Additional Management and Monitoring Tools
- Remote Management Tools
- Dependency Records
- Password Changer Tool
- Cisco Dialed Number Analyzer
- Quality Report Tool
- Summary
- Review Questions
Part VIII: Appendix
Appendix A. Answers to Review Questions
Index
EAN: 2147483647
Pages: 329
