Hack 8. Publish Maps of Your Photos on the Web


Plotting the photos from your latest trip on a map used to be a chore, until now.
Many of us enjoy sharing experiences and photographs from our travels with our family, friends, and colleagues. A map can provide a better sense of a trip or experience by showing how the images are related both to each other and to the world. Yet it has always been a challenge to share our photographs on an actual map.
93 Photo Street is a novel photo-mapping tool from Transmutable that helps you to tell your story with maps. It makes publishing maps with photographs about as easy as publishing to your blog, by offering a completely menu-driven, drag-and-drop user interface for building and publishing maps to the Web, as well as a programmer API for those users who want to do more.
As of this writing, it can be downloaded for Windows 2000, XP, or Mac OS X 10.3 or higher for free under a Creative Commons license. You can find it on Transmutable's web site at http://transmutable.com/93PhotoStreet/.
The process of using 93 Photo Street is straightforward. The first step is to find a map to use as a backdrop. 93 Photo Street supports two kinds of maps. It supports detailed, although plain, street maps of the United States (using maps provided online by the U.S. Census "Tiger" project), and it supports using images, allowing you to pick any image file and use it as a backdrop.
In this case, I'd like to share my pictures from a vacation in Hawaii. Using a search engine, I can find a number of excellent base maps of Hawaii:
http://clusty.com/search?query=hawaii+map&v%3Aproject=clusty-images
http://images.google.com/images?q=hawaii+map
By saving one of the maps from these searches to my computer, I can import it into 93 Photo Street using the "Map  Import Map Image menu item.
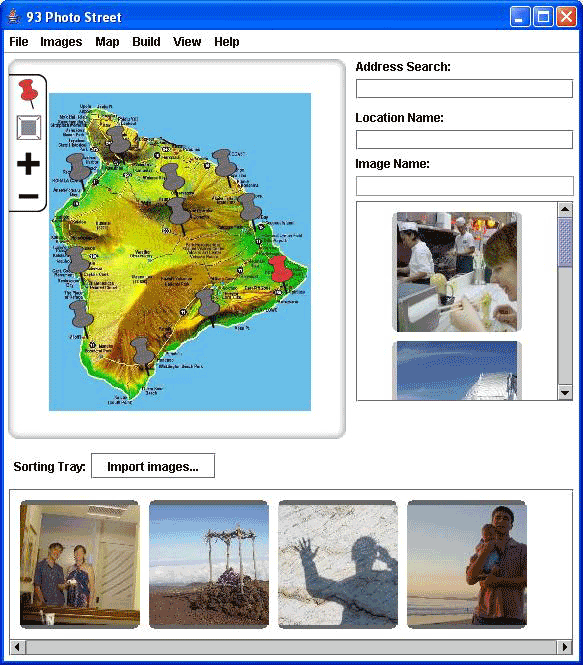
Next I open up my collection of photographs and drag my favorite photos from that vacation into 93 Photo Street. The photos then end up in a tray at the bottom of the screen. Although there is a File menu option to load photographs, I prefer to just drag and drop. Figure 1-17 shows a screenshot of this process.
Figure 1-17. Adding photographs to 93 Photo Street
The next step is to set the placement of these photographs. First, you place "pins" on the map indicating where photographs can go, and then you drag each photograph from your tray onto the map. The final result is a collection of photographs pinned to the map at the chosen locations.
The last step is to publish your map. There are two ways to do this. You can just ask 93 Photo Street to build the site locally. Select the menu option "Build images/ent/U2192.GIF border=0> Build with Velocity Templates" to choose from one of the default presentation templates. Figure 1-18 illustrates the process of selecting a presentation template. 93 Photo Street will make an index.html file, associate the images and the map together, and put them all on disk under Documents and Settings93 Photo StreetSites.
Figure 1-18. Selecting a presentation template in 93 Photo Street

Alternatively, you can ask 93 Photo Street to publish the site to your blog automatically. Your blog must support TypePad or MoveableType interfaces, and you will need to have a valid Atom password (often displayed in the personal preferences area of your blog). You may also wish to go to http://www.typekey.com/ to give yourself a globally valid TypeKey, simply for completeness.
As you can see, it would be hard to make an interface that was easier to use than 93 Photo Streetbut wait, there's more! There is an open API for developers to extend the service, including:
- A simple XML photo-map file format. Use this to translate from GPS formats into Photo Map files or to translate Photo Map files into one of the emerging RDF vocabularies discussed elsewhere in this book.
- A templating system based on the quite excellent Apache Velocity project. Use this to define new presentation styles and templates to dress up your photo-map presentations.
- An Atom publisher for simple blogging of maps.
- A publisher SDK for doing things like integrating 93 Photo Street with third-party systems.
- A built-in U.S. Census TIGER/Line map download manager and renderer.
- An open source TIGER/Line parser. If you're interested in rendering your own maps of the United States, this is one potential starting point, although there are many others, some of which are covered elsewhere in this book.
- An open source Atom network stack. This could be a starting point for adding publishing support for other blogging services.
The templating system and the publisher SDK are particularly useful together in incorporating map sources that are not freely available for commercial providers. This opens the possibility of merging photo maps with satellite weather images or USGS earthquake maps or any of the other map services on the Web.
Overall the product makes publishing photo maps to the Web "easy enough" that more people may actually do it. Technically an individual could cobble together her own solution, but the ease, convenience, and openness of this tool make it an appealing choice. See [Hack #10] and [Hack #96] for other methods to add photos to a map.
Anselm Hook
Mapping Your Life
- Hacks 1-13
- Hack 1. Put a Map on It: Mapping Arbitrary Locations with Online Services
- Hack 2. Route Planning Online
- Hack 3. Map the Places Youve Visited
- Hack 4. Find Your House on an Aerial Photograph
- Hack 5. The Road Less Traveled by in MapQuest
- Hack 6. Make Route Maps Easier to Read
- Hack 7. Will the Kids Barf?
- Hack 8. Publish Maps of Your Photos on the Web
- Hack 9. Track the Friendly Skies with Sherlock
- Hack 10. Georeference Digital Photos
- Hack 11. How Far? How Fast? Geo-Enabling Your Spreadsheet
- Hack 12. Create a Distance Grid in Excel
- Hack 13. Add Maps to Excel Spreadsheets with MapPoint
Mapping Your Neighborhood
- Hacks 14-21
- Hack 14. Make Free Maps of the United States Online
- Hack 15. Zoom Right In on Your Neighborhood
- Hack 16. Who Are the Neighbors Voting For?
- Hack 17. Map Nearby Wi-Fi Hotspots
- Hack 18. Why You Cant Watch Broadcast TV
- Hack 19. Analyze Elevation Profiles for Wireless Community Networks
- Hack 20. Make 3-D Raytraced Terrain Models
- Hack 21. Map Health Code Violations with RDFMapper
Mapping Your World
- Hacks 22-34
- Hack 22. Digging to China
- Hack 23. Explore David Rumseys Historical Maps
- Hack 24. Explore a 3-D Model of the Entire World
- Hack 25. Work with Multiple Lat/Long Formats
- Hack 26. Work with Different Coordinate Systems
- Hack 27. Calculate the Distance Between Points on the Earths Surface
- Hack 28. Experiment with Different Cartographic Projections
- Hack 29. Plot Arbitrary Points on a World Map
- Hack 30. Plot a Great Circle on a Flat Map
- Hack 31. Plot Dymaxion Maps in Perl
- Hack 32. Hack on Base Maps in Your Favorite Image Editor
- Hack 33. Georeference an Arbitrary Tourist Map
- Hack 34. Map Other Planets
Mapping (on) the Web
- Hacks 35-46
- Hack 35. Search Local, Find Global
- Hack 36. Shorten Online Map URLs
- Hack 37. Tweak the Look and Feel of Web Maps
- Hack 38. Add Location to Weblogs and RSS Feeds
- Hack 39. View Your Photo Thumbnails on a Flash Map
- Hack 40. Plot Points on a Spinning Globe Applet
- Hack 41. Plot Points on an Interactive Map Using DHTML
- Hack 42. Map Your Tracklogs on the Web
- Hack 43. Map Earthquakes in (Nearly) Real Time
- Hack 44. Plot Statistics Against Shapes
- Hack 45. Extract a Spatial Model from Wikipedia
- Hack 46. Map Global Weather Conditions
Mapping with Gadgets
- Hacks 47-63
- How GPS Works
- Hack 47. Get Maps on Your Mobile Phone
- Hack 48. Accessorize Your GPS
- Hack 49. Get Your Tracklogs in Windows or Linux
- Hack 50. The Serial Port to USB Conundrum
- Hack 51. Speak in Geotongues: GPSBabel to the Rescue
- Hack 52. Show Your Waypoints on Aerial Photos with Terrabrowser
- Hack 53. Visualize Your Tracks in Three Dimensions
- Hack 54. Create Your Own Maps for a Garmin GPS
- Hack 55. Use Your Track Memory as a GPS Base Map
- Hack 56. Animate Your Tracklogs
- Hack 57. Connect to Your GPS from Multiple Applications
- Hack 58. Dont Lose Your Tracklogs!
- Hack 59. Geocode Your Voice Recordings and Other Media
- Hack 60. Improve the Accuracy of Your GPS with Differential GPS
- Hack 61. Build a Map of Local GSM Cells
- Hack 62. Build a Car Computer
- Hack 63. Build Your Own Car Navigation System with GpsDrive
Mapping on Your Desktop
- Hacks 64-77
- Hack 64. Mapping Local Areas of Interest with Quantum GIS
- Hack 65. Extract Data from Maps with Manifold
- Hack 66. Java-Based Desktop Mapping with Openmap
- Hack 67. Seamless Data Download from the USGS
- Hack 68. Convert Geospatial Data Between Different Formats
- Hack 69. Find Your Way Around GRASS
- Hack 70. Import Your GPS Waypoints and Tracklogs into GRASS
- Hack 71. Turn Your Tracklogs into ESRI Shapefiles
- Hack 72. Add Relief to Your Topographic Maps
- Hack 73. Make Your Own Contour Maps
- Hack 74. Plot Wireless Network Viewsheds with GRASS
- Hack 75. Share Your GRASS Maps with the World
- Hack 76. Explore the Effects of Global Warming
- Conclusion
- Hack 77. Become a GRASS Ninja
Names and Places
- Hacks 78-86
- Hack 78. What to Do if Your Government Is Hoarding Geographic Data
- Hack 79. Geocode a U.S. Street Address
- Hack 80. Automatically Geocode U.S. Addresses
- Hack 81. Clean Up U.S. Addresses
- Hack 82. Find Nearby Things Using U.S. ZIP Codes
- Hack 83. Map Numerical Data the Easy Way
- Hack 84. Build a Free World Gazetteer
- Hack 85. Geocode U.S. Locations with the GNIS
- Hack 86. Track a Package Across the U.S.
Building the Geospatial Web
- Hacks 87-92
- Hack 87. Build a Spatially Indexed Data Store
- Hack 88. Load Your Waypoints into a Spatial Database
- Hack 89. Publish Your Geodata to the Web with GeoServer
- Hack 90. Crawl the Geospatial Web with RedSpider
- Hack 91. Build Interactive Web-Based Map Applications
- Hack 92. Map Wardriving (and other!) Data with MapServer
Mapping with Other People
- Hacks 93-100
- Hack 93. Node Runner
- Hack 94. Geo-Warchalking with 2-D Barcodes
- Hack 95. Model Interactive Spaces
- Hack 96. Share Geo-Photos on the Web
- Hack 97. Set Up an OpenGuide for Your Hometown
- Hack 98. Give Your Great-Great-Grandfather a GPS
- Hack 99. Map Your Friend-of-a-Friend Network
- Hack 100. Map Imaginary Places
EAN: 2147483647
Pages: 172
