IP Phone Configuration
The bulk of your initial Cisco CallManager configuration comes in adding Cisco IP Phones to the SQL database. After you add the phones to the database, you can manage and configure them through the Cisco CallManager interface. You can add the phones to the database using one of three methods:
- Manual entry
- Automatic registration
- The Bulk Administration Tool (BAT)
This chapter discusses the manual and automatic methods of adding IP Phones to the database. BAT is covered in Chapter 7, "Cisco Bulk Administration Tool."
Manual IP Phone and Directory Number Configuration
Manually adding new IP Phones to the network is often tedious, but it can constitute a large part of day-to-day voice network management. The Bulk Administration Tool (BAT) allows you to add a large number of IP Phones to the Cisco CallManager database at once, but BAT is not appropriate for adding or modifying a single IP Phone for a new employee.
Cisco CallManager uses the IP Phone MAC address to track the phone in the voice network. Cisco CallManager ties all IP Phone configuration settings to the IP Phone MAC address. Before you can perform any configuration on a Cisco IP Phone through Cisco CallManager, you must find the MAC address of that IP Phone. Use the following guidelines to locate a MAC address:
- You can find the MAC address in the text and Universal Product Code (UPC) form, which is imprinted on the shipping box for the IP Phone. Some administrators use bar code scanners to simplify the process of adding multiple IP Phones.
- You can also find the MAC address in the text and UPC form on the back of the IP Phone, on the middle sticker near the bottom.
- If you boot the IP Phone, you can press the Settings button on the face of the phone. Use the arrow keys to navigate, and choose Network Configuration. The MAC address will be displayed on line 3 of the network configuration.
You can continue the Cisco IP Phone configuration on the Cisco CallManager configuration after you have the MAC address of the IP Phone, as follows:
|
Step 1. |
In Cisco CallManager Administration, choose Device > Phone to open the Find and List Phones window. |
|
Step 2. |
Choose Add a New Phone in the upper-right corner of the window. |
|
Step 3. |
Choose the model of the IP Phone from the drop-down menu, and click Next. |
|
Step 4. |
At a minimum, you must configure the MAC Address, Device Pool, and Phone Button Template fields; then click Insert. |
|
Step 5. |
Cisco CallManager prompts you to add a DN for line 1; then click OK. |
|
Step 6. |
When the Directory Number Configuration window appears, enter the DN of the IP Phone in the appropriate field, and click Insert. |
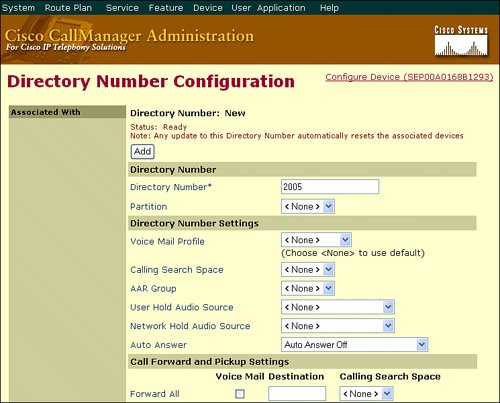
Figures 5-9 and 5-10 illustrate the IP Phone and directory number configuration screens, respectively.
Figure 5-9. Cisco CallManager IP Phone Configuration
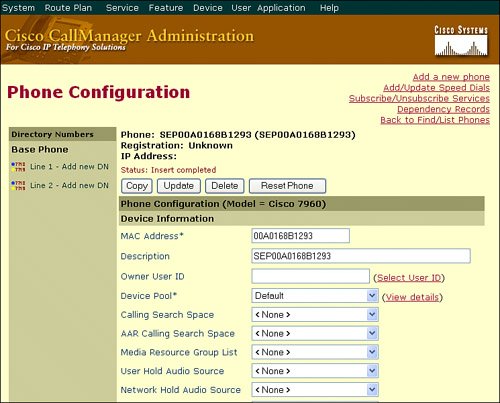
Figure 5-10. Cisco CallManager Directory Number Configuration
Automatic IP Phone Registration
Auto-registration allows Cisco CallManager to issue extension numbers to new IP Phones, which is similar to the way in which the Dynamic Host Control Protocol (DHCP) server issues IP addresses. When a new IP Phone boots and attempts to register with Cisco CallManager for the first time, Cisco CallManager issues an extension number from a configured range. After Cisco CallManager issues the extension, it records the extension number to the MAC address mapping in the SQL database.
Although auto-registration simplifies the process of deploying a new IP telephony network, it is an option that is available only in some new IP telephony deployments. Because administrators deploy most IP telephony networks as a migration from a PBX environment, users have existing telephone extensions. These existing telephone extensions typically map to Direct Inward Dial (DID) numbers from the Public Switched Telephone Network (PSTN) and cannot change. Therefore, these IP telephony deployments usually use manual configuration rather than auto-registration.
You should carefully evaluate auto-registration before implementing it because its use can pose a security risk to the network. Auto-registration allows anyone with physical access to the voice network to connect an IP Phone and use it, regardless of whether they are authorized. For this reason, many organizations, as part of their security policy, disable the use of auto-registration or use auto-registration in a secure staging environment for initial Cisco CallManager configuration.
Complete these steps to configure the Cisco CallManager server to support auto-registration:
|
Step 1. |
From Cisco CallManager Administration, choose System > Cisco CallManager. |
|
Step 2. |
From the list of Cisco CallManager servers, select the server that you want to support auto-registration. |
|
Step 3. |
Under the Auto-Registration Information Configuration section, enter the appropriate DN range in the Starting and Ending Directory Number fields. |
|
Step 4. |
Ensure that the Auto-registration Disabled on this Cisco CallManager check box is unchecked. |
|
Step 5. |
Click Update to save your changes. |
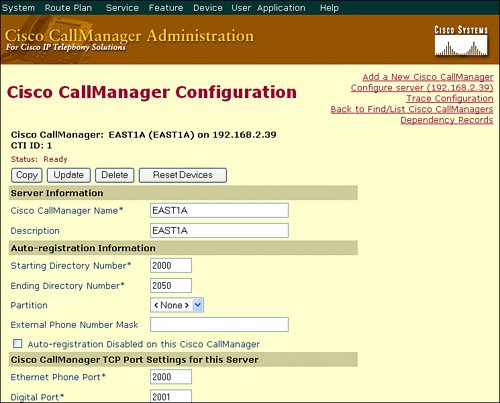
Figure 5-11 shows the auto-registration configuration window.
Figure 5-11. Cisco CallManager Auto-Registration Configuration
Installing Cisco CallManager automatically sets device defaults. You cannot create new device defaults or delete existing ones, but you can change the default settings. Use device defaults to set the default characteristics of each type of device that registers with a Cisco CallManager. The device defaults for a device type apply to all auto-registered devices of that type within a Cisco CallManager cluster. You can set the following device defaults for each device type to which they apply:
- Device load Lists the firmware load that is used with a particular type of hardware device
- Device pool Allows you to select the device pool that is associated with each type of device
- Phone button template Indicates the phone button template that is used by each type of device
When a device auto-registers with a Cisco CallManager, it acquires the device default settings for its device type. After a device registers, you can update its configuration individually to change the device settings.
Complete these steps to update the device defaults:
|
Step 1. |
In Cisco CallManager Administration, choose System > Device Defaults to open the Device Defaults Configuration window. |
|
Step 2. |
In the Device Defaults Configuration window, modify the appropriate settings for the device that you want to change. |
|
Step 3. |
Click Update to save the changes in the Cisco CallManager configuration database. |
|
Step 4. |
Click the Reset icon to the left of the device name to reset all the devices of that type and load the new defaults on all Cisco CallManager servers in the cluster. If you choose not to reset all devices of that type, only new devices that are added after you change the device defaults receive the latest defaults. |
Caution
Updating device load files and performing a phone reset can affect a large number of devices and cause significant WAN utilization as firmware files are sent to remote phones. Cisco recommends saving these large device resets for network off-hours.
Case Study Device Pool Design |
Part I: Cisco CallManager Fundamentals
Introduction to Cisco Unified Communications and Cisco Unified CallManager
Cisco Unified CallManager Clustering and Deployment Options
- Cisco Unified CallManager Clustering and Deployment Options
- The Two Sides of the Cisco Unified CallManager Cluster
- Cluster Redundancy Designs
- Call-Processing Deployment Models
- Summary
- Review Questions
Cisco Unified CallManager Installation and Upgrades
- Cisco Unified CallManager Installation and Upgrades
- Cisco Unified CallManager 4.x Clean Installation Process
- Upgrading Prior Cisco Unified CallManager Versions
- Summary
- Review Questions
Part II: IPT Devices and Users
Cisco IP Phones and Other User Devices
Configuring Cisco Unified CallManager to Support IP Phones
- Configuring Cisco Unified CallManager to Support IP Phones
- Configuring Intracluster IP Phone Communication
- IP Phone Configuration
- Case Study: Device Pool Design
- Summary
- Review Questions
Cisco IP Telephony Users
- Cisco IP Telephony Users
- Cisco CallManager User Database
- Cisco CallManager User Configuration
- User Logon and Device Configuration
- Summary
- Review Questions
Cisco Bulk Administration Tool
- Cisco Bulk Administration Tool
- The Cisco Bulk Administration Tool
- Using the Tool for Auto-Registered Phone Support
- Summary
- Review Questions
Part III: IPT Network Integration and Route Plan
Cisco Catalyst Switches
- Cisco Catalyst Switches
- Catalyst Switch Role in IP Telephony
- Powering the Cisco IP Phone
- Data and Voice VLANs
- Configuring Class of Service
- Summary
- Review Questions
Configuring Cisco Gateways and Trunks
- Configuring Cisco Gateways and Trunks
- Cisco Gateway Concepts
- Configuring Access Gateways
- Cisco Trunk Concepts
- Configuring Intercluster Trunks
- SIP and Cisco CallManager
- Summary
- Review Questions
Cisco Unified CallManager Route Plan Basics
- Cisco Unified CallManager Route Plan Basics
- External Call Routing
- Route Plan Configuration Process
- Summary
- Review Questions
Cisco Unified CallManager Advanced Route Plans
- Cisco Unified CallManager Advanced Route Plans
- Route Filters
- Discard Digit Instructions
- Transformation Masks
- Translation Patterns
- Route Plan Report
- Summary
- Review Questions
Configuring Hunt Groups and Call Coverage
- Configuring Hunt Groups and Call Coverage
- Call Distribution Components
- Configuring Line Groups, Hunt Lists, and Hunt Pilots
- Summary
- Review Questions
Implementing Telephony Call Restrictions and Control
- Implementing Telephony Call Restrictions and Control
- Class of Service Overview
- Partitions and Calling Search Spaces Overview
- Time-of-Day Routing Overview
- Configuring Time-of-Day Routing
- Time-of-Day Routing Usage Scenario
- Summary
- Review Questions
Implementing Multiple-Site Deployments
- Implementing Multiple-Site Deployments
- Call Admission Control
- Survivable Remote Site Telephony
- Summary
- Review Questions
Part IV: VoIP Features
Media Resources
- Media Resources
- Introduction to Media Resources
- Conference Bridge Resources
- Media Termination Point Resources
- Annunciator Resources
- Transcoder Resources
- Music on Hold Resources
- Media Resource Management
- Summary
- Review Questions
Configuring User Features, Part 1
- Configuring User Features, Part 1
- Basic IP Phone Features
- Softkey Templates
- Enhanced IP Phone Features
- Barge and Privacy
- IP Phone Services
- Summary
- Review Questions
Configuring User Features, Part 2
- Configuring User Features, Part 2
- Cisco CallManager Extension Mobility
- Client Matter Codes and Forced Authentication Codes
- Call Display Restrictions
- Malicious Call Identification
- Multilevel Precedence and Preemption
- Summary
- Review Questions
Configuring Cisco Unified CallManager Attendant Console
- Configuring Cisco Unified CallManager Attendant Console
- Introduction to Cisco CallManager Attendant Console
- Call Routing and Call Queuing
- Server and Administration Configuration
- Cisco Attendant Console Features
- Summary
- Review Questions
Configuring Cisco IP Manager Assistant
- Configuring Cisco IP Manager Assistant
- Cisco IP Manager Assistant Overview
- Cisco IP Manager Assistant Architecture
- Configuring Cisco IPMA for Shared-Line Support
- Summary
- Review Questions
Part V: IPT Security
Securing the Windows Operating System
- Securing the Windows Operating System
- Threats Targeting the Operating System
- Security and Hot Fix Policy
- Operating System Hardening
- Antivirus Protection
- Cisco Security Agent
- Administrator Password Policy
- Common Windows Exploits
- Security Taboos
- Summary
- Review Questions
Securing Cisco Unified CallManager Administration
- Securing Cisco Unified CallManager Administration
- Threats Targeting Remote Administration
- Securing CallManager Communications Using HTTPS
- Multilevel Administration
- Summary
- Review Questions
Preventing Toll Fraud
- Preventing Toll Fraud
- Toll Fraud Exploits
- Preventing Call Forward and Voice-Mail Toll Fraud Using Calling Search Spaces
- Blocking Commonly Exploited Area Codes
- Using Time-of-Day Routing
- Using FAC and CMC
- Restricting External Transfers
- Dropping Conference Calls
- Summary
- Review Questions
Hardening the IP Phone
Understanding Cryptographic Fundamentals
- Understanding Cryptographic Fundamentals
- What Is Cryptography?
- Symmetric Encryption
- Asymmetric Encryption
- Hash Functions
- Digital Signatures
- Summary
- Review Questions
Understanding the Public Key Infrastructure
- Understanding the Public Key Infrastructure
- The Need for a PKI
- PKI as a Trusted Third-Party Protocol
- PKI Entities
- PKI Enrollment
- PKI Revocation and Key Storage
- PKI Example
- Summary
- Review Questions
Understanding Cisco IP Telephony Authentication and Encryption Fundamentals
- Understanding Cisco IP Telephony Authentication and Encryption Fundamentals
- Threats Targeting the IP Telephony System
- How CallManager Protects Against Threats
- PKI Topologies in Cisco IP Telephony
- PKI Enrollment in Cisco IP Telephony
- Keys and Certificate Storage in Cisco IP Telephony
- Authentication and Integrity
- Encryption
- Summary
- Review Questions
Configuring Cisco IP Telephony Authentication and Encryption
- Configuring Cisco IP Telephony Authentication and Encryption
- Authentication and Encryption Configuration Overview
- Enabling Services Required for Security
- Using the CTL Client
- Working with Locally Significant Certificates
- Configuring the Device Security Mode
- Negotiating Device Security Mode
- Generating a CAPF Report
- Summary
- Review Questions
Part VI: IP Video
Introducing IP Video Telephony
- Introducing IP Video Telephony
- IP Video Telephony Solution Components
- Video Call Concepts
- Video Protocols Supported in Cisco CallManager
- Bandwidth Management
- Call Admission Control Within a Cluster
- Call Admission Control Between Clusters
- Summary
- Review Questions
Configuring Cisco VT Advantage
- Configuring Cisco VT Advantage
- Cisco VT Advantage Overview
- How Calls Work with Cisco VT Advantage
- Configuring Cisco CallManager for Video
- Configuring Cisco IP Phones for Cisco VT Advantage
- Installing Cisco VT Advantage on a Client
- Summary
- Review Questions
Part VII: IPT Management
Introducing Database Tools and Cisco Unified CallManager Serviceability
- Introducing Database Tools and Cisco Unified CallManager Serviceability
- Database Management Tools
- Cisco CallManager Serviceability Overview
- Tools Overview
- Summary
- Review Questions
Monitoring Performance
- Monitoring Performance
- Performance Counters
- Microsoft Event Viewer
- Microsoft Performance Monitor
- Real-Time Monitoring Tool Overview
- Summary
- Review Questions
Configuring Alarms and Traces
- Configuring Alarms and Traces
- Alarm Overview
- Alarm Configuration
- Trace Configuration
- Trace Analysis
- Trace Collection
- Bulk Trace Analysis
- Additional Trace Tools
- Summary
- Review Questions
Configuring CAR
- Configuring CAR
- CAR Overview
- CAR Configuration
- Report Scheduling
- System Database Configuration
- User Report Configuration
- Summary
- Review Questions
Using Additional Management and Monitoring Tools
- Using Additional Management and Monitoring Tools
- Remote Management Tools
- Dependency Records
- Password Changer Tool
- Cisco Dialed Number Analyzer
- Quality Report Tool
- Summary
- Review Questions
Part VIII: Appendix
Appendix A. Answers to Review Questions
Index
EAN: 2147483647
Pages: 329
- Challenging the Unpredictable: Changeable Order Management Systems
- Intrinsic and Contextual Data Quality: The Effect of Media and Personal Involvement
- Healthcare Information: From Administrative to Practice Databases
- A Hybrid Clustering Technique to Improve Patient Data Quality
- Development of Interactive Web Sites to Enhance Police/Community Relations
- Chapter III Two Models of Online Patronage: Why Do Consumers Shop on the Internet?
- Chapter IV How Consumers Think About Interactive Aspects of Web Advertising
- Chapter XIII Shopping Agent Web Sites: A Comparative Shopping Environment
- Chapter XV Customer Trust in Online Commerce
- Chapter XVI Turning Web Surfers into Loyal Customers: Cognitive Lock-In Through Interface Design and Web Site Usability
