Softkey Templates
Softkeys extend the functions of nearly all Cisco IP Phones (with the exception of the 7902). As shown in Figure 16-4, softkeys are buttons along the side and bottom of the IP phone liquid crystal display (LCD) that point to functions and feature options on the LCD screen. Softkeys change depending on the status of the phone.
Figure 16-4. Softkeys Available on 7940, 7960, and 7970 Cisco IP Phones

Cisco CallManager provides softkey templates for administrator convenience. Softkey templates group softkeys that are used for common call-processing functions and applications. You can use these default softkey templates to provide standard softkey definitions for devices, or you can create custom templates.
Cisco CallManager, starting with Release 4.0, includes these five standard softkey templates:
- Standard IPMA Assistant
- Standard User
- Standard Feature
- Standard IPMA Manager
- Standard IPMA Shared Mode Manager
You cannot delete or modify these standard templates. However, you can create custom (nonstandard) templates to meet the needs of your organization.
Adding Softkey Templates
To create a nonstandard softkey template, you must first copy a standard template and make the modifications desired to this copy. Choose Device > Device Settings > Softkey Templates to access softkey templates. The Find and List Softkey Templates window shown in Figure 16-5 appears. Choose the standard template and click the Copy button. The Softkey Template Configuration window then displays the softkey template name, description, and applications that are associated with the template. You must rename the template with a new descriptive name. After you have entered a unique name, click the Insert button. The standard template is copied, and when you choose Back to Find/List Softkey Templates, the new softkey template is displayed. After the nonstandard template is made, application softkeys can be added or removed from the template.
Figure 16-5. Standard Softkey Template Listing

Modifying Softkey Availability and Positioning
You can add or delete softkeys or modify softkey positions in a nonstandard softkey template to customize the appearance of the softkeys on Cisco IP Phones. In the Softkey Templates field, choose the template in which you want to add or delete softkeys or modify the softkey positions. In the upper-right corner of the window, click the Configure Softkey Layout link. As shown in Figure 16-6, the Softkey Layout Configuration window is displayed with call states on the left and the Selected Softkeys pane on the right. You can select the softkeys that you want displayed for each call state.
Figure 16-6. Modifying Softkey Availability and Positioning
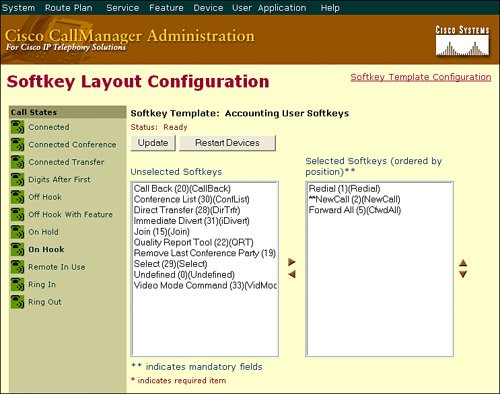
To add softkeys, select a softkey from the Unselected Softkeys pane and click the right arrow to move it to the Selected Softkeys pane. If the number of softkeys exceeds 16, an error message is displayed that states that you must remove some of the softkeys before continuing. To delete softkeys, select a softkey from the Selected Softkeys pane and click the left arrow to move it to the Unselected Softkeys pane. Click Update after completing either procedure.
To modify softkey positions, use the up and down arrows to rearrange the positions of the selected softkeys (the top position corresponds to the leftmost softkey on the IP phone). To save the modifications that you have made to the template, click Update.
After making modifications to softkey templates, you must restart the devices that are using the template.
Assigning Softkey Templates to Devices
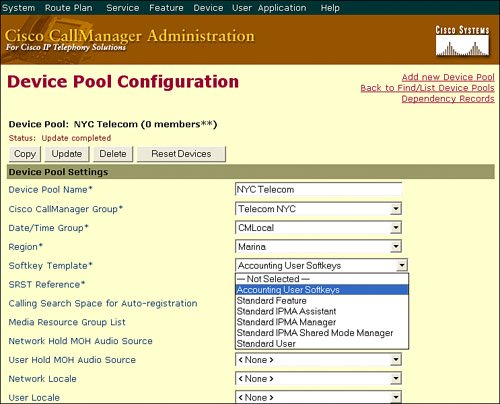
You can assign softkey templates to devices in several ways. The template can be assigned in the Device Pool Configuration window (System > Device Pool), through a user device profile (Device > Device Settings > Device Profile), or on the device itself (Device > Phone).
For example, you might have a (standard or nonstandard) softkey template that you assign to a device pool to configure the majority of phones in your cluster, a different softkey template that you use for a feature that requires a device profile (for example, Extension Mobility), and a different softkey template that includes the Barge, Privacy, and Immediate Divert softkeys that you assign to a device belonging to a manager.
Figure 16-7 illustrates the Accounting User Softkeys template being assigned to a device pool.
Figure 16-7. Assigning Softkey Templates to Devices
Deleting Softkey Templates
Standard templates cannot be deleted. Only nonstandard templates can be deleted. If you want to delete a nonstandard softkey template, the template cannot be in use by any device in the Cisco CallManager system. If the softkey template is assigned to a device pool, user profile, or Cisco IP Phone, you will receive an error message stating that the template is in use when you attempt to delete it. You must remove the template from all devices before the template can be deleted.
To determine whether a softkey template is in use, click the Dependency Records link, located in the upper-right corner of the Softkey Template Configuration window. By default, CallManager disables the dependency records function because of its high CPU consumption on CallManager servers.
Note
Dependency records functionality causes high CPU usage when it is used. After it has been enabled, this task executes at below-normal priority and might take time to complete because of the dial plan size and complexity, CPU speed, and CPU requirements of other applications.
To enable dependency records, follow these steps:
|
Step 1. |
Choose System > Enterprise Parameters. |
|
Step 2. |
Scroll to the CCMAdmin Parameters area of the window. |
|
Step 3. |
From the Enable Dependency Records drop-down menu, choose True. |
|
Step 4. |
Click OK. The field displays True. |
|
Step 5. |
Click Update. |
|
Step 6. |
Close the browser that you are using; then, reopen the browser. This action makes the parameter take effect for the entire system. |
Enhanced IP Phone Features |
Part I: Cisco CallManager Fundamentals
Introduction to Cisco Unified Communications and Cisco Unified CallManager
Cisco Unified CallManager Clustering and Deployment Options
- Cisco Unified CallManager Clustering and Deployment Options
- The Two Sides of the Cisco Unified CallManager Cluster
- Cluster Redundancy Designs
- Call-Processing Deployment Models
- Summary
- Review Questions
Cisco Unified CallManager Installation and Upgrades
- Cisco Unified CallManager Installation and Upgrades
- Cisco Unified CallManager 4.x Clean Installation Process
- Upgrading Prior Cisco Unified CallManager Versions
- Summary
- Review Questions
Part II: IPT Devices and Users
Cisco IP Phones and Other User Devices
Configuring Cisco Unified CallManager to Support IP Phones
- Configuring Cisco Unified CallManager to Support IP Phones
- Configuring Intracluster IP Phone Communication
- IP Phone Configuration
- Case Study: Device Pool Design
- Summary
- Review Questions
Cisco IP Telephony Users
- Cisco IP Telephony Users
- Cisco CallManager User Database
- Cisco CallManager User Configuration
- User Logon and Device Configuration
- Summary
- Review Questions
Cisco Bulk Administration Tool
- Cisco Bulk Administration Tool
- The Cisco Bulk Administration Tool
- Using the Tool for Auto-Registered Phone Support
- Summary
- Review Questions
Part III: IPT Network Integration and Route Plan
Cisco Catalyst Switches
- Cisco Catalyst Switches
- Catalyst Switch Role in IP Telephony
- Powering the Cisco IP Phone
- Data and Voice VLANs
- Configuring Class of Service
- Summary
- Review Questions
Configuring Cisco Gateways and Trunks
- Configuring Cisco Gateways and Trunks
- Cisco Gateway Concepts
- Configuring Access Gateways
- Cisco Trunk Concepts
- Configuring Intercluster Trunks
- SIP and Cisco CallManager
- Summary
- Review Questions
Cisco Unified CallManager Route Plan Basics
- Cisco Unified CallManager Route Plan Basics
- External Call Routing
- Route Plan Configuration Process
- Summary
- Review Questions
Cisco Unified CallManager Advanced Route Plans
- Cisco Unified CallManager Advanced Route Plans
- Route Filters
- Discard Digit Instructions
- Transformation Masks
- Translation Patterns
- Route Plan Report
- Summary
- Review Questions
Configuring Hunt Groups and Call Coverage
- Configuring Hunt Groups and Call Coverage
- Call Distribution Components
- Configuring Line Groups, Hunt Lists, and Hunt Pilots
- Summary
- Review Questions
Implementing Telephony Call Restrictions and Control
- Implementing Telephony Call Restrictions and Control
- Class of Service Overview
- Partitions and Calling Search Spaces Overview
- Time-of-Day Routing Overview
- Configuring Time-of-Day Routing
- Time-of-Day Routing Usage Scenario
- Summary
- Review Questions
Implementing Multiple-Site Deployments
- Implementing Multiple-Site Deployments
- Call Admission Control
- Survivable Remote Site Telephony
- Summary
- Review Questions
Part IV: VoIP Features
Media Resources
- Media Resources
- Introduction to Media Resources
- Conference Bridge Resources
- Media Termination Point Resources
- Annunciator Resources
- Transcoder Resources
- Music on Hold Resources
- Media Resource Management
- Summary
- Review Questions
Configuring User Features, Part 1
- Configuring User Features, Part 1
- Basic IP Phone Features
- Softkey Templates
- Enhanced IP Phone Features
- Barge and Privacy
- IP Phone Services
- Summary
- Review Questions
Configuring User Features, Part 2
- Configuring User Features, Part 2
- Cisco CallManager Extension Mobility
- Client Matter Codes and Forced Authentication Codes
- Call Display Restrictions
- Malicious Call Identification
- Multilevel Precedence and Preemption
- Summary
- Review Questions
Configuring Cisco Unified CallManager Attendant Console
- Configuring Cisco Unified CallManager Attendant Console
- Introduction to Cisco CallManager Attendant Console
- Call Routing and Call Queuing
- Server and Administration Configuration
- Cisco Attendant Console Features
- Summary
- Review Questions
Configuring Cisco IP Manager Assistant
- Configuring Cisco IP Manager Assistant
- Cisco IP Manager Assistant Overview
- Cisco IP Manager Assistant Architecture
- Configuring Cisco IPMA for Shared-Line Support
- Summary
- Review Questions
Part V: IPT Security
Securing the Windows Operating System
- Securing the Windows Operating System
- Threats Targeting the Operating System
- Security and Hot Fix Policy
- Operating System Hardening
- Antivirus Protection
- Cisco Security Agent
- Administrator Password Policy
- Common Windows Exploits
- Security Taboos
- Summary
- Review Questions
Securing Cisco Unified CallManager Administration
- Securing Cisco Unified CallManager Administration
- Threats Targeting Remote Administration
- Securing CallManager Communications Using HTTPS
- Multilevel Administration
- Summary
- Review Questions
Preventing Toll Fraud
- Preventing Toll Fraud
- Toll Fraud Exploits
- Preventing Call Forward and Voice-Mail Toll Fraud Using Calling Search Spaces
- Blocking Commonly Exploited Area Codes
- Using Time-of-Day Routing
- Using FAC and CMC
- Restricting External Transfers
- Dropping Conference Calls
- Summary
- Review Questions
Hardening the IP Phone
Understanding Cryptographic Fundamentals
- Understanding Cryptographic Fundamentals
- What Is Cryptography?
- Symmetric Encryption
- Asymmetric Encryption
- Hash Functions
- Digital Signatures
- Summary
- Review Questions
Understanding the Public Key Infrastructure
- Understanding the Public Key Infrastructure
- The Need for a PKI
- PKI as a Trusted Third-Party Protocol
- PKI Entities
- PKI Enrollment
- PKI Revocation and Key Storage
- PKI Example
- Summary
- Review Questions
Understanding Cisco IP Telephony Authentication and Encryption Fundamentals
- Understanding Cisco IP Telephony Authentication and Encryption Fundamentals
- Threats Targeting the IP Telephony System
- How CallManager Protects Against Threats
- PKI Topologies in Cisco IP Telephony
- PKI Enrollment in Cisco IP Telephony
- Keys and Certificate Storage in Cisco IP Telephony
- Authentication and Integrity
- Encryption
- Summary
- Review Questions
Configuring Cisco IP Telephony Authentication and Encryption
- Configuring Cisco IP Telephony Authentication and Encryption
- Authentication and Encryption Configuration Overview
- Enabling Services Required for Security
- Using the CTL Client
- Working with Locally Significant Certificates
- Configuring the Device Security Mode
- Negotiating Device Security Mode
- Generating a CAPF Report
- Summary
- Review Questions
Part VI: IP Video
Introducing IP Video Telephony
- Introducing IP Video Telephony
- IP Video Telephony Solution Components
- Video Call Concepts
- Video Protocols Supported in Cisco CallManager
- Bandwidth Management
- Call Admission Control Within a Cluster
- Call Admission Control Between Clusters
- Summary
- Review Questions
Configuring Cisco VT Advantage
- Configuring Cisco VT Advantage
- Cisco VT Advantage Overview
- How Calls Work with Cisco VT Advantage
- Configuring Cisco CallManager for Video
- Configuring Cisco IP Phones for Cisco VT Advantage
- Installing Cisco VT Advantage on a Client
- Summary
- Review Questions
Part VII: IPT Management
Introducing Database Tools and Cisco Unified CallManager Serviceability
- Introducing Database Tools and Cisco Unified CallManager Serviceability
- Database Management Tools
- Cisco CallManager Serviceability Overview
- Tools Overview
- Summary
- Review Questions
Monitoring Performance
- Monitoring Performance
- Performance Counters
- Microsoft Event Viewer
- Microsoft Performance Monitor
- Real-Time Monitoring Tool Overview
- Summary
- Review Questions
Configuring Alarms and Traces
- Configuring Alarms and Traces
- Alarm Overview
- Alarm Configuration
- Trace Configuration
- Trace Analysis
- Trace Collection
- Bulk Trace Analysis
- Additional Trace Tools
- Summary
- Review Questions
Configuring CAR
- Configuring CAR
- CAR Overview
- CAR Configuration
- Report Scheduling
- System Database Configuration
- User Report Configuration
- Summary
- Review Questions
Using Additional Management and Monitoring Tools
- Using Additional Management and Monitoring Tools
- Remote Management Tools
- Dependency Records
- Password Changer Tool
- Cisco Dialed Number Analyzer
- Quality Report Tool
- Summary
- Review Questions
Part VIII: Appendix
Appendix A. Answers to Review Questions
Index
EAN: 2147483647
Pages: 329
