Writing the Output Data
After we read the data from the source disk, we need to write them somewhere. In this section, we will discuss where to save data and the various formats in which data can be saved.
Destination Location
When we save the data, we can write them either directly to a disk or to a file. We will examine both options in this section.
Before there was specialized analysis software, an investigator either booted the suspect system or mounted the disks in her analysis system. She acquired the drive by copying the data directly to another disk. In other words, sector 0 of the source disk was identical to sector 0 of the destination disk. The resulting disk was frequently called a duplicate copy or a cloned copy. This method can cause problems when the destination disk is bigger than the source disk because it can be difficult to tell exactly where the copy ends. When acquiring directly to disk, it is recommended that the disk be wiped with zeros before acquisition so that unrelated data, possibly from a previous investigation, are not are not confused with data from the suspect system. A second problem with acquiring to disk is that some operating systems, such as Microsoft Windows, will try to mount any disk, and the copy could be mounted by the acquisition system and have its data changed. You also can run into difficulties if the original and destination disks have different geometries because some of the data structures rely on the geometry to describe locations.
Currently, the most common output location is to save the data to a file on a hard disk or CD-ROM. With a file, it is easy to know the boundaries of the data, and operating systems will not try to mount it automatically. The file is frequently called an image or a duplicate image. Many tools will allow you to break an image file into smaller pieces so that they fit onto CDs or DVDs. Some investigators will wipe the disks that store image files so that they can more easily testify that there could not have been any contamination from a previous case.
Image File Format
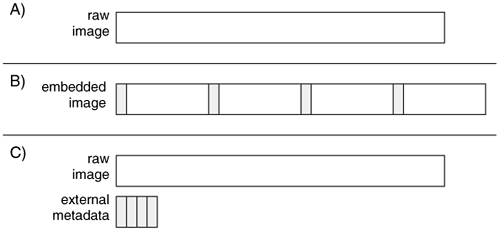
If we save the data to a file, we have a choice of in what format the image will be. A raw image contains only the data from the source device, and it is easy to compare the image with the source data. An embedded image contains data from the source device and additional descriptive data about the acquisition, such as hash values, dates, and times. Some tools will create a raw image and save the additional descriptive data to a separate file. Recall that hash values, such as CRC, MD5, and SHA-1, are used to show the integrity of data. Examples of image formats can be seen in Figure 3.5.
Figure 3.5. Examples of (A) a raw image, (B) an embedded image with meta data interleaved in the raw data, and (C) an image with the data stored in a raw format and the meta data stored in a second file.
In current implementations of acquisition tools, many of the embedded image formats are proprietary, such as those from Guidance Software's EnCase[1] and NTI's SafeBack, and some are documented, such as the format used by Technology Pathway's ProDiscover [Technology Pathways 2003]. Most analysis tools import a raw image; therefore, it is the most flexible format. The SMART tool from ASR Data and the dcfldd/dccidd tools acquire data in a raw format and have an external file with additional data.
[1] A specification to the format used by Expert Witness, which is a predecessor to EnCase, can be found at http://www.asrdata.com/SMART/whitepaper.html.
Compressing the Image File
When we write the data to a file, we may have the option to compress the file so that it takes up less storage space. Compression works by storing repetitive data more efficiently. For example, if the data have 10,000 consecutive 1s, a compressed format may be able to describe that in a few hundred bits instead of 10,000 bits. If the data are random, there will be little repetition, and compression will not be as effective. If you compress data that have already been compressed, the result will not be much smaller. For example, JPEG images have compression in them, and their size does not change if they are compressed.
When an image is compressed, any analysis tool you use it with must support the compression type. This is similar to using an image format in which data are embedded. Most general types of compression require you to decompress the entire file before it can be used. Examples of this include the Winzip tools for Windows and the gzip tools in Unix. Special compression algorithms will allow you to uncompress a small part of the compressed file, and those are the ones that should be used by acquisition tools so that you do not have to uncompress the entire image.
The benefit of compression is that you can acquire a storage device to a smaller image file, although the actual amount of data saved depends on the acquired data. The negatives of compression are as follows:
- You might be limited by the number of analysis tools that support the format.
- Acquisition might take longer because the software must perform the compression.
- Analysis might be slower because the analysis tool must decompress the image when it reads data from it.
Network-based Acquisition
The basic acquisition theory also allows you to create an image file on a remote computer by using a network. In this case, data are read from the source disk, transmitted to the destination host via a network, and written to a file. This method of acquisition is convenient if you cannot get access to the suspect disk or do not have the correct adaptors or interface for the suspect disk. Many current tools support network-based acquisition of dead and live systems. Some offer encryption to provide confidentiality on the network. Compression can be useful for the transmission to reduce the amount of data sent over a slow network.
Integrity Hashes
In Chapter 1, we discussed some of the core concepts of an investigation, one of which was to calculate hash values for evidence so that we can later verify the integrity of the data. Some acquisition tools will calculate a hash while the data are being copied, and others require a separate tool. In many cases, the hashes are stored in either an embedded image or an external file with a raw image. Having the hashes embedded in the image does not provide any additional security or integrity.
It is important to note what the hashes actually do for you. Any hash that is stored with the image will not ensure that someone has not modified the data. After all, if someone modifies the image, they can also recalculate the hashes, even if they are embedded in the format. A program could be easily written to do this. To prove the integrity of an image file using a digital hash, you will need to use a cryptographic signature and a trusted time source. This requires a lot of overhead; therefore, a much easier method is to write the hash value down in your notebook. Then someone will have to modify the image, recalculate the hash, and rewrite your notebook.
While hashes are important to later prove the integrity of an image, they can also be used to show the accuracy of an acquisition process and that the acquisition process did not modify the original disk. By calculating the hash of the disk before it is acquired and comparing that value with the hash of a raw image, you can show that the raw image contains the same data that were on the original disk. Ideally, the original hash should be calculated with a tool that is independent of the acquisition tools so that any errors are not applied to both the control case and the actual image.
Note that the previous hashing process reads only the data that are available to the tool. If hardware or software problems prevent you from accessing all bytes in a disk, the hash of the disk can equal the hash of the image file even though the image file does not represent all data on the disk. For example, if the tool can read only the first 8GB of a 12GB disk, the tool will compute the hash of the first 8GB of the disk, copy the first 8GB of data, and then compute the hash of the 8GB image file.
Another consideration for hashes is how often they are calculated. Hashes are most commonly used to identify when a value in a chunk of data has been changed. If the hash shows that a value in the chunk has been changed, the chunk must not be used. Calculating hashes of smaller chunks can minimize the impact of an integrity failure. If any chunk of data fails an integrity test, then it will not be used, but the rest of the image will.
Part I: Foundations
Digital Investigation Foundations
- Digital Investigation Foundations
- Digital Investigations and Evidence
- Digital Crime Scene Investigation Process
- Data Analysis
- Overview of Toolkits
- Summary
- Bibliography
Computer Foundations
Hard Disk Data Acquisition
- Hard Disk Data Acquisition
- Introduction
- Reading the Source Data
- Writing the Output Data
- A Case Study Using dd
- Summary
- Bibliography
Part II: Volume Analysis
Volume Analysis
PC-based Partitions
Server-based Partitions
Multiple Disk Volumes
Part III: File System Analysis
File System Analysis
- File System Analysis
- What is a File System?
- File System Category
- Content Category
- Metadata Category
- File Name Category
- Application Category
- Application-level Search Techniques
- Specific File Systems
- Summary
- Bibliography
FAT Concepts and Analysis
- FAT Concepts and Analysis
- Introduction
- File System Category
- Content Category
- Metadata Category
- File Name Category
- The Big Picture
- Other Topics
- Summary
- Bibliography
FAT Data Structures
- FAT Data Structures
- Boot Sector
- FAT
- Directory Entries
- Long File Name Directory Entries
- Summary
- Bibliography
NTFS Concepts
- NTFS Concepts
- Introduction
- Everything is a File
- MFT Concepts
- MFT Entry Attribute Concepts
- Other Attribute Concepts
- Indexes
- Analysis Tools
- Summary
- Bibliography
NTFS Analysis
- NTFS Analysis
- File System Category
- Content Category
- Metadata Category
- File Name Category
- Application Category
- The Big Picture
- Other Topics
- Summary
- Bibliography
NTFS Data Structures
- NTFS Data Structures
- Basic Concepts
- Standard File Attributes
- Index Attributes and Data Structures
- File System Metadata Files
- Summary
- Bibliography
Ext2 and Ext3 Concepts and Analysis
- Ext2 and Ext3 Concepts and Analysis
- Introduction
- File System Category
- Content Category
- Metadata Category
- File Name Category
- Application Category
- The Big Picture
- Other Topics
- Summary
- Bibliography
Ext2 and Ext3 Data Structures
- Ext2 and Ext3 Data Structures
- Superblock
- Group Descriptor Tables
- Block Bitmap
- Inodes
- Extended Attributes
- Directory Entry
- Symbolic Link
- Hash Trees
- Journal Data Structures
- Summary
- Bibliography
UFS1 and UFS2 Concepts and Analysis
- UFS1 and UFS2 Concepts and Analysis
- Introduction
- File System Category
- Content Category
- Metadata Category
- File Name Category
- The Big Picture
- Other Topics
- Summary
- Bibliography
UFS1 and UFS2 Data Structures
- UFS1 and UFS2 Data Structures
- UFS1 Superblock
- UFS2 Superblock
- Cylinder Group Summary
- UFS1 Group Descriptor
- UFS2 Group Descriptor
- Block and Fragment Bitmaps
- UFS1 Inodes
- UFS2 Inodes
- Directory Entries
Summary
Bibliography
Bibliography
EAN: 2147483647
Pages: 184
