Editing Dimensions
As you begin to add more dimensions to your drawings, you will find that AutoCAD will occasionally place the dimension text or line in an inappropriate location, or you might need to modify the dimension text. In this section, you'll take an in-depth look at how you can modify dimensions to suit those special circumstances that always crop up.
Appending Data to Dimension Text
So far in this chapter, you've been accepting the default dimension text. You can append information to the default dimension value or change it entirely if you need to. At the point when you see the temporary dimension dragging with your cursor, enter T ![]() . Then, by using the less-than (<) and greater-than (>) symbols, you can add text either before or after the default dimension or replace the symbols entirely to replace the default text. The Properties button on the Properties toolbar lets you modify the existing dimension text in a similar way.
. Then, by using the less-than (<) and greater-than (>) symbols, you can add text either before or after the default dimension or replace the symbols entirely to replace the default text. The Properties button on the Properties toolbar lets you modify the existing dimension text in a similar way.
Let's see how this works by changing an existing dimension's text in your drawing:
-
Choose Modify Object Text Edit or type ED
 .
. -
Click the last horizontal dimension you added to the drawing at the top of the screen to open the Text Formatting toolbar.

-
Click the text editor, move the cursor behind the <> sign, and then type to face of stud .
-
Click OK on the Text Formatting toolbar. The dimension changes to read 14 ¢ -0 ² to face of stud . The text you entered is appended below the dimension text.
-
Because you don't really need the new appended text for the tutorial, click the Undo button in the Standard toolbar to remove the appended text.
Tip Place your appended text in front of the <> symbols if you want to add text to the beginning of the dimension text. You can also replace the dimension text entirely by replacing the <> sign in the Contents input box with new text. If you want to restore a dimension that has been modified, delete everything in the Contents input box, including space. Or include a space to leave the dimension text blank.
Tip In this exercise, you were able to edit only a single dimension. To append text to several dimensions at once, you need to use the Dimension Edit tool. See the " Making Changes to Multiple Dimensions" sidebar in this chapter for more on this command.
You can also have AutoCAD automatically add a dimension suffix or prefix to all dimensions, instead of just a chosen few, by using the Suffix or Prefix option in the Primary Units tab of the Dimension Style dialog box. See Appendix C for more on this feature.
AutoCAD provides the associative dimensioning capability to automatically update dimension text when a drawing is edited. Objects called definition points are used to determine how edited dimensions are updated.
The definition points are located at the same points you pick when you determine the dimension location. For example, the definition points for linear dimensions are the extension line origin and the intersection of the extension line/dimension line. The definition points for a circle diameter are the points used to pick the circle and the opposite side of the circle. The definition points for a radius are the points used to pick the circle, plus the center of the circle.
| |
You can use the Dimension Edit tool to quickly edit existing dimensions. It gives you the ability to edit more than one dimension's text at one time. One common use for the Dimension Edit tool is to change a string of dimensions to read Equal instead of showing the actual dimensioned distance. The following example shows an alternative to the Properties palette for appending text to a dimension:
-
Click the Dimension Edit tool in the Dimension toolbar or type Ded
 .
. -
At this prompt
Enter type of dimension Edit [Home/New/Rotate/Oblique]<Home>:
type N
 to use the New option. The Multiline Text Editor appears, showing the <> brackets in the text box.
 -
Click the space behind or in front of the <> brackets, and then enter the text you want to append to the dimension. Or you can replace the brackets entirely to replace the dimension with your text.
-
Click OK.
-
At the Select objects: prompt, pick the dimensions you want to edit. The Select objects: prompt remains, enabling you to select several dimensions.
-
Press
 to finish your selection. The dimension changes to include your new text or to replace the existing dimension text.
The Dimension Edit tool is useful in editing dimension text, but you can also use this command to make graphical changes to the text. Here is a listing of the other Dimension Edit tool options:
Home Moves the dimension text to its standard default position and angle.
Rotate Enables you to rotate the dimension text to a new angle.
Oblique Skews the dimension extension lines to a new angle. (See the "Skewing Dimension Lines"section later in this chapter.)
| |
Definition points are actually point objects. They are difficult to see because they are usually covered by the feature that they define. You can, however, see them indirectly by using grips. The definition points of a dimension are the same as the dimension's grip points. You can see them simply by clicking a dimension. Try the following:
-
Make sure the Grips feature is turned on. (See Chapter 2 to refresh your memory on the Grips feature.)
-
Click the longest of the three vertical dimensions you drew in the earlier exercise. You will see the grips of the dimension, as shown in Figure 9.7.
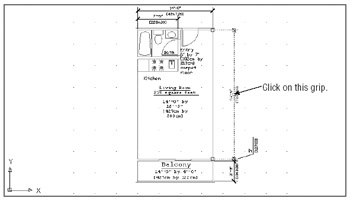
Figure 9.7: The grip points are the same as the definition points on a dimension.Tip AutoCAD 2005 treats dimensions as fully associative. This means that dimensions are updated automatically whenever an object associated with the dimension is modified. See the section " Using True Associative Dimensions" later in this chapter.
Using Grips to Make Minor Adjustments to Dimensions
The definition points, whose location you can see through their grips, are located on their own unique layer called Defpoints. Definition points are displayed regardless of whether the Defpoints layer is on or off. To give you an idea of how these definition points work, try the following exercises, which show you how to directly manipulate the definition points.
In this exercise, you'll use coordinates to move a dimension line:
-
With the grips visible, click the grip near the dimension text.
Tip Because the Defpoints layer has the unique feature of being visible even when turned off, you can use it as a layer for laying out your drawing. While Defpoints is turned off, you can still see objects assigned to it, but the objects won't plot.
-
Move the cursor around. Notice that when you move the cursor vertically, the text moves along the dimension line. When you move the cursor horizontally, the dimension line and text move together, keeping their parallel orientation to the dimensioned floor plan.
Tip Here the entire dimension line, including the text, moves. In a later exercise, you'll see how you can move the dimension text independently of the dimension line.
-
Enter @9 ¢ <0
 . Metric users should enter @275<0
  . The dimension line, text, and dimension extensions move to the new location to the right of the text (see Figure 9.8).
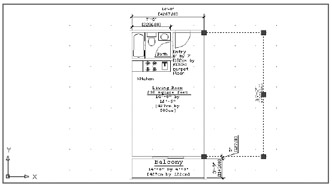
Figure 9.8: Moving the dimension line by using its gripTip If you need to move several dimension lines at once, select them all at the command prompt; then Shift+click one set of dimension-line grips from each dimension. After you've selected the grips, click one of the hot grips again. You can then move all the dimension lines at once.
In step 3 of the previous exercise, you saw that you can specify an exact distance for the dimension line's new location by entering a relative polar coordinate. Cartesian coordinates work just as well. You can even use object snaps to relocate dimension lines.
Next , try moving the dimension line back by using the Perpendicular Osnap:
-
Click the grip at the bottom of the dimension line you just edited.
-
Shift+click the right mouse button and choose Perpendicular from the Osnap shortcut menu.
-
Place the cursor on the vertical dimension line that dimensions the balcony and click it.
The selected dimension line moves to align with the other vertical dimension, back to its original location.
Changing Style Settings of Individual Dimensions
In some cases, you will have to make changes to an individual dimension's style setting in order to edit that dimension. For example, if you try to move the text of a typical linear dimension, you might find that the text and dimension lines are inseparable. You need to make a change to the dimension style setting that controls how AutoCAD locates dimension text in relation to the dimension line. This section describes how you can make changes to the style settings of individual dimensions to facilitate changes in the dimension.
| Tip | If you need to change the dimension style of a dimension to match that of another, you can use the Match Properties tool. See Chapter 6 for details on how to use this tool. |
Moving Fixed Dimension Text
Earlier in this chapter, you saw how dimension text is attached to the dimension line so that when the text is moved, the dimension line follows . You might encounter situations in which you want to move the text independently of the dimension line. The following exercises show you how you can separate dimension text from its dimension line. In the process, you'll learn how you can make a change to a single dimension's style settings. Then you'll use grips to move the dimension text away from the dimension line.
Use these steps to change the necessary settings:
-
Press the Esc key twice to cancel the grip selection from the previous exercise.
-
Zoom in to the 24 ¢ dimension so you have a view similar to Figure 9.9.
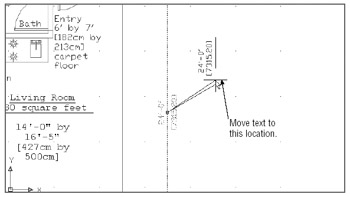
Figure 9.9: Selecting and then moving the 24- foot dimension -
Click the 24 ¢ -0 ² dimension to expose its grips.
-
Right-click and choose Properties from the shortcut menu to open the Properties palette.
-
Scroll down the list of properties until you see the Fit option. If you do not see a list of options under Fit, click the downward pointing arrow to the right to display a new set of options.
-
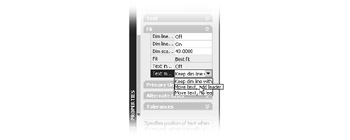
Scroll down the list farther until you see the Keep Dim Line With Text option to the right of the Text Movement listing, and then click this option.
-
Click the arrow that appears next to the Text Movement listing to open the drop-down list; then select the Move Text, Add Leader option.
-
Close the Properties palette.
Let's see the effect of the changes you just made:
-
Click the grip of the 24 ¢ -0 ² dimension text and move it up and to the right, and click again to place the text in a new location, as shown in Figure 9.9.
-
Review the changes that you made, and then click the Undo button to return to the state before you moved the dimension text.
Moving the text in step 1 demonstrates that the text is no longer tied to the dimension line. In the Properties palette, the Move Text, Add Leader option in the Fit options lets you move the dimension text independently of the dimension line. It also draws a leader from the dimension line to the text. Another option, Move Text, No Leader, does the same thing but doesn't include a leader. You can also set these options for a dimension style by using the Text Placement options in the Fit tab of the Dimension Style dialog box.
As you can see from this exercise, the Properties palette gives you access to many of the settings that you saw for setting up dimension styles. The main difference here is that the Properties palette affects only the dimensions that you have selected.
In the previous exercise, you changed the format setting of a single dimension after it was placed. These settings can be made a standard part of your Architectural dimension style by using the Modify button in the Dimension Style Manager dialog box.
You need to make one more change to the drawing's dimension to set up for the next exercise:
-
Pan your view downward so you can see the 5 ² dimension clearly, and then click the 5 ² dimension and move it into a position in line with the dimension text.

-
Choose View Zoom All, and then choose File Save to save this file in its current state.
In this short exercise, you were able to move the 5 ² dimension without making any changes to its properties. AutoCAD automatically selects the appropriate Text Movement setting if the text is too large to fit between the dimension extension lines. In the case of the 5 ² dimension text, AutoCAD automatically chose the Move Text, Add Leader setting when the dimension was placed in the drawing.
| Tip | If you have multiple dimension styles and you want to change an existing dimension to the current dimension style, use the Dimension Update tool. Click the Dimension Update tool on the Dimension toolbar or choose Dimension Update from the pull-down menu. Then select the dimensions you want to change and press |
Rotating Dimension Text
Once in a while, dimension text works better if it is kept in a horizontal orientation, even if the dimension itself is not horizontal. If you need to rotate dimension text, here's the way to do it:
-
Click the Undo button twice in the toolbar or type U
 to return the 5 ² dimension to its original location.
 -
 Click the Dimension Edit tool in the Dimension toolbar.
 -
At the Enter type of dimension editing [Home/New/Rotate/Oblique] <Home>: prompt, enter R
 .
. -
At the Enter text angle: prompt, type 45
 to rotate the text to a 45 ° angle.
 -
At the Select objects: prompt, click the 5 ² dimension text again. Press
 .
. -
Click the Undo button to undo the text rotation. You won't want to save this change to your drawing.
Tip You can also choose Dimension Align Text Angle, select the dimension text, and then enter an angle. A 0 ° angle will cause the dimension text to return to its default angle.
The Dimension Text Edit tool (Dimtedit command) also enables you to align the dimension text to either the left or right side of the dimension line. This is similar to the Alignment option in the Multiline Text Editor that controls text justification.
As you have seen in this section, the Grips feature is especially well suited to editing dimensions. With grips, you can stretch, move, copy, rotate, mirror, and scale dimensions.
Understanding the Dimension Text Edit Tool
![]() One dimension text-editing tool you haven't used yet is the Dimension Text Edit tool.
One dimension text-editing tool you haven't used yet is the Dimension Text Edit tool.
Although it might sound as though this tool enables you to edit dimension text, its purpose is to enable you to quickly position dimension text to the left, right, or center of the dimension line. To use it, choose Dimension Text Edit from the toolbar and then click the dimension text you want to move. You'll see the following prompt:
Click on a dimension and the Select dimension: Specify new location for
dimension text or [Left/Right/Center/Home/Angle]:
You can then enter the letter of the option you want. For example, if you enter L ![]() , the dimension text moves to the left side of the dimension line.
, the dimension text moves to the left side of the dimension line.
Editing Dimensions and Other Objects Together
Certainly it's helpful to be able to edit a dimension directly by using its grips. But the key feature of AutoCAD's dimensions is their ability to automatically adjust themselves to changes in the drawing. As long as you include the dimension's definition points when you select objects to edit, the dimensions themselves will automatically update to reflect the change in your drawing.
To see how this works, try moving the living room closer to the bathroom wall. You can move a group of lines and vertices by using the Stretch command and the Crossing option:
-
 Click the Stretch tool in the Modify toolbar, or type S
  and then C
  . You will see the following prompt:
 At the Select objects to stretch by crossing-window or -polygon...
Select objects: C
Specify first corner:
Modifying the Dimension Style Settings by Using Override In the " Moving Fixed Dimension Text"section, you used the Properties palette to facilitate the moving of the dimension text. You can also choose Dimension Override (Dimoverride command) to accomplish the same thing. The Override option enables you to change an individual dimension's style settings. Here's an example showing how you can use the Override option in place of the Properties palette in the first exercise of the " Moving a Fixed Dimension Text"section.
-
Press the Esc key twice to make sure you are not in the middle of a command. Then choose Dimension Override from the pull-down menu.
-
At the next prompt
-
Enter dimension variable name to override or [Clear overrides ]:
-
type Dimfit
 .
. -
At the Current value <3>: prompt, enter 4
 . This has the same effect as selecting Move Text, Add Leader from the Fit option of the Properties palette.
 -
The Enter dimension variable to override : prompt appears again, enabling you to enter another dimension variable. Press
 to move to the next step.
 -
At the Select objects: prompt, select the dimension you want to change. You can select a group of dimensions if you want to change several dimensions at once. Press
 when you have finished with your selection. The dimension settings will change for the selected dimensions.
As you can see from this example, the Dimoverride command requires that you know exactly which dimension variable to edit in order to make the desired modification. In this case, setting the Dimfit variable to 4 lets you move the dimension text independently of the dimension line. If you find the Dimoverride command useful, consult Appendix C to find which system variable corresponds to the Dimension Style dialog box settings.

-
-
Pick a crossing window, as illustrated in Figure 9.10, and then press
 to confirm your selection.
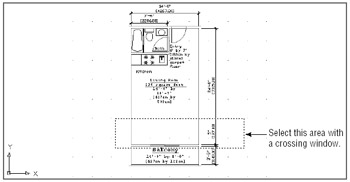
Figure 9.10: The Stretch crossing window -
At the Specify base point or displacement: prompt, pick any point on the screen.
-
At the Specify second point of displacement: prompt, enter @2 ¢ <90 to move the wall 2 ¢ in a 90 ° direction. The wall moves, and the dimension text changes to reflect the new dimension, as shown in Figure 9.11.
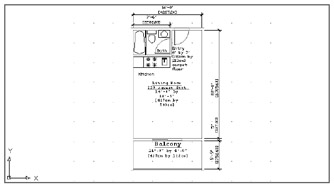
Figure 9.11: The moved wall, with the updated dimensionsTip In some situations, a crossing window might select objects other than those you want to stretch. This frequently occurs when many objects are close together at the location of a vertex you want to stretch. To be more selective about the vertices you move and their corresponding objects, use a standard window instead of a crossing window to select the vertices. Then pick the individual objects whose vertices you want to move.
When you selected the crossing window corners, you included the definition points of both vertical dimensions. This enabled you to move the dimension extension lines along with the wall, thereby updating the dimensions automatically.
You can also use the Mirror, Rotate, and Stretch commands with dimensions. The polar arrays also work, and you can use Extend and Trim with linear dimensions.
When editing dimensioned objects, be sure to select the dimension associated with the object being edited. As you select objects, using the Crossing (C) or Crossing Polygon (CP) selection option helps you include the dimensions. For more on these selection options, see Chapter 2.
| Tip | If a hatch pattern or solid fill completely covers a dimension, you can use the Draworder command to have AutoCAD draw the dimension over the hatch or solid fill. See Chapters 6, 11, and 13 for more on various uses of the Draworder command. |
| |
The tool you used for moving the wall and the dimension line extensions is the Stretch command. This is one of the most useful, yet least understood , AutoCAD commands. Think of the Stretch command as a vertex mover: its sole purpose is to move the vertices (or endpoints) of objects.
The Stretch command requires you to do two things: select the objects you want to edit and then select the vertices you want to move. The crossing window and the crossing polygon window are convenient ways to kill two birds with one stone because they select objects and vertices in one operation. But when you want to be more selective, you can click objects and window vertices instead. For example, consider the exercise in this chapter in which you moved a wall with the Stretch command. To move the walls but not the dimension-line extensions, take the following steps:
-
Click the Stretch tool on the Modify toolbar or click Stretch on the Modify pull-down menu. You can also type S
 .
. -
At the Select objects: prompt, enter W
 (Window) or WP
  (Window Polygon).
 -
Use the window to select the vertices you want to move. Because the Window and Window Polygon selection options select objects completely enclosed within the window, most of the items you want to stretch will already be selected.
-
Click the vertical walls to include them in the set of objects to be edited.
-
Press
 to finish your selection.
 -
Indicate the base point and second point for the stretch.
You could also use the Remove Selection option and click the dimensions to deselect them in the previous exercise. Then, when you enter the base and second points, the walls move but the dimensions stay in place.
Stretch will stretch only the vertices included in the last window, crossing window, crossing polygon, or window polygon. (See Chapter 2 for more on these selection options.) Thus, if you had attempted to use a window to select another part of your drawing in the wall-moving exercise, nothing would have moved. Before Stretch will do anything, objects need to be highlighted (selected) and their endpoints also selected with a window.
The Stretch command is especially well suited to editing dimensioned objects, and when you use it with the Crossing Polygon (CP) or Window Polygon (WP) selection options, you have substantial control over what gets edited.
| |
Using Associative Dimensions
You've seen how you can edit dimensions by manipulating their definition points. For versions prior to 2002, if you want to edit dimensions together with the objects, you need to use a crossing window because the dimension is not fully associated with the object it is dimensioning. In those versions, AutoCAD uses the dimension's definition point to simulate what is known as associative dimensioning. In AutoCAD 2002 and later, you can fully associate a dimension with an object so that you need only change the object and the dimension will follow.
To use this feature, called associative dimensioning, you'll need to turn it on in the Options dialog box. Here's how it's done:
-
Choose Tools Options to open the Options dialog box, and then click the User Preferences tab.
-
In the Associative Dimensioning group, turn on the Make New Dimensions Associative option.
-
Click OK.
From now on, any dimension you place will be associated with the object you are dimensioning. Try the following exercise to see how it works:
-
Choose File New and create a new blank file from the Acad.dwt template.
-
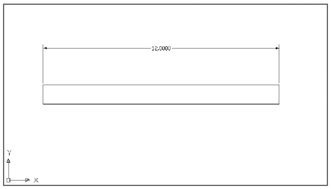
Click the Rectangle tool from the Draw toolbar; then draw a rectangle roughly 12 units wide by 1 unit high.
-
Use the Zoom Window tool in the Standard toolbar to get a good view of your drawing so far.
-
Choose Dimension Linear, turn on the Object Snap mode, and then dimension the top of the rectangle.
-
Click the rectangle to select it; then click the grip in the upper-right corner of the rectangle.
-
Move the grip to the right and upward and then click. The rectangle corner moves, and the dimension moves with it.
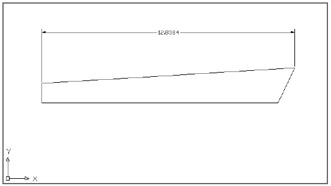
In this case, you had to change only the shape of the rectangle, and the dimension followed the change. The dimension in this example is fully associated with the rectangle.
Associative dimensioning also works with external references (see Chapter 12 for more on external references, or Xrefs) and blocks. This means that you can dimension an Xref, edit the source Xref file, and have the dimensions update in the current file. Such changes are not completely automatic; you need to issue the Dimregen command to update dimensions to the new Xref configuration.
You can use associative dimensioning on objects within blocks, and if the block is edited, those dimensions will update automatically. But be aware that nonuniform scaling of a block ”that is, scaling along one axis and not the other ”will not affect an associative dimension.
You can dimension a Model Space object in Paper Space, and the Paper Space dimension will be associated with the Model Space object. This means that even though the Paper Space dimension will not be visible in Model Space, the Paper Space dimension will reflect changes made to objects in Model Space. In some instances, you might need to use the Dimregen command to "refresh" Paper Space dimensions. See Chapter 12 for more on these features.
Associating Dimensions with Objects
Now suppose you have a drawing from an older version of AutoCAD, and you want to create an association between an existing dimension and an object. The next exercise will show you how this is done. You'll use the Unit plan to associate one of the dimensions you've already created with a line representing a wall:
-
Close the rectangle drawing file. You don't have to save it.
-
Back in the Unit drawing, zoom in to the balcony area so your view looks similar to Figure 9.12.
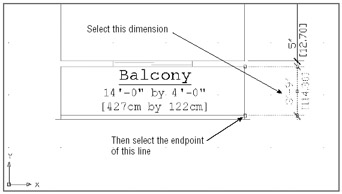
Figure 9.12: Reassociating a dimension to an object -
Choose Dimension Reassociate Dimensions. You can also type Dimreassociate
 at the command prompt.
 -
At the prompt
Select dimension to reassociate
Select Objects:
select the vertical dimension that dimensions the balcony (see Figure 9.12) and then press
 .
. -
At the Specify first extension line origin or [Select object] <next> : prompt, you'll see an X at the top definition point of the dimension.
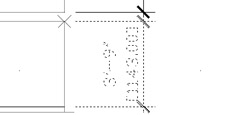
-
Press
 . This tells AutoCAD to go to the next extension line origin. You'll see an X at the bottom definition point of the dimension.
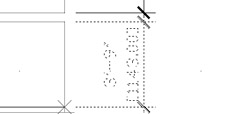
-
Use the Endpoint Osnap and click the end of the line representing the rail of the unit (see Figure 9.12). You now have the dimension associated with the endpoint of the line representing the rail of the balcony.
-
Try moving the rail to see what happens: use the Move tool in the Modify toolbar to move the balcony rail downward, as shown in Figure 9.13. The dimension follows the line.
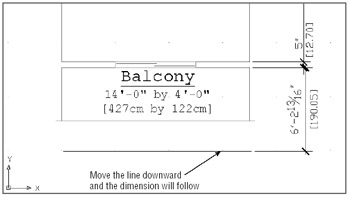
Figure 9.13: The reassociated dimension follows the rail as it is moved.
In step 5, you saw an X appear at the location of a dimension definition point. If the definition point is already associated with an object, the X will appear with a box around it. The box is a reminder that the definition point is already associated with an object and that you will be changing its association.
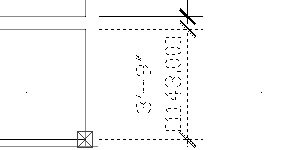
Also in step 5, you have the option to select an object. This option enables you to associate the dimension with an entire object instead of with just one endpoint. If you type S ![]() at that prompt in step 5, you can then select the object that you want to associate with the dimension. The dimension will change so that its definition points coincide with the endpoints of the object. The dimension will remain in its original orientation. For example, a vertical dimension will remain vertical even if you associate the dimension with a horizontal line. In this situation, the dimension dutifully dimensions the endpoints of the line but will show a distance of zero.
at that prompt in step 5, you can then select the object that you want to associate with the dimension. The dimension will change so that its definition points coincide with the endpoints of the object. The dimension will remain in its original orientation. For example, a vertical dimension will remain vertical even if you associate the dimension with a horizontal line. In this situation, the dimension dutifully dimensions the endpoints of the line but will show a distance of zero.
| Tip | You can remove a dimension's association with an object by using the Dimdisassociate command. Type Dimdisassociate |
Adding a String of Dimensions with a Single Operation
AutoCAD provides a method for creating a string of dimensions by using a single operation. The Qdim command lets you select a set of objects instead of having to select points. The following exercise demonstrates how the Qdim command works:
-
If you haven't done so already, zoom out so you have an overall view of the Unit floor plan.
-
 Choose Dimension Quick Dimension or click Quick Dimension on the Dimension toolbar.
 -
At the Select geometry to dimension: prompt, place a selection window around the entire left-side wall of the unit.
-
Press
 to finish your selection. The following prompt appears:
 Specify dimension line position, or [Continuous/Staggered/Baseline/Ordinate/Radius/Diameter/ datumPoint/Edit/seTtings] <Continuous>:
-
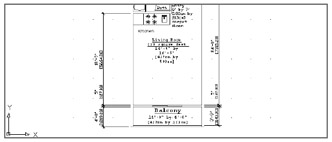
Click a point to the left of the wall to place the dimension. A string of dimensions appears, displaying all the dimensions for the wall.
-
When you have finished reviewing the results of this exercise, exit the file without saving it.
The prompt in step 4 indicates several types of dimensions you can choose from. For example, if you want the dimensions to originate from a single baseline, you can enter B ![]() in step 5 to select the Baseline option.
in step 5 to select the Baseline option.
The Qdim command can be a time-saver when you want to dimension a wall quickly. It might not work in all situations, but if the object you're dimensioning is fairly simple, it can be all you need.
| Tip | In this exercise, you used a simple window to select the wall. For more complex shapes , try using a crossing polygon selection window. See Chapter 2 for more on crossing polygons. |
Removing the Alternate Dimensions
In the beginning of this chapter, you set up the My Architectural dimension style to include an alternate dimension. You can remove those alternate dimensions by turning off the alternate dimension features. Here's how it's done:
-
Choose Dimension Style or enter D
 to open the Dimension Style Manager dialog box.
 -
Select the style that uses the alternate units. In the Styles list box, choose Modify.
-
Click the Alternate Units tab.
-
Click the Display Alternate Units check box to remove the checkmark.
-
Click OK, and then click Close to close the Dimension Style Manager dialog box.
The dimensions that use the style you just edited change to remove the alternate dimensions. You can also perform the reverse operation and add alternate dimensions to an existing set of dimensions. Follow the steps shown here, but instead of removing the checkmark in step 4, add the checkmark and make the appropriate setting changes to the rest of the Alternate Units tab.
Using Osnap While Dimensioning
When you pick intersections and endpoints frequently, as during dimensioning, it can be a bit inconvenient to use the Osnap shortcut menu. If you know you will be using certain Osnaps frequently, you can use Running Osnaps. You can do so in the following two ways:
-
Choose Tools Drafting Settings to open the Drafting Settings dialog box. In the Object Snap tab, make sure the Object Snap On check box is selected, and then select the desired default Osnap mode. You can pick more than one mode ”for example, Intersection, Endpoint, and Midpoint ”so that whichever geometry you happen to be nearest will be the point selected.
-
Another way to accomplish this is to type “osnap
 at the command prompt and then enter the name of the Osnap modes you want to use. If you want to use more than one mode, enter their names separated by commas; for example:
 endpoint,midpoint,intersect
After you've designated your Running Osnaps, the next time you are prompted to select a point, the selected Osnap modes are automatically activated. You can still override the default settings by using the Osnap shortcut menu (Shift+click the right mouse button).
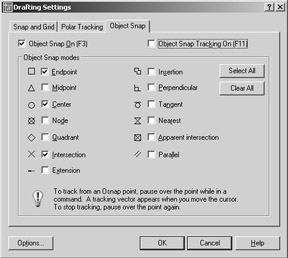
There is a drawback to setting a Running Osnap mode: when your drawing gets crowded, you can end up picking the wrong point by accident . However, you can easily toggle the Running Osnap mode off by clicking Osnap in the status bar or by pressing F3.
EAN: 2147483647
Pages: 261