Customizing the Desktop
In this chapter, you will learn how to develop two VBScripts that customize the Windows desktop in a number of ways. The first script will demonstrate how to create a shortcut to an Internet URL as well as how to work with Windows special folders. The second script will demonstrate how to programmatically manipulate the contents of the Windows registry in order to configure both the Windows desktop wallpaper and the Windows screen saver.
Adding a URL Desktop Shortcut to the Corporate Web Site
The first script that needs to be completed is the one that creates a shortcut on the Windows desktop to the company's Web site. This is the easier of the two scripts to write, and it will give Tom, the new desktop support employee from Chapter 10, a chance to get his feet wet before trying to learn how to programmatically interact with the Windows registry.
There are a number of different pieces of information that you must take into account when developing this first script. First of all, you need to learn how to work with the WshUrlShortcut object. In order to add a shortcut to the Windows desktop, you also need to learn about a Windows management feature known as special folders. Special folders are used to represent and administer a number of Windows features, including the Start menu, the Quick Launch toolbar, and the desktop.
Working with Special Folders
Windows special folders represent a number of important system resources. By manipulating the contents of these folders, you are able to directly modify numerous Windows resources, including:
- Desktop
- Favorites
- Fonts
- MyDocuments
- NetHood
- PrintHood
- Programs
- Recent
- SendTo
- StartMenu
- Startup
- Templates
To examine these special folders, right-click on the Windows XP Start button and click on Explore. This will open an Explorer folder. By default, the Document and Settings folder will be expanded, as will a folder representing a number of your personal user profile settings. To view the contents of your Windows desktop, select the Desktop folder, as demonstrated in Figure 11.1.
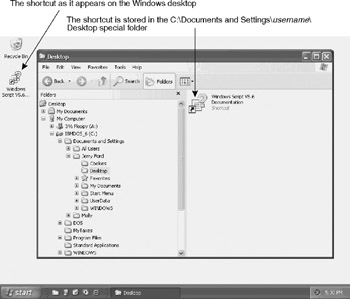
Figure 11.1: Examining the contents of the Desktop special folder
One way to configure the contents of your Windows desktop is to drag and drop Windows shortcuts to and from this folder.
In addition to the special folders associated with your specific profile, Windows provides a second group of special folders that apply to all users of the computer. To view these folders, expand the All Users folder, as shown in Figure 11.2.
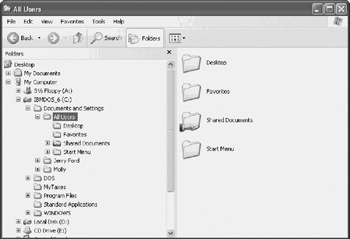
Figure 11.2: Making changes to the folders stored under the All Users folder affects all users of the computer
These special folders are not readily identifiable. However, their names are easy to interpret. For example, the following list shows the names of the commonly used special folders.
- AllUsersDesktop. Items added to this folder are visible on the desktop of every user of the computer.
- AllUsersStartMenu. Items added to this folder are visible on the Start menu of every user of the computer.
- AllUsersPrograms. Items added to this folder are visible on the All Programs menu of every user of the computer.
- AllUsersStartup. Items added to this folder are automatically started each time a user logs on to the computer.
As you can see, the names of these special folders are generated by appending AllUsers to the folder names (less any spaces).
Working with the WshUrlShortcut Object
In order to create a shortcut for a URL, you must use the methods and properties belonging to the WshUrlShortcut object. This object is a child object of the WshShell object. In order to work with the WshUrlShortcut object, you must first instantiate the WshShell object, as shown below.
Set WshShl = WScript.CreateObject("WScript.Shell")
In order to place a shortcut on the Windows desktop, you must set up a reference to it using the WshShell object's SpecialFolders property. The syntax for doing so is outlined below.
WshShl.SpecialFolders(SpecialFolderName)
SpecialFolderName specifies the name of a special folder, which in the case of the Windows desktop is the Desktop special folder. A reference to the Desktop special folder is set up as follows:
DesktopFolder = WshShl.SpecialFolders("Desktop")
| Note |
The WshShell object's SpecialFolders property will return an empty string if the specified folder does not exist. |
Once the WshShell object is established and the reference to the special folder is set, you can use the WshShell object's CreateShortcut method to instantiate a WshUrlShortcut object. The syntax for doing so is outlined below.
WshShell.CreateShortcut(ShortcutPathname)
When creating a URL shortcut in a special folder such as the Desktop special folder, the value assigned to the ShortcutPathname parameter consists of two different pieces of information. The first piece is the name of the special folder reference. The second piece of information is a descriptive string that ends with .url.
These two pieces of information are then concatenated to the special folder name, as shown below.
Set UrlShortcut = WshShl.CreateShortcut(DesktopFolder + "\Premier Press
Publishing.url")
The next step to perform when setting up a URL shortcut on the Windows desktop is the specification of the URL address that the shortcut is to represent. Setting the WshUrlShortcut object's TargetPath property does this.
UrlShortcut.TargetPath = "www.premierpressbooks.com"
The only remaining step is to use the WshUrlShortcut object's Save() method to save the object to disk, as shown below.
UrlShortcut.Save
When fully assembled, the previous statements create a desktop shortcut to the Premier Press Web site, as shown below.
Set WshShl = WScript.CreateObject("WScript.Shell")
DesktopFolder = WshShl.SpecialFolders("Desktop")
Set UrlShortcut = WshShl.CreateShortcut(DesktopFolder + "\Premier Press
Publishing.url")
UrlShortcut.TargetPath = "www.premierpressbooks.com"
UrlShortcut.Save
Developing the Desktop URL VBScript
By duplicating the logic of the previous example, you can easily create a VBScript that places a URL shortcut on the Windows desktop, as shown in the following example.
'*************************************************************************
'Script Name: Script 11.1.vbs
'Author: Jerry Ford
'Created: 02/17/03
'Description: This script creates a URL to the corporate web site on the
'Windows desktop
'*************************************************************************
'Initialization Section

Option Explicit

Dim WshShl, DesktopFolder, UrlShortcut

Set WshShl = WScript.CreateObject("WScript.Shell")


'Main Processing Section

CreateUrlShortcut()

WScript.Quit()


'Procedure Section

'Create the desktop URL Shortcut
Sub CreateUrlShortcut()

 DesktopFolder = WshShl.SpecialFolders("Desktop")

 Set UrlShortcut = WshShl.CreateShortcut(DesktopFolder + "\ABC Inc " & _
 "Home Page.url")
UrlShortcut.TargetPath = "www.abc_inc.com"
 UrlShortcut.Save

End Sub
The script begins with the Option Explicit statement and then defines the variables that it will need to work with. Next the WshShell object is instantiated. The Main Processing Section consists of two statements. The first statement calls a subroutine called CreateUrlShortcut(), which creates the desktop URL shortcut. The second statement uses the WScript object's Quit() method to terminate the script's execution.
The key part of the script is contained in the CreateUrlShortcut() subroutine. It begins by setting up a reference to the Desktop special folder. Next the shortcut is created. Then its URL address is assigned, and finally it is saved to disk. Once run, this script creates the desktop URL shortcut shown in Figure 11.3.

Figure 11.3: An example of a desktop URL shortcut created by a VBScript
| Note |
The coverage of desktop shortcuts in this chapter is very limited. For a detailed review of shortcuts, including their attributes and construction, refer to Chapter 12, "Customizing the Start Menu and Taskbar." |
Understanding the Windows Registry
Now that you have written a VBScript to configure a desktop URL shortcut, it is time to begin working on a script that will automate the configuration of the Windows background wallpaper and the screen saver. This script must satisfy a number of requirements, including:
- Creating a D:Images folder if it does not already exist
- Copying the CorpLogo.bmp desktop background file from floppy disk to the D:Images folder
- Configuring CorpLogo.bmp as the Windows desktop wallpaper
- Setting the Windows desktop background to white so that text displayed on the desktop will not have a background color
- Disabling the Wallpaper Tile setting
- Enabling the screen saver
- Enabling password protection
- Setting up a 15-minute delay before the screen saver begins executing
- Enabling the Starfield screen saver
- Logging the user off in order for changes to take effect
Working with the Registry
The Windows registry is a built-in database that provides a central repository for storing configuration information about:
- User configuration settings and profile information
- Windows operating system settings
- Software configuration settings
- Hardware settings
- Configuration information for Windows services
- Configuration information for software device drivers
The registry contains configuration information about virtually every aspect of a Windows computer. By modifying the contents of the Windows registry, you can configure the operation of many Windows features, including desktop settings, the desktop wallpaper, and the screen saver.
Users and administrators work with the registry every day, often without even realizing it. For example, the utilities or applets located on the Windows Control Panel provide graphical interfaces for making modifications to the registry. The Control Panel applets simplify the process of making changes to the registry by providing intuitive interfaces. An alternative way to work with the Windows registry is to use the Regedit registry editor.
| Tip |
On Windows NT, 2000, and XP you may also use the Regedt32 registry editor. |
Figure 11.4 provides a high-level view of the Windows XP registry, which is made up of five root keys.
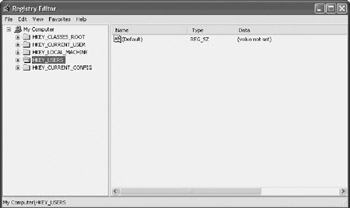
Figure 11.4: Using the Regedit registry editor to examine the contents of the Windows registry
| Note |
Making a mistake when modifying the contents of the Windows registry can have a potentially devastating impact on the computer. In certain circumstances, it can even prevent the computer from starting. Unless you are absolutely certain of the effects of a change that you are making to the registry, do not make the change. In addition, take advantage of Control Panel applets and other utilities whenever possible to avoid making manual registry changes with Regedit. Finally, make sure that you back up the registry on a regular basis so that you can recover from any changes that result in a problem. |
Understanding How the Registry Is Organized
The Windows registry is logically organized in a treelike structure with five root or parent keys, as shown in Table 11.1.
|
Key |
Abbreviation |
Description |
|---|---|---|
|
HKEY_CLASSES_ROOT |
HKCR |
Stores information about Windows file associations |
|
HKEY_CURRENT_USER |
HKCU |
Stores information about the currently logged on user |
|
HKEY_LOCAL_MACHINE |
HKLM |
Stores global computer settings |
|
HKEY_USERS |
N/A |
Stores information about all users of the computer |
|
HKEY_CURRENT_CONFIG |
N/A |
Stores information regarding the computer's current configuration |
| Note |
There is a sixth root key on Windows 98 and Me called HKEY_DYN_DATA. This key references Plug and Play related information. |
Physically, the Windows registry is made up of a number of different files. On a computer running Windows 2000 or XP, these files are located in %system-root%system32config and include all of the following:
- DEFAULT
- SAM
- SECURITY
- SOFTWARE
- SYSTEM
- Userdiff
In addition to these files, information is stored in individual user profiles. These user profiles are located in the Documents and Settings folder and are organized by username.
| Note |
On computers running Windows 98 and Me, the contents of the Windows registry are stored in two files called user.dat and system.dat. User.dat stores user-profile-related information and system.dat stores system-related information. |
Of the five registry keys, the only ones that you will probably need to work with are the first three keys listed in Table 11.1. As a convenience, each of these root keys has an associated abbreviation that you can use within your VBScripts when working with any of these keys. The remaining two keys do not have an abbreviation. To work with these two keys, you will have to reference them using their full names (HKEY_CURRENT_CONFIG or HKEY_USERS).
Keys, Values, and Data
Within the Windows registry data is stored a complex hierarchy made up of keys and values. A key can be thought of as a container that holds other keys or values. The five root keys are analogous to disk drives, while the various levels of subkeys that reside underneath them can be thought of as functioning like folders. Actual data within the registry is stored within values. A value is therefore very much like a file, which in turn stores data.
Data is stored in the registry using the following format:
Key : key_type : value
Key represents the name of a registry key. For example, the following statement references a key named Desktop, which is a subkey of the Control Panel key, which itself is a subkey of the HKEY_CURRENT_USERS root key.
HKCU
 Control Panel
 Desktop
You specify a key versus a value by adding a closing character to the end of a key name, as demonstrated above. Values, on the other hand, are specified without a closing , as demonstrated below.
HKCU
 Control Panel
 Desktop
 Wallpaper
In this example, the Wallpaper value, which is located within the Desktop key, is specified.
Key_type specifies the type of data being stored. The Windows registry supports the storage of a number of different types of data, as listed in Table 11.2. Value is used to specify the actual data to be stored.
|
Type |
Description |
|---|---|
|
REG_BINARY |
Stores a binary value |
|
REG_DWORD |
Stores a hexadecimal DWORD value |
|
REG_EXPAND_SZ |
Stores an expandable string |
|
REG_MULTI_SZ |
Stores multiple strings |
|
REG_SZ |
Stores a string |
There are two types of registry values, named and unnamed. Most registry values are named. A named value is one that is assigned a name by which the data stored within the value can be referenced. An unnamed value is one without a name. Every registry key has one unnamed value that represents its default value (that is, the value that is changed if a named value is not specified). Unnamed values are represented within the Windows registry with a label of Default, as shown in Figure 11.5.
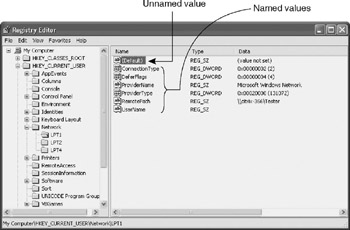
Figure 11.5: Unnamed values are represented with a label of Default when viewed using the Regedit utility
Writing VBScripts That Programmatically Interact with the Windows Registry
In order to programmatically interact with the Windows registry using VBScript and the WSH, you must first instantiate the WshShell object. The WshShell object provides three methods that you can use to read, write, add, delete, and modify registry keys and values. These methods are described below.
- RegRead(). Retrieves a key or value from the registry
- RegWrite(). Creates or modifies a registry key or value
- RegDelete(). Deletes a key or value from the registry
Reading Registry Keys and Values
The WshShell object's RegRead() method provides the ability to examine the contents of registry keys and values. The RegRead() method has the following syntax:
X = WshShell.RegRead(KeyOrValue)
KeyOrValue specifies the name of a registry key or value to be retrieved. The RegRead() method can only retrieve the following types of data from the registry:
- REG_SZ
- REG_MULTI-SZ
- REG_DWORD
- REG_BINARY
- REG_EXPAND_SZ
If a VBScript attempts to retrieve a value whose contents are not stored in one of the previous data types, then a value of DISP_E_TYPEISMATCH is returned.
In order to work with the RegRead() method, you must first establish an instance of the WshShell object, as shown below.
Set wshObject = WScript.CreateObject("WScript.Shell")
You may then use the method to retrieve information from the registry and assign it to a variable for later interrogation.
results = wshObject.RegRead("HKCUTestKeyFileName")
In this example, the data assigned to a value named FileName (stored in a key named HKCUTestKey) is retrieved.
Adding or Changing Registry Keys and Values
The WshShell object's RegWrite() method provides the ability to create new registry keys or values. It also provides the ability to modify them if they already exist. The syntax required to work with this method is shown below.
WshShell.RegWrite(KeyOrValue, Data, DataType)
KeyOrValue represents the registry key or value being created or modified. Data specifies the data that is being written to the registry, and DataType identifies the data's type.
All registry values are typed. The RegWrite() method provides VBScript with the ability to write the following types of data to the Windows registry:
- REG_SZ
- REG_DWORD
- REG_BINARY
- REG_EXPAND_SZ
By default, all data is stored as a string (for example, REG_SZ). VBScript is a loosely typed scripting language that supports only the variant data type. Therefore, when writing nonstring data, it is important that your VBScripts specify the DataType parameters to ensure that the data is stored using the proper type.
To write to the registry, you must first instantiate the WshShell object. You may then add or modify registry keys or values as demonstrated below.
Set WshShell = WScript.CreateObject("WScript.Shell")
WshShell.RegWrite "HKCUTestKeyFileName", "Error.log", "REG_SZ"
In this example, a new value is created, as demonstrated in Figure 11.6. It is stored in a key called Error.Log, which is located under HKCUTestKey. If the TestKey key does not exist, the RegWrite() method will automatically create it. The data being stored is the name of a file (Error.log). This data is stored as a string.
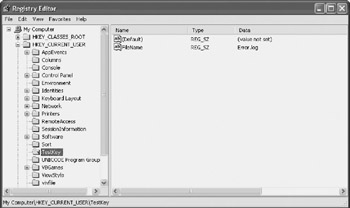
Figure 11.6: Using the Regedit utility to view the new value
To later modify this value, all that you have to do is assign it a new string, as demonstrated below.
Set WshShell = WScript.CreateObject("WScript.Shell")
WshShell.RegWrite "HKCUTestKeyFileName", "Error.txt", "REG_SZ"
In this example, the file extension of the Error file was changed from .log to .txt.
| Note |
A registry key can be used to store an unlimited number of subkeys or values. For example, the following statement could be used to create a second value and store it under HKCUTestKeyFileName: WshShell.RegWrite "HKCUTestKeyFileStatus", "Active", "REG_SZ" |
Deleting Registry Keys and Values
The WshShell object's RegDelete() method provides VBScript with the ability to delete registry keys and values. Use the following syntax when working with this method:
WshShell.RegDelete KeyOrValue
KeyOrValue identifies the name of a key or variable to be deleted.
| Note |
Windows 2000 and XP will not allow you to delete a registry key if it contains other subkeys. You must delete all child keys before deleting a parent key. Things work differently on Windows 98 and Me, where the RegDelete() method will allow a parent key that contains child keys to be deleted. |
To work with the RegDelete() method, you must first instantiate the WshShell object. You can then delete a key or value, as demonstrated below.
Set wshObject = WScript.CreateObject("WScript.Shell")
wshObject.RegDelete "HKCUTestKeyFileName"
In this example, a value named FileName is deleted from HKCUTestKey. In a similar fashion, the HKCUTestKey key can be deleted, as shown below.
Set wshObject = WScript.CreateObject("WScript.Shell")
wshObject.RegDelete "HKCU TestKey "
Customizing Desktop Wallpaper and Screen Saver Settings
The VBScript that is to modify desktop wallpaper and screen saver settings has a number of tasks that it must perform. These tasks include creating a folder to store the CorpLogo.bmp wallpaper file, modifying Windows desktop wallpaper and screen saver values located in the HKCUControl PanelDesktop key, and logging off the user once the changes have been made.
The Initialization Section
As with all the VBScripts developed in this book, this VBScript is divided into three sections. The Initialization Section is responsible for defining variables used by the script. It also instantiates both the WshShell object and the FileSystemObject object, as shown below.
Option Explicit

Dim WshShl, ChangeSettings, shellApp, FsoObject
Set WshShl = WScript.CreateObject("WScript.Shell")
Set FsoObject = CreateObject("Scripting.FileSystemObject")
The WshShell object must be established in order for the script to make use of its RegWrite() method. The FileSystemObject object is needed in order to have access to methods that will allow the script to create the Images folder on the computer's D: drive and to store a copy of the CorpLogo.bmp wallpaper file in that folder.
The Main Processing Section
The Main Processing Section controls the overall execution of the script, deciding when and if the registry is to be modified. This is accomplished by calling the GetConfirmation() function, which returns a value of 6 if permission to run the script has been given. If this is the case, then a series of subroutine calls is made to procedures that copy the CorpLogo.bmp file to the computer's disk drive, modify both the background wallpaper and screen saver settings, and then initiate the logoff process.
ChangeSettings = GetConfirmation()

If ChangeSettings = 6 Then
 CopyCorpLogo()
 SetBackground()
 SetScreenSaver()
 ForceLogoff()
End If

WScript.Quit()
Once each of these subroutines has executed, control returns to the Main Processing Section, and the WScript object's Quit() method is called in order to terminate the script's execution.
| Tip |
The use of the WScript object's Quit() method is not required in this instance because as it is written, the script would stop executing at this point anyway. However, by adding this method to the end of the Main Processing Section, you make the script easier to read and prevent any code that may have been accidentally placed outside of a procedure in the Procedure Section from inadvertently executing. |
The CopyCorpLogo() Subroutine
The CopyCorpLogo() subroutine uses several methods belonging to the FileSystemObject object to interrogate and manipulate the Windows file system. For starters, the subroutine uses the FolderExists() method to determine whether or not the D:Images folder already exists. If it does not exist, then the CreateFolder() method is used to create it. Since Tom is working with all new computers, the folder shouldn't already exist. However, adding this check provides a foundation for expanding the script should Tom ever need to reconfigure computers that have already been deployed. The last thing that the script does is copy the CorpLogo.bmp file to the D:Images folder.
Sub CopyCorpLogo()
 If (FsoObject.FolderExists("D:Images") = false) Then
 FsoObject.CreateFolder "D:Images"
 End If
 FsoObject.CopyFile "a:CorpLogo.bmp", "D:Images"
End Sub
The GetConfirmation() Function
The GetConfirmation() function displays a message in a pop-up dialog box using the built-in VBScript MsgBox() function. This procedure is written as a function instead of as a subroutine because it needs to be able to return a result back to its calling statement. A value of 6 is returned if the Yes button is clicked and a value of 7 is returned if the No button is clicked.
Function GetConfirmation()
 GetConfirmation = MsgBox("This script will perform the following " & _
 "tasks:" & _ vbCrLf & vbCrLf & "1. Configure the display of the " & _
 "Corporate Logo the Windows desktop" & vbCrLf & _
 "2. Configure a password protected screen saver" & vbCrLf & _
 "3. Initiate a restart of the of the computer so that " & _
 "changes may take effect" & vbCrLf & vbCrLf & _
 "Do you wish to continue?", 36)
End Function
The SetBackground() Subroutine
The SetBackground() subroutine uses the WshShell object's RegWrite() method to modify three registry values located in the HKCUControl PanelDesktop subkey. The first value that is modified is Wallpaper, which is set to D:ImagesCorpLogo.bmp. The second value to be modified is TileWallpaper, which is set to 0. Finally, the Background value is set to 255 255 255 (white).
Sub SetBackground()
 'Set CorpLogo.bmp as the desktop wallpaper
 WshShl.RegWrite "HKCUControl PanelDesktopWallpaper", _
 "D:ImagesCorpLogo.bmp"

 'Make sure that the Tile option is disabled
 WshShl.RegWrite "HKCUControl PanelDesktopTileWallpaper", "0"


 'Configure the background color to be white
 WshShl.RegWrite "HKCUControl PanelColorsBackground", "255 255 255"
End Sub
The registry modifications performed by this subroutine are equivalent to opening the Desktop Properties dialog box (by right-clicking on the Windows desktop and selecting Properties from the menu that appears) and then modifying the settings on the Desktop Saver property sheet, as shown in Figure 11.7.
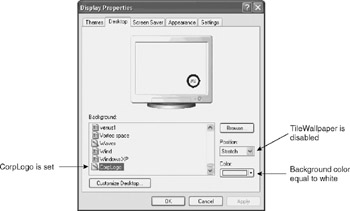
Figure 11.7: Examining the changes made to the desktop wallpaper settings
The SetScreenSaver() Subroutine
The SetScreenSaver() subroutine modifies four screen-saver-related registry values located in the HKCUControl PanelDesktop subkey. The first value that is changed is ScreenSaveActive, which is set to 1. This enables the Windows screen saver. Next the ScreenSaverIsSecure value is set to 1. This enables Windows screen saver password protection. The ScreenSaveTimeOut value is then set to 900. This configures a 15-minute delay before the screen saver will kick in. Finally, the SCRNSAVE.EXE value is set to ("%SystemRoot%") & "System32ssstars.scr". This sets up the Starfield Simulation screen saver.
| Note |
Windows XP screen savers are stored in C:WindowsSystem32 and have a .scr file extension. Their file names are rather cryptic, making it difficult to identify them by name. However, you can double-click on them to open and view them. |
Sub SetScreenSaver()
 'Enable the screen saver
 WshShl.RegWrite "HKCUControl PanelDesktopScreenSaveActive", 1
 'Enable password protection
 WshShl.RegWrite "HKCUControl PanelDesktopScreenSaverIsSecure", 1

 'Set up a 15 minute delay
 WshShl.RegWrite "HKCUControl PanelDesktopScreenSaveTimeOut", 900

 'Enable the Starfield screen saver
 WshShl.RegWrite "HKCUControl PanelDesktopSCRNSAVE.EXE", ("%SystemRoot%") &
"System32ssstars.scr"

End Sub
The registry modifications made by this script are the equivalent of opening the Desktop properties dialog box and then modifying the settings on the Screen Saver property sheet, as shown in Figure 11.8.
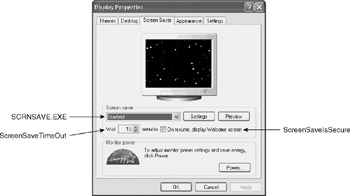
Figure 11.8: Examining the changes made to the desktop screen saver settings
The ForceLogoff() Subroutine
Desktop wallpaper and screen saver configuration settings are associated with individual users and are stored in each user's profile (for example, HKCU). In order to make changes to HKCU, the user must be logged on to the computer.
Once the script has changed the settings that affect the desktop wallpaper and screen saver, the user must log off for the changes to take effect.
Windows XP comes equipped with a command line utility called logoff.exe that can be called by the script in order to automatically log the user off. The WshShell object has a method called Run() that VBScript can use to execute any Windows command or command line utility. The ForceLogoff() subroutine, shown below, takes advantage of both the Run() method and logoff.exe. When the user logs back in, the changes will be in effect.
Sub ForceLogoff()
 WshShl.Run("%SystemRoot%") & "System32logoff.exe"
End Sub
The Fully Assembled Script
The entire VBScript is assembled below. When run, the VBScript will make the required Windows registry changes and then log the user off.
'*************************************************************************
'Script Name: Script 11.2.vbs
'Author: Jerry Ford
'Created: 02/16/03
'Description: This script configures the Windows desktop background and
'screen saver. Then it initiates a system restart.
'*************************************************************************


'Initialization Section

Option Explicit

Dim WshShl, ChangeSettings, shellApp, FsoObject
Set WshShl = WScript.CreateObject("WScript.Shell")
Set FsoObject = CreateObject("Scripting.FileSystemObject")


'Main Processing Section
'Verify that the user intends to change his or her screen saver settings
ChangeSettings = GetConfirmation()

If ChangeSettings = 6 Then
 CopyCorpLogo()
 SetBackground()
 SetScreenSaver()
 ForceLogoff()
End If

WScript.Quit()


'Procedure Section

'This subroutine copies the CorpLogo.bmp file to D:Images
Sub CopyCorpLogo()
 If (FsoObject.FolderExists("D:Images") = false) Then
 FsoObject.CreateFolder "D:Images"
 End If
 FsoObject.CopyFile "a:CorpLogo.bmp", "D:Images"
End Sub

'This subroutine prompts for permission to proceed
Function GetConfirmation()
 GetConfirmation = MsgBox("This script will perform the following " & _
 "tasks:" & vbCrLf & vbCrLf & "1. Configure the display of " & _
 "the Corporate Logo the Windows desktop" & vbCrLf & _
 "2. Configure a password protected screen saver" & vbCrLf & _
 "3. Initiate a restart of the computer so that changes " & _
 "may take effect" & vbCrLf & vbCrLf & _
"Do you wish to continue?", 36)
End Function

'This subroutine configures the desktop background
Sub SetBackground()
 'Set CorpLogo.bmp as the desktop wallpaper
 WshShl.RegWrite "HKCUControl PanelDesktopWallpaper", _
 "D:ImagesCorpLogo.bmp"

 'Make sure that the Tile option is disabled
 WshShl.RegWrite "HKCUControl PanelDesktopTileWallpaper", "0"


 'Configure the background color to be white
 WshShl.RegWrite "HKCUControl PanelColorsBackground", "255 255 255"
End Sub

'This subroutine configures the screen saver
Sub SetScreenSaver()
 'Enable the screen saver
 WshShl.RegWrite "HKCUControl PanelDesktopScreenSaveActive", 1

 'Enable password protection
 WshShl.RegWrite "HKCUControl PanelDesktopScreenSaverIsSecure", 1

 'Set up a 15 minute delay
 WshShl.RegWrite "HKCUControl PanelDesktopScreenSaveTimeOut", 900

 'Enable the Starfield screen saver
 WshShl.RegWrite "HKCUControl PanelDesktopSCRNSAVE.EXE", _
 ("%SystemRoot%") & "System32ssstars.scr"

End Sub

'This subroutine initiates a system shutdown
Sub ForceLogoff()
 WshShl.Run("%SystemRoot%") & "System32logoff.exe"
End Sub
Summary
In this chapter, you learned how to programmatically interact with the Windows registry in order to configure desktop wallpaper and screen saver related settings. By using the techniques presented in this chapter, you will be able to write VBScripts that can configure just about any aspect of a computer running a Windows operating system.
You also learned how to create a desktop URL shortcut and how to work with special folders. In the next chapter, you will get the opportunity to expand upon your knowledge of shortcuts and to use them to configure both the Start menu and the Quick Launch toolbar.
Part I - Introducing Microsoft VBScriptBasics
- What Is VBScript?
- Errors, Constants, and Variables
- Conditional Logic and Iterative Structures
- Procedures
- Arrays
- Data Collection, Notification, and Error Reporting
- VBScript Objects
- VBScript and Internet Explorer
- VBScript and the WSH
Part II - Professional Project 1 Desktop Administration Using VBScript and the WSH
- Project Case Study Desktop Customization and Deployment
- Customizing the Desktop
- Customizing the Start Menu and Quick Launch Toolbar
- Scheduling Disk Maintenance
- Mapping Network Printers and Disks
- Creating Administrator Accounts
Part III - Professional Project 2 Analyzing Application Logs
- Project Case Study Analyzing Application Logs
- Using Configuration Files to Control Script Execution
- Developing Script Log Analyzers
- Scheduling Script Execution
- Maintaining a 30-Day Summary Log Archive
Part IV - Professional Project 3 Creating a Centralized Report Management Station
- Project Case Study Creating a Centralized Report Management Station
- Developing a Setup Script
- Collecting Remote Summary Reports
- Processing and Consolidating Report Data
- Archive Management
Part V - Professional Project 4 Reporting Application Summary Data via the Web
- Reporting Application Summary Data via the Web
- Designing the Web Site
- Building the Web Sites Main Page
- Building the Registration and Configuration Settings Page
- Converting Reports to HTML Pages
- Building the Report Archive Page
- Report Distribution and Remote Archive Management
Part VI - Introducing Microsoft VBScriptBasics
EAN: 2147483647
Pages: 366
