| After the last example, you should now have some understanding of how keyframes can enhance and customize your own transitions. But you must carefully control keyframes if you're to get the best from them. It's possible to add a keyframe to the Timeline at any time in order to attach an effect to it. This is useful when you're using such advanced techniques as Keyframe Interpolation covered in the section "Working with Classic Transitions" later in this chapter. You copy and paste keyframes if you need a parameter to stay the same throughout the length of the transition. Moving a keyframe is a quick-and-dirty but useful technique if you have a keyframe that requires just a little tweaking to get it in the ideal position. In this section, you learn how to manually add and delete a keyframe, and how to copy/paste and move a keyframe inside the editor. To add a keyframe 1. | With the editor open, scrub through the Timeline until you find the spot where you want to add a keyframe.
| 2. | When the cursor is over this spot, click the Set Keyframe button  . .
|
To delete a keyframe 1. | With the editor open, scrub through the Timeline until you are on a keyframe, or use the Go to Next Keyframe buttons  to find each keyframe. to find each keyframe.
| 2. | When the cursor is over the keyframe, the Delete Keyframe button  becomes active. Click it and the keyframe vanishes. becomes active. Click it and the keyframe vanishes.
|
To copy and paste a keyframe 1. | Place a keyframe anywhere on the Timeline using the methods detailed in the "To add a keyframe" task.
| 2. | With the cursor over the keyframe, click the Copy Keyframe button 
| 3. | Move the cursor to the new point by scrubbing or playing, then click the Paste Keyframe button  to apply this keyframe. to apply this keyframe.
|
 Tips Tips
To move a keyframe - Hold down the Alt key, then using the mouse, left-click the keyframe and drag it to the new position.
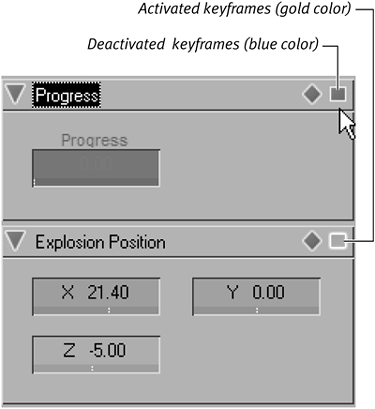
Deactivating a keyframe area Occasionally you may want to turn off certain parameters in order to see the interaction of the other keyframes on the Timeline more clearly. You accomplish this using the keyframe toggle. To deactivate a set of keyframes - Click the Activate square at the end of the row.
It turns from gold to blue and the parameters become grayed out (Figure 8.43).
Figure 8.43. Toggle a set of keyframe parameters on or off with this symbol. 
If you scrub through this effect window, the keyframes won't be used.
Reversing Keyframes One effect common to both the Classic and RT interfaces is the Revert Direction of Effect button  . This button inverts the keyframes you have created, effectively playing the effect backward. . This button inverts the keyframes you have created, effectively playing the effect backward. Note: Due to technical restrictions, not all transitions have this button. |
|
 Tips
Tips