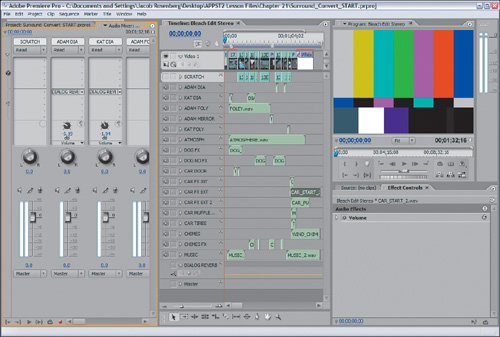
| In the previous chapter's two-channel stereo project, you learned about mixing and automation to spatially distribute the sound so it came from either the left or right speaker. Two-channel stereo audio is fundamentally based on a left and right speaker, while 5.1 surround sound, also referred to as six-channel audio, is based on distributing sound to six speakers. Three speakers face the person listening: left, center, and right. Two are typically behind the listener: surround left and surround right. The sixth, LFE, is a low-frequency speaker that completes the surround environment by providing the deep bass. The LFE is typically in the front center on the floor. Converting a stereo project to 5.1 is as easy as copying and pasting. To start this lesson, open the Project Surround_Convert_START.prproj from the APPST2 Lesson Files/Chapter 21 folder (Figure 21.1). To provide a project with the depth to properly articulate 5.1 mixing, this project file has 18 audio tracks all filled with sound elements from the final scene of my short film Bleach. You'll find the files for this project in the Chapter 21 and Chapter 26 folders. Figure 21.1. Take a close look at the Surround_Convert _START project and its workspace. Notice how the Project panel and Audio Mixer panel are docked into the same frame, which is tall enough to accommodate the expanded mixer. Also notice how the timeline with all of its audio tracks is tall enough to display them. Because the Program Monitor and Effect Controls panel are less important, they have been reduced in overall size 
Notes For more on configuring a surround sound speaker system, see Chapter 17, "Using Your Audio Hardware."
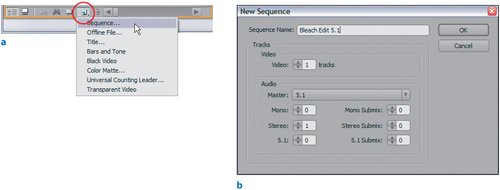
| | 1. | In the bottom of the Project panel, click the New Item button and select Sequence to create a new sequence. Name the sequence Bleach Edit 5.1. Set the number of video tracks to 1. Set the Audio Master to 5.1 and the number of stereo tracks to 1 with 0 for Mono, 5.1, and Submix Tracks (Figures 21.2a and b).
Figures 21.2a and b. Clicking the New Item button at the bottom of the Project panel allows you to create a new sequence (a). Inside the New Sequence dialog box, you name the sequence and set its audio Master Track to 5.1 with one stereo track (b) 
This first step simply creates a 5.1 surround sound project. Remember that you can have any type of audio track inside of any type of audio master project. When performing 5.1 surround sound mixing, the sequence Master Track setting needs to be 5.1. With a 5.1 Master Track setting, all the tracks in the sequence can be spatially mixed down within 5.1 space.
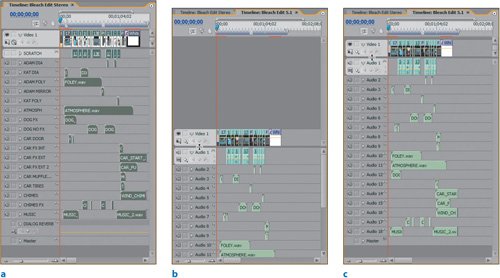
| | | 2. | Double-click on the file Bleach Edit Stereo in the Project panel to make sure that the sequence is open in the Timeline panel. With the Sequence activated, press Ctrl+A to select the entire contents of the sequence, then press Ctrl+C to copy the selected content (see Figures 21.3a and b). Double-click on the file Bleach Edit 5.1 in the Project panel to open it in the Timeline panel, then press Ctrl+V on your keyboard to paste the selected material into the newly opened sequence. Realign the vertical positioning of the tracks to make sure you can view them all in the open space of the Timeline panel (see Figure 21.3c).
Figures 21.3a, b, and c. To start, you selected all the files in the stereo sequence and copied them to your clipboard (a). Next, you opened a surround sound project and pasted the copied clips directly into it (b). Because the new sequence does not have the same vertical track shift, you dragged the dividing line between the Video and Audio tracks upward to reveal all the audio tracks (c) 
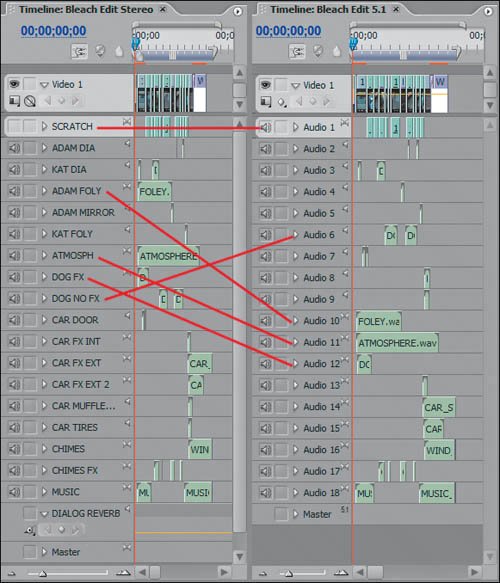
In this step you physically copied all the material from one sequence and pasted it into another. The sequences are similar; you can adjust them, however, to make them virtually the same (see Figure 21.4).
Figure 21.4. For this image, I split the current timeline frame in half, placing the two sequences side by side. When copying and pasting in this manner, you will find that the track types copy in groups. Because the first track being pasted was stereo, the scratch track copied it into exactly the same position. The remaining tracks then copied in descending groups, mono and then stereo. The stereo sequence does not have the source tracks grouped by type, so you will have to rename the tracks manually after you convert your sequence. But don't worry; I will do that for you in the next lesson 
|
Congratulations. You just converted a stereo sequence into a 5.1 sequence. Simple, eh? Of course, if you want to exactly duplicate the source sequence, you still have to manually rename each of the tracks in the 5.1 project. Notice that when you copied and pasted, the Paste command added the tracks in groups. If the 5.1 sequence had 18 created tracks, each matching the stereo sequence's stack order, then the copied and pasted sequence will match the original. I have gone ahead and renamed the tracks so you can start remixing in the next lesson. |
