Cisco WebVPN Solution
WebVPN is an evolving method to establish remote-access VPN tunnels without having to install the Cisco VPN Client. A VPN user establishes the secure connection to the Cisco ASA by using a web browser such as Internet Explorer, Netscape, or FireFox. A WebVPN tunnel can easily be created from a computer that has Secure HTTP (HTTPS) access to the public interface of a Cisco ASA. Thus, using WebVPN, the client machine establishes a Secure Sockets Layer (SSL) connection to Cisco ASA, providing easy access to a broad range of applications, including intranet web browsing, e-mail, and Windows file sharing. The list continues on by implementing the robust port-forwarding feature, which provides secure access to most of the TCP-based applications.
Figure 16-15 illustrates a WebVPN connection initiated by UserA going to the SecureMe Chicago ASA. When the SSL tunnel is authenticated, the user can access the servers on the inside network of the Cisco ASA.
Figure 16-15. WebVPN Topology for SecureMe

Caution
The WebVPN functionality on Cisco ASA does not affect in any way the other VPN implementations such as site-to-site or remote-access tunnels. However, WebVPN tunnels are memory-intensive, which can indirectly affect the overall performance of the security appliance.
Table 16-4 lists the major differences between the Cisco VPN client solution and the WebVPN solution. WebVPN is an obvious choice for someone who wants to check their e-mail from a hotel or an Internet café without the need to install and configure a Cisco VPN client.
|
Feature |
Cisco VPN Client |
WebVPN |
|---|---|---|
|
VPN Client |
Uses Cisco VPN Client software for complete network access. |
Uses a standard web browser to access limited corporate network resources. Eliminates need for separate client software. |
|
Management |
You have to go through the installation and configuration on the VPN client. |
You do not need to install a VPN client. No configuration is required on the client machine. |
|
Encryption |
Uses a variety of encryption and hashing algorithms. |
Uses SSL encryption native to web browsers. |
|
Connectivity |
Establishes seamless connection to network. |
Supports application connectivity through browser portal. |
|
Applications |
Encapsulates all IP protocols, including TCP, UDP, and ICMP. |
Supports limited TCP-based client/server applications. |
In WebVPN, a web client starts an HTTPS session to the public IP address of the security appliance. After processing the request, the security appliance presents a certificate to the web client to authenticate it. Once the secure connection is established, the web client is presented with a login screen to specify the user login credentials. If authentication is successful, a cookie is presented to the user. This cookie is valid until the session is over. When the user clicks the logout icon, or the idle timeout or the maximum connect time is reached, the session cookie is deleted, thus terminating the connection.
Note
Stateful failover for WebVPN is currently not supported.
Configuration Steps
The configuration of WebVPN can be broken down into five steps. Figure 16-15 is used throughout this section to demonstrate how to set up Cisco ASA.
|
Step 1. |
Enable the HTTP server. |
|
Step 2. |
Enable WebVPN on the interface. |
|
Step 3. |
Configure WebVPN look and feel. |
|
Step 4. |
Configure WebVPN group attributes. |
|
Step 5. |
Configure user authentication. |
Step 1: Enable the HTTP Service
The first step in configuring WebVPN is to enable the HTTP service on the security appliance. Once the HTTP service is enabled, Cisco ASA listens on TCP port 80 for HTTP traffic and on TCP port 443 for HTTPS traffic. You can access the WebVPN interface by one of the following methods:
- Make a request on TCP port 443
- Make a request on TCP port 80, which Cisco ASA will redirect to port 443 if port-redirection is enabled
Example 16-61 shows the configuration for the Chicago ASA to make it act as an HTTP server that is also configured to redirect the requests made for TCP port 80.
Example 16-61. Enabling the HTTP Service on the Chicago ASA
Chicago(config)# http server enable

Chicago(config)# http redirect outside 80
Note
In the current implementation, both WebVPN and ASDM cannot be enabled on the same interface. Chapter 21, "VPN Management Using ASDM," covers ASDM for VPNs in more detail.
Step 2: Enable WebVPN on the Interface
After setting up the web services on Cisco ASA, the second step is to enable WebVPN on the interface where the WebVPN connections will be terminated. If WebVPN is not enabled on the interface, Cisco ASA will not accept any connections even if WebVPN is globally set up.
To enable WebVPN on an interface, you must use the enable command followed by the name of the interface in the WebVPN subconfiguration menu. The configuration in Example 16-62 shows the Chicago ASA is using the outside interface for the termination of WebVPN sessions.
Example 16-62. Enabling the WebVPN on the Chicago ASA Outside Interface
Chicago# config terminal

Chicago(config)# webvpn

Chicago(config-webvpn)# enable outside
Once WebVPN is enabled on an interface, the security appliance is ready to accept the connections. However, recommended practice is to follow all the steps for a complete WebVPN implementation.
Step 3: Configure WebVPN Look and Feel
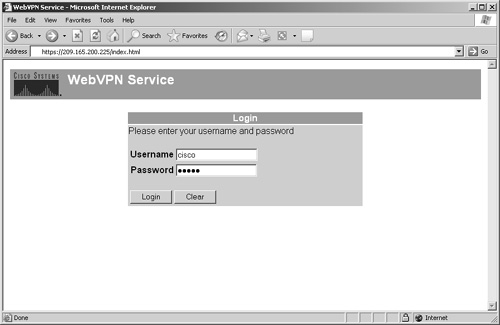
Figure 16-16 shows the default WebVPN page when a connection is made from a web browser. The title of the page is "WebVPN Service" and the Cisco Systems logo is displayed in the upper-left corner of the web page. The initial page prompts the user for user authentication credentials.
Figure 16-16. Default WebVPN Page
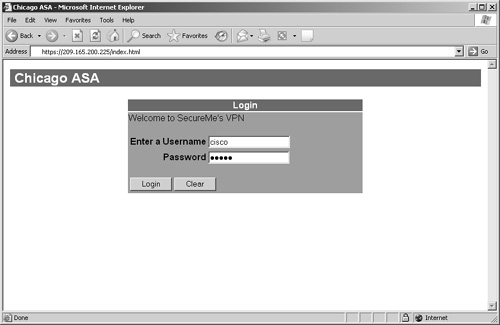
You can customize the WebVPN login page to accommodate an organization's security policy. Figure 16-17 shows the customized login page for SecureMe. The title of the login page has been changed to "Chicago ASA", and the login message has been changed to "Welcome to SecureMe's VPN". The user prompt message has been set to "Enter Username". The primary and secondary title colors are changed to 108,108,108 (dark gray) and 161,161,161 (light gray), respectively. Additionally, the primary and secondary title text colors are set to white and black, respectively. SecureMe does not want to display the Cisco Systems logo in its login page. Therefore, the logo is removed from the upper-left corner of the page. When users log out, the security appliance will display the message You are not logged into SecureMe's Network.
Figure 16-17. Customized WebVPN Page
Example 16-63 shows the corresponding Cisco ASA configuration for customization. The WebVPN configuration parameters are specified in the WebVPN submenu.
Example 16-63. Customizing the WebVPN Login Page on Cisco ASA
Chicago(config)# webvpn

Chicago(config-webvpn)# enable outside

Chicago(config-webvpn)# title Chicago ASA

Chicago(config-webvpn)# username-prompt Enter a Username

Chicago(config-webvpn)# login-message Welcome to SecureMe's VPN

Chicago(config-webvpn)# logout-message You are not logged into SecureMe's Network

Chicago(config-webvpn)# logo none

Chicago(config-webvpn)# title-color 108,108,108

Chicago(config-webvpn)# secondary-color 161,161,161

Chicago(config-webvpn)# text-color white

Chicago(config-webvpn)# secondary-text-color black
You can upload a customized logo file in Flash. The accepted formats are JPEG, GIF, and PNG.
Step 4: Configure WebVPN Group Attributes
Cisco ASA allows you to configure most of the WebVPN parameters in three different places:
- Under default group-policy
- Under user group-policy
- Under user policy
As mentioned earlier, Cisco ASA implements the inheritance model and applies attributes from the user policy first, then from the user group-policy, and finally from the default group-policy. The same concept is true for WebVPN implementations.
Note
The default and user group policies are set up to allow both Cisco IPSec VPN and WebVPN tunnels. If you want to restrict a policy to solely use WebVPN, use the vpn-tunnel-protocol webvpn command, as demonstrated later in Example 16-66.
The user group and default group policies are configured by using the group-policy command followed by the name of the group-policy. Cisco ASA uses DfltGrpPolicy as the group-policy name for the default group-policy. A group-policy name other than DfltGrpPolicy is treated as a user group-policy. In Example 16-64, SecureMeWebGrp is set up as an internal group-policy.
Example 16-64. User Group-Policy Configuration
Chicago(config)# group-policy SecureMeWebGrp internal

Chicago(config)# group-policy SecureMeWebGrp attributes
The WebVPN attributes are configured under the WebVPN subconfiguration mode of the group-policy menu, as shown in Example 16-65.
Example 16-65. WebVPN User Group-Policy Configuration
Chicago(config)# group-policy SecureMeWebGrp internal

Chicago(config)# group-policy SecureMeWebGrp attributes

Chicago(config-group-policy)# webvpn

Chicago(config-group-webvpn)#
Table 16-5 lists all the WebVPN attributes that can be mapped to user, user group, and default group policies.
|
Attribute |
Purpose |
|---|---|
|
filter |
Apply a WebVPN ACL for traffic filtering. |
|
functions |
Enable features such as file access, file browsing, and file entry. |
|
homepage |
Set an initial web page when users log in. |
|
html-content-filter |
Filter HTML content, such as Java and images, from the WebVPN sessions. |
|
port-forward |
Map the port-forwarding list to the group. |
|
port-forward-name |
Configure the name to be shown on the WebVPN page for the port-forwarding applet. |
|
url-list |
Map the URL-mangling list to the group. |
All of these attributes are discussed in detail in the next section, "Advanced WebVPN Features." Example 16-66 shows the Cisco ASA configuration for a user group-policy named SecureMeWebGrp that permits only WebVPN connections. The WebVPN users are allowed to browse, access, and enter file information using the functions command.
Example 16-66. Configuration of User Group Attributes
Chicago(config)# group-policy SecureMeWebGrp internal

Chicago(config)# group-policy SecureMeWebGrp attributes

Chicago(config-group-policy)# vpn-tunnel-protocol webvpn

Chicago(config-group-policy)# webvpn

Chicago(config-group-webvpn)# functions file-access file-entry file-browsing
Step 5: Configure User Authentication
Cisco ASA supports many authentication servers, such as RADIUS, NT domain, Kerberos, SDI, TACACS+, and local database. For small organizations, a local database can be set up for user authentication. In Example 16-67, the Chicago ASA has a user account, cisco, set up for authentication.
Example 16-67. Local User Accounts
Chicago# configure terminal

Chicago(config)# username cisco password cisco123
The WebVPN submenu must be configured with the corresponding authentication server. The authentication-server-group command is used to specify the authentication server. Example 16-68 illustrates the necessary commands required to use a local database.
Example 16-68. Local Authentication Database Configuration
Chicago(config)# webvpn

Chicago(config-webvpn)# authentication-server-group LOCAL
For configuration of external servers, consult Chapter 7.
Part I: Product Overview
Introduction to Network Security
- Introduction to Network Security
- Firewall Technologies
- Intrusion Detection and Prevention Technologies
- Network-Based Attacks
- Virtual Private Networks
- Summary
Product History
- Product History
- Cisco Firewall Products
- Cisco IDS Products
- Cisco VPN Products
- Cisco ASA All-in-One Solution
- Summary
Hardware Overview
Part II: Firewall Solution
Initial Setup and System Maintenance
- Initial Setup and System Maintenance
- Accessing the Cisco ASA Appliances
- Managing Licenses
- Initial Setup
- IP Version 6
- Setting Up the System Clock
- Configuration Management
- Remote System Management
- System Maintenance
- System Monitoring
- Summary
Network Access Control
- Network Access Control
- Packet Filtering
- Advanced ACL Features
- Content and URL Filtering
- Deployment Scenarios Using ACLs
- Monitoring Network Access Control
- Understanding Address Translation
- DNS Doctoring
- Monitoring Address Translations
- Summary
IP Routing
Authentication, Authorization, and Accounting (AAA)
- Authentication, Authorization, and Accounting (AAA)
- AAA Protocols and Services Supported by Cisco ASA
- Defining an Authentication Server
- Configuring Authentication of Administrative Sessions
- Authenticating Firewall Sessions (Cut-Through Proxy Feature)
- Configuring Authorization
- Configuring Accounting
- Deployment Scenarios
- Troubleshooting AAA
- Summary
Application Inspection
- Application Inspection
- Enabling Application Inspection Using the Modular Policy Framework
- Selective Inspection
- Computer Telephony Interface Quick Buffer Encoding Inspection
- Domain Name System
- Extended Simple Mail Transfer Protocol
- File Transfer Protocol
- General Packet Radio Service Tunneling Protocol
- H.323
- HTTP
- ICMP
- ILS
- MGCP
- NetBIOS
- PPTP
- Sun RPC
- RSH
- RTSP
- SIP
- Skinny
- SNMP
- SQL*Net
- TFTP
- XDMCP
- Deployment Scenarios
- Summary
Security Contexts
- Security Contexts
- Architectural Overview
- Configuration of Security Contexts
- Deployment Scenarios
- Monitoring and Troubleshooting the Security Contexts
- Summary
Transparent Firewalls
- Transparent Firewalls
- Architectural Overview
- Transparent Firewalls and VPNs
- Configuration of Transparent Firewall
- Deployment Scenarios
- Monitoring and Troubleshooting the Transparent Firewall
- Summary
Failover and Redundancy
- Failover and Redundancy
- Architectural Overview
- Failover Configuration
- Deployment Scenarios
- Monitoring and Troubleshooting Failovers
- Summary
Quality of Service
- Quality of Service
- Architectural Overview
- Configuring Quality of Service
- QoS Deployment Scenarios
- Monitoring QoS
- Summary
Part III: Intrusion Prevention System (IPS) Solution
Intrusion Prevention System Integration
- Intrusion Prevention System Integration
- Adaptive Inspection Prevention Security Services Module Overview (AIP-SSM)
- Directing Traffic to the AIP-SSM
- AIP-SSM Module Software Recovery
- Additional IPS Features
- Summary
Configuring and Troubleshooting Cisco IPS Software via CLI
- Configuring and Troubleshooting Cisco IPS Software via CLI
- Cisco IPS Software Architecture
- Introduction to the CIPS 5.x Command-Line Interface
- User Administration
- AIP-SSM Maintenance
- Advanced Features and Configuration
- Summary
Part IV: Virtual Private Network (VPN) Solution
Site-to-Site IPSec VPNs
- Site-to-Site IPSec VPNs
- Preconfiguration Checklist
- Configuration Steps
- Advanced Features
- Optional Commands
- Deployment Scenarios
- Monitoring and Troubleshooting Site-to-Site IPSec VPNs
- Summary
Remote Access VPN
- Remote Access VPN
- Cisco IPSec Remote Access VPN Solution
- Advanced Cisco IPSec VPN Features
- Deployment Scenarios of Cisco IPSec VPN
- Monitoring and Troubleshooting Cisco Remote Access VPN
- Cisco WebVPN Solution
- Advanced WebVPN Features
- Deployment Scenarios of WebVPN
- Monitoring and Troubleshooting WebVPN
- Summary
Public Key Infrastructure (PKI)
- Public Key Infrastructure (PKI)
- Introduction to PKI
- Enrolling the Cisco ASA to a CA Using SCEP
- Manual (Cut-and-Paste) Enrollment
- Configuring CRL Options
- Configuring IPSec Site-to-Site Tunnels Using Certificates
- Configuring the Cisco ASA to Accept Remote-Access VPN Clients Using Certificates
- Troubleshooting PKI
- Summary
Part V: Adaptive Security Device Manager
Introduction to ASDM
- Introduction to ASDM
- Setting Up ASDM
- Initial Setup
- Functional Screens
- Interface Management
- System Clock
- Configuration Management
- Remote System Management
- System Maintenance
- System Monitoring
- Summary
Firewall Management Using ASDM
- Firewall Management Using ASDM
- Access Control Lists
- Address Translation
- Routing Protocols
- AAA
- Application Inspection
- Security Contexts
- Transparent Firewalls
- Failover
- QoS
- Summary
IPS Management Using ASDM
- IPS Management Using ASDM
- Accessing the IPS Device Management Console from ASDM
- Configuring Basic AIP-SSM Settings
- Advanced IPS Configuration and Monitoring Using ASDM
- Summary
VPN Management Using ASDM
- VPN Management Using ASDM
- Site-to-Site VPN Setup Using Preshared Keys
- Site-to-Site VPN Setup Using PKI
- Cisco Remote-Access IPSec VPN Setup
- WebVPN
- VPN Monitoring
- Summary
Case Studies
EAN: 2147483647
Pages: 231
