Setting Up ASDM
Initial Setup
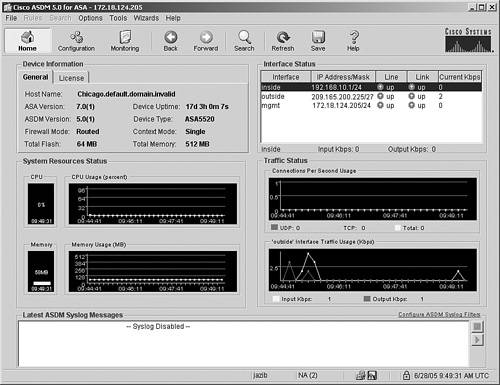
If the user authentication is successful, ASDM checks the current version of the stub application and downloads a new copy if necessary. It loads the current configuration from the security Cisco ASA and displays it in the GUI, as shown in Figure 18-3.
Figure 18-3. Initial ASDM Screen
Tip
ASDM logs the debug and error messages into a file to troubleshoot the application-related issues. The name of the file is asdm-log-[timestamp].txt and it is located at user_home_directory.asdmlog.
ASDM divides the initial screen, also known as the Home screen, into the following five sections:
- Device Information Displays the hardware and software information of the security Cisco ASA, such as the current version of operating system and the device type. If the License tab is selected, ASDM shows the features that are enabled on the security Cisco ASA.
- System Resources Status Provides the current status of CPU and memory usage on Cisco ASA.
- Interface Status Displays the interface name and the assigned IP address. It also shows the link information of the currently configured interfaces and the rate of traffic passing through them.
- Traffic Status Provides information about the number of active TCP and UDP connections and the traffic rate passing through the outside interface.
- Latest ASDM Syslog Messages Shows the latest ASDM syslog messages that are generated by the security Cisco ASA. Syslogging is disabled by default and needs to be enabled for log monitoring. When enabled, the security Cisco ASA sends the messages to the ASDM client. This is discussed later in the chapter, in the section "System Logging."
The statistics on the Home screen are refreshed every 10 seconds and show the information for the last 5 minutes.
Startup Wizard
The ASDM application has seven menus on the toolbars to configure certain parameters. One of the menus is called Wizards, which contains two options, VPN Wizard and Startup Wizard. To launch the Startup Wizard, choose Wizards > Startup Wizard, as shown in Figure 18-4.
Figure 18-4. Launching the Startup Wizard
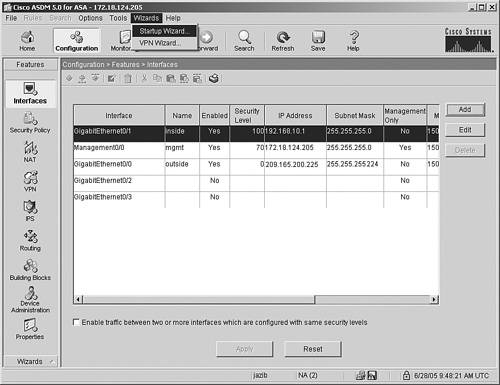
The Startup Wizard can also be launched by choosing Configuration > Wizards > Startup.
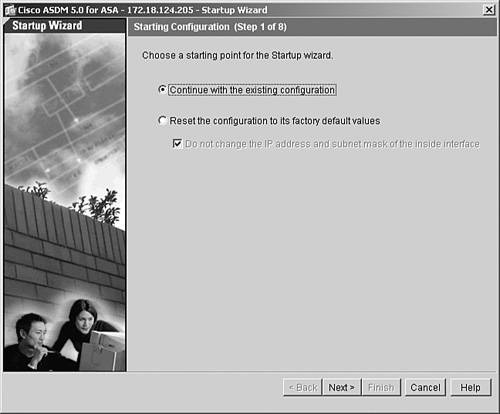
The next screen on the wizard prompts you to specify whether you want the wizard to continue with the existing device configuration or to reset the running configuration to its factory default values. Resetting the security Cisco ASA into default configuration is helpful if you do not want to keep the existing configuration. This option is feasible if the security Cisco ASA is deployed in a lab environment with no production traffic traversing through it. In Figure 18-5, the administrator has selected the option to modify the existing configuration.
Figure 18-5. Starting Point of the Configuration
Note
Chapter 4 talks about the default configuration.
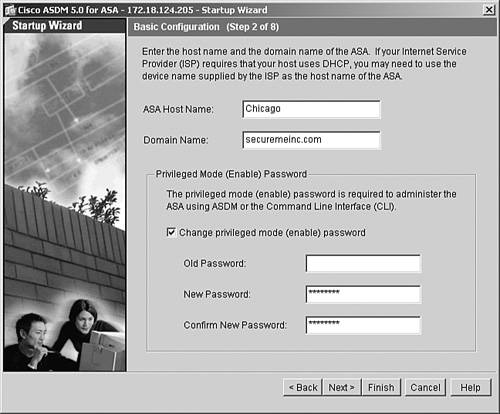
The Basic Configuration screen allows you to modify the host name and domain name of the security Cisco ASA. ASDM also enables you to modify the enable password by specifying the current enable password and then entering the new enable password, as illustrated in Figure 18-6. By default, there is no enable password configured on the security Cisco ASA.
Figure 18-6. Basic Configuration
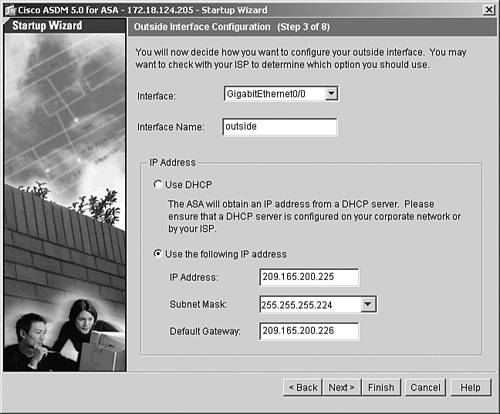
You can modify the outside interface attributes, such as the interface name and the IP address, on the next screen. If the outside interface is being assigned an IP address from the DHCP server, select the Use DHCP option. In Figure 18-7, the outside interface has a static IP address of 209.165.200.225/27 and a default gateway of 209.165.200.226.
Figure 18-7. Outside Interface Configuration
You can select the remaining interfaces and edit attributes such as the interface name, security level, and IP address/subnet mask.
Note
You might lose your connection to the security Cisco ASA if you modify the interface parameters that ASDM is connected to.
The wizard allows you to enable a DHCP server on the inside interface. The security Cisco ASA can assign DHCP attributes such as IP addresses from a pool, the DNS and WINS server addresses, the default gateway address, the domain name, and the lease expiration time.
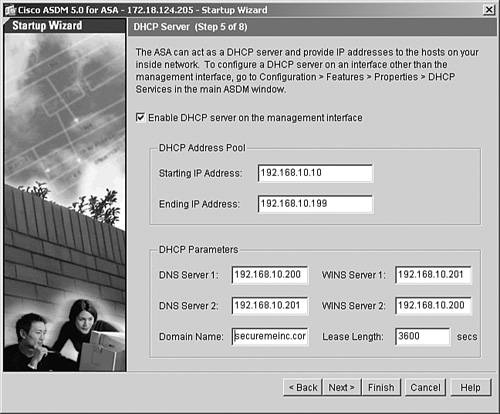
As illustrated in Figure 18-8, a pool of addresses in the range of 192.168.10.10 to 192.168.10.199 is set up with DNS and WINS addresses of 192.168.10.200 and 192.168.10.201. The default domain name is securemeinc.com and the IP address lease expires in 3600 seconds. Click Next to proceed.
Figure 18-8. DHCP Server
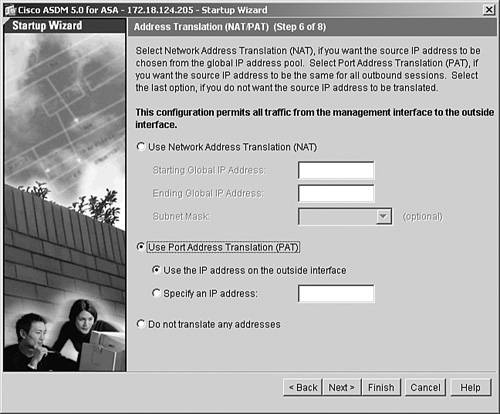
If address translation needs to be set up on Cisco ASA, the Startup Wizard presents three options:
- The first option creates a pool of addresses for dynamic NAT.
- The second option configures dynamic PAT.
- The third option bypasses address translation.
In Figure 18-9, ASDM is being set up to dynamically translate the inside hosts to the outside interface's IP address using PAT.
Figure 18-9. Address Translation
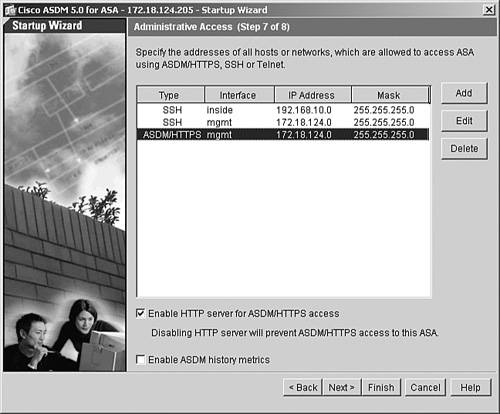
The last configuration step in the Startup Wizard allows you to set up administrative access to Cisco ASA. As discussed in Chapter 4, the security Cisco ASA supports Telnet and SSH as the CLI-based remote management protocols, and supports ASDM as a GUI-based application. You can specify the allowed IP addresses on each of the interfaces for each of the management protocols. In Figure 18-10, the 192.168.10.0/24 network is allowed to establish SSH connections to Cisco ASA from the inside interface, while the 172.18.124.0/24 subnet is allowed to establish SSH and HTTPS connections from the mgmt interface.
Figure 18-10. Administrative Access
Caution
If the HTTP server is disabled, ASDM will stop communicating with Cisco ASA.
ASDM prompts you to either send the updated configuration or go back to modify the parameters. Click Finish to send the configuration to Cisco ASA.
If the "Preview command before sending to the device" option is enabled on ASDM under Tools > Preferences, the entire startup configuration is displayed before it is sent to the security Cisco ASA, as shown in Example 18-4.
Example 18-4. Initial Configuration Generated by ASDM
!DHCP server configuration

dhcpd address 192.168.10.10-192.168.10.199 inside

dhcpd enable inside

dhcpd dns 192.168.10.200 192.168.10.201

dhcpd wins 192.168.10.201 192.168.10.200

dhcpd domain securemeinc.com

!PAT configuration

global (outside) 10 interface

nat (inside) 10 0.0.0.0 0.0.0.0

!SSH configuration

ssh 172.18.124.0 255.255.255.0 mgmt

ssh 192.168.10.0 255.255.255.0 inside

!Changing the enable password

enable password cisco123
Part I: Product Overview
Introduction to Network Security
- Introduction to Network Security
- Firewall Technologies
- Intrusion Detection and Prevention Technologies
- Network-Based Attacks
- Virtual Private Networks
- Summary
Product History
- Product History
- Cisco Firewall Products
- Cisco IDS Products
- Cisco VPN Products
- Cisco ASA All-in-One Solution
- Summary
Hardware Overview
Part II: Firewall Solution
Initial Setup and System Maintenance
- Initial Setup and System Maintenance
- Accessing the Cisco ASA Appliances
- Managing Licenses
- Initial Setup
- IP Version 6
- Setting Up the System Clock
- Configuration Management
- Remote System Management
- System Maintenance
- System Monitoring
- Summary
Network Access Control
- Network Access Control
- Packet Filtering
- Advanced ACL Features
- Content and URL Filtering
- Deployment Scenarios Using ACLs
- Monitoring Network Access Control
- Understanding Address Translation
- DNS Doctoring
- Monitoring Address Translations
- Summary
IP Routing
Authentication, Authorization, and Accounting (AAA)
- Authentication, Authorization, and Accounting (AAA)
- AAA Protocols and Services Supported by Cisco ASA
- Defining an Authentication Server
- Configuring Authentication of Administrative Sessions
- Authenticating Firewall Sessions (Cut-Through Proxy Feature)
- Configuring Authorization
- Configuring Accounting
- Deployment Scenarios
- Troubleshooting AAA
- Summary
Application Inspection
- Application Inspection
- Enabling Application Inspection Using the Modular Policy Framework
- Selective Inspection
- Computer Telephony Interface Quick Buffer Encoding Inspection
- Domain Name System
- Extended Simple Mail Transfer Protocol
- File Transfer Protocol
- General Packet Radio Service Tunneling Protocol
- H.323
- HTTP
- ICMP
- ILS
- MGCP
- NetBIOS
- PPTP
- Sun RPC
- RSH
- RTSP
- SIP
- Skinny
- SNMP
- SQL*Net
- TFTP
- XDMCP
- Deployment Scenarios
- Summary
Security Contexts
- Security Contexts
- Architectural Overview
- Configuration of Security Contexts
- Deployment Scenarios
- Monitoring and Troubleshooting the Security Contexts
- Summary
Transparent Firewalls
- Transparent Firewalls
- Architectural Overview
- Transparent Firewalls and VPNs
- Configuration of Transparent Firewall
- Deployment Scenarios
- Monitoring and Troubleshooting the Transparent Firewall
- Summary
Failover and Redundancy
- Failover and Redundancy
- Architectural Overview
- Failover Configuration
- Deployment Scenarios
- Monitoring and Troubleshooting Failovers
- Summary
Quality of Service
- Quality of Service
- Architectural Overview
- Configuring Quality of Service
- QoS Deployment Scenarios
- Monitoring QoS
- Summary
Part III: Intrusion Prevention System (IPS) Solution
Intrusion Prevention System Integration
- Intrusion Prevention System Integration
- Adaptive Inspection Prevention Security Services Module Overview (AIP-SSM)
- Directing Traffic to the AIP-SSM
- AIP-SSM Module Software Recovery
- Additional IPS Features
- Summary
Configuring and Troubleshooting Cisco IPS Software via CLI
- Configuring and Troubleshooting Cisco IPS Software via CLI
- Cisco IPS Software Architecture
- Introduction to the CIPS 5.x Command-Line Interface
- User Administration
- AIP-SSM Maintenance
- Advanced Features and Configuration
- Summary
Part IV: Virtual Private Network (VPN) Solution
Site-to-Site IPSec VPNs
- Site-to-Site IPSec VPNs
- Preconfiguration Checklist
- Configuration Steps
- Advanced Features
- Optional Commands
- Deployment Scenarios
- Monitoring and Troubleshooting Site-to-Site IPSec VPNs
- Summary
Remote Access VPN
- Remote Access VPN
- Cisco IPSec Remote Access VPN Solution
- Advanced Cisco IPSec VPN Features
- Deployment Scenarios of Cisco IPSec VPN
- Monitoring and Troubleshooting Cisco Remote Access VPN
- Cisco WebVPN Solution
- Advanced WebVPN Features
- Deployment Scenarios of WebVPN
- Monitoring and Troubleshooting WebVPN
- Summary
Public Key Infrastructure (PKI)
- Public Key Infrastructure (PKI)
- Introduction to PKI
- Enrolling the Cisco ASA to a CA Using SCEP
- Manual (Cut-and-Paste) Enrollment
- Configuring CRL Options
- Configuring IPSec Site-to-Site Tunnels Using Certificates
- Configuring the Cisco ASA to Accept Remote-Access VPN Clients Using Certificates
- Troubleshooting PKI
- Summary
Part V: Adaptive Security Device Manager
Introduction to ASDM
- Introduction to ASDM
- Setting Up ASDM
- Initial Setup
- Functional Screens
- Interface Management
- System Clock
- Configuration Management
- Remote System Management
- System Maintenance
- System Monitoring
- Summary
Firewall Management Using ASDM
- Firewall Management Using ASDM
- Access Control Lists
- Address Translation
- Routing Protocols
- AAA
- Application Inspection
- Security Contexts
- Transparent Firewalls
- Failover
- QoS
- Summary
IPS Management Using ASDM
- IPS Management Using ASDM
- Accessing the IPS Device Management Console from ASDM
- Configuring Basic AIP-SSM Settings
- Advanced IPS Configuration and Monitoring Using ASDM
- Summary
VPN Management Using ASDM
- VPN Management Using ASDM
- Site-to-Site VPN Setup Using Preshared Keys
- Site-to-Site VPN Setup Using PKI
- Cisco Remote-Access IPSec VPN Setup
- WebVPN
- VPN Monitoring
- Summary
Case Studies
EAN: 2147483647
Pages: 231
- Measuring and Managing E-Business Initiatives Through the Balanced Scorecard
- A View on Knowledge Management: Utilizing a Balanced Scorecard Methodology for Analyzing Knowledge Metrics
- Technical Issues Related to IT Governance Tactics: Product Metrics, Measurements and Process Control
- Managing IT Functions
- Governance in IT Outsourcing Partnerships
