Creating Tables


Word's table feature gives you a wonderfully flexible way of aligning text in a grid of rows and columns . You enter text into the individual boxes in the grid, which are referred to as cells . The text in each cell wraps independently of the text in neighboring cells. This makes it possible to format and edit documents in which certain blocks of text have to be aligned alongside one another. You can create a table that looks table-ish, like the one shown in Figure 15.5.

Figure 15.5. This table doesn't disguise its true nature.

graphics/15fig05.jpg

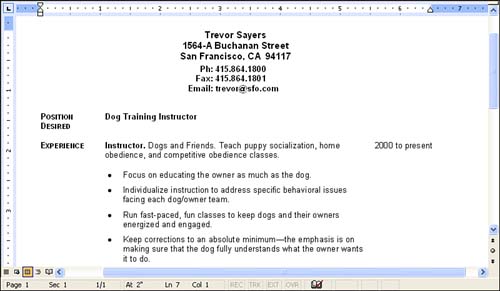
But you can also create tables that are "invisible" by hiding the gridlines between cells. The rsum shown in Figure 15.6 is actually typed in a table, but the gridlines have been hidden so that it's not obvious.

Figure 15.6. Tables don't have to look as if they belong in a scientific paper.

graphics/15fig06.jpg

Word gives you two methods for creating tables. With the standard method, you tell Word to create a table with a particular number of rows and columns, and then revise it from there. With the second method, you "draw" the table with your mouse. The first method is a little faster and you have the option of setting AutoFit options, but the second is better for creating a more complex table such as the one shown earlier in Figure 15.5.

Using the Standard Method

create a table using the standard method, you can either use the Insert Table button on the Standard toolbar or the Insert Table dialog box; the end result is the same. The one catch to using the Insert Table toolbar button is that you can start with a table that's no more than five columns wide by four rows tall. This is a minor limitation, however, because you can add rows and columns later on.

In these steps, you use the Insert Table toolbar button, which is the faster of the two techniques:

  1. Move the insertion point to the place where you want to insert the table.

  2. Click the Insert Table button on the Standard toolbar.

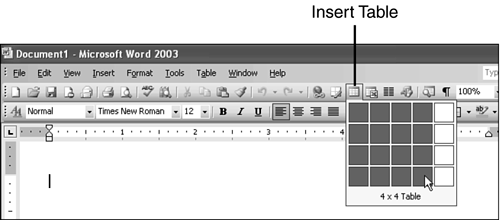
  3. The squares in the grid that drops down represent cells. Drag through the approximate number of rows and columns that you want (see Figure 15.7), and then release the mouse button.

    Figure 15.7. Drag through the number of rows and columns that you want to start with.

    graphics/15fig07.gif

A table appears in your document (see Figure 15.8). When the Show/Hide setting is turned on, as it is in Figure 15.8, an end of cell marker appears in each cell. When you type text in a table cell, it will be inserted to the left of the marker. To change the number of rows and columns in your table, see "Adding and Deleting Rows and Columns" later in this hour .

Figure 15.8. A blank table is inserted in your document.

graphics/15fig08.jpg

graphics/lightbulb_icon.gif

If you start a table at the very top of a document and then decide that you want to insert text above the table, click at the far-left edge of the upper-left cell in the table and press Enter. Word inserts a blank line above the table; you can now click in the blank line and type your text. (If the table isn't at the top of the document, pressing Enter adds a blank line to the cell.)


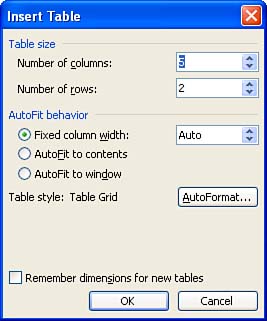
There are advantages to using the Insert Table dialog box instead of the Insert Table toolbar button. The Insert Table dialog box has AutoFit options that let you control how Word adjusts column widths in the table. It also provides access to the AutoFormat feature (which you'll learn about later in this hour), which enables you to tell Word to "remember" the settings you choose for new tables. To see these options, choose Table, Insert, Table. The dialog box shown in Figure 15.9 appears.

Figure 15.9. The Insert Table dialog box contains AutoFit options for controlling column width.

graphics/15fig09.jpg

You specify the number of columns and rows you'd like to start with under Table Size at the top of the dialog box. Under AutoFit Behavior, select one of these options:

  • Fixed Column Width When this option is set to Auto (the default choice), the table starts with columns of equal width, and it fills the space between the left and right margins. If you know the exact width you'd like your columns to be (in inches), enter that amount in the text box.

  • AutoFit to Contents The column widths automatically expand to fit the text you type. Word does not permit the overall table width to exceed the left and right margins of the page, so it wraps text within columns and narrows columns as necessary to prevent this from happening. (Even if you use this option, however, you can still widen a table to the point that it does not fit on the page if you widen the columns manually. You'll learn how to adjust column width later in this hour.)

  • AutoFit to Window This option is only useful if you're creating a document (either a Word document or a Web page) that will be displayed in a browser window. Choosing this option will permit the table to resize so that as the user resizes the browser window, the full width of the table is always visible.

If you don't choose an AutoFit option now, you can always select one using the Table, AutoFit command after you've inserted your table in the document.

To ask Word to remember all of your selections in the Insert Table dialog box (except for any AutoFormat option you choose) the next time you create a table using the Insert Table dialog box, mark the check box labeled Remember Dimensions for New Tables. Marking this check box does not affect the tables that you create with the Insert Table toolbar button.

Drawing a Table

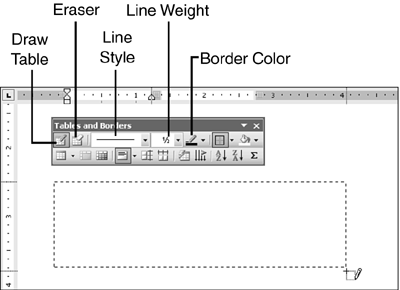
To draw a table, you use the Draw Table button on the Tables and Borders toolbar. (You can't use this tool in Normal view. If you click it in Normal view, Word automatically switches to Print Layout view.) Although you can start by drawing a single cell and then add on, it's usually more straightforward to draw the outline of a table and then fill in the rows and columns. This method of creating a table is extremely flexible; if you can envision a design for your table, you can almost certainly create it.

To draw a table, follow these steps:

  1. Click the Tables and Borders button on the Standard toolbar (see Figure 15.10) to display the Tables and Borders toolbar. (If you weren't already using Print Layout view, Word switches to it automatically.)

    Figure 15.10. Click the Tables and Borders toolbar button to display the Tables and Borders toolbar.

    graphics/15fig10.gif

  2. Click the Draw Table button if it isn't already selected (highlighted). Your mouse pointer now looks like a small pencil when it's over your document.

  3. Display the Line Style list and choose a line style for the outside border of your table.

  4. Display the Line Weight list and choose a line weight for the outside border of your table.

  5. Click the Border Color button and click a color for the outside border of your table in the drop-down palette.

  6. Starting in the upper-left corner, drag diagonally down and to the right, releasing the mouse button when the outline is the right size (see Figure 15.11). Word creates the outside border of your table.

    Figure 15.11. Drag until the outline of your table is approximately the right size.

    graphics/15fig11.gif

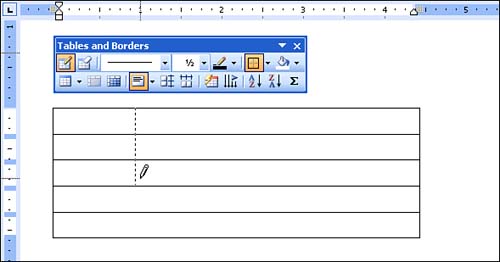
  7. Now repeat steps 35 to choose what kind of inside lines you want, and draw them with the Draw Table tool (see Figure 15.12). If you want to remove a line, click the Eraser toolbar button and then draw over the line. When you release the mouse button, the line disappears. (Don't worry if your rows or columns are not even now. You'll learn how to fix that later in this hour.)

    Figure 15.12. Draw the inside lines in your table.

    graphics/15fig12.jpg

    graphics/bookpencil_icon.gif

    You can draw lines to divide up the inside of the table however you like. You are not restricted to a standard grid. You can create cells of different sizes depending on what you're using the table for. Word even lets you draw diagonal lines.


  8. Click the Draw Table button to turn it off, and enter the text in the table (see the next section).

graphics/lightbulb_icon.gif

If you inserted a table accidentally and want to start over, make sure that the insertion point is in the table, and choose Table, Delete, Table.


Sams Teach Yourself Microsoft Office Word 2003 in 24 Hours
ISBN: 067232556X
EAN: 2147483647
Year: 2003
Pages: 315
Authors: Heidi Steele

flylib.com © 2008-2017.
If you may any questions please contact us: flylib@qtcs.net