Sharing Calendars in Windows Calendar
Windows Calendar enables you to share calendars with other people by publishing your calendar to an Internet site or shared network site. Once you publish the calendar, Windows Calendar can keep your calendar information updated as you change the calendar. Furthermore, other users can subscribe to your calendar, download it to their computer, and import it into their Windows Calendar program. In fact, other calendar programs that use the Internet Calendar format (ICS) can also import your calendar. You also can subscribe to other users' calendars, download them, and import them as additional calendars within Windows Calendar.
Publishing a Calendar
To publish a calendar, you must have a site to publish to. For example, some web sites allow users to post their calendars and share with others. In a company setting, your network administrator may have set up a shared folder in which calendars can be stored for sharing. In either case, you need to know the full path name for the shared site so you can fill out the Publish Calendar window.
To publish a calendar, follow these steps:
-
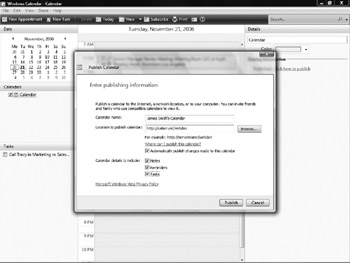
Choose Share Publish. The Publish Calendar dialog box appears (see Figure 7-8).

Figure 7-8: To share your calendar, set up the Publish Calendar dialog box. -
Type a name in the Calendar Name box. This helps identify your calendar when others import it into their calendar program.
-
Enter the path to the location where you will publish the calendar. If the location is on a local area network (LAN), you can click the Browse button to find it. Otherwise, you must enter the full path to a web address that supports published calendars.
-
Specify if you want Windows Calendar to publish changes to the calendar. If you do this, then those who subscribe to your calendar will be able to stay current with your calendar as you modify it.
-
Select the details of your calendar that you want published. You can include Notes, Reminders, and Tasks .
-
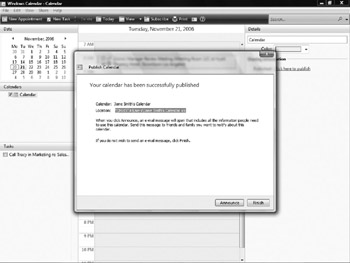
Click Publish. Windows Calendar publishes your calendar and displays the window shown in Figure 7-9.

Figure 7-9: You can announce to others that your calendar is published. -
If you want to send an e-mail out to announce that your calendar is published, click Announce. (If you do not want to send out an announcement, click Finish.) That launches a new mail message with the address of the calendar showing in the message body area. You can address the message to recipients and click Send. Click Finish.
If you want to stop publishing your calendar and remove your previously published one on the calendar-sharing server, you must unpublish your calendar. To do this, choose Share Stop Publishing. A message appears asking if you are sure you want to stop publishing your calendar. To remove the calendar that you have published to the server, make sure the Delete Calendar On Server option is selected. Click Unpublish.
Subscribing to Calendars
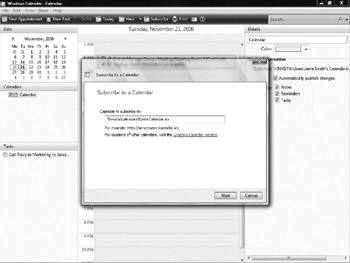
To import another user 's calendar, you must subscribe to it. Choose Share Subscribe from the Windows Calendar menu bar. This opens the Subscribe To A Calendar dialog box, as shown in Figure 7-10. Type the full path to the calendar, including the name of the calendar followed by .ics. An example is http://www.sharedcalendars/calendar.ics. If the shared calendar is on a LAN drive, you would use the format //networkdrive/calendar.ics.

Figure 7-10: Type the path to a shared calendar in this dialog box.
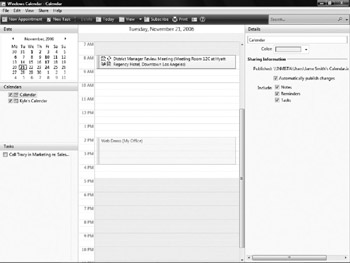
Click Next. The Calendar Subscription Settings dialog box appears. You can set update intervals, such as Every 15 Minutes, Every Hour, Every Day, or Every Week. Select if you want to include reminders and tasks, and then click Finish. Windows Calendar imports the calendar and displays it as an additional calendar in the Calendars list in the Navigation
Pane (see Figure 7-11). Appointments from calendars you import will show up as a lighter shade (and different color if that user specified a different calendar color ) on your calendar.

Figure 7-11: A subscribed-to calendar appears in your Calendars list in the Navigation Pane.
| Note | If you receive an e-mail from another user announcing a calendar that is being published, click the link in the e-mail message to subscribe to that calendar. |
Click the subscribed-to calendar in the Navigation Pane to view appointments from that calendar in a darker shade. You can also use the Color drop-down list in the Details pane to change the color of that calendar. Now you can easily discern which appointment is from your master calendar and which is from a different calendar.
EAN: 2147483647
Pages: 296