Section 10. Saving Document Presets


#10. Saving Document Presets

If you find yourself in the tedious situation of setting up similar documents over and overfor example, if you create new trifold brochures several times a weekyou can save all the settings in the New Document dialog box as document presets. You can then select from your document presets in the New Document dialog box. This not only saves you time when creating new documents, but it ensures consistency among similar documents. Never again will you wonder about the page size for the book jackets you're working on or the bleed area for a magazine.

Saving Document Presets

To save document presets:

1.

Choose File > New > Document. In the New Document dialog box, specify the Number of Pages, Page Size, Columns, Margins, and all other attributes you want in the preset.

2.

Click Save Preset. In the Save Preset dialog box (Figure 10a), type a name for the document preset in the field.

Figure 10a. The Save Preset dialog box lets you name and save all the specifications for a new document.


3.

Click OK. The new document preset is saved with your copy of InDesign.

Using Document Presets

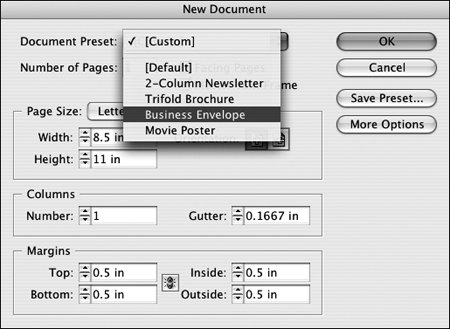
To use a document preset, select it from the Document Preset menu (Figure 10b) at the top of the New Document dialog box. All the settings in the dialog box automatically change to those in the preset. You can also choose one of your presets from the Document Preset submenu in the File menu; this automatically opens the New Document dialog box with the preset selected.

Figure 10b. The Document Preset menu in the New Document dialog box lets you create new documents quickly and efficiently by choosing from your custom list of document setups.


Note

If you select a document preset, and then make further changes in the New Document dialog box, the Document Preset menu lets you know by changing to [Custom].


Naming Document Presets

When you name your document presets, be sure the names are specific and meaningful so you can identify them later. For example, names such as "Two-Column Newsletter" and "Three-Column Newsletter" are more helpful than "Newsletter 1" and "Newsletter 2."


Editing Document Presets

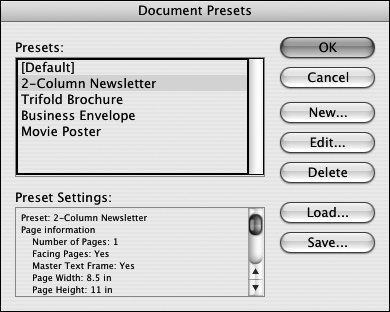
In addition to creating a document preset using the New Document dialog box, you can also use the Document Presets dialog box (Figure 10c) to create a preset. To open this dialog box, choose File > Document Presets > Define. The dialog box works as follows:

  • Presets list: The Presets list shows all your document presets. Click one to see its settings, edit it, or delete it.

  • Preset Settings area: This scroll box shows all the document specifications for the selected document preset.

  • New button: Click New to set up a new document preset; a version of the New Document dialog box displays so you can name and set up the preset.

  • Edit button: Click Edit to change the name or specifications of the selected document preset.

  • Delete button: Click Delete to remove the selected document presets from the list; you cannot delete Default.

  • Load button: Click Load to add document presets from another InDesign user to your list. (In the Load Document Presets dialog box, a document presets file will have a .dcst extension.)

  • Save button: Click Save to export selected document presets to share with another user. Within a workgroup, it's a good idea to share presets so you can ensure the same specifications for similar projects.

Figure 10c. The Document Presets dialog box lets you create, edit, and delete document presets and share document presets with other users.


Adobe InDesign CS2 How-Tos(c) 100 Essential Techniques
Adobe InDesign CS2 How-Tos: 100 Essential Techniques
ISBN: 0321321901
EAN: 2147483647
Year: N/A
Pages: 142

flylib.com © 2008-2017.
If you may any questions please contact us: flylib@qtcs.net