| When designers have requested transparency in a page-layout program, all they've thought about was seeing through objects. InDesign offers much more in its Transparency controls. The command center of all the transparency controls in InDesign is located in the Transparency palette. To open the Transparency palette: Ever since desktop publishing began, designers have requested some way to see through one object to the others behind it. One way to do this is to reduce the opacity, or increase the translucence, in an object  . .
 An example of how different opacity settings change the display of an object filled with black. An example of how different opacity settings change the display of an object filled with black.
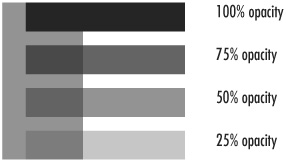 To reduce an object's opacity: 1. | Select the object that you want to see through.
| 2. | Use the Opacity slider in the Transparency palette to reduce the visibility of the object  . .
 The Opacity slider in the Transparency palette lowers the visibility of objects. The Opacity slider in the Transparency palette lowers the visibility of objects.
 Tip Once you have activated the Opacity field or slider, you can use the up and down arrow keys on the keyboard to increase or decrease the amount of opacity. Tip Place a white frame at a reduced opacity over an image to "ghost" that area in the image  . You can then add a text frame over the ghosted area. (See the sidebar on page 172 as to why you need to add a separate text frame over the ghosted area.) . You can then add a text frame over the ghosted area. (See the sidebar on page 172 as to why you need to add a separate text frame over the ghosted area.)
 An example of how a white frame set to 50% opacity creates a ghost area in the image. An example of how a white frame set to 50% opacity creates a ghost area in the image.
 |
If you've used Adobe Photoshop, you should be familiar with the Blend Mode menu. This feature allows the colors and shades in one object to interact with the objects beneath. To add a blend mode to objects: 1. | Select the object that you want to have interact with the objects beneath it.
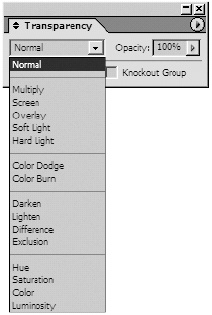
| 2. | Choose a blend mode from the list in the Transparency palette  . (See the opposite page for a description and display of the blend modes.) . (See the opposite page for a description and display of the blend modes.)
 The Blend Mode menu lets you change the interaction between objects. The Blend Mode menu lets you change the interaction between objects.
 |
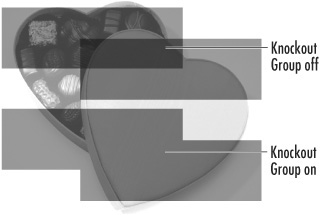
As you apply a blend mode or an opacity setting, you may need to control how the transparency is applied. One such control is called a knockout group. Objects in a knockout group display their blend modes or opacity settings on other objects, but not with each other  . .
 With the Knockout Group turned on, blended objects do not interact with each other. With the Knockout Group turned on, blended objects do not interact with each other.
 To create a knockout group: 1. | Apply a blend mode or opacity setting to an object.
| 2. | Repeat for any additional objects.
Tip Each object can have its own blend mode or opacity setting, or they all can have the same settings. | 3. | Use the Selection tool to select the objects that have the blend mode or opacity settings applied. These are the objects you don't want to have interact with each other.
| 4. | Choose Object > Group.
| 5. | With the group selected, click the Knockout Group checkbox in the Transparency palette  . .
 The Knockout Group checkbox in the Transparency palette changes the interaction of grouped objects among each other. The Knockout Group checkbox in the Transparency palette changes the interaction of grouped objects among each other.
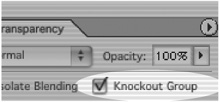 Tip If the Knockout Group checkbox is not visible, click the palette tab or choose Show Transparency Options from the Transparency palette menu. |
Understanding the Blend Modes The best way to understand the blend modes is to experiment and explore by applying them to objects. Here's a quick rundown of how they work  . .
 An example of how the 16 blend modes interact when placed over an image. An example of how the 16 blend modes interact when placed over an image.
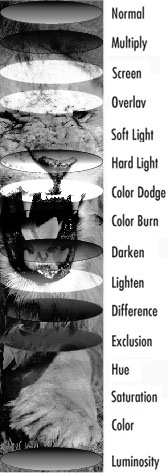 Multiply multiplies the bottom color with the top color. Screen is the inverse of Multiply. Overlay preserves the highlights and shadows of the base color while mixing in the top color. Soft Light is similar to shining a diffused spotlight on the artwork. Hard Light is similar to shining a harsh spotlight on the artwork. Color Dodge lightens the bottom color to reflect the top color. Color Burn darkens the bottom color to reflect the top color. Darken displays either the bottom or top color whichever is darker. Lighten selects the bottom or top color whichever is lighter. Difference subtracts one color from another depending on which has the greater brightness. Exclusion is similar to Difference but is lower in contrast. Hue replaces the hue of the bottom object with the hue of the top one. Saturation replaces the saturation of the bottom object with the top. Color colorizes the bottom object with the top color. Luminosity changes the bottom object's luminence with the top.
Difference, Exclusion, Hue, Saturation, Color, and Luminosity modes do not blend spot colors, only process colors. |
The other control for transparency is the Isolate Blending command. This creates the opposite effect of a Knockout group. With this command, the objects in the group display their blend modes with each other, but not with objects outside the group  . .
 With the Isolate Blending command turned on, blended objects only interact with each other, not the objects below. With the Isolate Blending command turned on, blended objects only interact with each other, not the objects below.
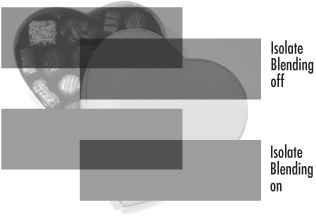 Tip The Isolate Blending command only affects the blend mode settings, not any opacity settings.
To isolate the blending in objects: 1. | Apply a blend mode to an object.
| 2. | Repeat for any additional objects.
Tip Each object can have its own blend mode, or all objects can have the same settings. | 3. | Use the Selection tool to select the objects that have the blend mode. These are the objects that you don't want to interact with the other objects.
| 4. | Choose Object > Group.
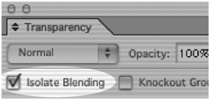
| 5. | Keep the group selected, click the Isolate Blending checkbox in the Transparency palette  . The objects in the group interact with each other, but not with other objects on the page. . The objects in the group interact with each other, but not with other objects on the page.
 The Isolate Blending checkbox in the Transparency palette limits grouped objects to interact only with each other. The Isolate Blending checkbox in the Transparency palette limits grouped objects to interact only with each other.
 |
| 


