Working with Bitmaps
A bitmap stores data for an image and its attributes in pixel format. The Bitmap class, which is inherited from the Image class, encapsulates a graphics bitmap in GDI+. Because the Bitmap class is inherited from the Image class, it offers all the methods and properties that we discussed in the previous section. The Bitmap class defines additional functionality. In this section we will learn about the members of the Bitmap class and how to use them.
7.5.1 Creating a Bitmap Object
The Bitmap class provides about a dozen overloaded forms of the constructors. You can create a Bitmap object from a bitmap file, or from Image, Stream, string, or Type objects. When you create a Bitmap object, you can also specify the size of the bitmap, the resolution of the Graphics object, and the pixel format of the bitmap.
The code snippet in Listing 7.17 creates Bitmap objects from an Image and file name with or without the size of the Bitmap included.
Listing 7.17 Creating Bitmap objects from different sources
// Creating an Image object
Image curImage = Image.FromFile("myfile.gif");
// Creating a Bitmap object from a file name
Bitmap curBitmap1 = new Bitmap("myfile.gif");
// Creating a Bitmap object from an Image object
Bitmap curBitmap2 = new Bitmap(curImage);
// Creating a Bitmap object with size and image
Bitmap curBitmap3 =
new Bitmap(curImage, new Size(200, 100) );
// Creating a Bitmap object with no images
Bitmap curBitmap4 = new Bitmap(200, 100);
Besides the constructor, the Bitmap class provides two static methodsFromHicon and FromResourcewhich can be used to create a Bitmap object from a window handle to an icon and from a Windows resource (.res file), respectively.
7.5.2 Viewing a Bitmap
Viewing a bitmap using the Bitmap class is similar to viewing an image. After constructing a Bitmap object, you just pass it as a parameter to DrawImage. The following code snippet creates a Bitmap object from a file and views the bitmap by calling the DrawImage method of a Graphics object associated with a form. You can write this code on a menu or a button click event handler.
Graphics g = this.CreateGraphics();
Bitmap bitmap = new Bitmap("myfile.jpg");
g.DrawImage(bitmap, 20, 20);
g.Dispose();
7.5.3 The Bitmap Class Methods and Properties
The Bitmap class doesn't define any properties beyond those defined in the Image class. However, Bitmap does provide additional methods. Among them are FromHicon, FromResource, GetHbitmap, GetHicon, GetPixel, LockBits, MakeTransparent, SetPixel, SetResolution, and UnlockBits.
The FromHicon and FromResource methods create a Bitmap object from a window handle to an icon and from a Windows resource, respectively. The GetHbitmap and GetHicon methods create a Windows HBITMAP structure and a window handle to an icon.
The GetPixel and SetPixel methods get and set the color of the specified pixel of an image. These methods are useful when an application needs to blur images, change the color of specific pixels, change the contrast of pixels, and so on. You can blur an image by reducing the color depth of pixels. We will use GetPixel and SetPixel in examples in this chapter and the next.
The following line of code returns the color of a pixel at positions x = 10 and y = 10:
Color curColor = curBitmap.GetPixel(10, 10);
The following code snippet uses SetPixel to change all pixels between point (50, 50) and point (60, 60) to red:
for (int i = 50; i < 60; i++)
{
 for (int j = 50; j < 60; j++)
 {
 curBitmap.SetPixel(i, j, Color.Red);
 }
}
SetResolution sets the resolution of a bitmap. This method takes two parameters of type float, which represent the horizontal resolution and vertical resolution in dots per inch.
MakeTransparent makes the default color transparent to a bitmap. This method takes either no arguments or a single argument of type Color:
Color curColor = curBitmap.GetPixel(10, 10);
curBitmap.MakeTransparent();
or
curBitmap.MakeTransparent(curColor);
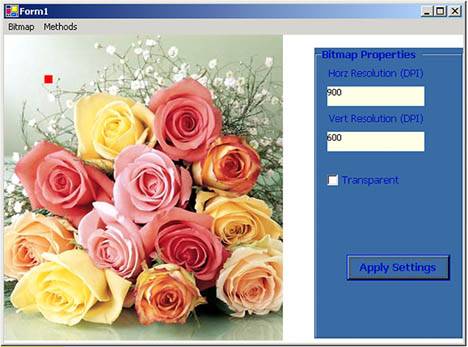
To test the methods and properties of Bitmap, we create a Windows application and add Open File and Exit menu items as in the previous examples. Then we add controls for a group box, text boxes, a button, a check box, and some labels. The final form looks like Figure 7.33. We can set the resolution and transparency of the bitmap from here.
Figure 7.33. A bitmap example

We add the following application-level variables to the application:
// Variables
private Bitmap curBitmap;
private float imgHeight;
private float imgWidth;
private string curFileName;
As usual, we browse images on the Open File menu item click event handler and close the form on the Exit menu item click event handler. We also create a Bitmap object from the selected file and store the height and width of the image, as Listing 7.18 shows.
Listing 7.18 The Open File and Exit menu item event handlers
private void OpenBmpMenu_Click(object sender,
 System.EventArgs e)
{
 OpenFileDialog openDlg = new OpenFileDialog();
 openDlg.Filter =
 "All Bitmap files|*.bmp;*.gif;*.jpg;";
 string filter = openDlg.Filter;
 openDlg.Title = "Open Bitmap File";
 openDlg.ShowHelp = true;
 if(openDlg.ShowDialog() == DialogResult.OK)
 {
 curFileName = openDlg.FileName;
 curBitmap = new Bitmap(curFileName);
 imgHeight = curBitmap.Height;
 imgWidth = curBitmap.Width;
 }
 Invalidate();
}
private void ExitMenu_Click(object sender,
 System.EventArgs e)
{
 this.Close();
}
Now we write code on the paint event handler to view the bitmap (see Listing 7.19).
Listing 7.19 The paint event handler
private void Form1_Paint(object sender,
 System.Windows.Forms.PaintEventArgs e)
{
 Graphics g = e.Graphics;
 if(curBitmap != null)
 {
 g.DrawImage(curBitmap,
 AutoScrollPosition.X, AutoScrollPosition.Y,
 imgWidth, imgHeight);
 }
}
The code for the Apply Settings button click event handler is given in Listing 7.20. It reads values for horizontal and vertical resolution from two text boxes and sets values for a bitmap using the SetResolution method. It also uses the MakeTransparent and SetPixel methods.
Listing 7.20 The Apply Settings button click event handler
private void ApplyBtn_Click(object sender,
 System.EventArgs e)
{
 if(curBitmap == null)
 return;
 float hDpi = 90;
 float vDpi = 90;
 // Create dpi settings
 if(textBox1.Text.ToString() != "")
 hDpi = Convert.ToInt32(textBox1.Text);
 if(textBox1.Text.ToString() != "")
 vDpi = Convert.ToInt32(textBox2.Text);
 curBitmap.SetResolution(hDpi, vDpi);
 // If Transparent check box is checked
 if(checkBox1.Checked)
 {
 Color curColor =
 curBitmap.GetPixel(10, 10);
 curBitmap.MakeTransparent();
 }
 // Set pixel colors to red
 for (int i = 50; i < 60; i++)
 {
 for (int j = 50; j < 60; j++)
 {
 curBitmap.SetPixel(i, j, Color.Red);
 }
 }
 // Redraw
 Invalidate();
}
If we run the application and click the Apply Settings button (see Figure 7.34), a small red rectangle appears, showing that the color of that part of the image has been changed to red.
Figure 7.34. Changing the pixel colors of a bitmap
The LockBits and UnlockBits methods are used to lock and unlock a bitmap into system memory. LockBits takes three parametersof type Rectangle, ImageLockMode enumeration, and PixelFormat enumerationand returns an object of type BitmapData. The rectangle is the portion of the bitmap that will be locked in system memory.
ImageLockMode provides the access level on the data. Its members include ReadOnly, ReadWrite, UserInputBuffer, and WriteOnly. The PixelFormat enumeration defines the format of color data for each pixel.
Note
We will discuss these methods and enumerations in more detail in Chapter 8.
GDI+: The Next-Generation Graphics Interface
- GDI+: The Next-Generation Graphics Interface
- Understanding GDI+
- Exploring GDI+ Functionality
- GDI+ from a GDI Perspective
- GDI+ Namespaces and Classes in .NET
- Summary
Your First GDI+ Application
- Your First GDI+ Application
- Drawing Surfaces
- The Coordinate System
- Tutorial: Your First GDI+ Application
- Some Basic GDI+ Objects
The Graphics Class
- The Graphics Class
- Graphics Class Properties
- Graphics Class Methods
- The GDI+Painter Application
- Drawing a Pie Chart
Working with Brushes and Pens
- Working with Brushes and Pens
- Understanding and Using Brushes
- Using Pens in GDI+
- Transformation with Pens
- Transformation with Brushes
- System Pens and System Brushes
- A Real-World Example: Adding Colors, Pens, and Brushes to the GDI+Painter Application
Colors, Fonts, and Text
- Colors, Fonts, and Text
- Accessing the Graphics Object
- Working with Colors
- Working with Fonts
- Working with Text and Strings
- Rendering Text with Quality and Performance
- Advanced Typography
- A Simple Text Editor
- Transforming Text
Rectangles and Regions
- Rectangles and Regions
- The Rectangle Structure
- The Region Class
- Regions and Clipping
- Clipping Regions Example
- Regions, Nonrectangular Forms, and Controls
Working with Images
- Working with Images
- Raster and Vector Images
- Working with Images
- Manipulating Images
- Playing Animations in GDI+
- Working with Bitmaps
- Working with Icons
- Skewing Images
- Drawing Transparent Graphics Objects
- Viewing Multiple Images
- Using a Picture Box to View Images
- Saving Images with Different Sizes
Advanced Imaging
- Advanced Imaging
- Rendering Partial Bitmaps
- Working with Metafiles
- Color Mapping Using Color Objects
- Image Attributes and the ImageAttributes Class
- Encoder Parameters and Image Formats
Advanced 2D Graphics
- Advanced 2D Graphics
- Line Caps and Line Styles
- Understanding and Using Graphics Paths
- Graphics Containers
- Reading Metadata of Images
- Blending Explained
- Alpha Blending
- Miscellaneous Advanced 2D Topics
Transformation
- Transformation
- Coordinate Systems
- Transformation Types
- The Matrix Class and Transformation
- The Graphics Class and Transformation
- Global, Local, and Composite Transformations
- Image Transformation
- Color Transformation and the Color Matrix
- Matrix Operations in Image Processing
- Text Transformation
- The Significance of Transformation Order
Printing
- Printing
- A Brief History of Printing with Microsoft Windows
- Overview of the Printing Process
- Your First Printing Application
- Printer Settings
- The PrintDocument and Print Events
- Printing Text
- Printing Graphics
- Print Dialogs
- Customizing Page Settings
- Printing Multiple Pages
- Marginal Printing: A Caution
- Getting into the Details: Custom Controlling and the Print Controller
Developing GDI+ Web Applications
- Developing GDI+ Web Applications
- Creating Your First ASP.NET Web Application
- Your First Graphics Web Application
- Drawing Simple Graphics
- Drawing Images on the Web
- Drawing a Line Chart
- Drawing a Pie Chart
GDI+ Best Practices and Performance Techniques
- GDI+ Best Practices and Performance Techniques
- Understanding the Rendering Process
- Double Buffering and Flicker-Free Drawing
- Understanding the SetStyle Method
- The Quality and Performance of Drawing
GDI Interoperability
Miscellaneous GDI+ Examples
- Miscellaneous GDI+ Examples
- Designing Interactive GUI Applications
- Drawing Shaped Forms and Windows Controls
- Adding Copyright Information to a Drawn Image
- Reading and Writing Images to and from a Stream or Database
- Creating Owner-Drawn List Controls
Appendix A. Exception Handling in .NET
- Chapter I e-Search: A Conceptual Framework of Online Consumer Behavior
- Chapter VII Objective and Perceived Complexity and Their Impacts on Internet Communication
- Chapter VIII Personalization Systems and Their Deployment as Web Site Interface Design Decisions
- Chapter XI User Satisfaction with Web Portals: An Empirical Study
- Chapter XII Web Design and E-Commerce
