Drawing Images on the Web
The process of drawing images on the Web is slightly different from that of drawing images on Windows Forms. In Windows Forms we create a Bitmap object and call the Graphics.DrawImage method. Drawing on the Web requires a Graphics object. The Bitmap.Save method takes care of the rest, as discussed earlier.
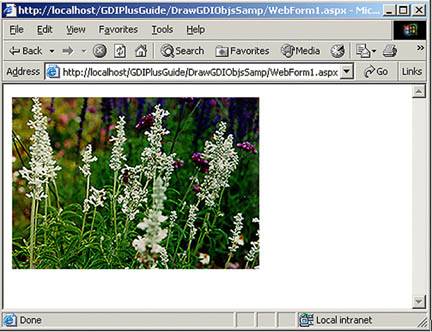
To test this, let's create a Web application using Visual Studio .NET and add the code given in Listing 12.5 on the page-load event. This code views an image on the browser. First we create a Bitmap object from an image, then we create a Graphics object from the image, and then we call the Save method of Bitmap.
Listing 12.5 Drawing images on the Web
// Create a Bitmap object from a file
Bitmap curBitmap =
 new Bitmap("d:\white_salvia.jpg");
// Create a Graphics object from Bitmap
Graphics g = Graphics.FromImage(curBitmap);
// Send output to the browser
curBitmap.Save(this.Response.OutputStream,
 ImageFormat.Jpeg);
// Dispose of object
g.Dispose();
Notice that we didn't even need to call the DrawImage method. Figure 12.11 shows the output from Listing 12.5.
Figure 12.11. Drawing an image
12.4.1 Setting Image Quality
As we discussed in Chapter 3, the SmoothingMode and TextRenderingHint properties of the Graphics object can be used to set the quality of images and text, respectively. GDI+ cannot draw text directly into a Web application. Like lines, curves, and other graphics shapes, text must also be rendered as an image for display in the browser. All graphics lines, curves, shapes, text, and images are first converted to an image and directed to a browser, so only the SmoothingMode property will be applicable. SmoothingMode has five members: AntiAlias, Default, HighQuality, HighSpeed, and None. The following code snippet sets the smoothing mode of the Graphics object:
// Set modes
g.SmoothingMode = SmoothingMode.AntiAlias;
12.4.2 Using LinearGradientBrush and PathGradientBrush
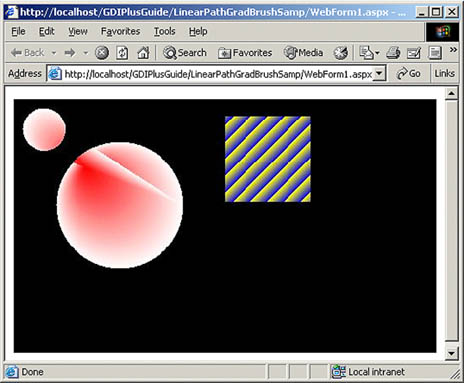
You can use linear and path gradient brushes in Web applications just as we did in Chapter 4. Listing 12.6 uses LinearGradientBrush and PathGradientBrush to fill a rectangle and a path. First we create a linear gradient brush and a graphics path, and we add two ellipses to the graphics path.
Next we create a path gradient brush, which takes the path as its only parameter, and we set the CenterColor property of the path. Then we create Bitmap and Graphics objects and call Graphics.FillPath and Graphics.FillRectangle, which fill a path and rectangle, respectively.
As in the previous examples, finally we call the Bitmap.Save method and dispose of the objects.
Listing 12.6 Using LinearGradientBrush and PathGradientBrush
private void Page_Load(object sender,
 System.EventArgs e)
{
 // Create a linear gradient brush
 LinearGradientBrush lgBrush =
 new LinearGradientBrush(
 new Rectangle(0, 0, 10, 10),
 Color.Yellow, Color.Blue,
 LinearGradientMode.ForwardDiagonal);
 // Create a path
 GraphicsPath path = new GraphicsPath();
 path.AddEllipse(50, 50, 150, 150);
 path.AddEllipse(10, 10, 50, 50);
 // Create a path gradient brush
 PathGradientBrush pgBrush =
 new PathGradientBrush(path);
 pgBrush.CenterColor = Color.Red;
 // Create Bitmap and Graphics objects
 Bitmap curBitmap = new Bitmap(500, 300);
 Graphics g = Graphics.FromImage(curBitmap);
 g.SmoothingMode = SmoothingMode.AntiAlias;
 g.FillPath(pgBrush, path);
 g.FillRectangle(lgBrush, 250, 20, 100, 100);
 curBitmap.Save(this.Response.OutputStream,
 ImageFormat.Jpeg);
 g.Dispose();
}
Figure 12.12 shows the output from Listing 12.6.
Figure 12.12. Using LinearGradientBrush and PathGradientBrush
12.4.3 Drawing Transparent Graphics Objects
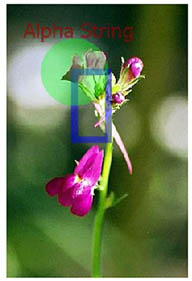
The alpha component of a color represents its transparency. Alpha component values vary from 0 to 255, where 0 indicates fully transparent and 255 indicates opaque. Listing 12.7 draws a rectangle, an ellipse, and text on top of an image.
Listing 12.7 Drawing semitransparent objects
// Create Bitmap and Graphics objects
Bitmap curBitmap = new Bitmap("c:\flower13.jpg");
Graphics g = Graphics.FromImage(curBitmap);
g.SmoothingMode = SmoothingMode.AntiAlias;
// Create brushes and pens with alpha values
Color redColor = Color.FromArgb(120, 0, 0, 255);
Pen alphaPen = new Pen(redColor, 10);
SolidBrush alphaBrush =
 new SolidBrush(Color.FromArgb(90, 0, 255, 0));
// Draw a rectangle, an ellipse, and text
g.DrawRectangle(alphaPen, 100, 100, 50, 100);
g.FillEllipse(alphaBrush, 50, 50, 100, 100);
g.DrawString("Alpha String",
 new Font("Tahoma", 30),
 new SolidBrush(Color.FromArgb(150, 160, 0, 0)),
 new PointF(20, 20));
curBitmap.Save(this.Response.OutputStream,
 ImageFormat.Jpeg);
g.Dispose();
First we create Bitmap and Graphics objects and set the Graphics smoothing mode. Then we create a color with transparency using the Color.FromArgb method, where transparency is the first parameter. Next, using the following code, we create a pen from this semitransparent color, which gives us a semitransparent pen:
Color redColor = Color.FromArgb(120, 0, 0, 255);
Pen alphaPen = new Pen(redColor, 10);
We also create a semitransparent brush by passing a semitransparent color as a parameter to SolidBrush, as follows:
SolidBrush alphaBrush =
 new SolidBrush(Color.FromArgb(90, 0, 255, 0));
Now to draw transparent shapes, we simply use the transparent brushes and pens. As Figure 12.13 shows, the graphics shapes are semitransparent.
Figure 12.13. Drawing semitransparent objects
GDI+: The Next-Generation Graphics Interface
- GDI+: The Next-Generation Graphics Interface
- Understanding GDI+
- Exploring GDI+ Functionality
- GDI+ from a GDI Perspective
- GDI+ Namespaces and Classes in .NET
- Summary
Your First GDI+ Application
- Your First GDI+ Application
- Drawing Surfaces
- The Coordinate System
- Tutorial: Your First GDI+ Application
- Some Basic GDI+ Objects
The Graphics Class
- The Graphics Class
- Graphics Class Properties
- Graphics Class Methods
- The GDI+Painter Application
- Drawing a Pie Chart
Working with Brushes and Pens
- Working with Brushes and Pens
- Understanding and Using Brushes
- Using Pens in GDI+
- Transformation with Pens
- Transformation with Brushes
- System Pens and System Brushes
- A Real-World Example: Adding Colors, Pens, and Brushes to the GDI+Painter Application
Colors, Fonts, and Text
- Colors, Fonts, and Text
- Accessing the Graphics Object
- Working with Colors
- Working with Fonts
- Working with Text and Strings
- Rendering Text with Quality and Performance
- Advanced Typography
- A Simple Text Editor
- Transforming Text
Rectangles and Regions
- Rectangles and Regions
- The Rectangle Structure
- The Region Class
- Regions and Clipping
- Clipping Regions Example
- Regions, Nonrectangular Forms, and Controls
Working with Images
- Working with Images
- Raster and Vector Images
- Working with Images
- Manipulating Images
- Playing Animations in GDI+
- Working with Bitmaps
- Working with Icons
- Skewing Images
- Drawing Transparent Graphics Objects
- Viewing Multiple Images
- Using a Picture Box to View Images
- Saving Images with Different Sizes
Advanced Imaging
- Advanced Imaging
- Rendering Partial Bitmaps
- Working with Metafiles
- Color Mapping Using Color Objects
- Image Attributes and the ImageAttributes Class
- Encoder Parameters and Image Formats
Advanced 2D Graphics
- Advanced 2D Graphics
- Line Caps and Line Styles
- Understanding and Using Graphics Paths
- Graphics Containers
- Reading Metadata of Images
- Blending Explained
- Alpha Blending
- Miscellaneous Advanced 2D Topics
Transformation
- Transformation
- Coordinate Systems
- Transformation Types
- The Matrix Class and Transformation
- The Graphics Class and Transformation
- Global, Local, and Composite Transformations
- Image Transformation
- Color Transformation and the Color Matrix
- Matrix Operations in Image Processing
- Text Transformation
- The Significance of Transformation Order
Printing
- Printing
- A Brief History of Printing with Microsoft Windows
- Overview of the Printing Process
- Your First Printing Application
- Printer Settings
- The PrintDocument and Print Events
- Printing Text
- Printing Graphics
- Print Dialogs
- Customizing Page Settings
- Printing Multiple Pages
- Marginal Printing: A Caution
- Getting into the Details: Custom Controlling and the Print Controller
Developing GDI+ Web Applications
- Developing GDI+ Web Applications
- Creating Your First ASP.NET Web Application
- Your First Graphics Web Application
- Drawing Simple Graphics
- Drawing Images on the Web
- Drawing a Line Chart
- Drawing a Pie Chart
GDI+ Best Practices and Performance Techniques
- GDI+ Best Practices and Performance Techniques
- Understanding the Rendering Process
- Double Buffering and Flicker-Free Drawing
- Understanding the SetStyle Method
- The Quality and Performance of Drawing
GDI Interoperability
Miscellaneous GDI+ Examples
- Miscellaneous GDI+ Examples
- Designing Interactive GUI Applications
- Drawing Shaped Forms and Windows Controls
- Adding Copyright Information to a Drawn Image
- Reading and Writing Images to and from a Stream or Database
- Creating Owner-Drawn List Controls
Appendix A. Exception Handling in .NET
- Using SQL Data Definition Language (DDL) to Create Data Tables and Other Database Objects
- Using SQL Data Manipulation Language (DML) to Insert and Manipulate Data Within SQL Tables
- Working with Queries, Expressions, and Aggregate Functions
- Using Data Control Language (DCL) to Setup Database Security
- Writing Advanced Queries and Subqueries
