Using Pens in GDI+
Pens are another key object in GDI+. As mentioned earlier, pens are used to draw lines and curves and the outlines of graphics shapes. A pen draws lines and curves with a specified width and style. The Pen object provides members to set the width and style of a pen. Pens can have various kinds of dashed lines and line fill styles. Actually, the process of drawing a line creates a region in the shape of a widened line, and that region is filled with a brush. The dashed lines of pens are represented by dash styles. The fill styles of lines can be solids or textures depending on the brush used to create a Pen object.
In this section we will discuss how to create and use pens in GDI+; the Pen and Pens classes; and how to create dash styles, cap styles, and line styles for pens.
4.2.1 Creating Pens
The Pen class represents a pen in GDI+. Using the Pen class constructor, an application can create a Pen object from a Brush or Color object with a specified width for the pen.
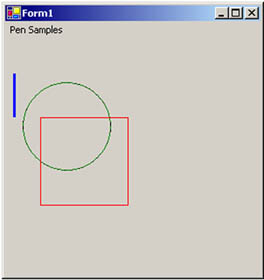
Listing 4.15 creates pens using Brush and Color objects with and without a specified width.
Listing 4.15 Using the Pen class constructor to create Pen objects
private void menuItem2_Click(object sender,
 System.EventArgs e)
{
 // Create a Graphics object and set it clear
 Graphics g = this.CreateGraphics();
 g.Clear(this.BackColor);
 // Create a solid brush and a hatch brush
 SolidBrush blueBrush =
 new SolidBrush(Color.Blue);
 HatchBrush hatchBrush =
 new HatchBrush(HatchStyle.DashedVertical,
 Color.Black, Color.Green);
 // Create a pen from a solid brush with
 // width 3
 Pen pn1 = new Pen( blueBrush, 3);
 // Create a pen from a hatch brush
 Pen pn2 = new Pen(hatchBrush, 8);
 // Create a pen from a Color structure
 Pen pn3 = new Pen(Color.Red);
 // Draw a line, ellipse, and rectangle
 g.DrawLine(pn1,
 new Point(10, 40), new Point(10, 90));
 g.DrawEllipse(pn2, 20, 50, 100, 100);
 g.DrawRectangle(pn3, 40, 90, 100, 100);
 // Dispose of objects
 pn1.Dispose();
 pn2.Dispose();
 pn3.Dispose();
 blueBrush.Dispose();
 hatchBrush.Dispose();
 g.Dispose();
}
Figure 4.19 shows the output from Listing 4.15.
Figure 4.19. Creating and using pens
The Pens class has static properties for all standard colors, which return appropriately colored Pen objects. The following code snippet creates three Pen objects using the Pens class.
Pen pn1 = Pens.Red;
Pen pn2 = Pens.Blue;
Pen pn3 = Pens.Green;
4.2.2 Pen Class Properties and Methods
The Pen class provides properties to set brush, color, and width programmatically after a Pen object is created. Table 4.8 describes the properties of the Pen class.
Table 4.9 describes the methods of the Pen class.
4.2.3 Pen Types
A pen can draw solid lines, filled lines, texture, and even gradient linesall depending on the brush you use to create the pen. For example, if you use a texture brush to create a pen and then use this pen to create lines, the lines will be texture lines.
The only way to set a pen's type is to create a brush and use that brush to create the pen. The PenType property of the Pen class represents the type of the pen's lines. This property is represented by the PenType enumeration.
Note
The PenType property is a read-only property.
Table 4.10 describes the members of the PenType enumeration.
4.2.4 Pens Example
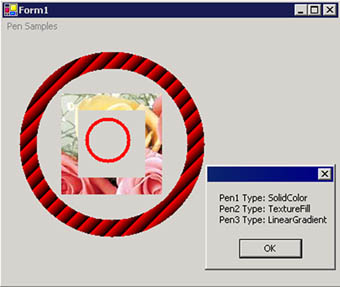
Now let's create a sample application. In Listing 4.16 we create three pens from three different brushes: a solid brush, a texture brush, and a linear gradient brush. After that we create three pens from these brushes, and then we read the type of each pen and display the types in a message box.
|
Property |
Description |
|---|---|
|
Alignment |
Alignment for a pena type of PenAlignment enumeration, which is defined in Table 4.11. |
|
Brush |
Brush object attached with a pen. Setting the Color property after Brush will replace the color of the current brush with the specified color. |
|
Color |
Color of a pen. Setting the Brush property after Color will update the color of a pen to the color of the brush. |
|
CompoundArray |
Specifies values of a compound pen, which draws compound lines made up of parallel lines and spaces. |
|
CustomEndCap, CustomStartCap, DashCap |
A line drawn by a pen can have custom starting and ending caps. The CustomEndCap and CustomStartCap properties represent the ending and starting caps, respectively, of lines drawn by a pen. DashCap is used for dashed lines. |
|
DashOffset |
The distance from the start of a line to the beginning of a dash pattern. |
|
DashPattern |
An array of custom dashes and spaces. |
|
DashStyle |
The style used for dashed lines. |
|
EndCap, StartCap |
Ending and starting cap of a line. |
|
LineJoin |
The join style for the ends of two consecutive lines. |
|
MiterLimit |
Limit of the thickness of the join on a mitered corner. |
|
PenType |
The style of lines of a pen. This property is represented by the PenType enumeration. |
|
Transform |
The geometric transformation of a pen. |
|
Width |
The width of a pen. |
|
Property |
Description |
|---|---|
|
Clone |
Creates an exact copy of a pen. |
|
MultiplyTransform |
Multiplies the transformation matrix of a pen by Matrix. |
|
ResetTransform |
Resets the geometric transformation matrix of a pen to identity. |
|
RotateTransform |
Rotates the local geometric transformation by the specified angle. |
|
ScaleTransform |
Scales the local geometric transformation by the specified factors. |
|
SetLineCap |
Sets the values that determine the style of cap used to end lines drawn by a pen. |
|
TranslateTransform |
Translates the local geometric transformation by the specified dimensions. |
|
Member |
Description |
|---|---|
|
HatchFill |
A hatch fill |
|
LinearGradient |
A linear gradient fill |
|
PathGradient |
A path gradient fill |
|
SolidColor |
A solid fill |
|
TextureFill |
A bitmap texture fill |
Listing 4.16 Getting pen types
private void GetPenTypes_Click(object sender,
 System.EventArgs e)
{
 // Create a Graphics object
 Graphics g = this.CreateGraphics();
 g.Clear(this.BackColor);
 // Create three different types of brushes
 Image img = new Bitmap("roses.jpg");
 SolidBrush redBrush = new SolidBrush(Color.Red);
 TextureBrush txtrBrush =
 new TextureBrush(img);
 LinearGradientBrush lgBrush =
 new LinearGradientBrush(
 new Rectangle(10, 10, 10, 10),
 Color.Red, Color.Black, 45.0f);
 // Create pens from brushes
 Pen pn1 = new Pen(redBrush, 4);
 Pen pn2 = new Pen(txtrBrush, 20);
 Pen pn3 = new Pen(lgBrush, 20);
 // Drawing objects
 g.DrawEllipse(pn1, 100, 100, 50, 50);
 g.DrawRectangle(pn2, 80, 80, 100, 100);
 g.DrawEllipse(pn3, 30, 30, 200, 200 );

 // Get pen types
 string str = "Pen1 Type: "+
 pn1.PenType.ToString() + "
";
 str += "Pen2 Type: "+
 pn2.PenType.ToString() + "
";
 str += "Pen3 Type: "+
 pn3.PenType.ToString();
 MessageBox.Show(str);

 // Dispose of objects
 pn1.Dispose();
 pn2.Dispose();
 pn3.Dispose();
 redBrush.Dispose();
 txtrBrush.Dispose();
 lgBrush.Dispose();
 img.Dispose();
 g.Dispose();
}
Figure 4.20 shows the output from Listing 4.16.
Figure 4.20. Displaying pen types
4.2.5 Pen Alignment
The alignment of a pen represents its position respective to a line. The PenAlignment enumeration specifies the alignment of a penmeaning the center point of the pen width relative to the line. Table 4.11 describes the members of the PenAlignment enumeration.
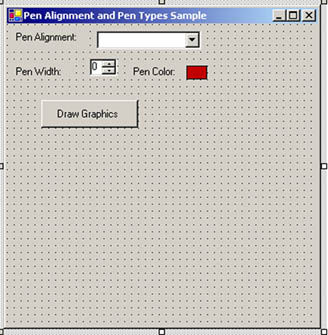
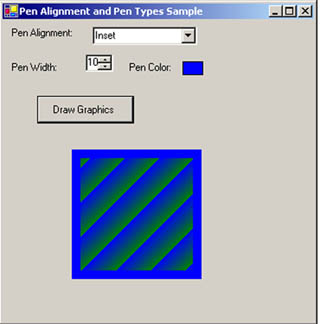
To see alignment in action, let's create a sample application. We create a Windows application, and add a combo box, three labels, two buttons, and a numeric up-down control. We change the control properties, and the final form looks like Figure 4.21.
Figure 4.21. Our pen alignment application
|
Member |
Description |
|---|---|
|
Center |
The pen is centered. |
|
Inset |
The pen is inside the line. |
|
Left |
The pen is left of the line. |
|
Outset |
The pen is outside of the line. |
|
Right |
The pen is right of the line. |
The Pen Alignment combo box lists the alignments of a pen. Pen Width represents the width of the pen, and Pen Color lets you pick the color of the pen. The Pen Color button click event handler simply sets the color of the pen and stores the selected color in a Color type variable at the class level, as shown in Listing 4.17.
Listing 4.17 The Pen Color button click event handler
private Color penColor = Color.Red;

private void ColorBtn_Click(object sender,
 System.EventArgs e)
{
 // Use ColorDialog to select a color
 ColorDialog clrDlg = new ColorDialog();
 if (clrDlg.ShowDialog() == DialogResult.OK)
 {
 // Save color as background color,
 // and fill text box with this color
 penColor = clrDlg.Color;
 ColorBtn.BackColor = penColor;
 }
}
Listing 4.18 (on the form's load event handler) loads all alignments to the combo box.
Listing 4.18 Adding pen alignments to the combo box
private void Form1_Load(object sender,
 System.EventArgs e)
{
 AddPenAlignments();

}
private void AddPenAlignments()
{
 // Add pen alignment
 comboBox1.Items.Add(PenAlignment.Center);
 comboBox1.Text =
 PenAlignment.Center.ToString();
 comboBox1.Items.Add(PenAlignment.Inset);
 comboBox1.Items.Add(PenAlignment.Left);
 comboBox1.Items.Add(PenAlignment.Outset);
 comboBox1.Items.Add(PenAlignment.Right);
}
Finally, in Listing 4.19 we write code for the Draw Graphics button click event handler. We set the Width and Color properties of the pen after reading values from the form's controls. Then we look for the current alignment set by the user in the combo box and set the Alignment property of the pen. In the end, we use this pen to draw a rectangle. We also fill one more rectangle with a linear gradient brush.
Listing 4.19 Creating a pen with alignment
private void DrawBtn_Click(object sender,
 System.EventArgs e)
{
 // Create a Graphics object and set it clear
 Graphics g = this.CreateGraphics();
 g.Clear(this.BackColor);
 // Create a solid brush and a hatch brush
 Pen pn1 = new Pen(Color.Blue, 3);
 pn1.Width = (float)numericUpDown1.Value;
 pn1.Color = ColorBtn.BackColor;
 // Find out current pen alignment
 string str = comboBox1.Text;
 switch(str)
 {
 case "Center":
 pn1.Alignment = PenAlignment.Center;
 break;
 case "Inset":
 pn1.Alignment = PenAlignment.Inset;
 break;
 case "Left":
 pn1.Alignment = PenAlignment.Left;
 break;
 case "Outset":
 pn1.Alignment = PenAlignment.Outset;
 break;
 case "Right":
 pn1.Alignment = PenAlignment.Right;
 break;
 default:
 break;
 }
 // Create a pen from a hatch brush
 // Draw a rectangle
 g.DrawRectangle(pn1, 80, 150, 150, 150);
 // Create a brush
 LinearGradientBrush brush =
 new LinearGradientBrush(
 new Rectangle(10, 10, 20, 20), Color.Blue,
 Color.Green, 45.0f);
 g.FillRectangle(brush, 90, 160, 130, 130);
 // Dispose of objects
 pn1.Dispose();
 g.Dispose();
}
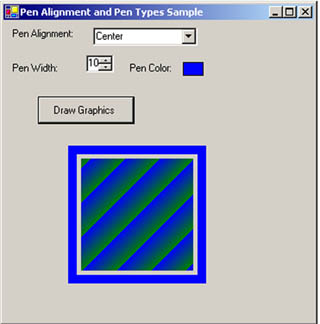
Figure 4.22 shows the output from Listing 4.19. The pen width is 10 and alignment is center.
Figure 4.22. Drawing with center pen alignment
If we set the alignment as inset, we get Figure 4.23.
Figure 4.23. Drawing with inset pen alignment
4.2.6 LineCap, DashCap, and DashStyle
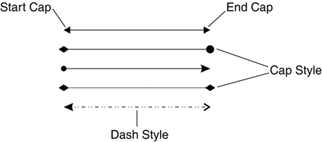
Pens offer more options than what we have seen so far. A line's caps are the starting and ending points of the line. For example, you may have seen lines with arrows and circles. Figure 4.24 shows some lines with their cap and dash styles.
Figure 4.24. Line cap and dash styles
Using Pen properties and methods, you can draw lines with cap and dash styles. Here we will discuss line cap and line dash styles only briefly (for more details, see Chapter 9).
Note
We can divide line caps into two types: anchor and nonanchor. The width of an anchor cap is bigger than the width of the line; the width of a nonanchor cap is the same as the width of the line.
The LineCap property of the Pen class represents the cap style used at the beginning and ending of lines drawn by the pen. You can determine the current cap style of a line by calling the GetLineCap method, which returns a LineCap enumeration. You can also apply a line cap style using the SetLineCap method. This method takes an argument of LineCap enumeration type. Table 4.12 describes the members of the LineCap enumeration.
The SetLineCap method takes the line cap style for the beginning, ending, and dash cap of the line. The first and second parameters of SetLineCap are of type LineCap. The third parameter is of type DashCap enumeration.
|
Member |
Description |
|---|---|
|
AnchorMask |
A mask used to check whether a line cap is an anchor cap |
|
ArrowAnchor |
An arrow-shaped anchor cap |
|
Custom |
A custom line cap |
|
DiamondAnchor |
A diamond anchor cap |
|
Flat |
A flat line cap |
|
NoAnchor |
No anchor |
|
Round |
A round line cap |
|
RoundAnchor |
A round anchor cap |
|
Square |
A square line cap |
|
SquareAnchor |
A square anchor cap |
|
Triangle |
A triangular line cap |
|
Member |
Description |
|---|---|
|
Flat |
A square cap that squares off both ends of each dash |
|
Round |
A circular cap |
|
Triangle |
A triangular cap |
The DashCap enumeration specifies the type of graphics shape used on both ends of each dash in a dashed line. Table 4.13 describes the members of the DashCap enumeration.
The DashStyle enumeration specifies the style of a dashed line drawn by the pen. Table 4.14 describes the members of the DashStyle enumeration.
|
Member |
Description |
|---|---|
|
Custom |
A user-defined custom dash style |
|
Dash |
A line consisting of dashes |
|
DashDot |
A line consisting of a repeating dash-dot pattern |
|
DashDotDot |
A line consisting of a repeating dash-dot-dot pattern of |
|
Dot |
A line consisting of dots |
|
Solid |
A solid line |
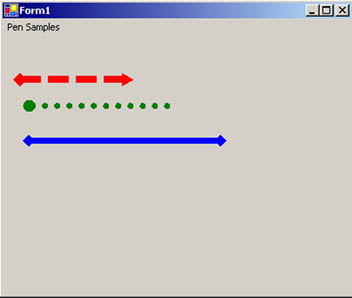
Listing 4.20 shows how to use various styles and properties of the Pen class to draw different kinds of dashed lines with different kinds of starting and ending caps. We use the DashStyle, SetLineCap, StartCap, and EndCap members of the Pen class to set the line dash style, line cap style, start cap style, and end cap style, respectively.
Listing 4.20 Using the Pen class to draw dashed lines
private void menuItem4_Click(object sender,
 System.EventArgs e)
{
 Graphics g = this.CreateGraphics();
 g.Clear(this.BackColor);
 // Create three pens
 Pen redPen = new Pen(Color.Red, 6);
 Pen bluePen = new Pen(Color.Blue, 7);
 Pen greenPen = new Pen(Color.Green, 7);
 redPen.Width = 8;
 // Set line styles
 redPen.DashStyle = DashStyle.Dash;
 redPen.SetLineCap(LineCap.DiamondAnchor,
 LineCap.ArrowAnchor, DashCap.Flat);
 greenPen.DashStyle = DashStyle.DashDotDot;
 greenPen.StartCap = LineCap.Triangle;
 greenPen.EndCap = LineCap.Triangle;
 greenPen.DashCap = DashCap.Triangle;
 greenPen.DashStyle = DashStyle.Dot;
 greenPen.DashOffset = 3.4f;
 bluePen.StartCap = LineCap.DiamondAnchor;
 bluePen.EndCap = LineCap.DiamondAnchor;
 greenPen.SetLineCap(LineCap.RoundAnchor,
 LineCap.Square, DashCap.Round);
 // Draw lines
 g.DrawLine(redPen, new Point(20, 50),
 new Point(150, 50));
 g.DrawLine(greenPen, new Point(30, 80),
 new Point(200, 80));
 g.DrawLine(bluePen, new Point(30, 120),
 new Point(250, 120));
 // Release resources. If you don't release
 // using Dispose, the GC (garbage collector)
 // takes care of it for you.
 redPen.Dispose();
 greenPen.Dispose();
 g.Dispose();
}
Figure 4.25 shows the output from Listing 4.20.
Figure 4.25. Drawing dashed lines with different cap styles
4.2.7 Drawing Other Graphics Shapes by Applying Cap and Dashed Line Styles
In the previous section we saw how to draw lines using cap and dash styles. But these styles are not limited to lines only. You can draw other graphics shapes, such as rectangles, ellipses, and curves, using the line cap and dash styles.
As in the previous section, here we will create a pen, set its line cap and line dash styles, and use itbut this time, drawing graphics shapes, rather than simple lines.
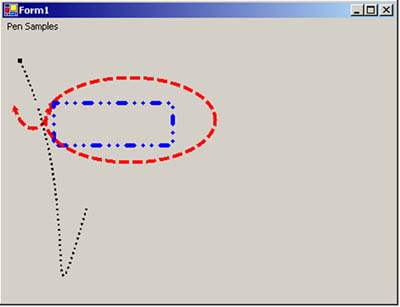
Listing 4.21 creates several pens and uses them to draw an arc, Bézier curve, rectangle, and ellipse with the help of the DrawArc, DrawBezier, DrawRectangle, and DrawEllipse methods of the Graphics class (see Chapter 3 for details).
Listing 4.21 Using different pens to draw various graphics objects
private void menuItem6_Click(object sender,
 System.EventArgs e)
{
 Graphics g = this.CreateGraphics();
 g.Clear(this.BackColor);
 Pen redPen = new Pen(
 new SolidBrush(Color.Red), 4);
 Pen bluePen = new Pen(
 new SolidBrush(Color.Blue), 5);
 Pen blackPen = new Pen(
 new SolidBrush(Color.Black), 3);
 // Set line styles
 redPen.DashStyle = DashStyle.Dash;
 redPen.SetLineCap(LineCap.DiamondAnchor,
 LineCap.ArrowAnchor, DashCap.Flat);
 bluePen.DashStyle = DashStyle.DashDotDot;
 bluePen.StartCap = LineCap.Triangle;
 bluePen.EndCap = LineCap.Triangle;
 bluePen.DashCap = DashCap.Triangle;
 blackPen.DashStyle = DashStyle.Dot;
 blackPen.DashOffset = 3.4f;
 blackPen.SetLineCap(LineCap.RoundAnchor,
 LineCap.Square, DashCap.Round);
 // Draw objects
 g.DrawArc(redPen, 10.0F, 10.0F, 50,
 100, 45.0F, 90.0F);
 g.DrawRectangle(bluePen, 60, 80, 140, 50);
 g.DrawBezier(blackPen, 20.0F, 30.0F,
 100.0F, 200.0F, 40.0F, 400.0F,
 100.0F, 200.0F);
 g.DrawEllipse(redPen, 50, 50, 200, 100 );
 // Dispose of objects
 redPen.Dispose();
 bluePen.Dispose();
 blackPen.Dispose();
 g.Dispose();
}
Figure 4.26 shows the output of Listing 4.21. All of the elements drawn have line cap and dash styles.
Figure 4.26. Graphics shapes with cap and dash styles
GDI+: The Next-Generation Graphics Interface
- GDI+: The Next-Generation Graphics Interface
- Understanding GDI+
- Exploring GDI+ Functionality
- GDI+ from a GDI Perspective
- GDI+ Namespaces and Classes in .NET
- Summary
Your First GDI+ Application
- Your First GDI+ Application
- Drawing Surfaces
- The Coordinate System
- Tutorial: Your First GDI+ Application
- Some Basic GDI+ Objects
The Graphics Class
- The Graphics Class
- Graphics Class Properties
- Graphics Class Methods
- The GDI+Painter Application
- Drawing a Pie Chart
Working with Brushes and Pens
- Working with Brushes and Pens
- Understanding and Using Brushes
- Using Pens in GDI+
- Transformation with Pens
- Transformation with Brushes
- System Pens and System Brushes
- A Real-World Example: Adding Colors, Pens, and Brushes to the GDI+Painter Application
Colors, Fonts, and Text
- Colors, Fonts, and Text
- Accessing the Graphics Object
- Working with Colors
- Working with Fonts
- Working with Text and Strings
- Rendering Text with Quality and Performance
- Advanced Typography
- A Simple Text Editor
- Transforming Text
Rectangles and Regions
- Rectangles and Regions
- The Rectangle Structure
- The Region Class
- Regions and Clipping
- Clipping Regions Example
- Regions, Nonrectangular Forms, and Controls
Working with Images
- Working with Images
- Raster and Vector Images
- Working with Images
- Manipulating Images
- Playing Animations in GDI+
- Working with Bitmaps
- Working with Icons
- Skewing Images
- Drawing Transparent Graphics Objects
- Viewing Multiple Images
- Using a Picture Box to View Images
- Saving Images with Different Sizes
Advanced Imaging
- Advanced Imaging
- Rendering Partial Bitmaps
- Working with Metafiles
- Color Mapping Using Color Objects
- Image Attributes and the ImageAttributes Class
- Encoder Parameters and Image Formats
Advanced 2D Graphics
- Advanced 2D Graphics
- Line Caps and Line Styles
- Understanding and Using Graphics Paths
- Graphics Containers
- Reading Metadata of Images
- Blending Explained
- Alpha Blending
- Miscellaneous Advanced 2D Topics
Transformation
- Transformation
- Coordinate Systems
- Transformation Types
- The Matrix Class and Transformation
- The Graphics Class and Transformation
- Global, Local, and Composite Transformations
- Image Transformation
- Color Transformation and the Color Matrix
- Matrix Operations in Image Processing
- Text Transformation
- The Significance of Transformation Order
Printing
- Printing
- A Brief History of Printing with Microsoft Windows
- Overview of the Printing Process
- Your First Printing Application
- Printer Settings
- The PrintDocument and Print Events
- Printing Text
- Printing Graphics
- Print Dialogs
- Customizing Page Settings
- Printing Multiple Pages
- Marginal Printing: A Caution
- Getting into the Details: Custom Controlling and the Print Controller
Developing GDI+ Web Applications
- Developing GDI+ Web Applications
- Creating Your First ASP.NET Web Application
- Your First Graphics Web Application
- Drawing Simple Graphics
- Drawing Images on the Web
- Drawing a Line Chart
- Drawing a Pie Chart
GDI+ Best Practices and Performance Techniques
- GDI+ Best Practices and Performance Techniques
- Understanding the Rendering Process
- Double Buffering and Flicker-Free Drawing
- Understanding the SetStyle Method
- The Quality and Performance of Drawing
GDI Interoperability
Miscellaneous GDI+ Examples
- Miscellaneous GDI+ Examples
- Designing Interactive GUI Applications
- Drawing Shaped Forms and Windows Controls
- Adding Copyright Information to a Drawn Image
- Reading and Writing Images to and from a Stream or Database
- Creating Owner-Drawn List Controls
Appendix A. Exception Handling in .NET
