Tutorial: Your First GDI+ Application
Tutorial Your First GDI+ Application
In this section you'll learn how to write your first GDI+ application, step-by-step. You will create a Windows application and draw a few simple objects, such as lines, rectangles, and ellipses, on a Windows Form.
Here are the steps we will cover:
- Creating a Windows application
- Adding references to the GDI+ library
- Obtaining the graphics surface
- Setting the graphics surface properties (optional)
- Drawing or filling graphics shapes
- Releasing objects
- Building and running the application
2.3.1 Creating a Windows Application
The first step of this tutorial is to create a Windows application using Visual Studio .NET.
- Open Visual Studio .NET, select File | New | Project, and then choose Visual C# Projects under Project Types and Windows Application under Templates, as shown in Figure 2.5.
Figure 2.5. Creating a Windows application
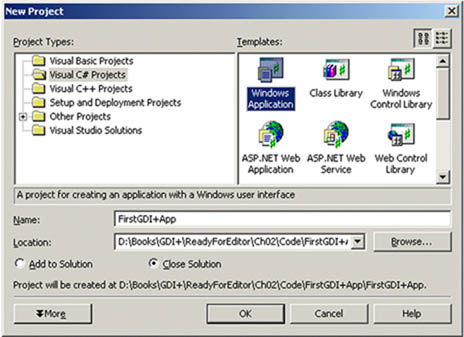
- Enter the application name, "FirstGDI+App", and click OK.
Note
Clicking the OK button creates a Windows application with a form and opens the Form Designer, in which you can build Windows applications.
2.3.2 Adding a Reference to GDI+
As mentioned in Chapter 1, GDI+ functionality resides in the System.Drawing.dll namespace and is defined in the System.Drawing namespace. Hence the System.Drawing namespace must be included in the application. Visual Studio .NET automatically adds a reference to this namespace, which you can see in the beginning of the class. If the namespace is not defined there, you must add a reference manually. To add a reference to the GDI+ library, you use the Add Reference dialog.
- Open the Add Reference dialog by selecting Project | Add Reference.
- Select the System.Drawing.dll assembly from the libraries listed under the .NET tab.
- Click the Select button to add the library to the Selected Components list, as shown in Figure 2.6.
Figure 2.6. Adding a reference to System.Drawing.dll

- Click the OK button to add the System.Drawing namespace reference to your project.
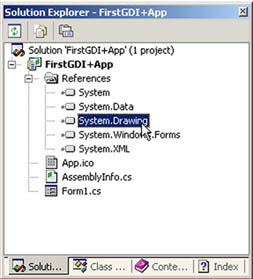
- Go to the Solution Explorer window and expand the References node. The System.Drawing namespace is listed there Figure 2.7).
Figure 2.7. The System.Drawing namespace in a project
Note
Visual Studio .NET version 1.0 (or later) automatically adds a reference to the System.Drawing.dll library. In that case, you may not need to add a reference to the library.
- After adding a reference to System.Drawing.dll, you must import System.Drawing and other related namespaces, depending on the classes your application will use. For now, we will import the System.Drawing and System.Drawing.Drawing2D namespaces. We add the following two lines to the top of our class:
using System.Drawing;
using System.Drawing.Drawing2D;
You can also qualify a namespace reference by directly adding it as a prefix of the class. For example, if you don't want to use the using statements defined here, you can define a class as follows:
System.Drawing.Graphics g = e.Graphics;
Note
If you create a Windows application using VS.NET, only the line using System.Drawing.Drawing2D needs to be written because using System.Drawing will already be there.
2.3.3 Getting a Graphics Object in an Application
After adding a GDI+ library reference to the project, the next step is to decide on a drawing surface. In a Windows application, a form is a drawing surface. Every form has a Graphics object associated with it, which provides the drawing functionality.
In the .NET Framework, the Graphics class represents a GDI+ Graphics object, which defines methods and properties to draw and fill graphics objects. Whenever an application needs to draw anything, it must go through the Graphics object.
Caution
There is no way to create a Graphics object using the new operator. For example, if you write the following code, you will get a compiler error:
Graphics g = new Graphics ()
There are several ways to obtain a Graphics object associated with a form. Three of them are described in the following sections.
2.3.3.1 Using the Paint Event of a Form
You can get a Graphics object corresponding to a form using the PaintEventArgs property of the form's paint event. For example, the following code gets a Graphics object from PaintEventArgs:
private void form1_Paint(object sender, PaintEventArgs e)
{
 Graphics g = e.Graphics;
}
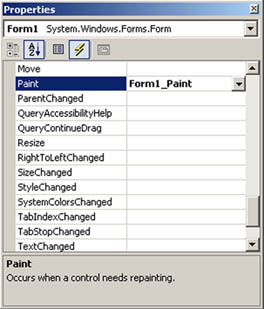
You can add the form's paint event handler using the Properties window. As Figure 2.8 shows, we add Form1_Paint (the default name) as the paint event handler.
Figure 2.8. Adding the Form_Paint event handler
Tip
Double-clicking in the paint event drop-down menu in the Properties window also adds the event handler.
2.3.3.2 Overriding the OnPaint Method
Another way to get a Graphics object associated with a form is to override the OnPaint method of the form, which uses PaintEventArgs in a manner similar to the Form1_Paint event. The following code snippet overrides the OnPaint method of a form:
protected override void OnPaint(PaintEventArgs e)
{
 Graphics g = e.Graphics;
}
2.3.3.3 Using Other Methods
Sometimes you don't want to use the OnPaint method. For example, you might want to draw something on a button or a menu click event handler. The Form class provides the CreateGraphics method, which returns a Graphics object. The following code snippet creates a Graphics object using the CreateGraphics method and calls a method of the Graphics class:
Graphics g = this.CreateGraphics();
g.Clear(this.BackColor);
g.Dispose();
As this snippet shows, we call the Clear method of the Graphics class, which sets the background color of the surface as the background color of the form.
Caution
When you create a Graphics object using the CreateGraphics method, you must dispose of that object explicitly by calling the Dispose method to release the resources associated with it.
You can also use the FromImage, FromHwnd, and FromHdc static methods of the Graphics class to create Graphics objects from images, window handles, and window handles to device contexts, respectively. We will discuss these methods in more detail in Chapter 3 (Section 3.2.3.3 ).
The following code creates a Bitmap object and calls the static FromImage method, using a Bitmap object as an input parameter, which returns a Graphics object.
Bitmap bmp =
 new Bitmap(600,400,PixelFormat.Format32bppArgb);
Graphics g = Graphics.FromImage(bmp);
The following code creates a Graphics object from a window handle. In this example, this refers to a Windows Form. You can even pass Form1.Handle if your form is Form1.
Graphics g = Graphics.FromHwnd(this.Handle);
2.3.4 Creating Pens and Brushes
Once you have a Graphics object, the next step is to decide what you're going to draw on the surface. You may need one or more of the three objects: pen, brush, or image. In this chapter we will concentrate on pens and brushes only. Images are discussed in Chapters 7 and 8.
In GDI+ the Pen and Brush classes represent a pen and a brush, respectively. The abstract Brush class functionality is accessed through its derived classes: SolidBrush and HatchBrush, among others. Pens are used when you need to draw lines, rectangles, and curve boundaries. Brushes are used when you need to fill graphics objects. Chapter 4 discusses pens and brushes in detail.
The Pen class constructor takes as arguments the color and width of the pen. The following code creates a red pen with a width of 3 pixels and a black pen with a width of 1 pixel. The Pens class provides static members, each of which represents a pen with a particular color.
Pen redPen = new Pen(Color.Red, 3);
Pen blackPen = Pens.Black;
The SolidBrush class represents a solid brush in GDI+. This class's constructor takes a color as an argument. The following code creates a green solid brush.
SolidBrush greenBrush = new SolidBrush(Color.Green);
2.3.5 Drawing Graphics Shapes
Once you have the surface, pens, and/or brushes, you can draw lines, shapes, curves, or images. The Graphics class provides draw and fill methods to draw and fill graphics shapes, curves, or images. For example, the FillRectangle method draws a rectangle with a filled color, and DrawRectangle draws the boundary of a rectangle with the specified pen. Draw methods take a pen as an argument, and fill methods take a brush.
We override the OnPaint method and write the code in Listing 2.1 on this method. As Listing 2.1 shows, we first set the smoothing mode of the Graphics object by setting its SmoothingMode property. The SmoothingMode enumeration is defined in the System.Drawing.Advanced2D namespace and is used to set the quality of a graphics object. In our code, we set the smoothing mode to anti-aliasing. We will discuss this in more detail in Chapters 8 and 9.
After that we create a rectangle, two pens, and a solid brush. In the next code snippet, we call the DrawRectangle, FillEllipse, and DrawLine methods. The DrawRectangle method draws the boundaries of a rectangle, the FillEllipse method fills an ellipse with the specified brush, and the DrawLine method draws a line using the specified pen. Chapter 3 will discuss the fill and draw methods in more detail.
Listing 2.1 Drawing lines, rectangles, and ellipses
protected override void OnPaint(PaintEventArgs e)
{
 // Obtain the Graphics object
 Graphics g = e.Graphics;
 // Set the smoothing mode of the surface
 g.SmoothingMode = SmoothingMode.AntiAlias;
 // Create a rectangle with height 100 and width 100
 Rectangle rect = new Rectangle(20, 20, 100, 100);
 // Create two Pen objects, one red and one black
 Pen redPen = new Pen(Color.Red, 3);
 Pen blackPen = Pens.Black;
 // Create a SolidBrush object
 SolidBrush greenBrush = new SolidBrush(Color.Green);
 // Draw shapes and lines
 g.DrawRectangle(redPen, rect);
 g.FillEllipse(greenBrush, rect);
 g.DrawLine(blackPen, 0, 250, this.Width, 250);
 g.FillEllipse(Brushes.Blue, 70, 220, 30, 30);
 g.FillEllipse(Brushes.SkyBlue, 100, 210, 40, 40);
 g.FillEllipse(Brushes.Green, 140, 200, 50, 50);
 g.FillEllipse(Brushes.Yellow, 190, 190, 60, 60);
 g.FillEllipse(Brushes.Violet, 250, 180, 70, 70);
 g.FillEllipse(Brushes.Red, 320, 170, 80, 80);
}
2.3.6 Releasing Objects
When you are done using objects, you must release them. In the .NET Framework library, most objects provide a Dispose method, which can be used to dispose of an object. The Dispose method makes sure that all resources allocated for an object are released.
The following code snippet creates Pen and SolidBrush objects as redPen and greenBrush, respectively:
Pen redPen = new Pen(Color.Red, 3);
SolidBrush greenBrush = new SolidBrush(Color.Green);
When you are done with these objects, call the Dispose method to release the resources allocated with them. For example, the following code snippet disposes of the redPen and greenBrush objects:
redPen.Dispose();
greenBrush.Dispose();
Now we will Dispose of the previously created objects using the Dispose method to the objects we created in Listing 2.1, as shown in Listing 2.2. (Boldface lines are the new lines added to the listing.)
Listing 2.2 Using Dispose calls
protected override void OnPaint(PaintEventArgs e)
{
 // Obtain the Graphics object
 Graphics g = e.Graphics;
 // Set the composite quality and smoothing mode
 // of the surface
 g.SmoothingMode = SmoothingMode.AntiAlias;
 // Create a rectangle from point (20, 20) to (100, 100)
 Rectangle rect = new Rectangle(20, 20, 100, 100);
 // Create two Pen objects, one red and one black
 Pen redPen = new Pen(Color.Red, 3);
 Pen blackPen = Pens.Black;
 // Create a SolidBrush object
 SolidBrush greenBrush = new SolidBrush(Color.Green);
 // Draw shapes and lines
 g.DrawRectangle(redPen, rect);
 g.FillEllipse(greenBrush, rect);
 g.DrawLine(blackPen, 0, 250, this.Width, 250);
 g.FillEllipse(Brushes.Blue, 70, 220, 30, 30);
 g.FillEllipse(Brushes.SkyBlue, 100, 210, 40, 40);
 g.FillEllipse(Brushes.Green, 140, 200, 50, 50);
 g.FillEllipse(Brushes.Yellow, 190, 190, 60, 60);
 g.FillEllipse(Brushes.Violet, 250, 180, 70, 70);
 g.FillEllipse(Brushes.Red, 320, 170, 80, 80);
 // Dispose of objects
 greenBrush.Dispose();
 // blackPen.Dispose();
 redPen.Dispose();
 g.Dispose();
}
2.3.7 Building and Running the Application
The final step in creating an application is to build and run it. To do this, in Visual Studio .NET you can simply select Debug | Start (F5) or Debug | Start Without Debugging (Ctrl+F5).
The output of the application looks like Figure 2.9. The application draws a line, a rectangle, and some ellipses with different colors.
Figure 2.9. Your first GDI+ application

Congratulations! You have finished the first step toward becoming a GDI+ expert. Now you can write simple graphics applications in Visual Studio .NET.
GDI+: The Next-Generation Graphics Interface
- GDI+: The Next-Generation Graphics Interface
- Understanding GDI+
- Exploring GDI+ Functionality
- GDI+ from a GDI Perspective
- GDI+ Namespaces and Classes in .NET
- Summary
Your First GDI+ Application
- Your First GDI+ Application
- Drawing Surfaces
- The Coordinate System
- Tutorial: Your First GDI+ Application
- Some Basic GDI+ Objects
The Graphics Class
- The Graphics Class
- Graphics Class Properties
- Graphics Class Methods
- The GDI+Painter Application
- Drawing a Pie Chart
Working with Brushes and Pens
- Working with Brushes and Pens
- Understanding and Using Brushes
- Using Pens in GDI+
- Transformation with Pens
- Transformation with Brushes
- System Pens and System Brushes
- A Real-World Example: Adding Colors, Pens, and Brushes to the GDI+Painter Application
Colors, Fonts, and Text
- Colors, Fonts, and Text
- Accessing the Graphics Object
- Working with Colors
- Working with Fonts
- Working with Text and Strings
- Rendering Text with Quality and Performance
- Advanced Typography
- A Simple Text Editor
- Transforming Text
Rectangles and Regions
- Rectangles and Regions
- The Rectangle Structure
- The Region Class
- Regions and Clipping
- Clipping Regions Example
- Regions, Nonrectangular Forms, and Controls
Working with Images
- Working with Images
- Raster and Vector Images
- Working with Images
- Manipulating Images
- Playing Animations in GDI+
- Working with Bitmaps
- Working with Icons
- Skewing Images
- Drawing Transparent Graphics Objects
- Viewing Multiple Images
- Using a Picture Box to View Images
- Saving Images with Different Sizes
Advanced Imaging
- Advanced Imaging
- Rendering Partial Bitmaps
- Working with Metafiles
- Color Mapping Using Color Objects
- Image Attributes and the ImageAttributes Class
- Encoder Parameters and Image Formats
Advanced 2D Graphics
- Advanced 2D Graphics
- Line Caps and Line Styles
- Understanding and Using Graphics Paths
- Graphics Containers
- Reading Metadata of Images
- Blending Explained
- Alpha Blending
- Miscellaneous Advanced 2D Topics
Transformation
- Transformation
- Coordinate Systems
- Transformation Types
- The Matrix Class and Transformation
- The Graphics Class and Transformation
- Global, Local, and Composite Transformations
- Image Transformation
- Color Transformation and the Color Matrix
- Matrix Operations in Image Processing
- Text Transformation
- The Significance of Transformation Order
Printing
- Printing
- A Brief History of Printing with Microsoft Windows
- Overview of the Printing Process
- Your First Printing Application
- Printer Settings
- The PrintDocument and Print Events
- Printing Text
- Printing Graphics
- Print Dialogs
- Customizing Page Settings
- Printing Multiple Pages
- Marginal Printing: A Caution
- Getting into the Details: Custom Controlling and the Print Controller
Developing GDI+ Web Applications
- Developing GDI+ Web Applications
- Creating Your First ASP.NET Web Application
- Your First Graphics Web Application
- Drawing Simple Graphics
- Drawing Images on the Web
- Drawing a Line Chart
- Drawing a Pie Chart
GDI+ Best Practices and Performance Techniques
- GDI+ Best Practices and Performance Techniques
- Understanding the Rendering Process
- Double Buffering and Flicker-Free Drawing
- Understanding the SetStyle Method
- The Quality and Performance of Drawing
GDI Interoperability
Miscellaneous GDI+ Examples
- Miscellaneous GDI+ Examples
- Designing Interactive GUI Applications
- Drawing Shaped Forms and Windows Controls
- Adding Copyright Information to a Drawn Image
- Reading and Writing Images to and from a Stream or Database
- Creating Owner-Drawn List Controls
Appendix A. Exception Handling in .NET
- Chapter VII Objective and Perceived Complexity and Their Impacts on Internet Communication
- Chapter IX Extrinsic Plus Intrinsic Human Factors Influencing the Web Usage
- Chapter XII Web Design and E-Commerce
- Chapter XVII Internet Markets and E-Loyalty
- Chapter XVIII Web Systems Design, Litigation, and Online Consumer Behavior
