Advanced Typography
Besides the text functionality defined in the System.Drawing namespace, the .NET Framework class library defines more advanced typography functionality in the System.Drawing.Text namespace. As usual, before using any of the System.Drawing.Text classes or other objects, you need to add a namespace reference to the project.
The System.Drawing.Text namespace provides three font collection classes: FontCollection, InstalledFontCollection, and PrivateFontCollection. The FontCollection class works as a base class for the other two classes and provides a property (Families) that returns an array containing a list of all font families in the collection.
The InstalledFontCollection class represents all the fonts installed on the system. The Families property returns a collection of all font families available on the system.
Note
Before using any of the System.Drawing.Text namespace classes, an application must add a reference to the namespace with the "using" directive:
using System.Drawing.Text;
Alternatively, you can qualify a class using the namespace as a prefix.
5.6.1 Getting All Installed Fonts on a System
As stated in the previous section, the InstalledFontCollection class represents all available font families on a system. The Families property returns an array of FontFamily type.
Listing 5.13 returns all available fonts on a system. To test this application, add a combo box to a form and write this code on the form-load event handler or a button or menu click event handler. using System.Drawing.Text Before executing this code, an application must add the following line:
using System.Drawing.Text
Listing 5.13 Using InstalledFontCollection to get all installed fonts on a system
// Create InstalledFontCollection object
InstalledFontCollection
 sysFontCollection = new InstalledFontCollection();
// Get the array of FontFamily objects
FontFamily[] fontFamilies = sysFontCollection.Families;
// Read all font familes and add to the combo box
for(int i = 0; i < fontFamilies.Length; ++i)
{
 comboBox1.Items.Add(fontFamilies[i].Name);
}
5.6.2 Private Font Collection
The PrivateFontCollection class is used to create a private collection of fonts, for use only by your application. A private collection may include the fonts available on a system, as well as fonts that are not installed on the system. Such a collection is useful when you want to use third-party fonts. The AddFontFile method is used to add a font file to the collection. The AddMemoryFont method reads fonts from system memory and adds them to the collection. The IsStyleAvailable method, which takes a FontStyle enumeration value, indicates whether a style is available.
Normally all system fonts are installed in your WindowsFonts directory. On our test machine, all fonts are installed in the directory C:WinNTFonts. You can also browse and add fonts from other locations to a private font collection by passing the full path of the font file in the AddFontFile method. For example, the following code snippet adds four fonts to a private font collection.
// Create a private font collection
PrivateFontCollection pfc =
 new PrivateFontCollection();
// Add font files to the private font collection
pfc.AddFontFile("tekhead.ttf");
pfc.AddFontFile("DELUSION.TTF");
pfc.AddFontFile("HEMIHEAD.TTF");
pfc.AddFontFile("C:\WINNT\Fonts\Verdana.ttf");
In this code we add four fonts to the private font collection. Verdana is available on all machines. The other three fonts can be downloaded from http://www.fontfreak.com (click Enter on site's home page to access naviagation area).
You can even add styles to an existing font. In Listing 5.14 we add four fonts to the private font collection with the AddFontFile method. Then we see if these font families have different styles. If not, we add new styles to the font families and draw text using the new fonts. In the end, we print out the font name on the form.
Listing 5.14 Using the PrivateFontCollection class
private void menuItem2_Click(object sender,
 System.EventArgs e)
{
 Graphics g = this.CreateGraphics();
 PointF pointF = new PointF(10, 20);
 string fontName;
 // Create a private font collection
 PrivateFontCollection pfc =
 new PrivateFontCollection();
 // Add font files to the private font collection
 pfc.AddFontFile("tekhead.ttf");
 pfc.AddFontFile("DELUSION.TTF");
 pfc.AddFontFile("HEMIHEAD.TTF");
 // MAKE SURE YOU HAVE THE Verdana.ttf FILE IN THE SPECIFIED
 // FOLDER, OR CHANGE THE FOLDER LOCATION
pfc.AddFontFile("C:\WINNT\Fonts\Verdana.ttf");
 // Return all font families from the collection
 FontFamily[] fontFamilies = pfc.Families;
 // Get font families one by one,
 // add new styles, and draw
 // text using DrawString
 for(int j = 0; j < fontFamilies.Length; ++j)
 {
 // Get the font family name
 fontName = fontFamilies[j].Name;

 if(fontFamilies[j].IsStyleAvailable(
 FontStyle.Italic) &&
 fontFamilies[j].IsStyleAvailable(
 FontStyle.Bold) &&
 fontFamilies[j].IsStyleAvailable(
 FontStyle.Underline) &&
 fontFamilies[j].IsStyleAvailable(
 FontStyle.Strikeout) )
 {
 // Create a font from the font name
 Font newFont = new Font(fontName,
 20, FontStyle.Italic | FontStyle.Bold
 |FontStyle.Underline, GraphicsUnit.Pixel);
 // Draw string using the current font
 g.DrawString(fontName, newFont,
 new SolidBrush(Color.Red), pointF);
 // Set location
 pointF.Y += newFont.Height;
 }
 }
 // Dispose of object
 g.Dispose();
}
Note
You may need to change the directory path in Listing 5.14 to match your machine.
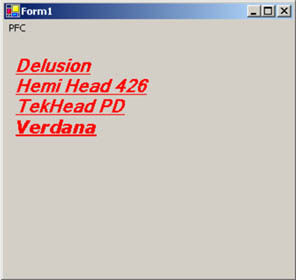
To test Listing 5.14, create a Windows application and insert the sample code on the form-paint, a button click, or a menu click event handler, and run the application. Figure 5.18 shows the ouput of the application. All the available fonts in the private font collection are listed.
Figure 5.18. Using a private font collection
GDI+: The Next-Generation Graphics Interface
- GDI+: The Next-Generation Graphics Interface
- Understanding GDI+
- Exploring GDI+ Functionality
- GDI+ from a GDI Perspective
- GDI+ Namespaces and Classes in .NET
- Summary
Your First GDI+ Application
- Your First GDI+ Application
- Drawing Surfaces
- The Coordinate System
- Tutorial: Your First GDI+ Application
- Some Basic GDI+ Objects
The Graphics Class
- The Graphics Class
- Graphics Class Properties
- Graphics Class Methods
- The GDI+Painter Application
- Drawing a Pie Chart
Working with Brushes and Pens
- Working with Brushes and Pens
- Understanding and Using Brushes
- Using Pens in GDI+
- Transformation with Pens
- Transformation with Brushes
- System Pens and System Brushes
- A Real-World Example: Adding Colors, Pens, and Brushes to the GDI+Painter Application
Colors, Fonts, and Text
- Colors, Fonts, and Text
- Accessing the Graphics Object
- Working with Colors
- Working with Fonts
- Working with Text and Strings
- Rendering Text with Quality and Performance
- Advanced Typography
- A Simple Text Editor
- Transforming Text
Rectangles and Regions
- Rectangles and Regions
- The Rectangle Structure
- The Region Class
- Regions and Clipping
- Clipping Regions Example
- Regions, Nonrectangular Forms, and Controls
Working with Images
- Working with Images
- Raster and Vector Images
- Working with Images
- Manipulating Images
- Playing Animations in GDI+
- Working with Bitmaps
- Working with Icons
- Skewing Images
- Drawing Transparent Graphics Objects
- Viewing Multiple Images
- Using a Picture Box to View Images
- Saving Images with Different Sizes
Advanced Imaging
- Advanced Imaging
- Rendering Partial Bitmaps
- Working with Metafiles
- Color Mapping Using Color Objects
- Image Attributes and the ImageAttributes Class
- Encoder Parameters and Image Formats
Advanced 2D Graphics
- Advanced 2D Graphics
- Line Caps and Line Styles
- Understanding and Using Graphics Paths
- Graphics Containers
- Reading Metadata of Images
- Blending Explained
- Alpha Blending
- Miscellaneous Advanced 2D Topics
Transformation
- Transformation
- Coordinate Systems
- Transformation Types
- The Matrix Class and Transformation
- The Graphics Class and Transformation
- Global, Local, and Composite Transformations
- Image Transformation
- Color Transformation and the Color Matrix
- Matrix Operations in Image Processing
- Text Transformation
- The Significance of Transformation Order
Printing
- Printing
- A Brief History of Printing with Microsoft Windows
- Overview of the Printing Process
- Your First Printing Application
- Printer Settings
- The PrintDocument and Print Events
- Printing Text
- Printing Graphics
- Print Dialogs
- Customizing Page Settings
- Printing Multiple Pages
- Marginal Printing: A Caution
- Getting into the Details: Custom Controlling and the Print Controller
Developing GDI+ Web Applications
- Developing GDI+ Web Applications
- Creating Your First ASP.NET Web Application
- Your First Graphics Web Application
- Drawing Simple Graphics
- Drawing Images on the Web
- Drawing a Line Chart
- Drawing a Pie Chart
GDI+ Best Practices and Performance Techniques
- GDI+ Best Practices and Performance Techniques
- Understanding the Rendering Process
- Double Buffering and Flicker-Free Drawing
- Understanding the SetStyle Method
- The Quality and Performance of Drawing
GDI Interoperability
Miscellaneous GDI+ Examples
- Miscellaneous GDI+ Examples
- Designing Interactive GUI Applications
- Drawing Shaped Forms and Windows Controls
- Adding Copyright Information to a Drawn Image
- Reading and Writing Images to and from a Stream or Database
- Creating Owner-Drawn List Controls
Appendix A. Exception Handling in .NET
- Linking the IT Balanced Scorecard to the Business Objectives at a Major Canadian Financial Group
- Technical Issues Related to IT Governance Tactics: Product Metrics, Measurements and Process Control
- Governing Information Technology Through COBIT
- Governance in IT Outsourcing Partnerships
- The Evolution of IT Governance at NB Power
