L2TPv3 Overview
L2TPv3 is the successor to the Cisco proprietary implementation of universal tunnel interface (UTI) for Layer 2 tunneling and implementation of Layer 2 VPNs. L2TPv3 accounts for signaling capabilities that were not implemented in the initial UTI implementations. In addition, L2TPv3 is a standardized implementation, depicted in the L2TPv3 draft draft-ietf-l2tpext-l2tp-base-xx, that defines the control protocol as well as the encapsulation procedures for tunneling multiple Layer 2 connections between two IP connected nodes. This extension to L2TP provides the capabilities to tunnel Layer 2 payloads over L2TP. L2TPv3 provides a scalable solution to deploy multiple Layer 2 VPNs over existing IP infrastructure and is emerging as the core tunneling technology for next generation IP core networks. With inherent ease of migration from existing UTI tunnels to L2TPv3, service providers implementing Layer 2 VPN services with UTI have migrated to L2TPv3 as the protocol of choice for implementing transparent Layer 2 services.
Operation of L2TPv3
If two routers, PE1-AS1 and PE2-AS1, are already connected through an IP network as illustrated in Figure 10-1, L2TPv3 can be used to provide Layer 2 VPN services between interfaces connecting to routers PE1-AS1 and PE2-AS1 that belong to Customer A. Therefore, the CE Routers CE1-A and CE2-A can be connected via the SP network where L2TPv3 can be used to provide a transparent tunnel or Layer 2 VPN between these two customer routers.
Figure 10-1. Implementing L2TPv3 Layer 2 Transparent Services
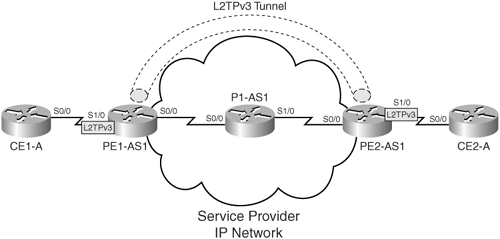
Figure 10-1 also highlights the interfaces that are part of the tunnel. On PE1-AS1, the interface connecting to CE1-A is configured as part of the L2TPv3 tunnel, and, on PE2-AS1, the interface connecting to CE2-A is configured as part of the L2TPv3 tunnel. Traffic from CE1-A to CE2-A entering Serial1/0 on PE1-AS1 is encapsulated in an L2TPv3 tunnel and forwarded to PE2-AS1. PE2-AS1, upon packet reception, decapsulates the packet and transmits the same on Serial1/0, which is configured as an endpoint of the tunnel. The routers in the core of the IP network forward this information as they would a regular IP packet, and the payload containing the information being transmitted across the tunnel is processed only on egress from the IP network.
When L2TPv3 is implemented, the physical interfaces that are connected to the customer's networks are used as the tunnel ingress and egress interfaces. L2TPv3 can also provide transparent LAN services between customer LAN segments connecting to different service provider routers. L2TPv3 can thus be used to tunnel traffic between the two separated LANs across the SP network.
L2TPv3 can also be used on serial and POS interfaces and on VLAN-based subinterfaces on certain platforms supporting L2TPv3. Frame Relay encapsulation on serial interfaces is supported for L2TPv3 tunneling based Layer 2 connectivity. For more information on supported interfaces for implementation of L2TPv3 tunnels and line card support, refer to Cisco documentation at Cisco.com.
Note
L2TPv3 is supported as a tunneling protocol on the following Cisco routers:
- Cisco 12000 gigabit switch routers
- Cisco 7500 series routers
- Cisco 7200 series routers
- Cisco 10700 Internet routers
For more information on platform and software support, refer to Cisco.com for the latest information and updates.
L2TPv3 Modes of Operation
The following modes of operation are supported when implementing L2TPv3 as the tunneling mechanism to deploy Layer 2 transparent services:
- Raw mode – In raw mode, information received on a physical interface is tunneled without regard to the type of information. Therefore, in raw mode, a physical interface is associated with the endpoints of the tunnel. The key to this implementation is that the physical interfaces associated with the tunnel as the endpoints must be of the same type. The interfaces supported in raw mode are serial, Packet over SONET, and Ethernet interfaces.
- Ethernet – Ethernet interfaces or virtual LAN segments can be extended from one site to another by using L2TPv3 tunneling technology. Therefore, either the physical interface (raw mode) or the VLAN subinterfaces can be mapped to L2TPv3 tunnels, and, thus, connectivity at Layer 2 is established across the SP infrastructure. Support for VLAN subinterfaces at this juncture is only provided on Cisco 10720 Internet routers. All other chassis support only raw mode where the physical interface is mapped to an L2TPv3 tunnel.
- Frame relay – If a Frame Relay subinterface is associated with an L2TPv3 tunnel, the tunnel parameters must be unique in relation to the subinterface; that is, a one-to-one mapping must exist between the Frame Relay subinterface to the tunnel. In addition, the DLCI used at the ingress and egress routers for interfaces mapped to the same L2TPv3 tunnel must be the same. The support for Frame Relay encapsulation on the physical interface is similar to the raw mode operation, wherein a packet arriving on an ingress router's physical interface is encapsulated and sent to the egress router's physical interface mapped to the tunnel without regard to the actual contents of the payload.
- ATM modes – ATM AAL5 OAM Emulation over L2TPv3 binds the PVC to an xconnect attachment circuit to forward ATM AAL5 frames over an established L2TPv3 pseudowire. ATM port mode cell relay over L2TPv3 enables ATM cells coming into an ingress ATM interface to be packed into the L2TP packets and transported to the egress ATM interface (tunnel endpoint). ATM Cell Packing over L2TPv3 enhances throughput and uses bandwidth more efficiently than the ATM cell relay function. Instead of packing a single ATM cell into each L2TPv3 data packet, multiple ATM cells can be packed into a single L2TPv3 data packet. ATM cell packing is supported for port mode, VP mode, and VC mode. Cell packing must be configured on the PE devices, and no additional configuration is required on the CE routers connecting into the SP infrastructure. ATM Single Cell Relay VC Mode over L2TPv3 enables mapping of a single VC to an L2TPv3 session. All ATM cells arriving on the ATM interface with the specified VPI and VCI are encapsulated into a single L2TP packet. ATM single cell relay VC mode can carry any type of AAL traffic over the Layer 2 VPN tunnel.
L2TPv3 Prerequisites
To implement L2TPv3 on Cisco routers, the following general prerequisites apply:
- CEF must be enabled on the interfaces that function as L2TPv3 endpoints.
- A loopback interface must be configured as the source and destination interface associated with the L2TPv3 tunnel.
- The number of tunnels that can be configured on a router that map to a PPP, HDLC, Ethernet, or dot1q VLAN is limited by the number of interface descriptor blocks that the router can support as each tunnel consumes an IDB.
- A tunnel server card is a requirement on a Cisco 12000 series router for implementing L2TPv3 tunnels. Cisco recommends the use of the OC48 POS Line Card for use as the tunnel server card for implementing L2TPv3 tunnels.
In addition to these general prerequisites, restrictions exist for the implementation of L2TPv3 on Cisco high-end platforms, depending on the platform in use (Cisco 12000, 7200, 7500, or 10720 Internet routers). Refer to the online documentation at Cisco.com for more information on platform and interface encapsulation specific restrictions.
Tunnel Server Card Operation on GSR 12000 Series Routers When Implementing L2TPv3
The tunnel server card performs the action of packet encapsulation and decapsulation when L2TPv3 is implemented on a Cisco 12000 series router. The data plane operations of the tunnel server card on a Cisco 12000 series router, both ingress into the tunnel (encapsulation) as well as egress out of the tunnel (decapsulation), are described in Figure 10-2.
Figure 10-2. Tunnel Server Card Operation – Ingress and Egress
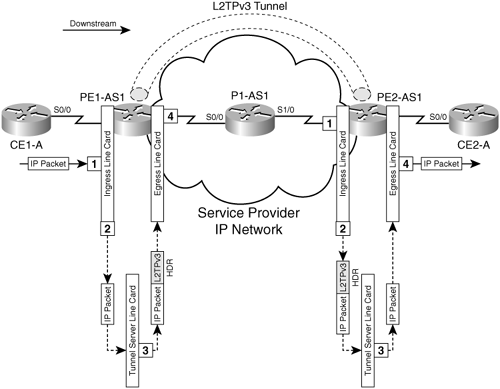
Figure 10-2 outlines the stages and the operation of a tunnel server card in a GSR 12000 series router on the ingress PE router PE1-AS1. The stages are
- An IP packet enters the interface that is part of the L2TPv3 tunnel (interface connected to customer router CE1-A).
- The IP packet is forwarded to the tunnel server card for encapsulation.
- The tunnel server card receives the IP packet and applies an L2TPv3 header on the IP packet on ingress into the tunnel server card. The contents of the L2TPv3 header and the format of the same will be discussed in the next section. The encapsulated packet is forwarded to the egress line card.
- The egress line card receives the encapsulated packet and forwards the encapsulated packet to the tunnel destination.
The stages in the operation of a tunnel server card on the egress router PE2-AS1 (L2TPv3 destination) are as follows:
- When the packet arrives at the ingress line card, a regular IP lookup is performed on the packet. If the lookup points to the loopback address that is used for the IP address of the tunneled interface, then the packet is forwarded to the tunnel server card.
- The L2TPv3 encapsulated packet is forwarded to the tunnel server card after IP lookup.
- The tunnel server card receives the encapsulated packet, and the packet is checked for a valid session ID and matching L2TPv3 key (part of the L2TPv3 header that will be covered in the next section). If the parameters match, the tunnel server card removes the IP and L2TPv3 headers and forwards the decapsulated packet to the egress line card.
- The packet is forwarded out the interface that is a part of the customer network (interface connected to customer Router CE2-A).
L2TPv3 Header Format
Figure 10-3 shows the L2TPv3 header used to encapsulate packets when using L2TPv3 tunnels.
Figure 10-3. L2TPv3 Header Format

In the L2TPv3 header, the session identifier identifies the tunnel context at the decapsulating router. The session ID of 0 is reserved for use by the protocol. Static L2TPv3 sessions need manual configuration of session ID on the PE routers. However, for dynamic L2TPv3 tunnel setup, the session IDs can be chosen depending on the number of tunnels that are supported by the router in question. Therefore, a smaller number of bits might be used by the router to depict a session ID to support a larger number of unique sessions.
The cookie contains the key for the L2TPv3 session. The cookie length can be configured on a router, but the default value for the cookie length is 4 bytes. When the originating and terminating routers are different platforms, the cookie length needs to be configured manually to be 4 bytes.
Pseudowire control encapsulation consists of 4 bytes and implements sequencing with the L2TPv3 tunnel. It uses only the first bit and bits 8 through 31. The value of the first bit defines if bits 8 through 31 contain a sequence number and if it needs to be updated.
MPLS Overview
- MPLS Overview
- Unicast IP Forwarding in Traditional IP Networks
- Overview of MPLS Forwarding
- MPLS Terminology
- MPLS Control and Data Plane Components
- MPLS Operation
- Special Outgoing Label Types
- Penultimate Hop Popping
- Frame-Mode MPLS
- Cell-Mode MPLS
Basic MPLS Configuration
- Basic MPLS Configuration
- Frame-Mode MPLS Configuration and Verification
- Cell-Mode MPLS over ATM Overview, Configuration, and Verification
- Command Reference
Basic MPLS VPN Overview and Configuration
- Basic MPLS VPN Overview and Configuration
- VPN Categories
- MPLS VPN Architecture and Terminology
- MPLS VPN Routing Model
- MPLS VPN Basic Configuration
- Outbound Route Filters
- Command Reference
PE-CE Routing Protocol-Static and RIP
- PE-CE Routing Protocol-Static and RIP
- Static PE-CE Routing Overview, Configuration, and Verification
- Static PE-CE Routing Command Reference
- RIPv2 PE-CE Routing Overview, Configuration, and Verification
- RIPv1 PE-CE Routing Configuration and Verification
- RIP PE-CE Routing Command Reference
PE-CE Routing Protocol-OSPF and EIGRP
- PE-CE Routing Protocol-OSPF and EIGRP
- OSPF PE-CE Routing Protocol Overview, Configuration and Verification
- EIGRP PE-CE Routing Protocol Overview, Configuration, and Verification
Implementing BGP in MPLS VPNs
- Implementing BGP in MPLS VPNs
- BGP PE-CE Routing Protocol Overview, Configuration, and Verification
- Implementing Route-Reflectors in MPLS VPN Networks
- Case Study-Hub and Spoke MPLS VPN Network Using BGP PE-CE Routing for Sites Using Unique AS Numbers
- Case Study-Hub and Spoke MPLS VPN Network with Sites Using Same AS Numbers
- Command Reference
Inter-Provider VPNs
- Inter-Provider VPNs
- Overview of Inter-Provider VPNs
- Option 1: Inter-Provider VPN Using Back-to-Back VRF Method
- Option 2: Inter-Provider VPNs Using ASBR-to-ASBR Approach
- Option 3: Multi-Hop MP-eBGP Between RR and eBGP Between ASBRs
- Option 4: Non-VPN Transit Provider
- Case Study-Inter-AS Implementing Route-Reflector and BGP Confederation in Provider Networks
- Case Study-Multi-Homed Inter-AS Provider Network
- Command Reference
Carrier Supporting Carriers
- Carrier Supporting Carriers
- Carrier Supporting Carriers Overview
- Deployment Scenarios with CSC Architecture
- CSC Architecture Benefits
- Command Reference
MPLS Traffic Engineering
- MPLS Traffic Engineering
- TE Basics
- MPLS TE Theory
- Constraint-Based Routing and Operation in MPLS TE
- Configuring MPLS TE
- Command Reference
Implementing VPNs with Layer 2 Tunneling Protocol Version 3
- Implementing VPNs with Layer 2 Tunneling Protocol Version 3
- L2TPv3 Overview
- Configuring L2TPv3 Tunnels for Layer 2 VPN
- Configuring L2TPv3 Static Tunnels
- Configuring L2TPv3 Dynamic Tunnels
- Implementing Layer 3 VPNs over L2TPv3 Tunnels
- Command Reference
Any Transport over MPLS (AToM)
- Any Transport over MPLS (AToM)
- Introduction to Layer 2 VPNs
- Implementing AToM for Like to Like Circuits
- L2 VPN-Any to Any Interworking
- Local Switching
- Command Reference
Virtual Private LAN Service (VPLS)
- Virtual Private LAN Service (VPLS)
- VPLS Overview
- VPLS Topology-Single PE or Direct Attachment
- Hierarchical VPLS-Distributed PE Architecture
- Command Reference
Implementing Quality of Service in MPLS Networks
- Implementing Quality of Service in MPLS Networks
- Introduction to QoS-Classification and Marking
- MPLS QoS Implementation
- MPLS QoS Operating Modes
- Modular QoS CLI: Configuration of QoS on Cisco Routers
- Configuration and Implementation of MPLS QoS in Uniform Mode and Short Pipe Mode Operation
- Implementing MPLS QoS for Layer 2 VPN Implementations
- Command Reference
MPLS Features and Case Studies
- MPLS Features and Case Studies
- Case Study 1: Implementing Multicast Support for MPLS VPNs
- Case Study 2: Implementing Multi-VRF CE, VRF Selection Using Source IP Address, VRF Selection Using Policy-Based Routing, NAT and HSRP Support in MPLS VPN, and Multicast VPN Support over Multi-VRF CE
- Case Study 3: Implementing Layer 2 VPNs over Inter-AS Topologies Using Layer 2 VPN Pseudo-Wire Switching
- Case Study 4: Implementing Layer 3 VPNs over Layer 2 VPN Topologies and Providing L2 VPN Redundancy
- Case Study 5: Implementing Dynamic Layer 3 VPNs Using mGRE Tunnels
- Case Study 6: Implementing Class-Based Tunnel Selection with MPLS Traffic Engineering
- Case Study 7: Implementing Hub and Spoke Topologies with OSPF
- Case Study 8: Implementing Hub and Spoke Topologies with EIGRP
- Case Study 9: Implementing VPLS Services with the GSR 12000 Series
- Case Study 10: BGP Site of Origin
- Command Reference
EAN: 2147483647
Pages: 130
