Form Properties
Every form and dialog box is derived from the Form class, which itself is derived from the Control class. Therefore, they share the approximately 100 properties of the Control and Form base classes. Table 5-1 listed many of the most commonly used form properties.
While all of the form properties can be used with either dialog boxes or normal forms, either modal or modeless, several properties are often used to create the "dialog box" look and otherwise control the appearance and behavior of the form. They include those shown in Table 6-1, extracted from Table 5-1 in Chapter 5.
|
Property |
Type |
Description |
|---|---|---|
|
AcceptButton |
IButtonControl |
Gets or sets the button on a form that is clicked when the user presses Enter, irrespective of which control actually has focus. |
|
BackColor |
Color |
Gets or sets the background color. |
|
CancelButton |
IButtonControl |
Gets or sets the button on a form that is clicked when the user presses Escape, irrespective of which control actually has focus. |
|
ControlBox |
Boolean |
Gets or sets a value indicating if the system menu can be displayed and if the Close button (X) is displayed on the right end of the titlebar. The system menu is exposed by clicking on the icon in the titlebar if the Icon property is set, or by right-clicking on the titlebar if the Icon property is not set. Default is true. |
|
DialogResult |
DialogResult |
Gets or sets the return value from a form or dialog box displayed modally. Legal values are members of the DialogResult enumeration. This property is covered in detail in Section 6.3. |
|
FormBorderStyle |
FormBorderStyle |
Gets or sets the border style. In addition to appearance, the FormBorderStyle dictates whether or not the form will be resizable. The possible values of the FormBorderStyle enumeration are listed in Table 6-2. |
|
Icon |
Icon |
Gets or sets the icon for the form. The icon is displayed in the control box of the form (if the ControlBox property is set to true) and in the taskbar (if the ShowInTaskbar property is set to true). |
|
MaximizeBox |
Boolean |
Gets or sets a value indicating if a maximize button will be displayed in the upper-right corner of the form on the titlebar. Default is true. If true, FormBorderStyle must be either FixedSingle, Sizable, Fixed3D, or FixedDialog. When the form is maximized, the maximize button automatically becomes a restore button. |
|
MinimizeBox |
Boolean |
Gets or sets a value indicating if a minimize button will be displayed in the upper-right corner of the form on the titlebar. Default is true. If true, FormBorderStyle must be either FixedSingle, Sizable, Fixed3D, or FixedDialog. |
|
ShowInTaskBar |
Boolean |
Gets or sets a value indicating if the form Text property is displayed in the Windows taskbar. Default is true. |
|
Size |
Size |
Gets or sets both the height and width of the form. |
|
StartPosition |
FormStartPosition |
Gets or sets the starting position of the form. Legal values of the FormStartPosition enumeration are listed in Table 6-3. |
|
TopMost |
Boolean |
Gets or sets value indicating the form is displayed on top all the other forms, even if it is not the active form. Typically used for modeless dialog boxes, which should always be visible. |
|
Value |
Description |
|---|---|
|
Fixed3D |
Nonresizable, 3-D border. |
|
FixedDialog |
Nonresizable, dialog-style border |
|
FixedSingle |
Nonresizable, single line border |
|
FixedToolWindow |
Nonresizable, tool window border |
|
None |
No border |
|
Sizable |
Default value. Standard resizable border |
|
SizableToolWindow |
Resizable, tool window border |
|
Value |
Description |
|---|---|
|
CenterParent |
Center form within parent form |
|
CenterScreen |
Center form within current display |
|
Manual |
Location and size of form dictates its starting position |
|
WindowsDefaultBounds |
Form at Windows default location with bounds determined by Windows default |
|
WindowsDefaultLocation |
Form at Windows default location with dimensions specified in form's constructor |
The following example will demonstrate the creation of a dialog box. This example will consist of a very simple form with only a single button. Clicking the button will open a modal dialog box. The dialog box is a separate form in the project, although many of its properties are set programmatically by the parent form.
|
Create a new project in Visual Studio .NET called DialogDemo.
|
Drag a button onto the form, change the Text property of the button to Create Dialog Box, and resize the button to fit the text. Rename the button to btnCreate.
Add a second form to the project to serve as the dialog box. To do so, either select the menu item Project  Add Windows Form... or right-click on the project name in the Solution Explorer and select Add
  Add Windows Form.... When the Add New Item dialog box comes up, change the default form name to dlg.cs or dlg.vb, depending on your language. Change the (Name) property of the form to DlgTest.
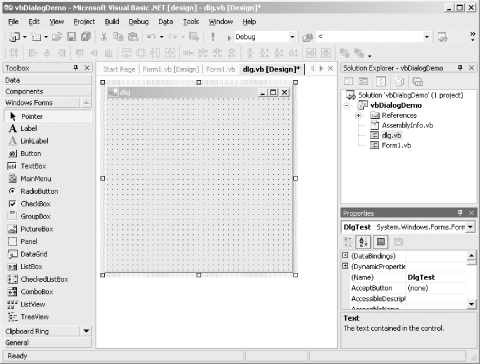
The new form will show up in the Solution Explorer, along with the original Form1.cs or Form1.vb. Your screen should look something like Figure 6-1. (Note that this project was actually named vbDialogDemo to distinguish it from the C# version.)
Figure 6-1. DialogDemo design

Click on the Form1.vb[Design] (or Form1.cs[Design]) tab at the top of the design window, and then double-click on the button created previously. This will open a code skeleton for the Click event handler in the code window. The Click event is the default event for a Button control. Enter the highlighted code shown in Example 6-1 (for C#) or in Example 6-2 (for VB.NET).
Example 6-1. Click event handler to show dialog box in C#
![]()
private void btnCreate_Click(object sender, System.EventArgs e)
{
 Form dlg = new DlgTest( );
 dlg.Text = "Dialog Test";
 dlg.FormBorderStyle = FormBorderStyle.FixedDialog;
 dlg.BackColor = Color.Azure;
 dlg.ControlBox = true;
 dlg.MaximizeBox = false;
 dlg.MinimizeBox = false;
 dlg.ShowInTaskbar = false;
 dlg.Icon = new Icon(typeof(csDialogDemo.Form1),"INFO.ICO");
 dlg.Size = new Size(300,300);
 dlg.StartPosition = FormStartPosition.CenterScreen;
 dlg.ShowDialog( );
}
Example 6-2. Click event handler to show dialog box in VB.NET
![]()
Private Sub btnCreate_Click(ByVal sender As System.Object, _
 ByVal e As System.EventArgs) _
 Handles btnCreate.Click
 dim dlg as New DlgTest
 dlg.Text = "Dialog Test"
 dlg.FormBorderStyle = FormBorderStyle.FixedDialog
 dlg.BackColor = Color.Azure
 dlg.ControlBox = true
 dlg.MaximizeBox = false
 dlg.MinimizeBox = false
 dlg.ShowInTaskbar = false
 dim f as New Form1( )
 dlg.Icon = new Icon(f.GetType( ),"INFO.ICO")
 dlg.Size = new Size(300,300)
 dlg.StartPosition = FormStartPosition.CenterScreen
 dlg.ShowDialog( )
End Sub
|
Before the project will run with this code, the icon file referred to when setting the Icon property needs to be properly located. You could hardwire in a location with a line such as the following:
![]()
dlg.Icon = new Icon("c:iconsinfo.ico")
but that raises obvious problems for deployment. A slightly better option would be to include the icon file in the same directory as the executable, in which case the following line of code would work:
![]()
dlg.Icon = new Icon("info.ico")
Note that in this case, when developing in Visual Studio .NET, the icon file must be included in the proper output directory, typically the bindebug directory located under the project directory when working in C#, or the bin directory when working in VB.NET.
In either case, this would require installing the actual icon file as part of the deployment. Instead, use the code shown in Example 6-1 or Example 6-2, which presumes that the icon file is included as an embedded resource in the assembly.
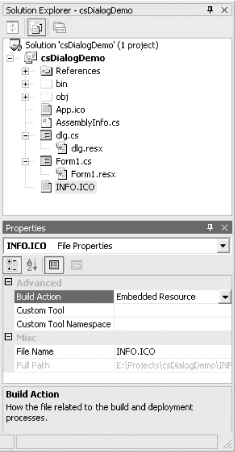
To embed the icon file, add it to the project by right-clicking on the project in the Solution Explorer, selecting Add  Add Existing Item, and navigating to the icon file. This will add a copy of the file to the project directory. Then select the newly added icon file in the Solution Explorer, go to the Properties window, and change the Build action for the file to Embedded Resource, as shown in Figure 6-2. This will cause the icon file to be included automatically in the compiled assembly, eliminating the need for a separate file in the deployment. (All issues concerning deployment of applications are covered in Chapter 22.)
|
Figure 6-2. Embedded Resource in project

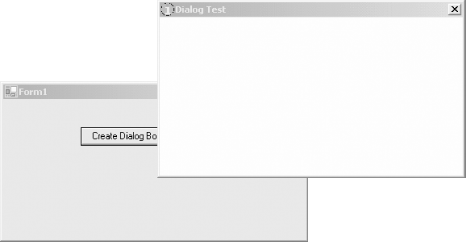
Running the application and clicking on the button will bring up the dialog box shown on top of the parent form in Figure 6-3.
Figure 6-3. DialogDemo dialog box

The first line of code in the Click event handler in Figure 6-1 or Figure 6-3 instantiates a new form of type dlgTest, which is the name you gave the form created previously in Visual Studio .NET. The last line of code in the method shows the form modally, using the ShowDialog method. All the lines in between set various properties to control the appearance and behavior of the dialog box. Each property is described in Table 6-1.
Windows Forms and the .NET Framework
Getting Started
Visual Studio .NET
- Overview
- Start Page
- Projects and Solutions
- The Integrated Development Environment (IDE)
- Building and Running
Events
Windows Forms
- Windows Forms
- Web Applications Versus Windows Applications
- The Forms Namespace
- Form Properties
- Forms Inheritance
- User Interface Design
Dialog Boxes
- Dialog Boxes
- Modal Versus Modeless
- Form Properties
- DialogResult
- Termination Buttons
- Apply Button
- CommonDialog Classes
Controls: The Base Class
Mouse Interaction
Text and Fonts
Drawing and GDI+
Labels and Buttons
Text Controls
Other Basic Controls
TreeView and ListView
List Controls
Date and Time Controls
Custom Controls
- Custom Controls
- Specializing an Existing Control
- Creating a User Control
- Creating Custom Controls from Scratch
Menus and Bars
ADO.NET
- ADO.NET
- Bug Database: A Windows Application
- The ADO.NET Object Model
- Getting Started with ADO.NET
- Managed Providers
- Binding Data
- Data Reader
- Creating a DataGrid
Updating ADO.NET
- Updating ADO.NET
- Updating with SQL
- Updating Data with Transactions
- Updating Data Using DataSets
- Multiuser Updates
- Command Builder
Exceptions and Debugging
- Exceptions and Debugging
- Bugs Versus Exceptions
- Exceptions
- Throwing and Catching Exceptions
- Bugs
- Debugging in Visual Studio .NET
- Assert Yourself
Configuration and Deployment
EAN: 2147483647
Pages: 148
- Integration Strategies and Tactics for Information Technology Governance
- A View on Knowledge Management: Utilizing a Balanced Scorecard Methodology for Analyzing Knowledge Metrics
- Technical Issues Related to IT Governance Tactics: Product Metrics, Measurements and Process Control
- Managing IT Functions
- The Evolution of IT Governance at NB Power


