The MainMenu Object
Your control, mainMenu1, is of type System.Windows.Forms.MainMenu. This class represents the container for the entire menu structure within a form. While the MainMenu class has a number of properties, the one you will use most often is the MenuItems property, which returns a collection of MenuItem objects. A menu consists of these MenuItem objects, each of which represents one choice on the menu.
You will find that when you click on the form, the menu disappears! When you click on mainMenu1, the menu reappears, in place, ready for you to edit. The menu is actually independent of the form; it is shown in its place as a convenience for you. However, if you run the application now, the menu will not appearit is not yet attached to the form.
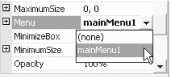
You can attach the menu to the form in several ways. The easiest is to click on the form to bring up its Properties window, and then scroll down to the Menu property. There you can choose mainMenu1, associating the menu with the form itself, as shown in Figure 18-2.
Figure 18-3. Associating the menu with the form
When you click on the form, the menu will no longer disappear; it is now a property of the form itself. This is reflected in the initialization code of the form:

this.Menu = this.mainMenu1;

me.Menu = me.mainMenu1
18.2.1 Adding Menu Items
As noted above, the menu consists of objects of type MenuItem. The MenuItem class has several properties that enable you to configure the appearance of a menu item and determine its functionality. Some of the most important properties are shown in Table 18-1.
|
Property |
Type |
Description |
|---|---|---|
|
Checked |
Boolean |
Read/write. Specifies whether a checkmark appears next to the menu item. The default is false. |
|
DefaultItem |
Boolean |
Read/write. Is this the default item on the menu? The default is false. |
|
Enabled |
Boolean |
Is this menu item enabled? The default is true. |
|
Index |
Integer |
Read/Write. Indicates the position within the parent menu (zero based). |
|
IsParent |
Boolean |
Read-only. Does this item have child items? |
|
MdiList |
Boolean |
Read/Write. Indicates whether the menu item will have a list of MDI Child windows. The default is false. |
|
MergeOrder |
Integer |
Read/write. Relative zero-based position of this item when merged with other menus. The default is zero. |
|
MergeType |
MenuMerge |
Read/write. Behavior of this menu item when it is merged into another menu. Valid values are members of the MenuMerge enumeration: Add, MergeItems, Remove, and Replace. |
|
OwnerDraw |
Boolean |
Read/write. Do you provide the code to draw the menu item, or does Windows? The default is false. |
|
Parent |
Menu |
Read-only. The menu in which this item appears. |
|
RadioCheck |
Boolean |
Read/write. Should the checkmark be a radio button instead of a checkmark? The default is false. |
|
ShowShortCut |
Boolean |
Read/write. Should the associated shortcut key be displayed? The default is true. |
|
Text |
String |
Read/write. The caption for the menu item. |
|
Visible |
Boolean |
Read/write. Is this item visible? The default is true. |
If you examine a typical menu (in Word, Visual Studio .NET, or another application), you'll find that most menus consist of words (or short phrases) strung horizontally across the top of the window. When you click on each, a submenu (sometimes referred to as a child menu) appears.
|

To get started, create a few simple menu items that correspond to some of the menu items available in a typical application. Enter the first menu item as File, by replacing the text "Type Here" with "File". As you do, you will note that the menu editor opens two new typing areas, one to the right of your menu item and one below it, as shown in Figure 18-3.
Figure 18-4. Entering a menu item
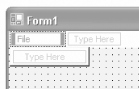
Also note that the properties window refers to your new menu item as menuItem1. Rename your menu item to mnuFile. Next, you will do one of a number of things:
- Add more items to the main menu.
- Add items to the submenus.
- Set properties on each of the items within the menu.
- Set event handlers for items in the menu.
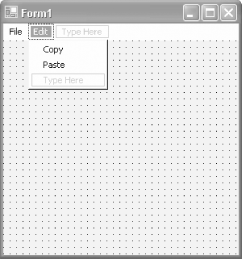
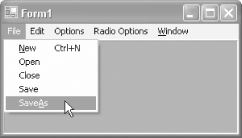
Add the usual child menu items to File (Open, Close, Save, or SaveAs). Once this is done, add an Edit menu with Copy and Paste, as shown in Figure 18-4.
Figure 18-5. Adding child menus
This menu creates a total of eight Menu items. Click on each and provide a meaningful name, such as mnuFileOpen or mnuFileClose. After doing so, you can examine the Windows Form Designer generated code in the code window (Form1.cs or Form1.vb), where you will find the renamed menu items:
private System.Windows.Forms.MainMenu mainMenu1;
private System.Windows.Forms.MenuItem mnuFile;
private System.Windows.Forms.MenuItem mnuFileOpen;
private System.Windows.Forms.MenuItem mnuFileClose;
private System.Windows.Forms.MenuItem mnuFileSave;
private System.Windows.Forms.MenuItem mnuFileSaveAs;
private System.Windows.Forms.MenuItem mnuEdit;
private System.Windows.Forms.MenuItem mnuEditCopy;
private System.Windows.Forms.MenuItem mnuEditPaste;
Friend WithEvents MainMenu1 As System.Windows.Forms.MainMenu
Friend WithEvents mnuFile As System.Windows.Forms.MenuItem
Friend WithEvents mnuEdit As System.Windows.Forms.MenuItem
Friend WithEvents mnuFileOpen As System.Windows.Forms.MenuItem
Friend WithEvents mnuFileClose As System.Windows.Forms.MenuItem
Friend WithEvents mnuFileSave As System.Windows.Forms.MenuItem
Friend WithEvents mnuFileSaveAs As System.Windows.Forms.MenuItem
Friend WithEvents mnuEditCopy As System.Windows.Forms.MenuItem
Friend WithEvents mnuEditPaste As System.Windows.Forms.MenuItem
18.2.2 Responding to Events
Menu items exist to be clicked. How your program responds to these events is determined by how you architect your code. One simple approach is to create independent event handlers for each click event. Visual Studio .NET makes this very easy; double-click on the menu item and an event handler is created for you.
For example, switch to the form view and double-click on mnuFileOpen in the File submenu. Visual Studio .NET switches back to code view and places your cursor within an event handler named mnuFileOpen_Click.
Each menu item has a default event; in this case, the Click event. To test this event handler, add a simple message box to pop up when the user clicks File  Open:
Open:
private void mnuFileOpen_Click(object sender, System.EventArgs e)
{
 MessageBox.Show ("You clicked File Open", "Menu Event Tester",
 MessageBoxButtons.OK, MessageBoxIcon.Asterisk);
}
Private Sub mnuFileOpen_Click(ByVal sender As System.Object,
ByVal e As System.EventArgs) _
Handles mnuFileOpen.Click
 MessageBox.Show("You clicked file open!", _
 "Menu event tester", _
 MessageBoxButtons.OK, _
 MessageBoxIcon.Information)
End Sub
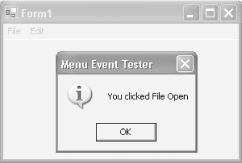
When you run the application and click on File Open, the message box appears, as shown in Figure 18-5.
Figure 18-6. Testing the event handler
The MenuItem object provides a number of other events as well, the most important of which are shown in Table 18-2.
|
Event |
Event argument |
Description |
|---|---|---|
|
Click |
EventArgs |
Default event, occurs when the item is selected or when a shortcut key is used. |
|
DrawItem |
DrawItemEventArgs |
Used when the OwnerDraw property of a menu item is set to true and it is time to draw the menu item. Covered later in this chapter. |
|
MeasureItem |
MeasureItemEventArgs |
Used by the menu to determine the size of the menu item before drawing it (used with OwnerDraw items). |
|
Popup |
EventArgs |
Occurs just before the menuItem's list of child menu items is displayed. |
|
Select |
EventArgs |
Raised when the user places the cursor over a menu item or the menu item is highlighted using the keyboard arrow keys. This event is not raised if the MenuItem has any child items. |
18.2.2.1 Adding MDI Windows
You can flesh out the File menu with a New command, which will create a new MDI Child window. To do so, first create a new form, MDIChild.cs or MDIChild.vb, which will serve as the child window. Fill that form with a rich text control so it will look like a standard text window that you might open from your application.
Prepare your first form to be an MDI container by setting the IsMDIContainer property to true (as described in Chapter 5). You are now ready to add code to respond to the menu choice:
private void mnuNew_Click(object sender, System.EventArgs e)
{
 MDIChild newMDIChild = new MDIChild( );
 newMDIChild.MdiParent = this;
 newMDIChild.Show( );
}
Private Sub mnuNew_Click(ByVal sender As System.Object, ByVal e As System.EventArgs) _
Handles mnuNew.Click
 Dim newMDIChild As New MDIChild( )
 newMDIChild.MdiParent = Me
 newMDIChild.Show( )
End Sub
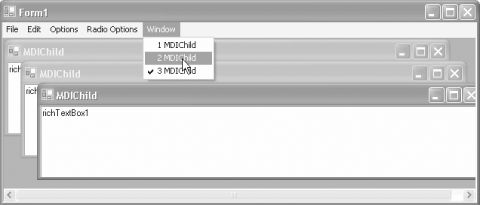
You can see that creating the new MDI Child window is as simple as instantiating your new form, assigning its MdiParent property to the current form, and then showing the child. What is particularly sweet about this is that you can now add a Window menu item, which will track your MDI Windows for you. You need only set a single property on the menu item: MdiList to true.
If you open several MDI Child windows (by repeatedly clicking File New), and then click on the Window menu item, it will display all the MDI Child windows with a checkmark next to the one that is current. You can change which child window is current by clicking on any of the listed child windows, as shown in Figure 18-6.
Figure 18-7. Managing MDI Child windows
18.2.3 Option Menu Items
Menu items can be added to indicate whether or not the user has selected various options. They come in two flavors: check options and radio button options. Check options let the user select one or more of a series of options, while radio button options are mutually exclusive.
The only difference between a check option and a radio button option is the value of the MenuItem's RadioCheck property. If set to true, the checkmark will be drawn as a filled-in dot. The framework does not, however, enforce that the options are mutually exclusive, and so you must do so in code, as shown next.
18.2.4 Shared Event Handlers
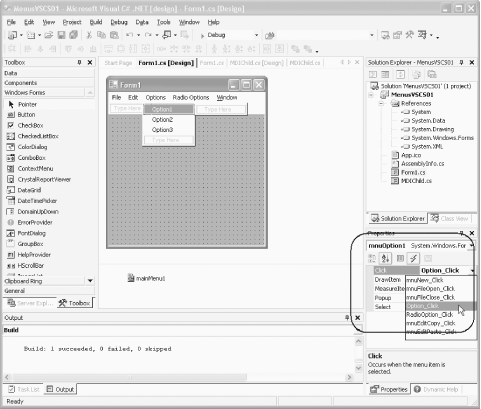
Both radio button options and check options cry out for shared event handlers. There is no point in having separate event handlers for each selectable option within one submenu; all will do the same thing (set or clear the checkmark).
You set up shared event handlers somewhat differently in C# than you do in VB.NET. In C#, you begin by creating the single (shared) event handler in code. Then set the event handler for each menu item from the properties window. Click on the yellow lightening bolt in the Properties window and choose the shared event handler for each item's click event, as shown in Figure 18-7.
Figure 18-8. Setting the event handler
The shared event-handling code itself is straightforward:
private void Option_Click(object sender, System.EventArgs e)
{
 MenuItem item = sender as MenuItem;

 if ( item != null )
 {
 item.Checked = ! item.Checked;
 }
}
Cast the sender object to be of type MenuItem, and then set the Checked property of the MenuItem to the opposite of its current state.
In VB.NET, you must create the event handler and then mark that event handler in the code to indicate that it handles the events for all the various options (remember to provide the options with meaningful names before implementing the handler):
Private Sub Option_Click(ByVal sender As System.Object, ByVal e As System.EventArgs) _
Handles mnuOption1.Click, mnuOption2.Click, mnuOption3.Click
 Dim item As MenuItem = CType(sender, MenuItem)
 item.Checked = Not item.Checked
End Sub
Once set up, however, the logic is the same as for C#: you cast the sender object to be of type MenuItem, and then you set the Checked property to the opposite of its current state.
18.2.4.1 Handling radio button options
Radio button options are handled with code that is nearly identical to that used to handle checkmarks, except that you must be sure to first clear all the checkmarks to ensure that only one is ever checked at a time. To accomplish this, ask the radio button item for its parent so you can get the parent's collection of MenuItems and iterate through that collection setting each MenuItem's Checked property to false. You can then set the current (chosen) item's Checked property to true:
private void RadioOption_Click(object sender, System.EventArgs e)
{
 MenuItem item = sender as MenuItem;
 Menu parent = item.Parent;
 if ( item != null )
 {
 foreach ( MenuItem mi in parent.MenuItems )
 mi.Checked = false;
 item.Checked = true;
 }
}
Private Sub RadioOption_Click(ByVal sender As System.Object,
ByVal e As System.EventArgs) _
Handles mnuRadioOption1.Click, mnuRadioOption2.Click, mnuRadioOption3.Click
 Dim item As MenuItem = CType(sender, MenuItem)
 Dim parent As Menu = item.Parent
 Dim tempMi As MenuItem
 For Each tempMi In parent.MenuItems
 tempMi.Checked = False
 Next
 item.Checked = True
End Sub
18.2.5 Menu Navigation
There are several easy ways to enhance the user's navigation of your menu items. The first is to provide an access key by placing an ampersand (&) before the character to be used as the access key. This causes the access key to be underlined (in XP, it is underlined when the user taps the Alt key).
The default for navigating menus is to access the various menu choices using the Alt key and the first letter of the menu item. For example, Alt-F will open the File menu. If you have two items with the same first letter (e.g., Save and SaveAs), you may want to add an access key for the A in SaveAs, so that pressing S will invoke Save and pressing A will invoke SaveAs, as shown in Figure 18-8.
Figure 18-9. Using the access key
18.2.5.1 Shortcut keys
The second way to enhance keyboard usage of your menus is to provide shortcuts. Notice that in Figure 18-8, the File New menu choice has a shortcut of Ctrl+N. Holding the control key and pressing N will invoke this menu choice even if the File menu is not open.
You can add shortcuts programmatically, or through Visual Studio .NET, by setting the ShortCut property of the MenuItem. When you use the Properties dialog in Visual Studio .NET, all potential shortcut keys are displayed in a drop-down menu, as shown in Figure 18-9.
Figure 18-10. Choosing a shortcut key
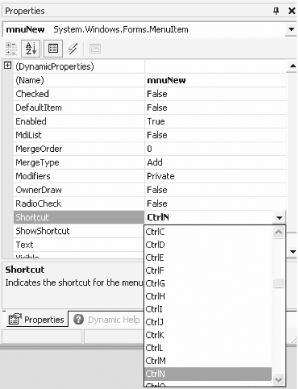
You must also make sure that the ShowShortCut property of the MenuItem is set to true, or else the shortcut key combination will not be displayed in the menu (though the shortcut will continue to work).
18.2.6 Creating Menus by Hand
While creating menus in Visual Studio .NET is quick, easy, and painless, there is an advantage (at least once) in writing your menus by hand in Notepad. The code produced by Visual Studio .NET can hide some of the intimate details of the relationship among the various MenuItems, the Menu, and the Form. In addition, writing it by hand gives you the opportunity to explore some of the overloaded constructors for MenuItems, and is generally a good way to gain insight into what Visual Studio .NET is actually doing for you. This is illustrated in C# in Example 18-1 and in VB.NET in Example 18-2. A detailed analysis follows the listings.
For the code in Example 18-1 or Example 18-2 to compile, you must add a reference in the compiler command line to the DLL that contains the MDI Child form. Example 18-3 (in C#) and Example 18-4 (in VB.NET) list the code for this form.
Example 18-1. Creating menus by hand (HandCraftedMenusCS)
using System;
using System.Windows.Forms;

namespace MenuByHand
{
 public class MenuForm : Form
 {
 // run the app
 public static void Main( )
 {
 Application.Run(new MenuForm( ));
 }

 // constructor
 public MenuForm( )
 {
 // build the menu inside out
 MenuItem mnuNew = new MenuItem( );
 // short cut
 mnuNew.Shortcut = Shortcut.CtrlN;
 // accelerator
 mnuNew.Text = "&New";
 // event handler
 mnuNew.Click += new EventHandler(this.mnuNew_Click);

 // alternative, pass text and event handler into constructor
 MenuItem mnuFileOpen = new MenuItem("&Open",
 new EventHandler(this.mnuFileOpen_Click));
 mnuFileOpen.Shortcut = Shortcut.CtrlO;

 // alternative, pass text, event handler and short cut
 MenuItem mnuFileClose = new MenuItem(
 "&Close",
 new EventHandler(this.mnuFileClose_Click),
 Shortcut.CtrlC);

 MenuItem mnuFileSave = new MenuItem( );
 mnuFileSave.Text = "Save";
 mnuFileSave.Click += new EventHandler(this.mnuFileSave_Click);

 MenuItem mnuFileSaveAs = new MenuItem( );
 mnuFileSaveAs.Text = "Save&As";
 mnuFileSaveAs.Click +=
 new EventHandler(this.mnuFileSaveAs_Click);

 // Create the file menu and add the array of sub-menu items
 // to its MenuItems collection
 MenuItem mnuFile = new MenuItem( );
 mnuFile.Text = "File";
 mnuFile.MenuItems.AddRange(new MenuItem[ ] {
 mnuNew,
 mnuFileOpen,
 mnuFileClose,
 mnuFileSave,
 mnuFileSaveAs});

 // create submenus for Edit menu
 MenuItem mnuEditCopy = new MenuItem( );
 mnuEditCopy.Text = "&Copy";
 mnuEditCopy.Click += new EventHandler(this.mnuEditCopy_Click);

 MenuItem mnuEditPaste = new MenuItem( );
 mnuEditPaste.Text = "Paste";
 mnuEditPaste.Click += new EventHandler(this.mnuEditPaste_Click);

 // Add the edit menu
 MenuItem mnuEdit = new MenuItem( );
 mnuEdit.Text = "Edit";
 mnuEdit.MenuItems.AddRange(new MenuItem[ ]
 { mnuEditCopy, mnuEditPaste } );

 // options sub-menu
 MenuItem mnuOption1 = new MenuItem( );
 mnuOption1.Text = "Option1";
 mnuOption1.Click += new EventHandler(this.Option_Click);

 MenuItem mnuOption2 = new MenuItem( );
 mnuOption2.Text = "Option2";
 mnuOption2.Click += new EventHandler(this.Option_Click);

 MenuItem mnuOption3 = new MenuItem( );
 mnuOption3.Text = "Option3";
 mnuOption3.Click += new EventHandler(this.Option_Click);

 // Add the options menu
 MenuItem mnuOptions = new MenuItem( );
 mnuOptions.Text = "Options";
 mnuOptions.MenuItems.AddRange(new MenuItem[ ]
 { mnuOption1, mnuOption2, mnuOption3 } );


 // radio options sub-menu
 MenuItem mnuROption1 = new MenuItem( );
 mnuROption1.Text = "Radio Option1";
 mnuROption1.RadioCheck = true;
 mnuROption1.Click += new EventHandler(this.RadioOption_Click);


 MenuItem mnuROption2 = new MenuItem( );
 mnuROption2.Text = "Radio Option2";
 mnuROption2.RadioCheck = true;
 mnuROption2.Click += new EventHandler(this.RadioOption_Click);

 MenuItem mnuROption3 = new MenuItem( );
 mnuROption3.Text = "Radio Option3";
 mnuROption3.RadioCheck = true;
 mnuROption3.Click += new EventHandler(this.RadioOption_Click);

 // Add the radio options menu
 MenuItem mnuRadioOptions = new MenuItem( );
 mnuRadioOptions.Text = "Radio Options";

 mnuRadioOptions.MenuItems.AddRange(
 new MenuItem[ ]
 { mnuROption1, mnuROption2, mnuROption3 } );

 // Add the window menu
 MenuItem mnuWindow = new MenuItem( );
 mnuWindow.MdiList = true;
 mnuWindow.Text = "&Window";

 MainMenu mainMenu1 = new MainMenu(
 new MenuItem[ ]
 {mnuFile, mnuEdit, mnuOptions, mnuRadioOptions, mnuWindow} );

 Text = "Menu Form Demonstration (by hand)";
 AutoScaleBaseSize = new System.Drawing.Size(5, 13);
 ClientSize = new System.Drawing.Size(292, 186);
 IsMdiContainer = true;
 Menu = mainMenu1;
 }

 private void mnuNew_Click(object sender, EventArgs e)
 {
 MDIChild newMDIChild = new MDIChild( );
 newMDIChild.MdiParent = this;
 newMDIChild.Show( );
 }

 private void mnuFileOpen_Click(object sender, EventArgs e)
 {
 MessageBox.Show ("You clicked File Open", "Menu Event Tester",
 MessageBoxButtons.OK, MessageBoxIcon.Asterisk);
 }

 private void mnuFileClose_Click(object sender, EventArgs e)
 {
 MessageBox.Show ("You clicked File Close", "Menu Event Tester",
 MessageBoxButtons.OK, MessageBoxIcon.Asterisk);

 }
 private void Option_Click(object sender, EventArgs e)
 {
 MenuItem item = sender as MenuItem;

 if ( item != null )
 {
 item.Checked = ! item.Checked;
 }
 }

 private void RadioOption_Click(object sender, EventArgs e)
 {
 MenuItem item = sender as MenuItem;

 if ( item != null )
 {
 Menu parent = item.Parent;
 foreach ( MenuItem mi in parent.MenuItems )
 mi.Checked = false;
 item.Checked = true;
 }
 }

 private void mnuEditCopy_Click(object sender, EventArgs e)
 {
 MessageBox.Show ("You clicked Edit Copy", "Menu Event Tester",
 MessageBoxButtons.OK, MessageBoxIcon.Asterisk);
 }

 private void mnuEditPaste_Click(object sender, EventArgs e)
 {
 MessageBox.Show ("You clicked Edit Paste", "Menu Event Tester",
 MessageBoxButtons.OK, MessageBoxIcon.Asterisk);
 }

 private void mnuFileSave_Click(object sender, EventArgs e)
 {
 MessageBox.Show ("You clicked Save", "Menu Event Tester",
 MessageBoxButtons.OK, MessageBoxIcon.Asterisk);
 }

 private void mnuFileSaveAs_Click(object sender, EventArgs e)
 {
 MessageBox.Show ("You clicked SaveAs", "Menu Event Tester",
 MessageBoxButtons.OK, MessageBoxIcon.Asterisk);
 }
 }
}
Example 18-2. Creating menus by hand (HandCraftedMenusVB)
Imports System
Imports System.Windows.Forms

Namespace MenuByHand
 Public Class MenuForm
 Inherits Form

 ' run the app
 Public Shared Sub Main( )
 Application.Run(New MenuForm( ))
 End Sub 'Main


 ' constructor - create the menu
 Public Sub New( )
 ' build the menu inside out
 Dim mnuNew As New MenuItem( )
 ' short cut
 mnuNew.Shortcut = Shortcut.CtrlN
 ' accelerator
 mnuNew.Text = "&New"
 ' event handler
 AddHandler mnuNew.Click, AddressOf Me.mnuNew_Click


 ' alternative, pass text and event handler into constructor
 Dim mnuFileOpen As New MenuItem( _
 "&Open", New EventHandler(AddressOf Me.mnuFileOpen_Click))
 mnuFileOpen.Shortcut = Shortcut.CtrlO

 ' alternative, pass text, event handler and short cut
 Dim mnuFileClose As New MenuItem( _
 "&Close", New EventHandler( _
 AddressOf Me.mnuFileClose_Click), Shortcut.CtrlC)


 ' remaining items use default constructor and add
 ' properties individually
 Dim mnuFileSave As New MenuItem( )
 mnuFileSave.Text = "Save"
 AddHandler mnuFileSave.Click, AddressOf Me.mnuFileSave_Click

 Dim mnuFileSaveAs As New MenuItem( )
 mnuFileSaveAs.Text = "Save&As"
 AddHandler mnuFileSaveAs.Click, _
 AddressOf Me.mnuFileSaveAs_Click


 ' Create the file menu and add the array
 ' of sub-menu items to its
 ' MenuItems collection
 Dim mnuFile As New MenuItem( )
 mnuFile.Text = "File"
 mnuFile.MenuItems.AddRange( _
 New MenuItem( ) _
 { mnuNew, mnuFileOpen, mnuFileClose, _
 mnuFileSave, mnuFileSaveAs } )


 ' create submenus for Edit menu
 Dim mnuEditCopy As New MenuItem( )
 mnuEditCopy.Text = "&Copy"
 AddHandler mnuEditCopy.Click, AddressOf Me.mnuEditCopy_Click

 Dim mnuEditPaste As New MenuItem( )
 mnuEditPaste.Text = "Paste"
 AddHandler mnuEditPaste.Click, AddressOf Me.mnuEditPaste_Click

 ' Add the edit menu
 Dim mnuEdit As New MenuItem( )
 mnuEdit.Text = "Edit"
 mnuEdit.MenuItems.AddRange( _
 New MenuItem( ) _
 { mnuEditCopy, mnuEditPaste } )

 ' options sub-menu
 Dim mnuOption1 As New MenuItem( )
 mnuOption1.Text = "Option1"
 AddHandler mnuOption1.Click, AddressOf Me.Option_Click

 Dim mnuOption2 As New MenuItem( )
 mnuOption2.Text = "Option2"
 AddHandler mnuOption2.Click, AddressOf Me.Option_Click


 Dim mnuOption3 As New MenuItem( )
 mnuOption3.Text = "Option3"
 AddHandler mnuOption3.Click, AddressOf Me.Option_Click

 ' Add the options menu
 Dim mnuOptions As New MenuItem( )
 mnuOptions.Text = "Options"
 mnuOptions.MenuItems.AddRange( _
 New MenuItem( ) _
 { mnuOption1, mnuOption2, mnuOption3 } )


 ' radio options sub-menu
 Dim mnuROption1 As New MenuItem( )
 mnuROption1.Text = "Radio Option1"
 mnuROption1.RadioCheck = True
 AddHandler mnuROption1.Click, AddressOf Me.RadioOption_Click


 Dim mnuROption2 As New MenuItem( )
 mnuROption2.Text = "Radio Option2"
 mnuROption2.RadioCheck = True
 AddHandler mnuROption2.Click, AddressOf Me.RadioOption_Click


 Dim mnuROption3 As New MenuItem( )
 mnuROption3.Text = "Radio Option3"
 mnuROption3.RadioCheck = True
 AddHandler mnuROption3.Click, AddressOf Me.RadioOption_Click


 ' Add the radio options menu
 Dim mnuRadioOptions As New MenuItem( )
 mnuRadioOptions.Text = "Radio Options"

 mnuRadioOptions.MenuItems.AddRange( _
 New MenuItem( ) _
 { mnuROption1, mnuROption2, mnuROption3 } )

 ' Add the window menu
 Dim mnuWindow As New MenuItem( )
 mnuWindow.MdiList = True
 mnuWindow.Text = "&Window"

 ' create an instance of MainMenu and add the sub-menus
 Dim mainMenu1 As New MainMenu( _
 New MenuItem( ) _
 {mnuFile, mnuEdit, mnuOptions, mnuRadioOptions, mnuWindow} )

 ' set the menu property of the form to the menu
 ' you just created
 Menu = mainMenu1

 ' set other form properties
 [Text] = "Menu Form Demonstration (by hand)"
 AutoScaleBaseSize = New System.Drawing.Size(5, 13)
 ClientSize = New System.Drawing.Size(292, 186)
 IsMdiContainer = true
 End Sub 'New

 ' implement the event handlers for the menus
 Private Sub mnuNew_Click( _
 ByVal sender As Object, ByVal e As EventArgs)
 Dim newMDIChild As New MDIChild( )
 newMDIChild.MdiParent = Me
 newMDIChild.Show( )
 End Sub 'mnuNew_Click

 Private Sub mnuFileOpen_Click( _
 ByVal sender As Object, ByVal e As EventArgs)
 MessageBox.Show("You clicked File Open", _
 "Menu Event Tester", _
 MessageBoxButtons.OK, _
 MessageBoxIcon.Asterisk)
 End Sub 'mnuFileOpen_Click

 Private Sub mnuFileClose_Click( _
 ByVal sender As Object, ByVal e As EventArgs)
 MessageBox.Show( _
 "You clicked File Close", _
 "Menu Event Tester", _
 MessageBoxButtons.OK, _
 MessageBoxIcon.Asterisk)
 End Sub 'mnuFileClose_Click

 Private Sub Option_Click( _
 ByVal sender As Object, ByVal e As EventArgs)
 Dim item As MenuItem = sender
 If Not (item Is Nothing) Then
 item.Checked = Not item.Checked
 End If
 End Sub 'Option_Click

 Private Sub RadioOption_Click( _
 ByVal sender As Object, ByVal e As EventArgs)

 Dim item As MenuItem = sender

 If Not (item Is Nothing) Then
 Dim parent As Menu = item.Parent
 Dim mi As MenuItem
 For Each mi In parent.MenuItems
 mi.Checked = False
 Next mi
 item.Checked = True
 End If
 End Sub 'RadioOption_Click

 Private Sub mnuEditCopy_Click( _
 ByVal sender As Object, ByVal e As EventArgs)
 MessageBox.Show( _
 "You clicked Edit Copy", _
 "Menu Event Tester", _
 MessageBoxButtons.OK, _
 MessageBoxIcon.Asterisk)
 End Sub 'mnuEditCopy_Click

 Private Sub mnuEditPaste_Click( _
 ByVal sender As Object, ByVal e As EventArgs)
 MessageBox.Show( _
 "You clicked Edit Paste", _
 "Menu Event Tester", _
 MessageBoxButtons.OK, _
 MessageBoxIcon.Asterisk)
 End Sub 'mnuEditPaste_Click

 Private Sub mnuFileSave_Click( _
 ByVal sender As Object, ByVal e As EventArgs)
 MessageBox.Show( _
 "You clicked Save", _
 "Menu Event Tester", _
 MessageBoxButtons.OK, _
 MessageBoxIcon.Asterisk)
 End Sub 'mnuFileSave_Click

 Private Sub mnuFileSaveAs_Click( _
 ByVal sender As Object, ByVal e As EventArgs)
 MessageBox.Show( _
 "You clicked SaveAs", _
 "Menu Event Tester", _
 MessageBoxButtons.OK, _
 MessageBoxIcon.Asterisk)
 End Sub 'mnuFileSaveAs_Click
 End Class 'MenuForm
End Namespace 'MenuByHand
18.2.6.1 Analysis
In this hand-coded example, you begin by creating your form and setting up your Main( ) method to start the application.
namespace MenuByHand
{
 public class MenuForm : Form
 {
 // run the app
 public static void Main( )
 {
 Application.Run(new MenuForm( ));
 }
Namespace MenuByHand
 Public Class MenuForm
 Inherits Form

 ' run the app
 Public Shared Sub Main( )
 Application.Run(New MenuForm( ))
 End Sub 'Main
|
This code is immediately followed by the constructor, in which you will create your menus and submenus. The process is somewhat inside-out. First you create the submenu MenuItems (e.g., New, Open, Close, Save, or SaveAs) and set their properties. You then create the outer MenuItem (File) and add the submenu items to the outer menu item's collection of MenuItems collection. Continue adding inner menus to outer menus until you reach the MainMenu, which you then add to the form.
There are a number of ways to create each MenuItem. The simplest is to use the default constructor:
MenuItem mnuNew = new MenuItem( );
Dim mnuNew As New MenuItem( )
You can then set the various properties of this MenuItem, such as its shortcut key, its text, and its event handler:
mnuNew.Shortcut = Shortcut.CtrlN;
mnuNew.Text = "&New";
mnuNew.Click += new EventHandler(this.mnuNew_Click);
mnuNew.Shortcut = Shortcut.CtrlN
mnuNew.Text = "&New"
AddHandler mnuNew.Click, AddressOf Me.mnuNew_Click
An alternative is to use one of the overloaded constructors, such as the constructor that takes the text and event handler as arguments:
MenuItem mnuFileOpen =
 new MenuItem("&Open",
 new EventHandler(this.mnuFileOpen_Click));
You are then free to add more properties to that MenuItem, as needed:
mnuFileOpen.Shortcut = Shortcut.CtrlO;
Dim mnuFileOpen As New MenuItem( _
 "&Open", New EventHandler(AddressOf Me.mnuFileOpen_Click))

mnuFileOpen.Shortcut = Shortcut.CtrlO
As a third alternative, you can pass the text, the event handler, and the shortcut all at one go:
MenuItem mnuFileClose=
 new MenuItem(
 "&Close",
 new EventHandler(this.mnuFileClose_Click),
 Shortcut.CtrlC);
Dim mnuFileClose As New MenuItem( _
 "&Close", New EventHandler( _
 AddressOf Me.mnuFileClose_Click), Shortcut.CtrlC)
In any case, once all the submenu items are added, you can add subitems to the menu item. Your first step is to create the File menu item.
MenuItem mnuFile = new MenuItem( );
mnuFile.Text = "File";
Dim mnuFile As New MenuItem( )
mnuFile.Text = "File"
You are then ready to create an array of the submenus and add it to the File menu's MenuItems collection:
MenuItem[ ] theSubMenus = new MenuItem[ ]
 { mnuNew, mnuFileOpen, mnuFileClose, mnuFileSave, mnuFileSaveAs };
mnuFile.MenuItems.AddRange ( theSubMenus );
Dim theSubMenus As MenuItem( ) = _
 {mnuNew, mnuFileOpen, mnuFileClose, mnuFileSave, mnuFileSaveAs}

mnuFile.MenuItems.AddRange(theSubMenus)
Your next step is to create the submenus for the Edit menu, and then add the submenus to the Edit menus MenuItems collection. You can combine the steps of creating the array and adding it to the collection into a single statement, if you prefer:
mnuEdit.MenuItems.AddRange(new MenuItem[ ] {mnuEditCopy, mnuEditPaste});
mnuEdit.MenuItems.AddRange(New MenuItem( ) {mnuEditCopy, mnuEditPaste})
18.2.6.2 Creating the options menu
Options menus require special attention because each option wants to share a common event handler. In C#, you accomplish this by creating an EventHandler for the specific event handler method, and then you assign that event handler to the event for each of the three MenuItems:
EventHandler optionHandler = new EventHandler(this.Option_Click);

MenuItem mnuOption1 = new MenuItem( );
mnuOption1.Text = "Option1";
mnuOption1.Click += optionHandler;

MenuItem mnuOption2 = new MenuItem( );
mnuOption2.Text = "Option2";
mnuOption2.Click += optionHandler;

MenuItem mnuOption3 = new MenuItem( );
mnuOption3.Text = "Option3";
mnuOption3.Click += optionHandler;
The syntax is a bit different in VB.NET, where you use the AddHandler command for each MenuItem to set the event handler:
Dim mnuOption1 As New MenuItem( )
mnuOption1.Text = "Option1"
AddHandler mnuOption1.Click, AddressOf Me.Option_Click

Dim mnuOption2 As New MenuItem( )
mnuOption2.Text = "Option2"
AddHandler mnuOption2.Click, AddressOf Me.Option_Click

Dim mnuOption3 As New MenuItem( )
mnuOption3.Text = "Option3"
AddHandler mnuOption3.Click, AddressOf Me.Option_Click
Creating the RadioButton options is identical to creating the checkmark options, except that you must remember to set the RadioCheck property to true:
MenuItem mnuROption1 = new MenuItem( );
mnuROption1.Text = "Radio Option1";
mnuROption1.RadioCheck = true;
mnuROption1.Click += radioOptionHandler;
Dim mnuROption1 As New MenuItem( )
mnuROption1.Text = "Radio Option1"
mnuROption1.RadioCheck = True
AddHandler mnuROption1.Click, AddressOf Me.RadioOption_Click
The Window MenuItem must have its MdiList property set to true so it can manage the MDI menus:
MenuItem mnuWindow= new MenuItem( );
mnuWindow.MdiList = true;
mnuWindow.Text = "&Window";
Dim mnuWindow As New MenuItem( )
mnuWindow.MdiList = True
mnuWindow.Text = "&Window"
You are now ready to create the instance of MainMenu: mainMenu1. There are two constructors: the default (that takes no arguments) and the one you'll use that takes an array of MenuItem objects. You'll pass in an array that consists of the topmost menu items.
MenuItem[ ] theTopMenus = new MenuItem[ ]
 {mnuFile, mnuEdit, mnuOptions, mnuRadioOptions, mnuWindow};

MainMenu mainMenu1 = new MainMenu( theTopMenus );
Dim theTopMenus As MenuItem( ) = _
 {mnuFile, mnuEdit, mnuOptions, mnuRadioOptions, mnuWindow}

Dim mainMenu1 As New MainMenu(theTopMenus)
When this is done, you are ready to attach the newly created MainMenu to the form itself by setting the Menu property of the form.
Menu = mainMenu1;
While you are at it, you can set the Text property and the scale of the form, and set the ClientSize property:
Text = "Menu Form Demonstration (by hand)";
AutoScaleBaseSize = new System.Drawing.Size(5, 13);
ClientSize = new System.Drawing.Size(292, 186);
Finally, you will set the IsMdiContainer property of the form to true to make the form an MDI container (required by your FileNew event handler):
IsMdiContainer = true;
All you need to do now is implement the various event handlers. The first is the New submenu on the File menu, in which you will create a new instance of MDIChild( ). This is a class you must create yourself. It consists of nothing but a form with a rich text control on it. The complete source code is shown in Example 18-3 for C# and Example 18-4 for VB.NET.
Example 18-3. MDI Child (HandCraftedMenusCSMDIChild.cs)
using System;
using System.Windows.Forms;

namespace MenuByHand
{
 public class MDIChild : Form
 {
 private RichTextBox richTextBox1;

 public MDIChild( )
 {
 richTextBox1 = new RichTextBox( );
 this.SuspendLayout( );

 // set the rich text box properties
 this.richTextBox1.Name = "richTextBox1";
 this.richTextBox1.Size = new System.Drawing.Size(296, 264);
 this.richTextBox1.TabIndex = 0;
 this.richTextBox1.Text = "richTextBox1";

 // set the form properties
 this.AutoScaleBaseSize = new System.Drawing.Size(5, 13);
 this.ClientSize = new System.Drawing.Size(292, 266);
 this.Controls.AddRange(new Control[ ] {this.richTextBox1});
 this.Name = "MDIChild";
 this.Text = "MDIChild";
 this.ResumeLayout(false);
 }

 }
}
Example 18-4. MDI Child (HandCraftedMenusVBMDIChild.vb)
Imports System
Imports System.Windows.Forms

Namespace MenuByHand

 Public Class MDIChild : Inherits Form
 Private richTextBox1 As RichTextBox

 Public Sub New( )
 richTextBox1 = New RichTextBox( )
 Me.SuspendLayout( )

 ' set the rich text box properties
 Me.richTextBox1.Name = "richTextBox1"
 Me.richTextBox1.Size = New System.Drawing.Size(296, 264)
 Me.richTextBox1.TabIndex = 0
 Me.richTextBox1.Text = "richTextBox1"

 ' set the form properties
 Me.AutoScaleBaseSize = New System.Drawing.Size(5, 13)
 Me.ClientSize = New System.Drawing.Size(292, 266)
 Me.Controls.AddRange(New Control( ) {Me.richTextBox1})
 Me.Name = "MDIChild"
 Me.Text = "MDIChild"
 Me.ResumeLayout(False)
 End Sub 'New
 End Class 'MDIChild
End Namespace 'MenuByHand
Returning to Example 18-1 and Example 18-2, the event handler for the New menu choice on the File menu creates an instance of this MDIChild class, sets its parent to the current form, and shows the window.
private void mnuNew_Click(object sender, System.EventArgs e)
{
 MDIChild newMDIChild = new MDIChild( );
 newMDIChild.MdiParent = this;
 newMDIChild.Show( );
}
Private Sub mnuNew_Click( _
 ByVal sender As Object, ByVal e As System.EventArgs)
 Dim newMDIChild As New MDIChild( )
 newMDIChild.MdiParent = Me
 newMDIChild.Show( )
End Sub 'mnuNew_Click
The File Open and File Close menu choices open a MessageBox indicating the action you've taken. For example, the event handler for File Open calls the Show method of MessageBox, passing in the message to be displayed ("You clicked File Open"), the title of the MessageBox ("MenuEventTester"), the button to display (using the MessageBoxButtons enumeration), and the icon to display (using the MessageBoxIcon enumeration):
private void mnuFileOpen_Click(object sender, EventArgs e)
{
 MessageBox.Show ("You clicked File Open", "Menu Event Tester",
 MessageBoxButtons.OK, MessageBoxIcon.Asterisk);
}
Private Sub mnuFileOpen_Click( _
 ByVal sender As Object, ByVal e As EventArgs)
 MessageBox.Show("You clicked File Open", _
 "Menu Event Tester", _
 MessageBoxButtons.OK, _
 MessageBoxIcon.Asterisk)
End Sub 'mnuFileOpen_Click
18.2.6.3 The options menu item event handler
You've already seen how to wire up the event handler for the Options menu. The implementation is straightforward:
private void Option_Click(object sender, EventArgs e)
{
 MenuItem item = sender as MenuItem;

 if ( item != null )
 {
 item.Checked = ! item.Checked;
 }
}
Private Sub Option_Click(sender As Object, e As EventArgs)
 Dim item As MenuItem = sender
 If Not (item Is Nothing) Then
 item.Checked = Not item.Checked
 End If
End Sub 'Option_Click
For this method, cast the sender to be of type MenuItem, and assuming the cast is successful, toggle the value of the Checked property.
The RadioButton's Click handler is different. Here you will take two actions. First, set all the RadioButtons to unchecked, and then set the chosen one to checked.
This process can get a bit confusing, so let's take it step by step. The sender argument to the event handler is the MenuItem that was clicked on by the user. Begin by casting that item to type MenuItem:
private void RadioOption_Click(object sender, EventArgs e)
{
 MenuItem item = sender as MenuItem;
This MenuItem is part of a submenu, and you want to set all the RadioButtons in this submenu to unchecked. This submenu can be retrieved as the MenuItems property of the current item's parent menu. Thus, to uncheck all these RadioButtons, you need that parent menu item:
Menu parent = item.Parent;
This code gets the parent menu to which the sender belongs. That parent menu has a collection, MenuItems, in which all the RadioButton menu items appear. You can iterate through that collection, setting all the RadioButtons to unchecked:
foreach ( MenuItem mi in parent.MenuItems )
 mi.Checked = false;
For Each mi In parent.MenuItems
 mi.Checked = False
Next mi
You are now ready for the second step: setting the RadioButton menu item that the user clicked on to true. You return to the variable item (which you'll remember you cast to type MenuItem from the sender argument to the event handler) and set its Checked property to true:
item.Checked = true;
18.2.7 Merging Menus
MDI Child windows can have menus just like any other form. When you create a menu on an MDI Child from within an MDI Container (as you do in the previous example with the modified code that runs when you choose File New), the menu of the child window is merged with the parent menu by default.
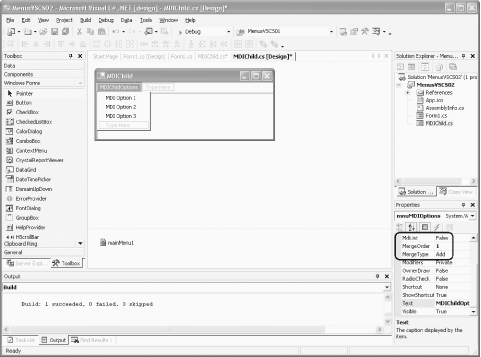
Two properties control how the items in the two menus are merged: MergeOrder and MergeType. The MergeOrder sets the relative order of the items in the two menus. If two items have the same MergeOrder, then the outcome of the merge is determined by the MergeType property of the merged menu.
The MergeType is an enumeration, as shown in Table 18-3.
|
Member |
Description |
|---|---|
|
Add |
The default for MDI Children. The MenuItem is added to the collection of existing MenuItem objects. |
|
MergeItems |
All submenu items are merged with those of the existing MenuItem objects at the same position in a merged menu. |
|
Remove |
The MenuItem is not included in the merged menu. |
|
Replace |
The MenuItem replaces an existing MenuItem at the same position. |
In the following example, you'll modify the MDIChild class you created in Example 18-3 and Example 18-4 to add a menu, as shown in Figure 18-10. Notice that the MergeOrder is set to 1, as shown circled in the properties window.
Figure 18-11. Adding a menu to MDIChild
The MDIChild class is unchanged, except the event handler:
private void Option_Click(object sender, System.EventArgs e)
{
 MenuItem item = sender as MenuItem;

 if ( item != null )
 {
 item.Checked = ! item.Checked;
 }
}
Private Sub Option_Click( _
 ByVal sender As System.Object, _
 ByVal e As System.EventArgs) _
 Handles mnuMDIOption1.Click, mnuMDIOption2.Click, mnuMDIOption3.Click
 Dim item As MenuItem = CType(sender, MenuItem)
 item.Checked = Not item.Checked
End Sub
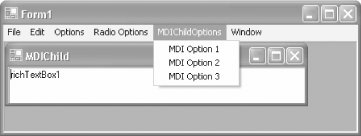
With this in place, return to Form1 and ensure that all items on the menu have a MergeOrder of 0 except for Window, which you'll give a MergeOrder of 99. This will force the new MDIChild menu to merge between the Radio Options and the Window option. You can assign each item in the menu its own MergeOrder to gain even finer control of the outcome. When you run the application and open an MDI Child (e.g., click on File New), the MDI Child's merged menu is inserted just before the Window Menu item, as shown in Figure 18-11.
Figure 18-12. The MDIChild menu inserted
If you set MDI Option 2 in this MDI Child window, and then create a second child, you'll find that the MDIChildOption menu reflects the state of the current MDI Child Windows. As you change what is current (using the Window menu choice), the options will reflect the current window's state.
18.2.7.1 Merging menus by hand
Under some exceptional circumstances, you may want to manually merge two or more menus. Do so by calling the MenuMerge method on the menu you are merging into and passing the menu you wish to merge. The same rules of MergeOrder and MergeType apply.
For an artificial example, return to the main form and add two menus: Menu1 and Menu2. In Menu1, add five items, as shown in Table 18-4.
|
Text |
Name |
Merge order |
|---|---|---|
|
Menu 1.1 |
mnuMenu11 |
1 |
|
Menu 1.2 |
mnuMenu12 |
2 |
|
Menu 1.3 |
mnuMenu13 |
3 |
|
Menu 1.4 |
mnuMenu14 |
4 |
|
Merge! |
mnuMerge |
99 |
For Menu2, add four items, as shown in Table 18-5.
|
Text |
Name |
Merge order |
MergeType |
|---|---|---|---|
|
Menu 2.1 |
mnuMenu21 |
1 |
Add |
|
Menu2.2 |
mnuMenu22 |
2 |
Replace |
|
Menu2.3 |
mnuMenu23 |
3 |
Remove |
|
Menu2.4 |
mnuMenu24 |
5 |
Add |
To see the results of these various settings, you must press Merge (to merge the menus) and then press it again (to merge a second time). It takes a moment to sort through the results, which are illustrated in Figure 18-12.
Figure 18-13. Merged twice
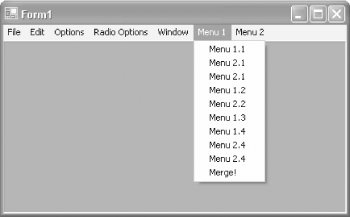
Notice that Menu 2.1 was added twice, just as you'd expect because it was set to Add. Menu 2.2 is added only once because it was set to replace, so when it found 2.2 on the menu, it replaced the original. Menu 2.3 doesn't appear at all! Its MergeType was set to Remove, so it does not appear in the merged menu. Finally, Menu 2.4 appears twice because it had no conflict (its MergeOrder was set to 5 and no other item had that MergeOrder).
Once again, the code is unchanged, except to add the event handler for the Merge! menu command.
|
private void mnuMerge_Click(object sender, System.EventArgs e)
{
 MenuItem item = sender as MenuItem;
 if ( item != null )
 {
 item.Parent.MergeMenu(mnuMenu2);

 }
}
Private Sub mnuMerge_Click(ByVal sender As System.Object, _
 ByVal e As System.EventArgs)
 Dim item As MenuItem = CType(sender, MenuItem)
 item.Parent.MergeMenu(mnuMenu2)
End Sub
|
18.2.8 OwnerDraw Menus
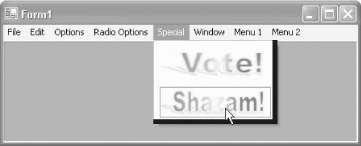
Until now, all menus have been simple text. There are times, however, when you'd like to draw your own menu items, perhaps to use fancy graphics. This task is simple, and even with very little graphical talent (and it is hard to have less than I do), you can create snazzy menus, as shown in Figure 18-13.
Figure 18-14. OwnerDraw menu
Here are the (incredibly easy) steps for creating this menu:
- Create the bitmaps (this is the hard part).
- Set the OwnerDraw property for your OwnerDraw menu items to true.
- Implement two event handlers for each OwnerDraw MenuItem: DrawItem and MeasureItem.
That's it! Let's take it step by step.
18.2.8.1 Create the bitmaps
We created these two bitmaps by opening Microsoft Word, using WordArt to make the picture. We then captured the picture to a bitmap using one of our favorite desktop utilities: Hypersnap DX.[1] We saved these files to our temp directory to make it easy to find and load them.
[1] Found at http://www.hypersnap.com.
You'll see later in this chapter (in the section Section 18.3) that Visual Studio .NET comes complete with dozens of bitmaps you can use. Also, you can always create your own, with programs as simple as Paint or as complex as Photoshop.
18.2.8.2 Set the OwnerDraw property
The second step is to create a new menu (in this case marked Special) with two submenu items (Vote and Shazam). Enter them like any other menu item (normal text nothing special), but set their OwnerDraw property to true.
|
Click on the lightening bolt (if you are doing this in C#) for each menu item (Vote and Shazam), and set their DrawItem and MeasureItem method event handlers. You may call these methods anything you like, and soon you'll fill in the body of these event handlers. While you're at it, set the Click event handler as well, (OnODDraw_Click).
|
VB.NET programmers create these event handlers in the drop-down menu, and then modify the event handler to handle the event for both menu items (using the handles keyword). For example:
 Private Sub mnuODVote_DrawItem( _
 ByVal sender As Object, _
 ByVal e As System.Windows.Forms.DrawItemEventArgs) _
 Handles mnuODVote.DrawItem, mnuODShazam.DrawItem
In either case, you end up with three event handlers (OnDrawItem, OnMeasureItem, and OnODDraw_Click), which you must now implement.
18.2.8.3 Implement the event handlers
Making these MenuItems OwnerDraw: MeasureItem and DrawItem requires only two event handlers. The third, Click, allows you to respond to the menu items (a useful idea), though this one is no different from any other MenuItem event handler.
MeasureItem is called before the owner draw menu item is displayed. The event handler receives a MeasureItemEventArgs object, which you can use to set the ItemHeight and ItemWidth:
private void OnMeasureItem(
 object sender, System.Windows.Forms.MeasureItemEventArgs e)
{
 Image img = Image.FromFile(files[e.Index]);
 e.ItemHeight = img.Height;
 e.ItemWidth = img.Width;
}
Private Sub mnuODVote_MeasureItem( _
 ByVal sender As Object, _
 ByVal e As System.Windows.Forms.MeasureItemEventArgs) _
 Handles mnuODVote.MeasureItem, mnuODShazam.MeasureItem

 Dim img As Image
 img = Image.FromFile(files(e.Index))
 e.ItemHeight = img.Height
 e.ItemWidth = img.Width

End Sub
All you are doing is getting the image from the file and setting the MeasureItemEventArgs ItemHeight and ItemWidth to the images Height and Width properties. Easy as pie.
The call to Image.FromFile calls a static method of the Image class. You'll pass in an array of strings. To make this work, return to the top of the class and define the string array files as a member variable:
private string[ ] files = { @"c: empvote.bmp", @"c: empshazam.bmp" };
Private files( ) As String = {"c: empvote.bmp", "c: empshazam.bmp"}
|
The second required event handler is DrawItem. This is raised when it is time to draw the item. Here, you are responsible for drawing your MenuItem. This event handler receives a DrawItemEventArgs object. A few of its most useful properties are shown in Table 18-6.
|
Property |
Type |
Description |
|---|---|---|
|
BackColor |
Color |
Read only. Gets the background color for the item being drawn. |
|
Bounds |
Rectangle |
Read only. The bounding rectangle to be drawn. |
|
Font |
Font |
Read only. The font of the item being drawn. |
|
ForeColor |
Color |
Read only. The foreground color of item being drawn. |
|
Graphics |
Graphics |
Read only. The graphics surface to draw on. |
Since you use are using a bitmap for the menu item, the code is fairly straightforward. Start by getting the bitmap from the file, as you did in OnMeasureItem:
private void OnDrawItem(object sender, System.Windows.Forms.DrawItemEventArgs e)
{
 Image img = Image.FromFile(files[e.Index]);
Dim img As Image
img = Image.FromFile(files(e.Index))
Next, create a rectangle based on the property Bounds.rectangle of the DrawItemEventArgs parameter:
Rectangle r = e.Bounds;
Dim r As Rectangle
r = e.Bounds
Create a pen to draw the rectangle, and deflate the rectangle by six pixels in both width and height to leave room for the border. Draw the rectangle, and then draw the bitmap image:
Pen pen = new Pen(e.BackColor,2);
r.Inflate(-6,-6);
e.Graphics.DrawRectangle(pen,r);
e.Graphics.DrawImage(img,r);
Dim p As Pen = New Pen(e.BackColor, 2)
r.Inflate(-6, -6)
e.Graphics.DrawRectangle(p, r)
e.Graphics.DrawImage(img, r)
All of the information you need is in either the bitmap itself or in the DrawItemEventArgs parameter.
Finally, you can implement the click event handler, much as you have other event handlers:
private void mnuODDraw_Click(object sender, System.EventArgs e)
{
 MenuItem item = sender as MenuItem;
 if ( item != null )
 {
 string choice = item.Text;

 MessageBox.Show ("You clicked " + choice, "Menu Event Tester",
 MessageBoxButtons.OK, MessageBoxIcon.Asterisk);
 }
}
Private Sub mnuODDraw_Click( _
 ByVal sender As System.Object, _
 ByVal e As System.EventArgs) _
 Handles mnuODVote.Click, mnuODShazam.Click
 Dim item As MenuItem = CType(sender, MenuItem)
 Dim choice As String = item.Text
 MessageBox.Show("You clicked " & choice, _
 "Menu Event Tester", MessageBoxButtons.OK, _
 MessageBoxIcon.Asterisk)
End Sub
|
18.2.9 Context Menus
Modern Windows applications are filled with context menus. Whenever you need to accomplish a task or find out what is possible, right-click on a control, and up pops a context menu.
Creating these menus is simple. Begin by creating a menu as you would for your form (this time dragging a context menu), but rather than attaching it to the form, attach it to one or more controls. That's all there is to it.
In the next simplified example, create a form with four controls as listed in Table 18-7 and shown in Figure 18-14.
|
Control |
Name |
Text |
Description |
|---|---|---|---|
|
ListBox |
listBox1 |
None |
A simple, small listbox |
|
Textbox |
textBox1 |
None |
A simple text box |
|
Button |
btnAdd |
Add |
|
|
Button |
btnDone |
Done |
Figure 18-15. Simple form for the context menu
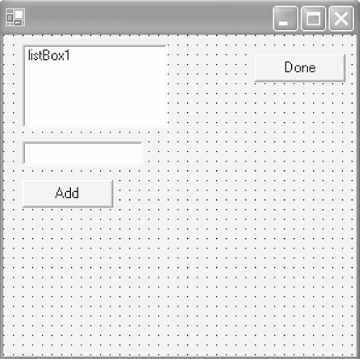
Drag a ContextMenu from the Toolbox onto the form. Name it mnuContext. Add four subitems below it, labeled Move Down, Move Up, Delete, and Duplicate. Name those menu items mnuDown, mnuUp, mnuDelete, and mnuDuplicate.
To associate this context menu with the listbox control, click on the listbox control, and click on the ContextMenu property in the Properties window. Set the property value to mnuContext. If you now run the form and right-click on the listbox, the context menu will pop up. None of the event handlers are in place yet, so nothing will happen, but you see where this is headed.
The user will enter text in the text box and then click on the Add button to add it to the listbox. This will invoke the event handler, as shown here (the VB.NET is nearly identical):
private void btnAdd_Click(object sender, System.EventArgs e)
{
 listBox1.Items.Add(textBox1.Text);
 textBox1.Text = "";
}
Once the listbox is populated, the user can right-click on the it to bring up a Context menu for manipulating the listbox, as shown in Figure 18-15.
Figure 18-16. Invoking the Context menu
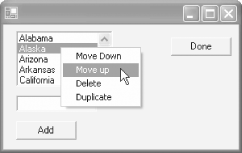
The implementation for the click event on a Context menu is accomplished much like the implementation for any other menu. You have a choice of creating separate event handlers for each menu item or combining them into a single event handler. Enter the following code snippet to implement a single event handler for all context menus.
private void ctxtMenuClick(object sender, System.EventArgs e)
{
 if ( listBox1.SelectedIndex != -1 )
 {
 MenuItem mi = (MenuItem) sender;
 MessageBox.Show("You asked to " + mi.Text + " on "
 + listBox1.SelectedItem,
 "Context Menu Tester",
 MessageBoxButtons.OK,
 MessageBoxIcon.Asterisk);
 }
 else
 {
 MessageBox.Show("Please select an item",
 "Context Menu Tester",
 MessageBoxButtons.OK,
 MessageBoxIcon.Asterisk);
 }
}
Private Sub mnuDown_Click( _
 ByVal sender As System.Object, _
 ByVal e As System.EventArgs) _
 Handles mnuDown.Click, mnuUp.Click, _
 mnuDelete.Click, mnuDuplicate.Click
 If Not listBox1.SelectedIndex = -1 Then
 Dim mi As MenuItem = CType(sender, MenuItem)
 MessageBox.Show("You asked to " & mi.Text + " on " + _
 listBox1.SelectedItem, "Context Menu Tester", _
 MessageBoxButtons.OK, MessageBoxIcon.Asterisk)
 Else
 MessageBox.Show("Please select an item", _
 "Context Menu Tester", _
 MessageBoxButtons.OK, MessageBoxIcon.Asterisk)

 End If
End Sub
The complete listing for C# is shown in Example 18-5 and in Example 18-6 for VB.NET.
Example 18-5. Context menu in C# (ContextCS01)
using System;
using System.Drawing;
using System.Collections;
using System.ComponentModel;
using System.Windows.Forms;
using System.Data;

namespace ContextCS01
{
 public class Form1 : System.Windows.Forms.Form
 {
 private System.Windows.Forms.Button btnDone;
 private System.Windows.Forms.TextBox textBox1;
 private System.Windows.Forms.Button btnAdd;
 private System.Windows.Forms.ListBox listBox1;
 private System.Windows.Forms.ContextMenu contextMenu1;
 private System.Windows.Forms.MenuItem mnuDown;
 private System.Windows.Forms.MenuItem mnuUp;
 private System.Windows.Forms.MenuItem mnuDelete;
 private System.Windows.Forms.MenuItem mnuDuplicate;

 private System.ComponentModel.Container components = null;

 public Form1( )
 {
 InitializeComponent( );
 }

 protected override void Dispose( bool disposing )
 {
 if( disposing )
 {
 if (components != null)
 {
 components.Dispose( );
 }
 }
 base.Dispose( disposing );
 }

 #region Windows Form Designer generated code
 private void InitializeComponent( )
 {
 this.btnDone = new System.Windows.Forms.Button( );
 this.textBox1 = new System.Windows.Forms.TextBox( );
 this.btnAdd = new System.Windows.Forms.Button( );
 this.listBox1 = new System.Windows.Forms.ListBox( );
 this.contextMenu1 =
 new System.Windows.Forms.ContextMenu( );
 this.mnuDown = new System.Windows.Forms.MenuItem( );
 this.mnuUp = new System.Windows.Forms.MenuItem( );
 this.mnuDelete = new System.Windows.Forms.MenuItem( );
 this.mnuDuplicate = new System.Windows.Forms.MenuItem( );
 this.SuspendLayout( );
 //
 // btnDone
 //
 this.btnDone.Location =
 new System.Drawing.Point(208, 16);
 this.btnDone.Name = "btnDone";
 this.btnDone.TabIndex = 3;
 this.btnDone.Text = "Done";
 this.btnDone.Click +=
 new System.EventHandler(this.btnDone_Click);
 //
 // textBox1
 //
 this.textBox1.Location =
 new System.Drawing.Point(16, 88);
 this.textBox1.Name = "textBox1";
 this.textBox1.TabIndex = 5;
 this.textBox1.Text = "";
 //
 // btnAdd
 //
 this.btnAdd.Location = new System.Drawing.Point(16, 120);
 this.btnAdd.Name = "btnAdd";
 this.btnAdd.TabIndex = 6;
 this.btnAdd.Text = "Add";
 this.btnAdd.Click +=
 new System.EventHandler(this.btnAdd_Click);
 //
 // listBox1
 //
 this.listBox1.ContextMenu = this.contextMenu1;
 this.listBox1.Location = new System.Drawing.Point(16, 8);
 this.listBox1.Name = "listBox1";
 this.listBox1.Size = new System.Drawing.Size(120, 69);
 this.listBox1.TabIndex = 7;
 //
 // contextMenu1
 //
 this.contextMenu1.MenuItems.AddRange(
 new System.Windows.Forms.MenuItem[ ] {
 this.mnuDown,
 this.mnuUp,
 this.mnuDelete,
 this.mnuDuplicate});
 //
 // mnuDown
 //
 this.mnuDown.Index = 0;
 this.mnuDown.Text = "Move Down";
 this.mnuDown.Click +=
 new System.EventHandler(this.ctxtMenuClick);
 //
 // mnuUp
 //
 this.mnuUp.Index = 1;
 this.mnuUp.Text = "Move up";
 this.mnuUp.Click +=
 new System.EventHandler(this.ctxtMenuClick);
 //
 // mnuDelete
 //
 this.mnuDelete.Index = 2;
 this.mnuDelete.Text = "Delete";
 this.mnuDelete.Click +=
 new System.EventHandler(this.ctxtMenuClick);
 //
 // mnuDuplicate
 //
 this.mnuDuplicate.Index = 3;
 this.mnuDuplicate.Text = "Duplicate";
 this.mnuDuplicate.Click +=
 new System.EventHandler(this.ctxtMenuClick);
 //
 // Form1
 //
 this.AutoScaleBaseSize = new System.Drawing.Size(5, 13);
 this.ClientSize = new System.Drawing.Size(292, 266);
 this.Controls.AddRange(new System.Windows.Forms.Control[ ] {
 this.listBox1,
 this.btnAdd,
 this.textBox1,
 this.btnDone});
 this.Name = "Form1";
 this.ResumeLayout(false);

 }
 #endregion

 [STAThread]
 static void Main( )
 {
 Application.Run(new Form1( ));
 }

 private void btnDone_Click(object sender, System.EventArgs e)
 {
 Application.Exit( );
 }

 private void btnAdd_Click(object sender, System.EventArgs e)
 {
 listBox1.Items.Add(textBox1.Text);
 textBox1.Text = "";
 }

 private void ctxtMenuClick(object sender, System.EventArgs e)
 {
 if ( listBox1.SelectedIndex != -1 )
 {
 MenuItem mi = (MenuItem) sender;
 MessageBox.Show("You asked to " + mi.Text + " on "
 + listBox1.SelectedItem,
 "Context Menu Tester",
 MessageBoxButtons.OK,
 MessageBoxIcon.Asterisk);
 }
 else
 {
 MessageBox.Show("Please select an item",
 "Context Menu Tester",
 MessageBoxButtons.OK,
 MessageBoxIcon.Asterisk);

 }
 }
 }
}
Example 18-6. Context menu in VB.NET (ContextVB01)
Public Class Form1
 Inherits System.Windows.Forms.Form

#Region " Windows Form Designer generated code "

 Public Sub New( )
 MyBase.New( )
 InitializeComponent( )
 End Sub

 Protected Overloads Overrides Sub Dispose(ByVal disposing As Boolean)
 If disposing Then
 If Not (components Is Nothing) Then
 components.Dispose( )
 End If
 End If
 MyBase.Dispose(disposing)
 End Sub

 Private components As System.ComponentModel.IContainer

 Friend WithEvents listBox1 As System.Windows.Forms.ListBox
 Friend WithEvents btnAdd As System.Windows.Forms.Button
 Friend WithEvents textBox1 As System.Windows.Forms.TextBox
 Friend WithEvents btnDone As System.Windows.Forms.Button
 Friend WithEvents contextMenu1 As System.Windows.Forms.ContextMenu
 Friend WithEvents mnuDown As System.Windows.Forms.MenuItem
 Friend WithEvents mnuUp As System.Windows.Forms.MenuItem
 Friend WithEvents mnuDelete As System.Windows.Forms.MenuItem
 Friend WithEvents mnuDuplicate As System.Windows.Forms.MenuItem
  Private Sub InitializeComponent( )
 Me.listBox1 = New System.Windows.Forms.ListBox( )
 Me.btnAdd = New System.Windows.Forms.Button( )
 Me.textBox1 = New System.Windows.Forms.TextBox( )
 Me.btnDone = New System.Windows.Forms.Button( )
 Me.contextMenu1 = New System.Windows.Forms.ContextMenu( )
 Me.mnuDown = New System.Windows.Forms.MenuItem( )
 Me.mnuUp = New System.Windows.Forms.MenuItem( )
 Me.mnuDelete = New System.Windows.Forms.MenuItem( )
 Me.mnuDuplicate = New System.Windows.Forms.MenuItem( )
 Me.SuspendLayout( )
 '
 'listBox1
 '
 Me.listBox1.ContextMenu = Me.contextMenu1
 Me.listBox1.Location = New System.Drawing.Point(13, 8)
 Me.listBox1.Name = "listBox1"
 Me.listBox1.Size = New System.Drawing.Size(120, 69)
 Me.listBox1.TabIndex = 11
 '
 'btnAdd
 '
 Me.btnAdd.Location = New System.Drawing.Point(16, 120)
 Me.btnAdd.Name = "btnAdd"
 Me.btnAdd.TabIndex = 10
 Me.btnAdd.Text = "Add"
 '
 'textBox1
 '
 Me.textBox1.Location = New System.Drawing.Point(16, 88)
 Me.textBox1.Name = "textBox1"
 Me.textBox1.TabIndex = 9
 Me.textBox1.Text = ""
 '
 'btnDone
 '
 Me.btnDone.Location = New System.Drawing.Point(216, 8)
 Me.btnDone.Name = "btnDone"
 Me.btnDone.TabIndex = 8
 Me.btnDone.Text = "Done"
 '
 'contextMenu1
 '
 Me.contextMenu1.MenuItems.AddRange( _
 New System.Windows.Forms.MenuItem( ) _
 {Me.mnuDown, Me.mnuUp, Me.mnuDelete, Me.mnuDuplicate})
 '
 'mnuDown
 '
 Me.mnuDown.Index = 0
 Me.mnuDown.Text = "Move Down"
 '
 'mnuUp
 '
 Me.mnuUp.Index = 1
 Me.mnuUp.Text = "Move up"
 '
 'mnuDelete
 '
 Me.mnuDelete.Index = 2
 Me.mnuDelete.Text = "Delete"
 '
 'mnuDuplicate
 '
 Me.mnuDuplicate.Index = 3
 Me.mnuDuplicate.Text = "Duplicate"
 '
 'Form1
 '
 Me.AutoScaleBaseSize = New System.Drawing.Size(5, 13)
 Me.ClientSize = New System.Drawing.Size(292, 266)
 Me.Controls.AddRange(New System.Windows.Forms.Control( ) _
 {Me.listBox1, Me.btnAdd, Me.textBox1, Me.btnDone})
 Me.Name = "Form1"
 Me.Text = "Form1"
 Me.ResumeLayout(False)

 End Sub

#End Region

 Private Sub btnAdd_Click( _
 ByVal sender As System.Object, ByVal e As System.EventArgs) _
 Handles btnAdd.Click
 listBox1.Items.Add(textBox1.Text)
 textBox1.Text = ""
 End Sub


 Private Sub mnuDown_Click( _
 ByVal sender As System.Object, _
 ByVal e As System.EventArgs) _
 Handles mnuDown.Click, mnuUp.Click, _
 mnuDelete.Click, mnuDuplicate.Click
 If Not listBox1.SelectedIndex = -1 Then
 Dim mi As MenuItem = CType(sender, MenuItem)
 MessageBox.Show("You asked to " & mi.Text + " on " + _
 listBox1.SelectedItem, "Context Menu Tester", _
 MessageBoxButtons.OK, MessageBoxIcon.Asterisk)
 Else
 MessageBox.Show("Please select an item", "Context Menu Tester", _
 MessageBoxButtons.OK, MessageBoxIcon.Asterisk)

 End If

 End Sub
End Class
Windows Forms and the .NET Framework
Getting Started
Visual Studio .NET
- Overview
- Start Page
- Projects and Solutions
- The Integrated Development Environment (IDE)
- Building and Running
Events
Windows Forms
- Windows Forms
- Web Applications Versus Windows Applications
- The Forms Namespace
- Form Properties
- Forms Inheritance
- User Interface Design
Dialog Boxes
- Dialog Boxes
- Modal Versus Modeless
- Form Properties
- DialogResult
- Termination Buttons
- Apply Button
- CommonDialog Classes
Controls: The Base Class
Mouse Interaction
Text and Fonts
Drawing and GDI+
Labels and Buttons
Text Controls
Other Basic Controls
TreeView and ListView
List Controls
Date and Time Controls
Custom Controls
- Custom Controls
- Specializing an Existing Control
- Creating a User Control
- Creating Custom Controls from Scratch
Menus and Bars
ADO.NET
- ADO.NET
- Bug Database: A Windows Application
- The ADO.NET Object Model
- Getting Started with ADO.NET
- Managed Providers
- Binding Data
- Data Reader
- Creating a DataGrid
Updating ADO.NET
- Updating ADO.NET
- Updating with SQL
- Updating Data with Transactions
- Updating Data Using DataSets
- Multiuser Updates
- Command Builder
Exceptions and Debugging
- Exceptions and Debugging
- Bugs Versus Exceptions
- Exceptions
- Throwing and Catching Exceptions
- Bugs
- Debugging in Visual Studio .NET
- Assert Yourself
Configuration and Deployment
EAN: 2147483647
Pages: 148
