18.2. Preparing Your Database If you've made it this far, you've decided that the multiuser features in Access are everything you need. However, before your database goes public, you may want to make a few changes. The most important of these is splitting the database a critical but often overlooked step that gives your shared database extra reliability.
Note: When you're sharing your data, it's essential to use a split database. Sharing an ordinary database can lead to all sorts of odd quirks that will make your database go wonky.
18.2.1. Understanding Split Databases A split database is a database that has its objects divided into two separate files: -
The back-end database contains the raw datain other words, the tables and nothing but. -
The front-end database contains everything you use to work with the tables. This includes all the other types of database objects, like queries, reports , forms, and macros. Once you've split your database, you place the back-end database in a shared location (like a network drive). However, the front-end database works a little differently. You copy it to every computer that's going to use the back-end database. Figure 18-1 shows how it works. Split databases offer several advantages: -
Performance . When you use a split database, each client has a copy of the objects they need to uselike formsready and waiting on their computer. That means you don't need to retrieve the same information from the shared database, which would take more time (and generate more traffic on your network). Instead, the only thing you need to get from the shared database is the data you want to work with. -
Easier updating . It's relatively safe for people to change the data in a shared database, but Access isn't as good at sorting out the confusion if multiple people try to change the design of your database objects. A split database avoids this problem, because the objects that need to be tweaked most often, like queries, reports, and forms, are located in the front end. If you want to modify these objects (or add new ones), you can safely change the front end on one computer, and then distribute it to everyone who needs it. This approach isn't just easierit's also more reliable, because there's no chance of an unsettling phenomenon called database corruption occurring (Section 18.4). 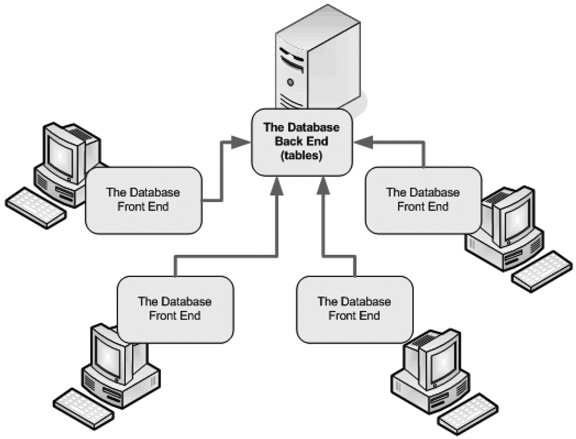 | Figure 18-1. In a system with a split database, you have one back end, which centralizes the data, and several front endsone for each person connecting to your database. | |
-
Different people, different front ends . When you use a shared database, you can create different front ends for different types of peoplefor example, the marketing department needs reports that show sales information, and the warehouse people need a form that shows outstanding orders. You can even use this approach to make sure people don't see forms, reports, and tables that don't apply to them, which reduces the risk of minor errors (like when the CEO accidentally wipes out the entire product catalog). But don't go too wildthe more front ends you create, the more you'll need to maintain.
Note: Technically speaking, you won't make your database more secure by giving people less capable front ends. After all, savvy Access users could just create their own front ends and use them to get unlimited access to the back-end database. However, even though the front end can't stop a malicious attacker, it can minimize the danger of a careless or overly curious user .
You have two ways to split a database. You can use a wizard, or you can do it by hand using the importing and exporting features in Access. The next sections describe both methods . WORD TO THE WISE
Finding a Home for Your Database on the Network | | Before you split your database, you should know where you want to place the back-end database file. One (somewhat risky) option is to share it directly from your own computer. All you need to do is drag your database to the Shared Documents folder or create a new shared folder. The exact process differs depending on your version of Windows and the way your computer is configured, but these instructions do the trick on most Windows XP boxes: -
Fire up Windows Explorer. -
Find the location where your database is stored, right-click that folder, and then choose Properties. -
Switch to the Sharing tab, and then choose Share this Folder. -
Optionally, configure an alternate name that will be used for the folder, and then set a limit on how many people can access the folder at one time. -
Now other people can get to your computerand your databaseby browsing through My Network Places. If this process seems a little too easy to be true, well, it is. The problem is that your computer isn't an ideal network server. If you turn off your computer to go on vacation, everyone is abruptly locked out of your database. Similarly, if you're busy running Revenge of the Demon Spawn Legion Part IV while other people are trying to use your database, their database performance (and your gaming experience) suffers. An even more serious problem occurs if you reboot your computer, at which point everyone who is currently using the database is rudely disconnected. This is guaranteed to lose somebody's work, and it may even cause database corruption (Section 18.4). For all these reasons, it's strongly recommended that you place your database on a server computer . A server computer isn't necessarily any different from your computerin fact, it may just be an ordinary Windows computer that's plugged into the network. The difference is that no one uses this computer directly. Instead, it's left alone so it can concentrate on the important job of doling out data to everyone who needs it. |
18.2.2. Splitting a Database with the Wizard The easiest way to split a database is to use the handy wizard that Access includes for just this purpose. The wizard creates a new back-end database and moves all the tables out of the current database and into the back end. The current file is left with all the other database objects, and so it becomes the front end. Here's how to use the wizard: -
Open any database that has both tables and some other objects (like queries, reports, or forms) . You can try these steps with the Boutique Fudge and Cacophon Studios databases you used in previous chapters. -
Before you begin, it's a good idea to make a database backup . Hey, you never know when something could go wrong. To make your backup, just copy the Access database file to another folder (or choose Office button  Manage Back Up Database to get Access to do it for you). Manage Back Up Database to get Access to do it for you). -
Move Data Access Database. The first window of the Database Splitter wizard appears (see Figure 18-2). 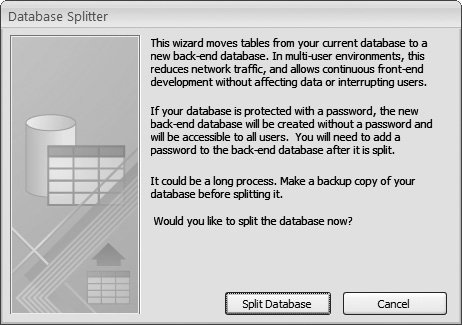 | Figure 18-2. The first step of the wizard is fairly unremarkable. It describes how the wizard works and reminds you to make a backup before you go any further. | | -
Click Split Database . A window appears that prompts you to pick a location and file name for the back-end database. Remember, you need to choose a location that everyone in your company or organization can access. (See the box "Pointing to a Network Location" in Section 18.2.2, for some tips.)
Note: Alternatively, you can save the back end on your computer for the time being, and then move it to the shared location later on (at which point you'll need to update the table links, as described in Section 18.2.3).
-
Choose a file name for the back-end database, and then click Split (Figure 18-3) . Access begins exporting the tablesin other words, copying them from the current database to the new back-end database file. This could take some time. When Access is finished, it shows the message "Database successfully split." It has successfully created the back-end database. The database that you started with (the one that's currently open) is now the front-end database. It no longer contains the tables with all the data; instead, it has a set of table links that let you pull the data out of the back-end database. (You'll learn how these table links work in the following section.) 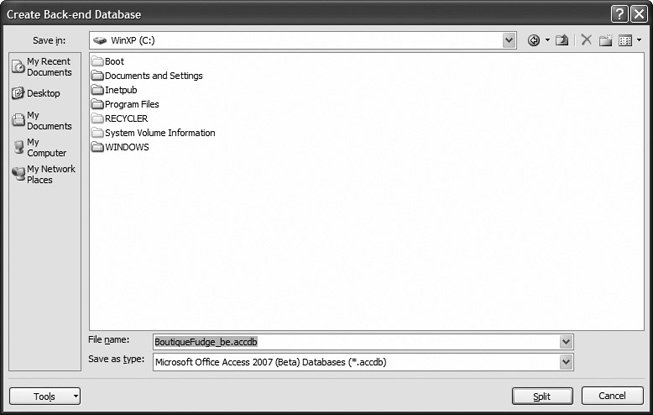 | Figure 18-3. Access recommends adding_be to the end of your database's file name to identify the back end. For example, JoesTaxidermy.accdb becomes JoesTaxidermy_be.accdb. | | UP TO SPEED
Pointing to a Network Location | | You have two ways to point to a place on a network. The first option is to use a mapped network drive , which takes a network location and gives it a drive letter on your computer. Mapped network drives look just the same as ordinary drivesfor example, you can have a drive C: that represents your hard drive, a drive D: that represents your CD-ROM, and a drive F: that represents a place on the network. The problem with mapped network drives is that they may be configured differently depending on the computer. For example, the drive you think of as F: may appear as drive H: on someone else's computer. As a result, the front-end database that works on one computer won't be able to find the back-end database it needs on another. Fortunately, this problem is easy to fix. You just need to point the front end to the appropriate back-end location, as described in Section 18.2.3. If you want to avoid this confusion altogether, you can use a UNC path instead of a mapped network drive. UNC (universal naming convention) is a standard way to create paths that point to locations on the network. The advantage of UNC paths is that they don't vary from one computer to the next. In other words, the UNC path that works on one computer will also work on any other computer on the network. You can recognize a UNC path by its starting characterstwo backslashes. Here's the basic form: \NetworkedComputerName\SharedFolderName
An example of a UNC path is \\SalesComputer\Database . When you browse to a computer through My Network Places, Access creates a UNC path that points to the location you choose. Some Access experts report better results when they use UNC paths to tell Access where to find a database. In rare, difficult-to-reproduce situations, using the mapped network drive syntax can cause Access to give a "too many users" error when you attempt to open a shared database, even when you're well within the maximum user limit (a theoretical 255 users). | -
Now it's time to distribute the front end to everyone who needs to use the database . It's up to you how you want to share your front end. You could email it, burn it on a CD and hand it out, or just pop it in a shared location. However, it's important that everyone understands they need to copy the front end to their computer before they use it.
Note: If you distribute the front end by placing it on the network, you run the risk that people will launch the front end straight from the network, without copying it to their computers first. Left unchecked, this introduces all the problems of ordinary (non-split) databases, like hampered performance and greater risk for errors.
FREQUENTLY ASKED QUESTION
What About Old Versions of Access? | | What happens if some of my coworkers have older versions of Access? In an ideal world, everyone has a copy of the latest and greatest version of AccessAccess 2007. In the real world, you're likely to find low-tech renegades who still love Windows 95. If you support Access 2003 lovers, you need to store the back end in the Access 2003 format. (See Section 1.2.2 for information about how to save a copy of your database in a different format.) As for the front end, you'll probably want to keep two versionsone for the Access 2007 club and another for Access 2003 folks. You'll lose out on some features in the Access 2003 format, but you don't need to lock the technologically challenged out of your database. |
18.2.3. How Linked Tables Work The concept of a split database seems straightforward enough. One file (the back end) stores the raw data, while another (the front end) gives you the tools for working with it. But there's one detail that you haven't considered yetnamely, how does the front end get access to the tables in the back end? The secret is table linking . Linking lets one database see a table in another database file. You can use linking in any databasein fact, you can choose to use it even if you won't be sharing your database. For example, you can divide your tables into two or more database files to get around the size limit (which is 2 GB, or gigabytes, per database file). Or, you can use it to help you organize a sprawling database with dozens of tables. Finally, you may also find it helps you separate public information from supersecret details. If you put the tables with the secret information in a separate database, you're free to share copies of your main database without worrying about sensitive data getting into the wrong hands. Thanks to linking, all the back-end tables still appear in the front-end database (see Figure 18-4). However, the actual data is in a separate file. When you open or otherwise interact with a linked table, Access heads to the linked file to get the information you need. 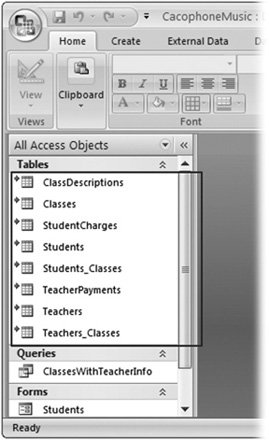 | Figure 18-4. These tables have an arrow icon next to them, which indicates they're linked tables. They aren't actually stored in the current database file, but Access knows where to find the information when it needs it. | |
The only disadvantage to linked tables is that there's always a chance Access will go looking for a linked table in another database file, but not be able to find it. This happens if the back-end database file is moved to another folder or if it's renamed .
Note: If your database has a bad link, when you attempt to open the table (or another object that uses the table, like a query or a report), you get a message informing you that Access can't find the file you need.
Fortunately, it's easy to update your links. Here's how: -
Choose Database Tools Database Tools Linked Table Manager (or right-click any linked table, and then choose Linked Table Manager) . The Linked Table Manager window appears, with a list of all the linked tables in your database (Figure 18-5). -
Place a checkmark next to each link you need to change . If you need to update all your links, click Select All. 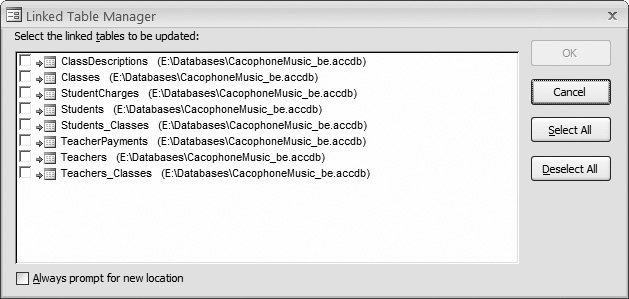 | Figure 18-5. This database has eight linked tables. All the links point to the same back-end database, which is common but isn't required. | | In most cases, all your links will point to the same database file. But if you need to point your tables to different files, then select "Always prompt for new location." -
Click OK . Access pops open the familiar file selection window. Browse to the database file that has your linked table, select it, and then click OK. If you choose "Always prompt for new location," Access shows a separate file selection window for each link. Look at the window title to find out what table you're updating. If you didn't choose "Always prompt for new location," you can update all your links in one step. TROUBLESHOOTING MOMENT
The Mysterious "File Already in Use" Error | | Now that you've created a shared database, you expect it to support a whole crowd of people. That's why it comes as quite a shock when you get the cryptic "file already in use" error. After all, aren't shared databases supposed to remain available even when someone else is using them? This error occurs because someone has already opened the database in Exclusive mode . Exclusive mode (discussed in Section 18.3.4) lets a single person tie up the database and lock out everyone else. The trick is that under certain circumstances, Access can use Exclusive mode even when you don't tell it to. The most common problem occurs when someone doesn't have the correct permissions for the shared folder where the shared database is stored. ( Permissions are a Windows security concept that determines how users are allowed to use files and folders.) Specifically, a problem occurs if you are the first person to open the database, and you don't have permission to create new files . In this situation, Access can't create the .laccdb file that tracks locks (see Section 18.3.3). With the .laccdb file, Access has no way to coordinate multiple users. Instead, it quietly switches to Exclusive mode, which freezes out everyone else. The obvious solution is to identify everyone who needs to use the database, and then make sure they're allowed to create new files in the shared folder. Of course, this problem wouldn't be nearly as confusing if Access could warn you when it's not able to open a database normally and needs to use Exclusive mode. |
18.2.4. Manually Splitting a Database You don't need to use the wizard to split your database. You can move tables into a separate database file on your own, and then create links by hand. The main reason that you'd use this approach is because you want to split your database into more piecesfor example, you want one front end and four-back end files. There are some good reasons for subdividing your back end. They include: -
Better reliability . Essentially, if one file is damaged, the others will still live on unaffected. -
Better security . Using the tools of the Windows operating system, you can control who can open a specific file. You can use this to your advantage with split databases to lock people out of parts of the back end where they don't belong. -
Leaving room to grow . As mentioned earlier, Access limits databases to 2 GB. If you plan to store large amounts of records with attachments (like pictures), it's a good idea to make sure plenty of space is available now and for the foreseeable future. To split a database by hand, you need to use the importing and exporting features in Access. The following steps show you how to split the Boutique Fudge database into three separate pieces so you can keep the credit card information separate from the rest of the data. (If you want to follow along, you can find the database with the sample content on the "Missing CD" page at www.missingmanuals.com.) -
Create the back-end databases that you need . In this example, you need two back ends: one for the credit card details (call this BoutiqueFudgeSecrets_be.accdb) and one for all the other details (named BoutiqueFudge_be.accdb). Before you go any farther, create both of these databases in Access and place them in the shared location, but leave them empty for now. -
Open the back-end database file . The next task is to add the correct tables to each back-end database. You do this using Access's importing wizard. Start with BoutiqueFudgeSecrets_be.accdb. It's easy because it requires just a single table. -
Choose External Data Import Access . The Import wizard begins (see Figure 18-6).
Note: In this example, you're importing the tables you need into the back end. You could also try the same trick in reverse, by exporting the tables out of the front end. However, export operations are more limited than import operations, because they let you transfer only a single table at a time.
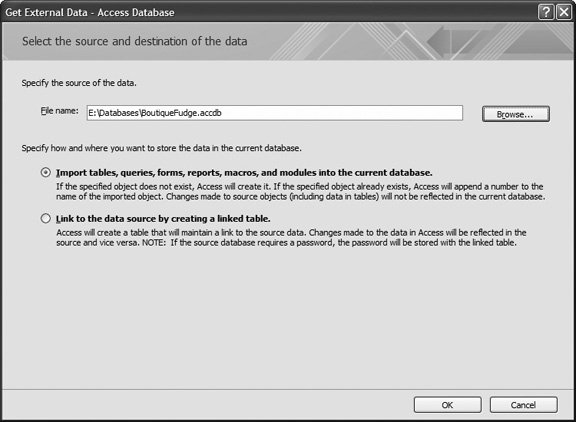 | Figure 18-6. In the first step of the Import wizard, you choose the file that has the tables you want to import, and then you decide whether to copy the tables or just create links. | | -
Specify the location of your front-end database in the "File name" box . In this example, that's BoutiqueFudge.accdb, which currently contains the whole shebang (tables, queries, forms, and reports). -
Choose the first option, "Import tables into the current database." The second option lets you create linked tables. You'll use it later in this process. -
Click OK . The Import Objects window appears, with a list of everything in your database (see Figure 18-7). -
Select the tables you want to import, and then click OK . The BoutiqueFudgeSecrets_be database needs just a single table: CreditCards. Once you click OK, Access copies the tables into your database. You can now close the database file. -
Repeat steps 2 to 7 for any other back-end database files . In this example, you need to open BoutiqueFudge_be.accdb, and import all the tables except CreditCards. Once you've finished transferring the data to your back ends, its time to update the front end. 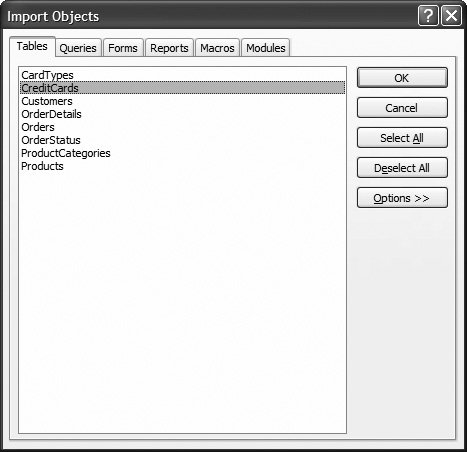 | Figure 18-7. The Tables tab lists all the tables in your database. Select the ones you want to import by clicking them once. | | -
Open the front-end database . In this example, that's BoutiqueFudge.accdb. -
Delete all the tables . Don't be shyafter all, you've already copied them to their new homes in the back-end files. Once you're finished, it's time to take the last step and create the links you need in your front end. If your tables are linked together, start with the child tables first. -
Choose External Data Import Access . The Import wizard starts again. -
Point the import wizard to your first back-end file, choose "Link to the data source," and then click OK . Start with the BoutiqueFudgeSecrets_be.accdb file. -
Choose all the tables, and then click OK . Access creates the corresponding linked tables in your database. Each table appears with the telltale arrow icon next to it in the navigation pane to let you know it uses a link. -
Repeat steps 11 to 13 for every back-end database . If you started with BoutiqueFudgeSecrets_be, it's time to move on to BoutiqueFudge_be, which contains all the other tables you need. If you've followed all these steps, you wind up with three database files that work together: BoutiqueFudgeSecrets_be.accdb with the credit card information, BoutiqueFudge_be.accdb with the rest of the tables, and BoutiqueFudge.accdb with the queries, forms, and reports. If you want to see the finished product, check out the downloadable samples for this chapter. And jump ahead to Section 18.5 to learn how you can apply different security settings to the different back ends. 18.2.5. Locking Down Your Front End Before you let your database out into the wild, you need to think about what can go wrong. In the hands of less savvy Access users, your lovingly crafted forms and reports can get scrambled. It's a common complaint with multiuser Access databases: Sooner or later, a curious or careless person changes something that's better left alone, and that person's front end stops working. Although you can't watch over everyone's shoulder, you can prevent mischief by locking down your front end. That way, other folks won't be allowed to modify the design of forms and reports. (Of course, they can still use the front end to review and edit data.) The secret to locking down your front end is to change the front-end database from an .accdb file to an .accd e file. Although there's only one letter of difference, the .accde format restricts people in several ways: -
They can't modify forms or reports. In fact, they can't even open these objects in Design view. -
They can't create new forms and reports. -
They can't rename existing forms and reports (although they can delete them). -
They can't edit or even look at your VBA code and macros. In fact, all code is compiled , which means it's converted from the code statements you learned about in Chapters 16 and 17 to a shorthand that only the computer can understand.
Note: Access gives you the same feature for the older .mdb database format. To lock down changes in an .mdb, you create an .mde file.
Making an .accde file is as easy as can be. Just follow these steps: -
Open your front-end database . -
Make sure that your database is running in full trust mode . If you haven't opened it from a trusted location (Section 15.2.4), you need to click the Options button in the security warning message bar, choose Enable Content, and then click OK. Section 15.2.2 has more on this procedure. -
Choose Database Tools Database Tools Make ACCDE . The Save As dialog box appears. -
Supply the file name for your .accde file . Access won't change your original databaseinstead, it makes a copy in the new format. When you create an .accde file, make sure you keep the original .accdb in your hands. That's because sooner or later you'll need to make changes. Access doesn't give you any way to change an .accde file back to its original format, so your only choice is to go back to the original format, make your changes, and then export a new .accde file.
Note: If you lose your original .accdb file, there's no way to change your forms and reports. You're stuck with a database that's frozen in time. However, as a last resort, you can try the Web, where other companies provide utilities that can (usually) transform an .accde file back to an .accdb file.
FREQUENTLY ASKED QUESTION
When Not to Use an ACCDE | | Is the .accde format for front ends only? You can turn any database into an .accde file. However, you should think twice before you use anything other than a front end. That's because it's difficult to update an .accde file that has data. To understand the problem, imagine you create an .accde file for an all-in-one database that sells discount hair care products. This database includes all the raw datacustomer lists, available services, and invoicesand it contains the forms and reports that make your life easier. There's no division between the back end and front end. A few weeks later, you decide to add a new report that shows customers subgrouped by the color of their highlights. Of course, you can't edit the .accde file directly, so you polish off the report in the original .accdb file, and create a new .accde. But waitthere's a problem. Your original .accdb file still has the old data. You're now stuck with two incomplete files: an .accde with the new data but the old forms and reports, and a new .accde with the right forms and reports but the wrong data. To remedy this situation, you need to perform a time-consuming import operation, as described earlier (Section 18.2.4). To avoid these data synchronization headaches , use the .accde format the way it's intended to be usedto lock down front ends that don't have any tables. |
18.2.6. Sharing a Database with People Who Don't Own Access Wouldn't it be nice if people could work with your data and use your forms and reports without needing the full Access software on their computers? It may seem like just a dream, but there's a way. Microsoft provides a scaled-down version of Access that's called the Access runtime engine . Rather than buying a separate copy of Access for each person who needs to use your database, you can give them all a copy of the Access runtime engine. Then, they can use the runtime engine to load up your database and use its forms and reports to review and edit data. The Access runtime engine doesn't have the full features of Access. Notably, it doesn't include the ribbon or the navigation pane. In fact, it doesn't provide any way for people to change the configuration or design of the database. (That's a job for you, the database designer.) The only thing you can do with the Access runtime is use the forms and reports that you've included in your front end.
Note: When using a well-designed front end with the Access runtime, people may not even realize that they're running Access.
So how can you get your hands on the Access runtime engine? At the time of this writing, it wasn't yet released. However, Microsoft has promised to make it available in early 2007 (and unlike Access 2003, Microsoft promises that the Access 2007 runtime engine will be available on their Web site, and not bundled with their Visual Studio programming tool). To get the latest update on the status of the Access runtime engine, click over to the "Missing CD" page at www.missingmanuals.com. In the meantime, you can take a look at what a database looks like when it's in the hands of the runtime engine. Here's how: -
Open your database and make sure it has a startup form (Section 14.2.2) . The Access runtime engine doesn't have a navigation pane, so you need to have a startup form in order for the user to be able to do anything. That startup form will probably be a switchboard (Section 14.2.1) with buttons that lead to other forms. To set the startup form, choose Office button Access Options. Pick the Current Database section on the left. Finally, set the Display Form setting to the form you want to show automatically when the database is opened. -
Double-click your database to run it in runtime mode. You'll see your startup form, but no ribbon or navigation (Figure 18-8) . Don't worry. You can rename your Access file to .accdb to get it back to normal.
Tip: The Access runtime engine is a truly useful way to share your databases without buying a zillion Access licenses and confusing people with all the features of the full Access user interface. If you're using Access to coordinate life in a small business, check it out.
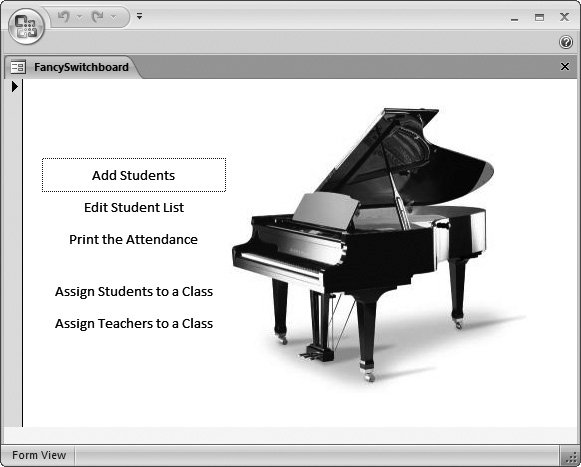 | Figure 18-8. This .accdr file uses the fancy switchboard you saw in Section 14.2.3.2. | |
NOSTALGIA CORNER
The Death of Data Access Pages | | Access 2003 had a feature called data access pages for creating a Web page front end to your database. The idea was a powerful oneusing these Web pages, anyone could review information in your database or make a change, even without the Access software. Unfortunately, Access and the Web have a troubled relationship. As you've already learned, Access can handle only so many simultaneous users at one time. The Web has no such limitation. In fact, just putting a database on the Internet is an invitation for hordes of people to try to use it at the same time. For this reason, as well as for several others (such as the difficulty in customizing data access pages and the lack of compatibility with other browsers), Microsoft discontinued the feature in Access 2007. If you still want a Web face for your database, Access doesn't have many tools to help you. Your best bet is to move your database to a server product like SQL Server, and use another development tool to build your Web page. Serious coders love ASP.NET (see www.asp.net), an all-in-one Microsoft toolkit for building the simplest to the most sophisticated Web sites. |
|