Date Time


Date & Time

The Date & Time preferences pane includes three panes for setting the system time and clock options:

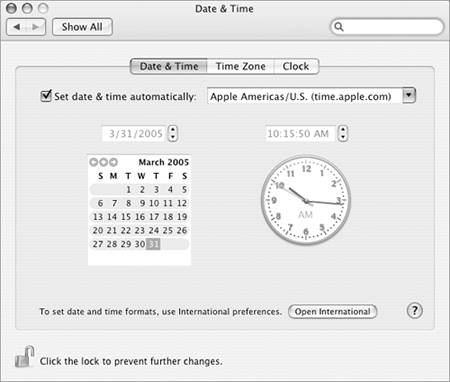
  • Date & Time (Figure 22) enables you to manually set the date and time.

    Figure 22. The Date & Time pane of the Date & Time preferences pane.


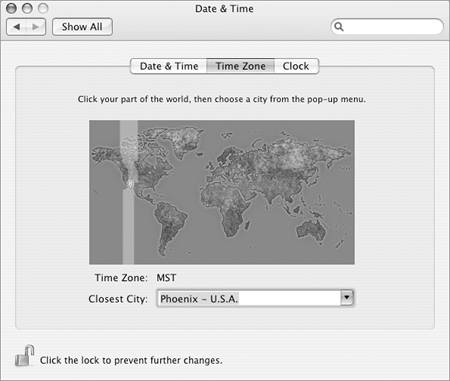
  • Time Zone (Figure 25) enables you to set your time zone.

    Figure 25. The Time Zone pane of the Date & Time preferences pane, with a time zone selected.


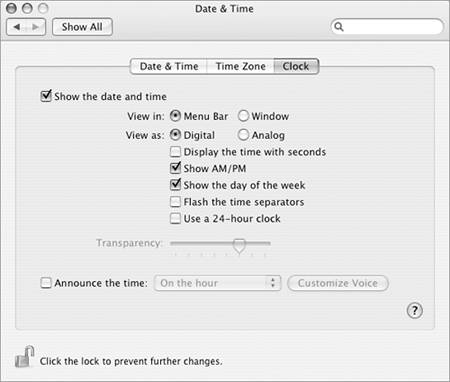
  • Clock (Figure 27) enables you to set options for the appearance of the clock.

    Figure 27. The Clock pane of the Date & Time preferences pane.


To manually set the date & time

1.

In the Date & Time preferences pane, click the Date & Time button (Figure 22).

2.

If necessary, turn off the Set date & time automatically check box.

3.

To change the date, click the part of the date you want to change (Figure 23), then type a new value or use the tiny arrow buttons beside the date to change the value.

Figure 23. Click the part of the date that you want to change, then use the arrow buttons to change the value.


4.

To change the time, click the part of the time that you want to change and type a new value or use the tiny arrow buttons beside the time to change the value.

5.

Click Save.

Tips

  • You can't manually change the date or time if you have enabled the network time server feature; I tell you more about that on the next page.

  • Another way to change the time in step 4 is to drag the hands of the analog clock so they display the correct time.


To automatically set the date & time

1.

In the Date & Time preferences pane, click the Date & Time button (Figure 22).

2.

Turn on the Set date & time automatically check box.

3.

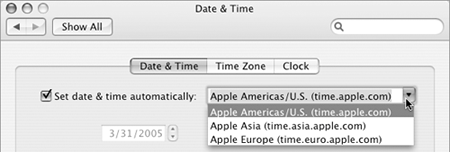
Choose the closest time server from the drop-down list (Figure 24).

Figure 24. The drop-down list includes time servers all over the world.


Tip

  • With the network time server feature enabled, your computer will use its Internet connection to periodically get the date and time from a time server and update the system clock automatically. This ensures that your computer's clock is always correct.


To set the time zone

1.

In the Date & Time preferences pane, click the Time Zone button (Figure 25).

2.

Click your approximate location on the map. A white bar indicates the time zone area (Figure 25).

3.

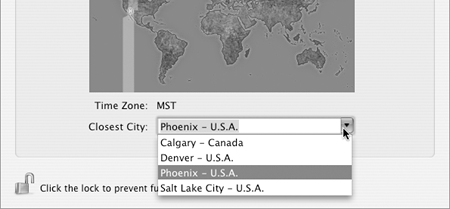
If necessary, choose the name of your time zone from the Closest City drop-down list beneath the map (Figure 26).

Figure 26. The Closest City drop-down list only displays cities in the currently selected time zone.


Tips

  • In step 3, only those time zones within the white bar on the map are listed in the drop-down list (Figure 26). If your time zone does not appear, make sure you clicked the correct area in the map in step 2.

  • It's a good idea to choose the correct time zone, since Mac OS uses this information with the network time server (if utilized) and to properly change the clock for daylight saving time.


To set clock options

1.

In the Date & Time preferences pane, click the Clock button (Figure 27).

2.

To enable the clock, turn on the Show the date and time check box.

3.

Select a View in radio button:

  • Menu Bar puts the clock in the menu bar, which is the default location.

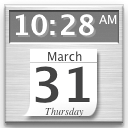
  • Window puts the clock in a floating window (Figure 28).

    Figure 28. You can display the clock in a floating window. This example shows a digital clock.


4.

Select a View as radio button:

  • Digital displays the date and time with letters and numbers.

  • Analog displays the time on an analog clock. If you select this option, you cannot set options in step 5.

5.

Toggle check boxes to customize the clock's appearance:

  • Display the time with seconds displays the seconds as part of the time.

  • Show AM/PM displays AM or PM after the time.

  • Show the day of the week displays the three-letter abbreviation for the day of the week before the time.

  • Flash the time separators blinks the colon(s) in the time every second.

  • Use a 24-hour clock displays the time as a 24-hour (rather than 12-hour) clock.

6.

If you selected Window in step 3, you can use the Transparency slider to set the transparency of the clock window.

7.

To instruct your computer to vocally announce the time periodically, turn on the Announce the time check box and choose a frequency option from the pop-up menu.

Tip

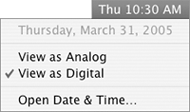
  • The menu bar clock is also a menu that displays the full date and time and offers options for changing the clock display (Figure 29).

    Figure 29. The menu bar clock is also a menu.


Visual QuickStart Guide. Mac OS X 10. 4 Tiger
Mac Os X 10.4 Tiger (Visual Quickstart Guides)
ISBN: 0321423372
EAN: 2147483647
Year: 2003
Pages: 301
Authors: Maria Langer

flylib.com © 2008-2017.
If you may any questions please contact us: flylib@qtcs.net