Smart Sharpen
| The new Smart Sharpen filter is a fascinating piece of work. Unfortunately, it shares with Reduce Noise a significant lack of speed, both in execution and, worse, in updating the proxy image when you change settings. For Web-resolution images, it's just about the greatest thing since sliced toast, but for high-resolution images its usefulness is much more debatable. We suspect that somewhere inside Smart Sharpen lies the algorithm that lets the CSI team read that suspect's driver's license from a convenience store security camera frame grabthe catch is that this filter would have to run for about six months to produce the result. If you need to make low-resolution images look good on screen, Smart Sharpen is great. If the idea of making sharpening masks fills you with terror, Smart Sharpen does a fairly good job of differentiating edges from non-edges. It's quite useful for capture sharpening, though on the whole we still prefer our tried-and-true techniques. On the other hand, it's a very slow and difficult way to do output sharpening. Smart Sharpen Remove ModesSmart Sharpen is really three sharpening filters in one. You select which one you want to use by choosing an option from the Remove menu (see Figure 9-24). Figure 9-24. The Smart Sharpen filter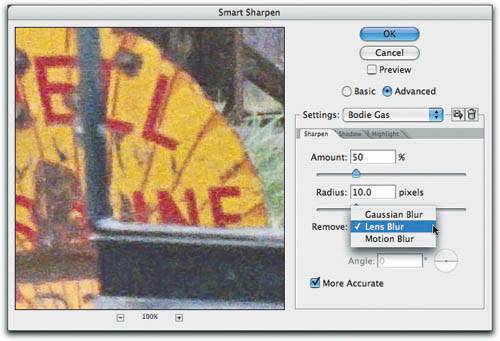 Gaussian BlurThe Gaussian Blur mode isironicallythe Unsharp Mask with a new user interface. If you turn on the More Accurate option (when would you want "less accurate"?) the result is a good deal gentler than Unsharp Mask at the same Amount and Radius, but it's basically the same type of sharpening. We don't see any compelling reasons to use it. Lens BlurIn Lens Blur mode, Smart Sharpen is a whole different animal than Unsharp Mask. Lens Blur uses much more sophisticated algorithms than Unsharp Mask (or Smart Sharpen in Gaussian Blur mode) to detect edges and detail, and hence typically produces better sharpening with less-obvious sharpening halos. Motion BlurIn Motion Blur mode, Smart Sharpen tries to undo the effects of blurring caused by either camera or subject movement. If the movement is truly unidirectional, it does a surprisingly good job, but camera shake rarely happens in all directions, and subject movement is often quite complex, so don't expect blurred subjects to be rendered razor-sharp by the filter. We typically apply Smart Sharpen's Motion Blur on small areas of images rather than globallyfew images benefit from global application. Advanced ModeWhen you choose Advanced mode by clicking the Advanced radio button, two additional tabs, labeled Shadow and Highlight, become available. They offer controls very similar to those offered by the Shadow/Highlight command found in the Adjust submenu (under the Image menu)see "Shadow/Highlight" in Chapter 6, Image Adjustment Fundamentals. Each tab provides three sliders for Fade Amount, Tonal Width, and Radius. They let you reduce the strength of the shadow and highlight sharpening contours, allowing stronger sharpening of the midtones.
Thus far, our use of Smart Sharpen is confined to the Lens Blur and Motion Blur modes, and we always use the Advanced setting with the More Accurate option turned on. Smart Sharpen in ActionAs with the Unsharp Mask filter, the key parameter is Radius. While you can obtain some interesting contrast effects with very high Radius settings (just as you can with Unsharp Mask), you typically need to match the Radius to the image content to obtain good sharpening. But as you'll see, you need very different Radius settings for the Lens Blur and Motion Blur modes. We start out by setting the Amount all the way to 500 percent, in Basic mode, while we find the correct Radius setting (see Figure 9-25). Figure 9-25. Setting the Radius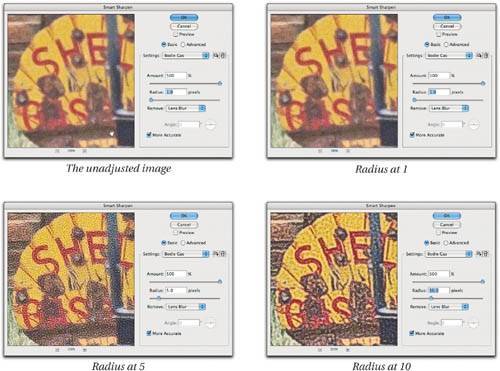 At a Radius setting of 1, this high-resolution image barely looks different from the unsharpened version, even with the Amount cranked all the way up. At a Radius setting of 5, we see sharpening starting to happen, but it's emphasizing the film grain and the artifacts left by Reduce Noise rather than sharpening the image details. A Radius of 10 matches the image content nicely, though the Amount is obviously now far too high. We proceed by bringing the Amount down to 50 percent, then we switch to Advanced mode and further soften the Shadow and Highlight contours (see Figure 9-26). Figure 9-26. Setting the Amount and Advanced settings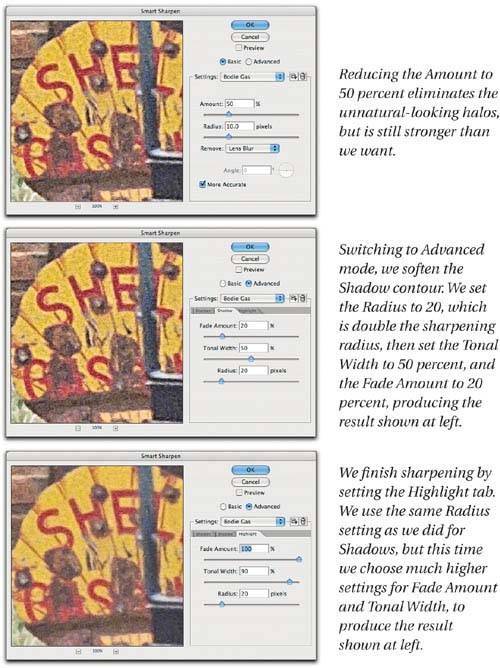 In practice, finding the right settings for all three tabs in Smart Sharpen is an iterative processafter adjusting the Shadow and Highlight tabs, we may go back and tweak the Amount in the main panel, then revisit the Shadow and Highlight tabs once again. Smart Sharpen is also effective at much smaller Radius settings, depending on the image. The image shown in Figure 9-27 requires a very different treatment from the previous example, but the process is essentially the same. Figure 9-27. Small-Radius sharpening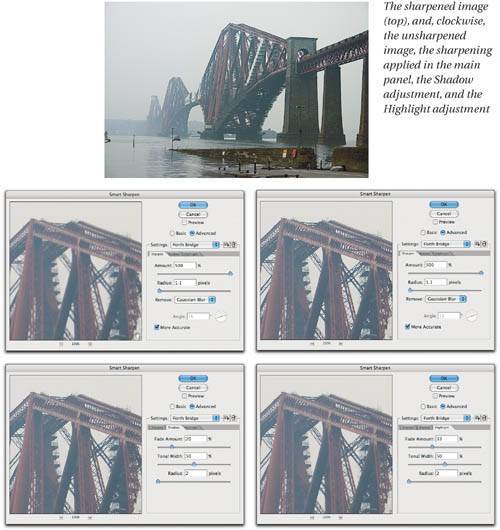 As before, we started by setting the Radius in the main panel with the Amount set to 500 percent. This time, we kept the Amount setting, and used the Advanced panels to reduce the contrast on the sharpening halos. When we use Smart Sharpen to remove Motion Blur, the process is only slightly different. Radius is still very much a key parameter, but so is the setting of the Angle. Figure 9-28 shows an image at various stages of the application of Smart Sharpen set to remove Motion Blur. Figure 9-28. Removing Motion Blur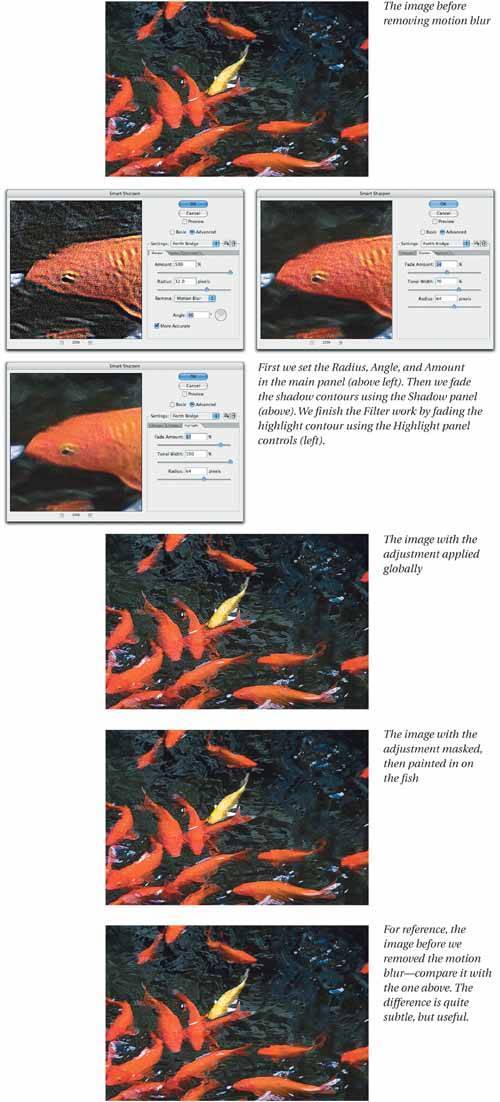 Making the filter settings is only part of the process. After running the filter, we applied a solid-black layer mask, then we painted the filter effect into the image where we wanted it. Few if any images benefit from global application of Smart Sharpen in Motion Blur mode and this one is no exception. In the example in Figure 9-28, we really needed to apply the filter globally, then mask it. But if you can isolate the area that needs the sharpening, you can make things go much faster if you make a rough selection, float the pixels to a new layer (by pressing Command-J), then load the layer's transparency mask as a selection. Loading the selection is key, because if you don't, the filter spends an inordinate amount of time trying to sharpen the transparent areas of the layer. Figure 9-29 shows a case in point. Figure 9-29. Removing Motion Blur on details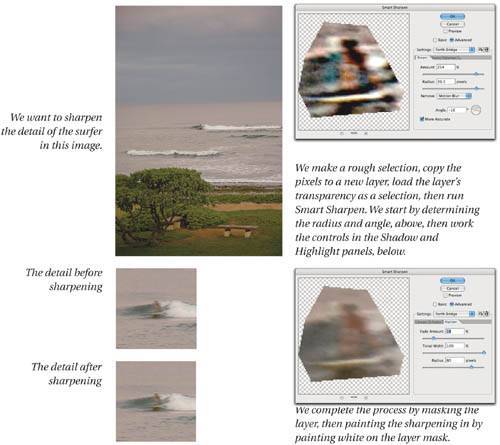 When we run the filter on the entire layer, it takes much longer to execute than when we run it on the selection, even though most of the layer is empty! Smart Sharpen is an intriguing piece of work that shows great potential, but until it gets a good deal faster and more interactive, we're likely to reserve its use for special cases such as Web or multimedia images, which are small and designed to be viewed on screen, or special cases such as removing motion blur. For most sharpening operations, we can obtain very similar results running Unsharp mask on masked layers set to Luminosity mode, and when we automate the process with actions, it's quite a bit faster than Smart Sharpen. One final note: Those of you with sharp eyes may have noticed that many of the screen shots of Smart Sharpen use a named setting. It's great that Smart Sharpen lets you save settings, but in practice the mechanism doesn't seem to be at all reliable. If you load a saved setting, change it, and simply run the filter without renaming the saved setting, the new settings overwrite the old ones, so the next time you call up your carefully constructed saved setting, it doesn't contain the values you expect. We suspect that this isn't the intended behavior! |
EAN: N/A
Pages: 220