| Organizing your workspace is fundamentally important. Effective file management not only enables you to use FCP more efficiently, but because you know what your assets are and where to locate them, it also fosters greater creativity. Establishing a New Project Although there may be as many ways to structure and organize an FCP project as there are people working with the application, you can follow some general guidelines to make things easier and more efficient. Generally speaking, you need to keep each project self-contained and separate media assets from other files. Most importantly, your system needs to make sense to everyone who uses itthe best way to do that is to keep it simple. Note Maintaining a defined structure in which you keep individual projects separate will not only help while you are working, as you will learn later in this lesson, it will also make archiving your project easier.
Manual Administration Manually organizing your files is a matter of creating a centralized, or master, directory on your system and collecting files there. If you spend some time creating a defined set of directories at the beginning of each project, you'll effectively streamline file management tasks. 1. | In the Finder, choose File > New Folder (Shift-Cmd-N) to create a new directory on a local drive; this will be where you collect and store all of your Final Cut projects.
The most suitable location for the folder is determined by the requirements of your workflow. Typically, this will be somewhere on your startup disk or a different physical drive you don't use for media storage. If you are the only user who needs to access the project, place it within your Home directory. However, if more than one user will be working on the project, you can make the folder either at root level or within the Shared folder of the User directory. If you choose to create the folder at the root level, you may need to follow the steps in the lesson on configuring Mac OS X to change the directory's permissions so that other users have read and write access.
Note The Shared folder in your User directory already has the appropriate permissions assigned by default. Later in this lesson, you'll learn how to use it to share customized user settings with different users. | 2. | Change the name of the new folder to FCP Projectsor something equally appropriate.
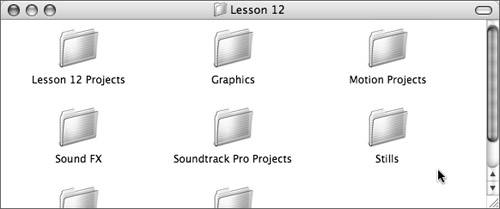
 | 3. | Create and name a second folder, Lesson 12, inside your new FCP Projects folder for this project.
| 4. | Within the Lesson 12 folder, create another subfolder named Lesson 12 Projects.
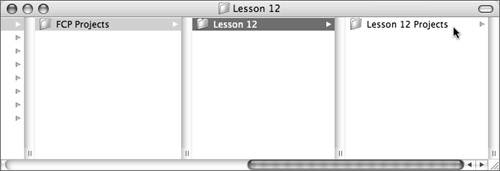 In a real-world situation, each project folder should include separate, appropriately labeled folders for everything that relates to a specific project, including non-timecode media (stills, graphics, sound effects, music), schedules, budget information, scripts, correspondence, and miscellaneous notes. If you maintain this strategy, every time you need something you'll know exactly where to find it. Stray files won't float around your system, and your projects will be much easier to archive. In a real-world situation, each project folder should include separate, appropriately labeled folders for everything that relates to a specific project, including non-timecode media (stills, graphics, sound effects, music), schedules, budget information, scripts, correspondence, and miscellaneous notes. If you maintain this strategy, every time you need something you'll know exactly where to find it. Stray files won't float around your system, and your projects will be much easier to archive.
 Note You'll notice later in the lesson that FCP actually uses a similar directory structure to organize media files. Tip You can further organize project folders by using color labels to identify the most current and highest priority projects. Add project folders to the Finder window's sidebar or to the Dock for easy access. Tip You could create a workflow in Automator to perform many of these actions to create new project directories in the Finder. | 5. | Open FCP, and choose File > Close Project to close any open projects.
| 6. | Choose Final Cut Pro > System Settings (Shift-Q).
| 7. | Under the Scratch Disks tab, confirm that your media directory is correctly selected, and click OK.
Note If you need to make any changes to the scratch disk settings, refer to the "Priming Final Cut Pro" section of the previous lesson. | 8. | Under Final Cut Pro > User Preferences, make sure the Audio Outputs tab is set to the Default Stereo Preset.
| 9. | Choose Final Cut Pro > Easy Setup.
| 10. | Choose the DV-NTSC preset from the Setup For pop-up menu.
| 11. | Click the Setup button to confirm your selection.
| 12. | If everything is correct, choose File > New Project to create a new project.
| 13. | Choose File > Save Project As and name your project Lesson 12 New Project.fcp.
| 14. | Navigate to your Lesson 12 Projects subfolder and click Save to create your project.
Define a simple and easy-to-remember naming convention for your project files. It's much easier to retrace your steps if everything is clearly and accurately labeled. Implement sequential naming strategies or include the editors' initials in projects when you're working in a team.
Note You need to save your project immediately to preserve your settings and allow Autosave to function. Establish a convention early and stick to it. It is common to use the name of the project and the date it was created, which is the model used in the Autosave Vault. Your files do have a timestamp, so you may like to use other descriptive elements. Whatever you decide, keep it simple! |
Virtual Organization If you're used to sorting clips in the Browser in a variety of ways, Spotlight in Mac OS X 10.4 creates similar opportunities for you to organize project files. One method is to apply a folder action to your project directory and use Spotlight Comments to tag any files you save there. If the files are ever moved or misplaced, you can use a Spotlight search or create a Smart Folder to locate them. 1. | Open the Automator application (/Applications/Automator).
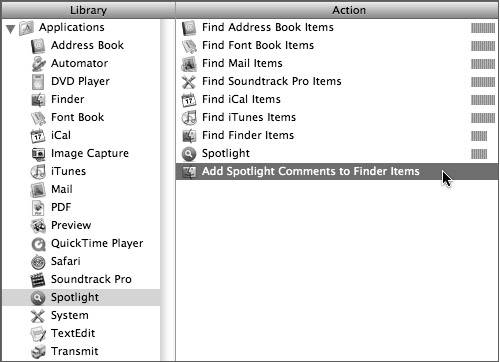
| 2. | In the Library column, select the Spotlight icon.
| 3. | In the Action column, double-click the Add Spotlight Comments To Finder Items option.
 | 4. | Enter L12Asset in the action text field, and check the Append To Existing Comments check box.
 Note It's important when creating a Spotlight Search to use a unique and appropriate identifiersomething that's specific enough to help Spotlight locate only the files you need. | 5. | Choose File > Save As Plug-in (Option-Cmd-S).
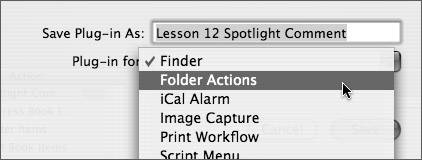
| 6. | Name the action Lesson 12 Spotlight Comment.
| 7. | Choose Folder Actions from the Plug-in For pop-up menu.
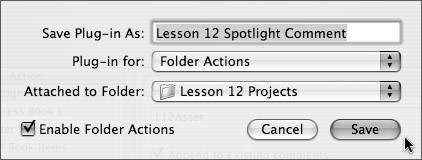
 | 8. | Choose Other from the Attached To Folder pop-up menu.
| 9. | Select the Lesson 12 Projects folder you created in the last exercise and click Open.
| 10. | Select the Enable Folder Actions check box and click Save to apply the action to the folder.
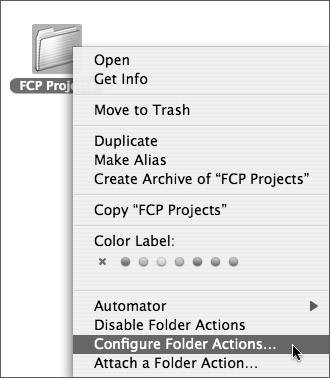
 Note You can apply, disable, or edit folder actions at any time. Simply Cntrl-click the folder you want to modify in the Finder and choose the appropriate option from the contextual menu.  | 11. | Create a new project in Final Cut Pro (File > New Project).
| 12. | Choose File > Save Project.
| 13. | Name your project Lesson 12 Action Test.fcp, and save the file in the Lesson 12 Projects folder.
| 14. | Open the Lesson 12 Projects folder in the Finder and select the Lesson 12 Action Test file.
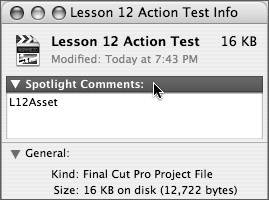
| 15. | Choose File > Get Info (Cmd-I), and your custom tag appears in the file's Spotlight Comments text field.
 Tip To add the custom Spotlight Comment to files you've already created, simply drag the files out of the Lesson 12 Projects folder temporarily. When you drag them back in again, the comment is added. You could create a stand-alone workflow in Automator to apply the comment to existing files. |
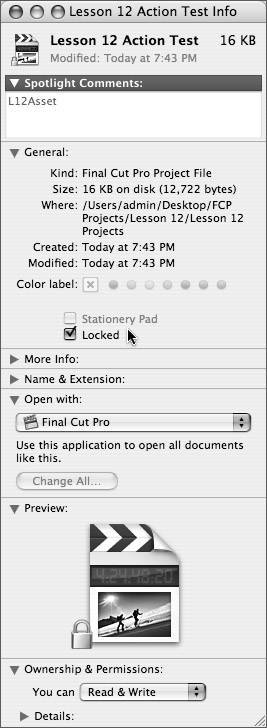
You can now use the Spotlight Comment in conjunction with other search criteria and metadata to create customized Smart Folders. For example, you could search by Spotlight Comment and Date Modified to maintain a list of your most current project files. (Refer to Lesson 10 for details on how to work with Smart Folders.) Protecting and Archiving Projects Project files embody every aspect of your work in Final Cut Pro. They represent all the time you've invested and the creative decisions you've made. Preserving the integrity of your project files should be one of your prioritiesmake it part of your daily workflow. Think of project files as precious objects, and be proactive about protecting them. Creating regular, incremental backups of current projects will dramatically reduce your losses in the event of something like a hard drive failure, which could otherwise be catastrophic. Returning to an old project is also quite common, especially with the advent of DVD and other digital distribution technologies. A well-organized archive will be invaluable if you should need to reestablish a project. Safeguarding your files requires creating backups and secure, permanent archives. There are a number of ways to do this, including using optical media, secondary or portable hard drives, and remote storage. Whichever option you choose, you should make sure that it is a failover system with built-in redundancy. The first way to protect your project is to make sure you save it at regular intervals. Whenever you create a new project file, you should immediately save it into your designated project folder. Even though Autosave will begin to function after the first save, you should continue with manual saves and create incremental versions to preserve different stages of your project as it progresses. The next step in preserving your data is to use co-location, which means you store files in more than one place so that you're not relying on a single device. It could simply mean that you burn your projects to CD or DVD at the end of each session, or you copy files onto a removable drive to take away with you at the end of the day. If you make two copies, you can leave one in a safe or security box at your facility and take the other home with you. A more sophisticated method would be to upload your files to a server in an enterprise class datacenter. Such facilities usually include secure data backup, power regulation, and fire suppression as part of their service. Deciding which strategy is right for you will depend on your particular circumstances and what you can afford to invest in a backup solution. Ultimately, you may use a combination of strategiessaving to an offsite server and a removable drive, for instance. Once you have a plan in place, you need to follow through and be consistent in your implementation. If you've organized your project, Mac OS X has tools that can streamline the process of creating and securing your daily archive. Locking Files Locking project files will prevent accidental modification or deletion of work you want to preserve. Having locked a file, you'll be unable to make any changes or move it to a different directory, including the Trash. 1. | In the Info window, click to select the Locked check box. A lock appears in the file's icon.
 More Info Locked files in Mac OS X will override Unix file permissionseven if you have write access, you will not be able to modify the file. To unlock a file, you need to deselect the check box in the Info window. Refer to the Apple Knowledge Base article, "Unable to move, unlock, modify, or copy an item in Mac OS X" for additional details: http://docs.info.apple.com/article.html?artnum=106237. | 2. | Close the Info window.
|
Back Up to Optical Disc You can store several hundred megabytes (MB) of data using current CD technology, and several gigabytes (GB) with DVD. The latest version of the Apple SuperDrive supports dual-layer DVD+R discs, which have a capacity of 8.5 GB. With the advent of new high-capacity optical discs, you'll be able to store many times that amount of information on a single disc. More Info For further details on new DVD technologies, see http://en.wikipedia.org/wiki/Blue_ray and www.blu-ray.com.
Burn Folders are a new feature in Mac OS X 10.4they help streamline the process of creating archives on CD or DVD. 1. | In the Finder, choose File > New Burn Folder.
Note Project files are relatively small, and it might seem unnecessary to use a new disc every time you back up your workthough you might think of the discs as an additional level of redundancy in your system. If you want to fill each disc, you need to use Disk Utility or third-party applications such as Toast (www.roxio.com/en/products/toast) to burn multisession discs. See "Recording On a CD-R Disc More Than Once" in Disk Utility Help for further information. | 2. | Name the new folder Lesson 12 Burn.
 | 3. | Drag the files you want to back up to the new Lesson 12 Burn folder.
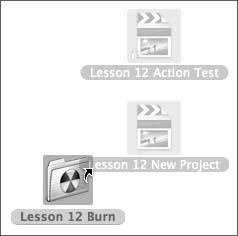
 Notice the alias arrow appears as you drag the files to the folder. This happens because rather than move or copy files into the Burn Folder, what you add are aliases, which point to the original files on your hard drive. When you burn a disc, the Finder simply copies the files and leaves the originals untouched.
When you've added all the files you want to backup to the folder and are ready to burn a disc, simply Control-click the Burn Folder, or select it in the Finder and choose File > Burn Disk.
Note You should always examine the contents of your discs to test the integrity of the burn, especially if you eventually plan to remove the files from your hard drive. |
Backup to Remote Storage The general principle of remote storage is that you back up your files to a secondary hard drive, which resides at a separate geographic location. There are many solutions you can work with, ranging from portable hard drives (including iPods) that you carry with you, to dedicated datacenters that you access via the Internet. If you have a .Mac account (www.mac.com), you already have secure online storage on Apple's servers. Uploading files to your iDisk is just like copying files between local disks or partitions. Mac OS X 10.4 introduced a new iDisk Sync feature, which can be configured to make the transfer process completely seamless. Note In Mac OS X 10.3, you need to manually mount your iDisk before you can upload files. For Mac OS X 10.2 or earlier versions, you need to download the iDisk Utility (www.mac.com/1/idiskutility_download.html) application or use an FTP client application such as Panic's Transmit. (See Lesson 15 for more information on file transfer solutions.)
1. | Open System Preferences, and click the .Mac icon.
 | 2. | If you've already established a .Mac account, your information should already be entered in the .Mac Member Name and Password fields under the Account tab.
Note To continue with the exercise, you need a .Mac account. Click the Learn More button to access the .Mac Web site (www.mac.com) and sign up for a free 60-day trial. | 3. | Click the iDisk tab, and click the Start button if you haven't enabled iDisk syncing yet.
 When you enable syncing, a special iDisk partition is created on your computer.
 | 4. | Choose the Synchronize Manually option to control exactly when files are transferred.
Note Your iDisk partition will mount on your Desktop. | 5. | Close the System Preferences window.
| 6. | In the Finder, choose File > New Window (Cmd-N).
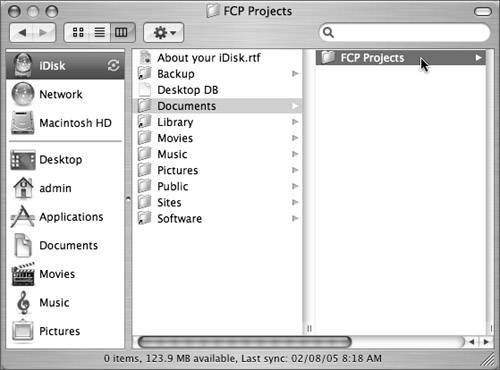
| 7. | In the Sidebar of the Finder window, click the iDisk icon to view its contents.
| 8. | Select the Documents folder and choose File > New Folder (Shift-Cmd-N).
| 9. | Name the new directory FCP Projects.
 | 10. | Select the files you want to back up, and drag your files to your new FCP Projects folder.
Tip You might choose to create an archive of your files, since it's more convenient to transfer a single file to your iDisk. Although an archive is not necessary in this process, it will serve as a protective envelope around your files. See the section on zipping and stuffing files in Lesson 15. | 11. | Click the Sync icon next to the iDisk icon, and your computer will synchronize the contents of your local iDisk folder with the folder on Apple's servers.
 Note Other hosting solutions and large storage email accounts will function adequately as an alternative to .Mac. Refer to Lesson 15 for further information on transferring project files. Note A number of applications, including Backup (www.mac.com/1/iTour/tour_backup.html), Retrospect (www.dantz.com/en/products/mac_personal/index.dtml), and RsyncX (http://archive.macosxlabs.org/rsyncx/rsyncx.html), can be configured to perform automatic backups. |
Recovering Projects The Revert and Restore features in Final Cut Pro provide additional means to recover project files that effectively complement your manual backup routine. Both options can be accessed directly within FCP and can help you manage your work. Revert The option to revert projects is especially useful if you want to quickly undo a series of steps and return the project to the state it was in the last time you performed a manual save. If you're mindful of when you save your project, you can use Revert to confidently experiment and explore different tangents in your work. If you use Revert as an alternative to multiple undo actions, you need to be aware that it is a destructive stepthere's no equivalent to redo, and all of your changes will be lost. Note You can also save test versions of your file to facilitate experimentation. Working with incremental files enables you to preserve each deviation and maintain a record of your process.
1. | Open the Lesson 12 Project.fcp file.
| 2. | Choose File > Save Project As.
| 3. | Name your project Lesson 12 Working.fcp, and save it into your project directory.
| 4. | Select one the video clips in the Revert sequence.
| 5. | Choose Effects > Video Filters > Image Control > Desaturate.
| 6. | Choose Effects > Image Control > Tint and use the filter controls to choose a color.
| 7. | Choose File > Revert Project.
| 8. | Click OK in the warning dialog box to acknowledge that your changes will be lost and your project will be returned to the state it was in the last time you saved it.
 |
Restore The Restore feature utilizes files stored in the Autosave Vault to recover projects. How often a file is placed in the vault and how many iterations are kept in the archive is determined by your Autosave preference settings. (Refer to Lesson 11 for instructions on how to properly set your Autosave Vault.) 1. | Choose Final Cut Pro > User Preferences (Option-Q).
| 2. | Ensure that the Autosave Vault check box is active, and change the Save A Copy Every setting to 1 minute.
 Note In a real-world situation, creating a backup of your project every minute is highly impractical. You should choose a setting that enables you to have made significant changes to your project. | 3. | Click OK to save your changes and close the User Preferences window.
| 4. | Double-click the Restore sequence in the Browser.
| 5. | Apply filters to individual clips for approximately 3 minutes, until Autosave has had at least 3 opportunities to archive your project.
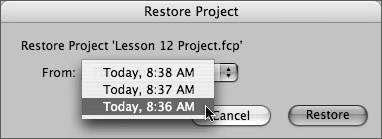
Note If you've been working with the project for longer than 3 minutes, you may see additional versions stored in the archive. | 6. | Choose Fle > Restore Project.
| 7. | Click the From pop-up menu and scroll down to select the third option.
| 8. | Click Restore.
 Note You will most likely have different timestamps. | 9. | In the warning dialog box, click OK to acknowledge that unsaved changes will be lost.
Note Even though you have selected the earliest version of the file, all the other versions remain accessible through the Restore function. | 10. | Choose File > Save Project (Cmd-S) to update the file.
Note The Restore function in FCP 5 replaces the open project file. In earlier versions it opened the archived project and required that you re-name the project immediately. You should never save a file into the Autosave Vault. This is not only important in terms of organization, but the Autosave Vault also operates a first-in/first-out policy with files, and you may find items you've saved in there unexpectedly moved to the Trash.
| 11. | Open User Preferences and reset the frequency of automatic saves.
|
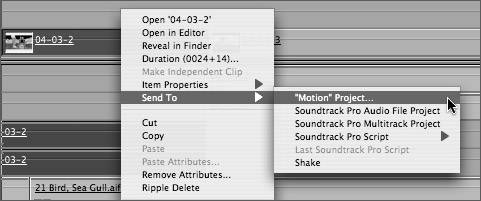
Sharing With Final Cut Pro, you can share a wide range of resources, including media, clip information, third-party plug-ins, entire projects, and individual user settings. This kind of functionality means that FCP can support a variety of workflows and enable round-trip migration between users, applications, and platforms. Media Final Cut Pro works with storage area network (SAN) solutions and is compatible with administration tools such as Apple's Xsan. FCP respects Mac OS X file permissions, enabling multiple stations to access the same media files simultaneously. (Refer to Lesson 7 for more information.) Clips Final Cut Pro 5 includes increased support for sharing clips between other applications. You can now send clips directly to Soundtrack Pro, Motion, or Shake.  When you share media files, you're sharing the raw material of your project. When you share clips, you're sharing information about how you're using your files. It is this data that you can share between the other Pro applications, and any changes you make in those applications will be immediately reflected in Final Cut Pro. FCP continues to support files created in other applications such as Maya, After Effects, and Photoshop. Note If you exchange files between other applications, make sure you keep settings, such as pixel aspect ratio and color space, consistent or that the application is able to perform adequate conversions to properly support round-trip workflow.
Third-Party Plug-ins FCP also continues to support third-party plug-ins (including After Effects plug-ins). Compatibility can be an issue, and you need to make sure you're using the appropriate plug-ins for your version of FCP. If you're working with third-party plug-ins, and the license permits, you can also transport them between different Final Cut Pro installations. Projects Sharing projects between Final Cut Pro users is remarkably easy. When you're moving projects between different systems using identical versions of FCP, you only need to reconnect media before you're ready to work. (See Lesson 5 for more information on reconnecting media files.) If you're transferring projects between different versions of Final Cut Pro, you do need to be a little careful. Although you are able to open a project created in FCP 4 in FCP 5, advances in the technology driving the application mean that project files are not immediately compatible with earlier versions, and a FCP 5 project will not open directly in FCP 4. On the occasions you need to transport a FCP5 project to an earlier version, you'll need to use one of the interchange formats such as XML or EDL. (Refer to Lesson 5 for specific details on how to work with these formats.) XML interchange was introduced in FCP 4.1 and is the recommended solution if your systems are able to support it. For earlier versions, you'll need to generate an EDL to open your project in the earlier version. Note Not all video formats will be supported in earlier versions of Final Cut Pro.
User Settings With Final Cut Pro 5, it's possible to share custom user settings, including button bars, keyboard layouts, hardware settings, and window arrangements. You can manually copy settings files to other systems or set up a shared directory to make them available to other users on your network. 1. | Drag the Final Cut Pro windows to create a custom layout.
| 2. | Choose Window > Arrange > Save Window Layout.
| 3. | Click the disclosure triangle to expand the window, and navigate to the Shared directory (/Users/Shared/).
| 4. | Click the New Folder button, and name the new directory Window Layouts.
| 5. | Create a name for your layout and click Save.
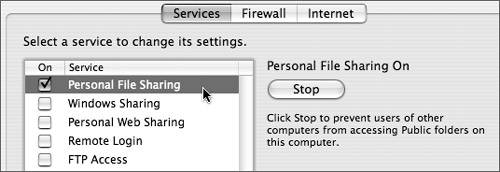
Note Individual window layouts can be saved in the user's Window Layouts folder. If you are transferring layouts manually, this is the directory to which you should copy files in other user accounts. | 6. | Open System Preferences, and click the Sharing icon.
| 7. | Select the Personal File Sharing check box.
 Note Typically, you would use a dedicated file server computer rather than an FCP workstation to share files. (Refer to Lesson 10 for more information on Sharing services.) Any users who connect to your system will now be able to access the shared Window Layouts directory and load the layout into Final Cut Pro.
Tip In FCP 5, you can also load different user settings, hardware profiles, and plug-ins using a network server. Refer to the Final Cut Pro user's manual and the Late-Breaking News About Final Cut Pro 5 documents for more information about this feature. |
Streamlining Project Configuration If your particular worflow involves repetitive tasks, you might consider using Mac OS X to streamline certain jobs. Creating Stationery A stationery file is the Mac OS X equivalent of a template; once you've activated a file's stationery setting, you'll create a copy of the file every time you attempt to open it. Rather than set up each file you make from scratch, you can use stationery to create a default template. 1. | Choose Final Cut Pro > Easy Setup (Ctrl-Q).
| 2. | Choose DV-NTSC from the Setup For pop-up menu, and click Setup.
| 3. | Choose File > New Project (Shift-Cmd-N) to create a new project.
| 4. | Choose File > Save Project (Cmd-S), name your project Lesson 12 Template, and save it into your Lesson 12 Projects directory.
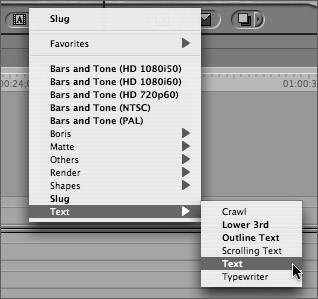
| 5. | Click the Generator pop-up menu and choose Text > Text.
 | 6. | In the Viewer, click the Controls tab and change the Text to My Template Project.
| 7. | Drag the new title into the Browser and change the clip name to Title.
| 8. | Choose File > Save Project.
| 9. | Choose File > Close Project.
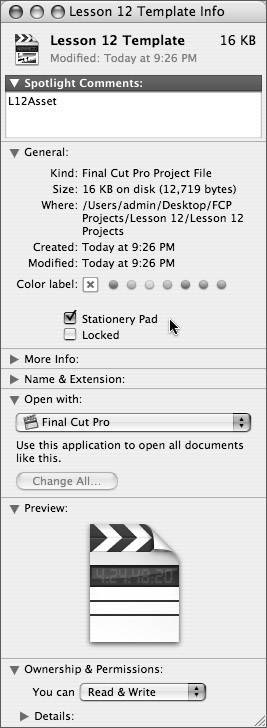
| 10. | Select your Lesson 12 Template file in the Finder and choose File > Get Info (Cmd-I).
| 11. | Click the disclosure triangle next to General to reveal file details.
| 12. | Select the Stationery Pad check box. The image inside the file's icon disappears.
 | 13. | Close the Info window.
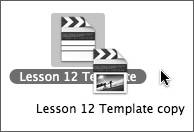
| 14. | Double-click the Lesson 12 Template file to create copy of the file. The copy that opens in FCP includes the Title clip you created and settings you assigned.
 | 15. | Choose File > Save Project As immediately, and rename the project.
|
Automating Tasks As you learned earlier in this lesson, in Mac OS X 10.4, Automator can now be used to manage repetitive and time-consuming jobs. At this time, Final Cut Pro is not an AppleScript-able application, but there are a number of tasks, such as resizing and renaming image files, you can perform outside of FCP to streamline your workflow. Converting the frame size of multiple image files is the kind of process that's perfectly suited for Automator. Before you import images into FCP, you need to make sure that the dimensions and pixel aspect ratio are compatible with your sequence settings. There are actions in Automator that perform both of these operations; you just need to create a workflow around them. 1. | Launch Automator (/Applications/Automator).
| 2. | In the Library column, click the Finder icon.
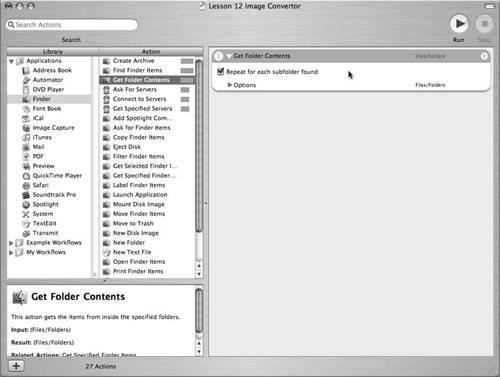
| 3. | In the Action column, double-click the Get Folder Contents icon to begin your workflow.
Click the Repeat For Each Subfolder Found check box, if you want to include subdirectories whenever you execute the workflow.
 | 4. | Double-click to apply the Copy Finder Items action, and choose Other from the To pop-up menu.
| 5. | Navigate to your Lesson 12 Project directory and click the New Folder button.
| 6. | Name your new folder Converted Stills and click Create.
| 7. | Click Open to select your new folder.
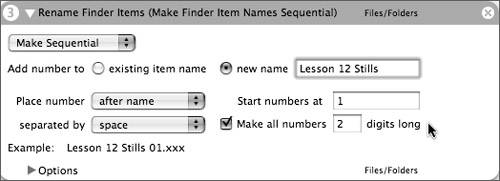
 | 8. | Double-click the Rename Finder Items action.
| 9. | Choose Make Sequential from the first pop-up menu; this allows you to rename the files and apply a sequential number sequence.
| 10. | Click the New Name radio button and enter the name Lesson 12 Stills.
| 11. | Choose After Name from the Place Number pop-up menu and enter 1 as the starting number.
| 12. | Choose Space from the Separated By pop-up menu.
| 13. | Select the Make All Numbers check box, and enter the value 2.
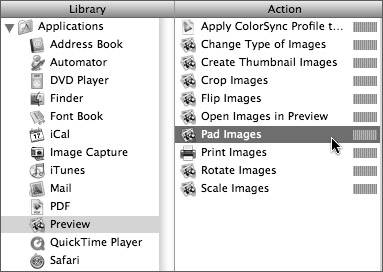
 | 14. | In the Library column, click the Preview icon and double-click to apply the Pad Images action.
 | 15. | Enter a Width value of 720 and Height value of 540.
| 16. | Click to activate the Scale Image Before Padding check box; you should be careful when resizing images that you don't lose quality by enlarging your picture too much.
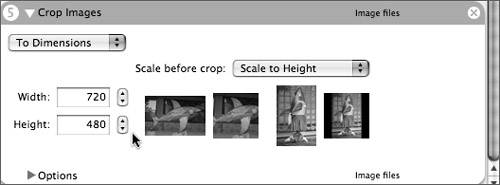
 | 17. | Double-click the Crop Images action.
| 18. | Choose To Dimensions from the first pop-up menu and Scale To Height from the Scale Before Crop pop-up menu; this will squash or stretch the image before it is cropped.
| 19. | Enter a Width value of 720 and Height value of 480 to allow for nonsquare DV-NTSC pixels.
 | 20. | Choose File > Save As Plug-in.
| 21. | Name your plug-in Lesson 12 Image Converter, and choose Finder from the Plug-in For pop-up menu.
| 22. | Click Save to create your plug-in.
| 23. | In the Finder, open the Lesson 12 Media directory.
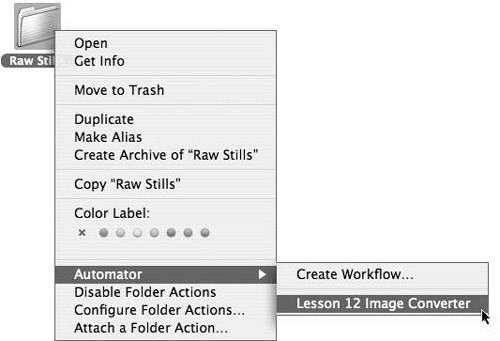
| 24. | Cntrl-click the Raw Stills folder and choose Automator > Lesson 12 Image Converter from the contextual menu to activate the workflow.
 Feedback on the workflow is provided in the menu bar.
 More Info You can download prebuilt Automator workflows on the Apple Web site: www.apple.com/downloads/macosx/automator. |
|

 In a real-world situation, each project folder should include separate, appropriately labeled folders for