23. Scale and Position a Still  BEFORE YOU BEGIN BEFORE YOU BEGIN
22 Prepare a Still for Video 68 About the Properties Panel
 SEE ALSO SEE ALSO
24 Set Still Image Duration 69 Add Motion to a Still 70 Pan and Zoom Still Images a la Ken Burns
23. Scale and Position a Still  
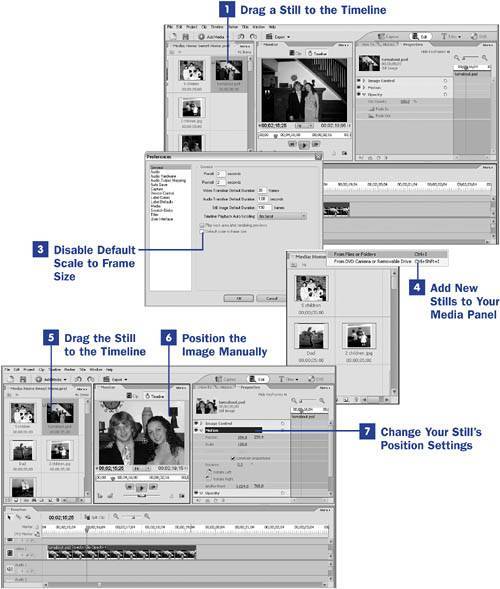
Premiere Elements has a number of settings that determine how your still images will behave by default when placed on the Timeline. Depending on your needs and preferences, you might decide to position your stills manually or change the default settings so your image lands in your preferred position automatically. 1. | Drag a Still to the Timeline
By default, Premiere Elements automatically scales the image you drop on the Timeline to the size of the video frame.
 NOTE NOTE
Although Premiere Elements automatically scales your image to the size of the video frame when you place it on the Timeline, this scaling does not affect the aspect ratio of your image. In other words, if your graphic is not the same shape as your video frame, Premiere Elements does not stretch it in either dimension to fill the frame (which is preferable, of course) and the video frame might be wider or taller than your image, resulting in black bars along the sides of the image. | 2. | Open the Preferences Dialog Box
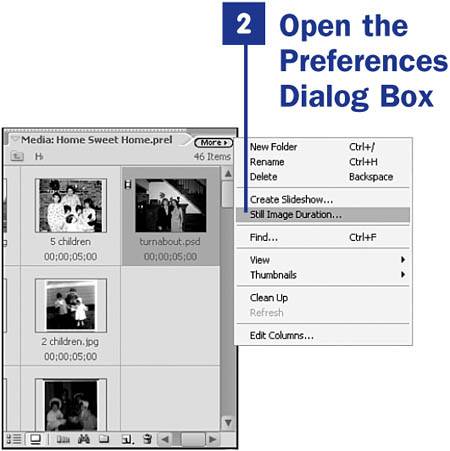
Click the More button in the Media panel. From the drop-down menu, select Still Image Duration to open the Preferences dialog box to the General category page. Alternatively, open the Preferences dialog box to this page by choosing Edit, Preferences, General.
If you want, you can change the default duration of your stills (see 24 Set Still Image Duration).
| 3. | Disable Default Scale to Frame Size
Uncheck the Default scale to frame size option to disable Premiere Elements's automatic scaling feature. With this feature disabled, new stills or graphics placed on the Timeline appear at their actual size rather than automatically being scaled to the video frame size.
Click OK to close the Preferences dialog box.
 NOTE NOTE
If you change the default settings for still duration or scale, this does not affect stills already in the Media panel. Only stills added to the Media panel after the settings have been changed are affected by the changes (see 24 Set Still Image Duration). | 4. | Add New Stills to Your Media Panel
Click the Add Media button, select From Files or Folders, and browse to select the images you want to add to the Timeline at this new setting.
If you already have a photo in your Media panel with which you want to use the new default settings you just established, you must re-import the image to the Media panel: Right-click the image in the Media panel and select Clear to remove it from the panel. (This action does not erase the file from your hard drive.) Then click the Add Media button, select From Files or Folders, and browse to add the image to your Media panel again. The new default setting is applied to this still image.
 TIP TIP
You can also change the Scale to Frame option for a clip on the fly. Right-click on the clip on the Timeline and uncheck Scale to Frame. The clip reverts to its actual pixel dimensions in the video frame. | 5. | Drag the Still to the Timeline
Drag the still (with its new scale settings) to the Timeline. The still is added at its actual size rather than at the enforced size of the video frame. In the case of my example, the image is now much larger than the video frame, and only a portion of the image is displayed in the Monitor.
If you plan to add motion to your stills by panning and zooming around them (see 70 Pan and Zoom Still Images a la Ken Burns), you might find it easier to work with your still at its actual size as it appears in the example, rather than automatically scaling it to the video frame size. When it is displayed at its actual size, you'll have a much better idea of how much scaling the still's size and resolution will allow for. But this is purely a matter of personal preference. Choose the default setting that best fits your personal workflow.
| 6. | Position the Image Manually
You can reposition your still in this frame of the video by clicking the image in the Monitor panel and dragging it into whatever position you'd like.
| 7. | Change Your Still's Position Settings
Alternatively, you can position your still using the Position settings in the Properties panel. With your still selected on the Timeline, click the triangle to the left of Motion in the Properties panel to reveal the Motion property's details, including Position and Scale. The first number represents the horizontal position (in pixels) of the center of your image in the video frame. The second number represents its vertical position. By changing one or both of these numbers, you can adjust the still's placement in the video frame. You can also change these numbers more fluidly by moving your mouse over numbers until the settings icon appears, and then dragging across the numbers to raise or lower the settings.
You can also resize the image in the video frame by changing the Scale settings in the Motion panel.
|
|

 BEFORE YOU BEGIN
 SEE ALSO
 NOTE
NOTE