Matrix Operations in Image Processing
Recoloring, the process of changing image colors, is a good example of color transformation. Recoloring includes changing colors, intensity, contrast, and brightness of an image. It can all be done via the ImageAttributes class and its methods.
The color matrix can be applied to an image via the SetColorMatrix method of the ImageAttributes class. The ImageAttributes object is used as a parameter when we call DrawImage.
10.8.1 Translating Colors
Translating colors increases or decreases color intensities by a set amount (not by multiplying them). Each color component (red, green, and blue) has 255 different intensity levels ranging from 0 to 255. For example, assume that the current intensity level for the red component of a color is 100. Changing its intensity level to 150 would imply translating by 50.
In a color matrix representation, the intensity varies from 0 to 1. The last row's first four elements represent the translation of red, green, blue, and alpha components of a color, as shown in Figure 10.22. Hence, adding a value to these elements will transform a color. For example, the t1, t2, t3, and t4 values in the following color matrix represent the red, green, blue, and alpha component translations, respectively:
Color Matrix = {
{1, 0, 0, 0, 0},
{0, 1, 0, 0, 0},
{0, 0, 1, 0, 0},
{0, 0, 0, 1, 0},
{t1, t2, t3, t4, 1}};
Listing 10.18 uses a ColorMatrix object to translate colors. We change the current intensity of the red component to 0.90. First we create a Graphics object using the CreateGraphics method, and we create a Bitmap object from a file. Next we create an array of ColorMatrix elements and create a ColorMatrix object from this array. Then we create an ImageAttributes object and set the color matrix using SetColorMatrix, which takes the ColorMatrix object as its first parameter. After all that, we draw two images. The first image has no effects; the second image shows the result of our color matrix transformation. Finally, we dispose of the objects.
Listing 10.18 Using ColorMatrix to translate colors
private void TranslationMenu_Click(object sender,
 System.EventArgs e)
{
 // Create a Graphics object
 Graphics g = this.CreateGraphics();
 g.Clear(this.BackColor);
 // Create a Bitmap object
 Bitmap curBitmap = new Bitmap("roses.jpg");
 // Color matrix elements
 float[][] ptsArray =
 {
 new float[] {1, 0, 0, 0, 0},
 new float[] {0, 1, 0, 0, 0},
 new float[] {0, 0, 1, 0, 0},
 new float[] {0, 0, 0, 1, 0},
 new float[] {.90f, .0f, .0f, .0f, 1}
 };
 // Create a ColorMatrix object
 ColorMatrix clrMatrix = new ColorMatrix(ptsArray);
 // Create image attributes
 ImageAttributes imgAttribs = new ImageAttributes();
 // Set color matrix
 imgAttribs.SetColorMatrix(clrMatrix,
 ColorMatrixFlag.Default,
 ColorAdjustType.Default);
 // Draw image with no effects
 g.DrawImage(curBitmap, 0, 0, 200, 200);
 // Draw image with image attributes
 g.DrawImage(curBitmap,
 new Rectangle(205, 0, 200, 200),
 0, 0, curBitmap.Width, curBitmap.Height,
 GraphicsUnit.Pixel, imgAttribs) ;
 // Dispose of objects
 curBitmap.Dispose();
 g.Dispose();
}
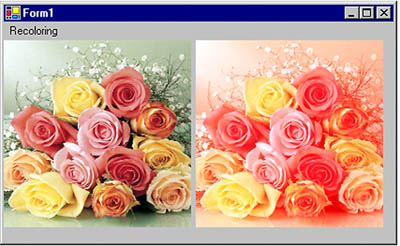
Figure 10.24 shows the output from Listing 10.18. The original image is on the left; on the right we have the results of our color translation. If you change the values of other components (red, blue, and alpha) in the last row of the color matrix, you'll see different results.
Figure 10.24. Translating colors
10.8.2 Scaling Colors
Scaling color involves multiplying a color component value by a scaling factor. For example, the t1, t2, t3, and t4 values in the following color matrix represent the red, green, blue, and alpha components, respectively. If we change the value of M[2][2] to 0.5, the transformation operation will multiply the green component by 0.5, cutting its intensity by half.
Color Matrix = {
{t1, 0, 0, 0, 0},
{0, t2, 0, 0, 0},
{0, 0, t3, 0, 0},
{0, 0, 0, t4, 0},
{0, 0, 0, 0, 1}};
Listing 10.19 uses the ColorMatrix object to scale image colors.
Listing 10.19 Scaling colors
private void ScalingMenu_Click(object sender,
 System.EventArgs e)
{
 // Create a Graphics object
 Graphics g = this.CreateGraphics();
 g.Clear(this.BackColor);
 // Create a Bitmap object
 Bitmap curBitmap = new Bitmap("roses.jpg");
 // Color matrix elements
 float[][] ptsArray =
 {
 new float[] {1, 0, 0, 0, 0},
 new float[] {0, 0.8f, 0, 0, 0},
 new float[] {0, 0, 0.5f, 0, 0},
 new float[] {0, 0, 0, 0.5f, 0},
 new float[] {0, 0, 0, 0, 1}
 };
 // Create a ColorMatrix object
 ColorMatrix clrMatrix = new ColorMatrix(ptsArray);
 // Create image attributes
 ImageAttributes imgAttribs = new ImageAttributes();
 // Set color matrix
 imgAttribs.SetColorMatrix(clrMatrix,
 ColorMatrixFlag.Default,
 ColorAdjustType.Default);
 // Draw image with no effects
 g.DrawImage(curBitmap, 0, 0, 200, 200);
 // Draw image with image attributes
 g.DrawImage(curBitmap,
 new Rectangle(205, 0, 200, 200),
 0, 0, curBitmap.Width, curBitmap.Height,
 GraphicsUnit.Pixel, imgAttribs) ;
 // Dispose of objects
 curBitmap.Dispose();
 g.Dispose();
}
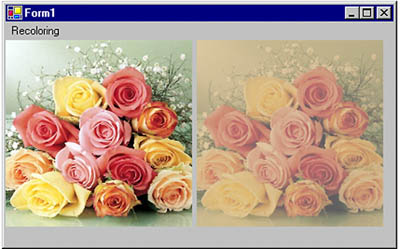
Figure 10.25 shows the output from Listing 10.19. The original image is on the left; on the right is the image after color scaling. If you change the values of t1, t2, t3, and t4, you will see different results.
Figure 10.25. Scaling colors
10.8.3 Shearing Colors
Earlier in this chapter we discussed image shearing. It can be thought of as anchoring one corner of a rectangular region and stretching the opposite corner horizontally, vertically, or in both directions. Shearing colors is the same process, but here the object is the color instead of the image.
Color shearing increases or decreases a color component by an amount proportional to another color component. For example, consider the transformation in which the red component is increased by one half the value of the blue component. Under such a transformation, the color (0.2, 0.5, 1) would become (0.7, 0.5, 1). The new red component is 0.2 + (0.5)(1) = 0.7. The following color matrix is used to shear image colors.
float[][] ptsArray = {
 new float[] {1, 0, 0, 0, 0},
 new float[] {0, 1, 0, 0, 0},
 new float[] {.50f, 0, 1, 0, 0},
 new float[] {0, 0, 0, 1, 0},
 new float[] {0, 0, 0, 0, 1}};
ColorMatrix clrMatrix = new ColorMatrix(ptsArray);
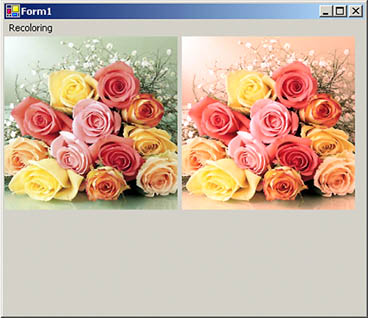
If we substitute this color matrix into Listing 10.19, the output will look like Figure 10.26.
Figure 10.26. Shearing colors
10.8.4 Rotating Colors
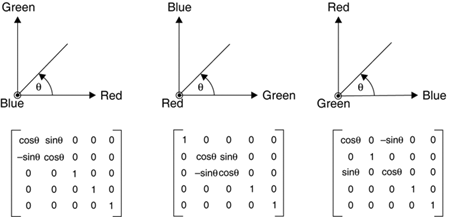
As explained earlier, color in GDI+ has four components: red, green, blue, and alpha. Rotating all four components in a four-dimensional space is hard to visualize. However, such rotation can be visualized in a three-dimensional space. To do this, we drop the alpha component from the color structure and assume that there are only three colorsred, green, and blueas shown in Figure 10.27. The three colorsred, green, and blueare perpendicular to each other, so the angle between any two primary colors is 90 degrees.
Figure 10.27. RGB rotation space
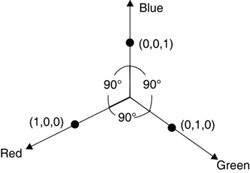
Suppose that the red, green, and blue colors are represented by points (1, 0, 0), (0, 1, 0), and (0, 0, 1), respectively. If we rotate a color with a green component of 1, and red and blue components of 0 each, by 90 degrees, the new color will have a red component of 1, and green and blue components of 0 each. If we rotate the color less than 90 degrees, the new color will be located somewhere between green and red.
Figure 10.28 shows how to initialize a color matrix to perform rotations about each of the three components: red, green, and blue.
Figure 10.28. RGB initialization
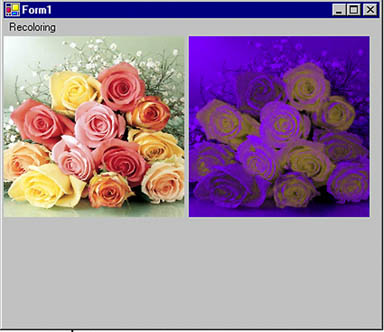
Listing 10.20 rotates the colors by 45 degrees from the red component.
Listing 10.20 Rotating colors
private void RotationMenu_Click(object sender,
 System.EventArgs e)
{
 float degrees = 45.0f;
 double r = degrees*System.Math.PI/180;
 // Create a Graphics object
 Graphics g = this.CreateGraphics();
 g.Clear(this.BackColor);
 // Create a Bitmap object from a file
 Bitmap curBitmap = new Bitmap("roses.jpg");
 // Color matrix elements
 float[][] ptsArray =
 {
 new float[] {(float)System.Math.Cos(r),
 (float)System.Math.Sin(r),
 0, 0, 0},
 new float[] {(float)-System.Math.Sin(r),
 (float)-System.Math.Cos(r),
 0, 0, 0},
 new float[] {.50f, 0, 1, 0, 0},
 new float[] {0, 0, 0, 1, 0},
 new float[] {0, 0, 0, 0, 1}
 };
 // Create a ColorMatrix object
 ColorMatrix clrMatrix = new ColorMatrix(ptsArray);
 // Create image attributes
 ImageAttributes imgAttribs = new ImageAttributes();
 // Set ColorMatrix to ImageAttributes
 imgAttribs.SetColorMatrix(clrMatrix,
 ColorMatrixFlag.Default,
 ColorAdjustType.Default);
 // Draw image with no effects
 g.DrawImage(curBitmap, 0, 0, 200, 200);
 // Draw image with image attributes
 g.DrawImage(curBitmap,
 new Rectangle(205, 0, 200, 200),
 0, 0, curBitmap.Width, curBitmap.Height,
 GraphicsUnit.Pixel, imgAttribs) ;
 // Dispose of objects
 curBitmap.Dispose();
 g.Dispose();
}
Figure 10.29 slows the output from Listing 10.20. On the left is the original image; on the right is the image after color rotation.
Figure 10.29. Rotating colors
GDI+: The Next-Generation Graphics Interface
- GDI+: The Next-Generation Graphics Interface
- Understanding GDI+
- Exploring GDI+ Functionality
- GDI+ from a GDI Perspective
- GDI+ Namespaces and Classes in .NET
- Summary
Your First GDI+ Application
- Your First GDI+ Application
- Drawing Surfaces
- The Coordinate System
- Tutorial: Your First GDI+ Application
- Some Basic GDI+ Objects
The Graphics Class
- The Graphics Class
- Graphics Class Properties
- Graphics Class Methods
- The GDI+Painter Application
- Drawing a Pie Chart
Working with Brushes and Pens
- Working with Brushes and Pens
- Understanding and Using Brushes
- Using Pens in GDI+
- Transformation with Pens
- Transformation with Brushes
- System Pens and System Brushes
- A Real-World Example: Adding Colors, Pens, and Brushes to the GDI+Painter Application
Colors, Fonts, and Text
- Colors, Fonts, and Text
- Accessing the Graphics Object
- Working with Colors
- Working with Fonts
- Working with Text and Strings
- Rendering Text with Quality and Performance
- Advanced Typography
- A Simple Text Editor
- Transforming Text
Rectangles and Regions
- Rectangles and Regions
- The Rectangle Structure
- The Region Class
- Regions and Clipping
- Clipping Regions Example
- Regions, Nonrectangular Forms, and Controls
Working with Images
- Working with Images
- Raster and Vector Images
- Working with Images
- Manipulating Images
- Playing Animations in GDI+
- Working with Bitmaps
- Working with Icons
- Skewing Images
- Drawing Transparent Graphics Objects
- Viewing Multiple Images
- Using a Picture Box to View Images
- Saving Images with Different Sizes
Advanced Imaging
- Advanced Imaging
- Rendering Partial Bitmaps
- Working with Metafiles
- Color Mapping Using Color Objects
- Image Attributes and the ImageAttributes Class
- Encoder Parameters and Image Formats
Advanced 2D Graphics
- Advanced 2D Graphics
- Line Caps and Line Styles
- Understanding and Using Graphics Paths
- Graphics Containers
- Reading Metadata of Images
- Blending Explained
- Alpha Blending
- Miscellaneous Advanced 2D Topics
Transformation
- Transformation
- Coordinate Systems
- Transformation Types
- The Matrix Class and Transformation
- The Graphics Class and Transformation
- Global, Local, and Composite Transformations
- Image Transformation
- Color Transformation and the Color Matrix
- Matrix Operations in Image Processing
- Text Transformation
- The Significance of Transformation Order
Printing
- Printing
- A Brief History of Printing with Microsoft Windows
- Overview of the Printing Process
- Your First Printing Application
- Printer Settings
- The PrintDocument and Print Events
- Printing Text
- Printing Graphics
- Print Dialogs
- Customizing Page Settings
- Printing Multiple Pages
- Marginal Printing: A Caution
- Getting into the Details: Custom Controlling and the Print Controller
Developing GDI+ Web Applications
- Developing GDI+ Web Applications
- Creating Your First ASP.NET Web Application
- Your First Graphics Web Application
- Drawing Simple Graphics
- Drawing Images on the Web
- Drawing a Line Chart
- Drawing a Pie Chart
GDI+ Best Practices and Performance Techniques
- GDI+ Best Practices and Performance Techniques
- Understanding the Rendering Process
- Double Buffering and Flicker-Free Drawing
- Understanding the SetStyle Method
- The Quality and Performance of Drawing
GDI Interoperability
Miscellaneous GDI+ Examples
- Miscellaneous GDI+ Examples
- Designing Interactive GUI Applications
- Drawing Shaped Forms and Windows Controls
- Adding Copyright Information to a Drawn Image
- Reading and Writing Images to and from a Stream or Database
- Creating Owner-Drawn List Controls
Appendix A. Exception Handling in .NET
