Understanding Local Area Networks
Connecting the computers in your organization via a LAN can save you a lot of time and money. The amount of money you put into networking hardware, even in a small configuration (less than five or six users), can save you from buying multiple printers, backup media, and other hardware. Add a single, shared Internet connection and you no longer need multiple modems and Internet accounts.
With a LAN, you don't have to run down the hall anymore with your file on a disk or USB thumb drive to print it on your friend's printer. Information that had to wait for the mailroom to make the rounds can be sent in an instant to anyone (or everyone) on your LAN.
With a LAN, you begin to open the greatest potential of Linux - its ability to act as a server on a network. Because Fedora and RHEL are more robust and feature-rich than other computing systems ( certainly for the price), adding it to your LAN can provide a focal point to workstations that could use Linux as a file server, a mail server, a print server, or a boot server. (Those features are described later in this book.)
Creating and configuring a LAN consists of these steps:
-
Setting up LAN hardware - This entails choosing a network topology, purchasing the equipment you need, and installing it (adding cards and connecting wires or using wireless antennas).
-
Configuring TCP/IP - To use most of the networking applications and tools that come with Linux, you must have TCP/IP configured. TCP/IP lets you communicate not only with computers on your LAN, but with any computers that you can reach on your LAN, modem, or other network connection (particularly via the Internet).
Setting up LAN Hardware
Even with a simple LAN, you must make some decisions about network topology (that is, how computers are connected). You must also make some decisions about network equipment (network interface cards, wires, hubs, and so on).
LAN Topologies
Most small office and home LANs connect computers together in one of the following topologies:
-
Star topology - The star topology is by far the most popular LAN topology. In this arrangement, each computer contains a Network Interface Card (NIC) that connects with a cable to a central network switch or hub. The cabling is typically Category 5 ( unshielded twisted pair) wiring with RJ-45 connectors. Other equipment, such as printers and fax machines, can also be connected to the hub in a star topology. Figure 15-1 is an example of a star topology.
-
Bus topology - Instead of using switches or hubs, the bus topology connects computers in a chain from one to the next . The cabling usually used is referred to as coaxial, or Thin Ethernet cable. A "T" connector attaches to each computer's NIC, then to two adjacent computers in the chain. At the two ends of the chain, the T connectors are terminated . Figure 15-2 illustrates an example of a bus topology.
-
Ring topology - This is a less popular topology than star and bus topologies. In a ring topology, computers connect to a ring of wires on which tokens are taken and passed by computers that want to send information on the network. This type of topology typically uses IBM's token ring protocols.
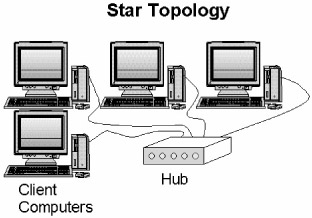
Figure 15-1: In a star topology, machines on the network connect to a central hub.

Figure 15-2: A bus topology chains computers together without using a hub.
You can configure a wireless Ethernet LAN in several different topologies, depending on how you want to use the LAN. With a wireless LAN, each computer broadcasts in the air rather than across wires. Here are some examples of wireless topologies:
-
Wireless peer-to-peer - In this topology, frames of data are broadcast to all nodes within range, but are consumed only by the computers for which they are intended. This arrangement is useful if you are sharing file and print services among a group of client computers. Figure 15-3 shows an example of a peer-to-peer wireless LAN.
-
Wireless access point - A wireless interface can act as an access point for one or more wireless clients. Clients can be configured to communicate directly with the access point, instead of with every client that is within range. This arrangement is useful for point-to-point connections between two buildings , where the access point is acting as a gateway to the Internet or, for example, a campus intranet. It is also the most popular topology for home wireless LANs. Figure 15-4 depicts a point-to-point wireless LAN.
-
Multiple wireless access points and roaming - Each wireless network can be configured as a separate cell . Multiple cells can be joined together in what is called a Managed Wireless LAN . In this arrangement, each cell's access point acts as a bridge (in fact, its actions are referred to as bridging ) by passing all data from the cell to other cells without changing any node's MAC address. In other words, the managed wireless LAN masks the fact that there are multiple wireless cells invisible to the clients on those cells. This arrangement allows users to roam among cells as they come in and out of range without losing continuity of communication.
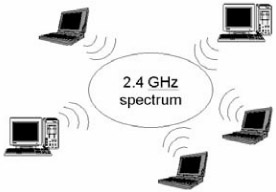
Figure 15-3: Wireless LANs can communicate as peers by broadcasting data.

Figure 15-4: Wireless communication can go through an access point.
| Note | Although Linux does not support any wireless LAN cards that can act as a bridging wireless access point, you can have the Linux system act as a client to a bridging access point. Set your card to Managed mode and identify the MAC address for your wireless LAN's access point. For information on the current state of wireless Ethernet bridging, refer to the Bridging page at the OSDL Web site (http: //linux-net.osdl.org/index.php/Bridge ). |
For our purposes, we focus on star (wired) and peer-to-peer (wireless) topologies. Common to both of these topologies is the protocol used to send data over those wired and wireless media - the Ethernet protocol.
LAN Equipment
The equipment that you need to connect your LAN can include some or all of the following:
| Cross-Reference | For a complete description of wireless hardware, see the "Choosing wireless hardware" section later in this chapter. |
-
Network Interface Card (NIC) - Typically, one of these cards goes into a slot in each computer. For wired Ethernet networks, the cards can transmit data at 10 Mbps or 100 Mbps. Gigabit (1000 Mbps) NICs are also now available, and have recently dropped quite a bit in price. An 802.11b wireless NIC card can operate at speeds of up to 11 Mbps, but is more expensive than a wired NIC card. Recently, 802.11g cards have become much more popular, as well as coming down drastically in price.
-
Cables - For star topologies, cables are referred to as twisted-pair . Category 5e wiring, which contains four twisted-pair sets per wire, is the most common type of wiring used for LANs today. A connector at each end of the cable is an RJ-45 plug, similar to those used on telephone cables. Ethernet interfaces are either 10Base-T (10 Mbps speeds) or 100Base-TX (100 Mbps speeds). These cables plug into the computer's NIC at one end and the hub at the other.
-
Figure 15-5 shows an example of a twisted-pair cable with an RJ-45 connector used for star topologies.
-
-
Hubs - With the star topology, hubs were once the most popular ways to connect computers. With low-cost network switches becoming more popular, however, hubs are now less often used. Sometimes hubs are also referred to as repeaters because they receive signals from the nodes connected to them and send the signals on to other nodes.
-
Switches - Switches are now more commonly used thanhubs. Switches let you divide a LAN that is getting too large into segments that are more manageable. A switch can reduce network traffic by directing messages intended for a specific computer directly to that computer. This is as opposed to a hub, which broadcasts all data to all nodes. Because switches have come down so much in price, in most cases you should just pay a few extra dollars and get a switch instead of a hub. Besides the common 10/100 Mbps switches, Gigabit switches (1000 Mbps) are now available for economical prices.
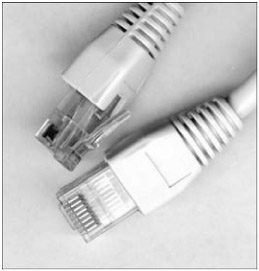
Figure 15-5: A star topology's twisted-pair cables have RJ-45 connectors (similar to telephone-cable connectors).
One piece of equipment that I won't go into yet is a router. A router is used to direct information from the LAN to other LANs or the Internet.
| Cross-Reference | Machines that carry out routing functions are described in Chapter 16. |
LAN Equipment Setup
With an Ethernet NIC, appropriate cables, and a hub or switch, you are ready to set up your wired Ethernet LAN. Most new computers include built-in Ethernet ports. If your computer doesn't have one, most PCI Ethernet cards you can purchase for only a few dollars can be used with Linux. The steps for setting up an Ethernet LAN are:
-
Power down each computer and physically install the NIC card (following the manufacturer's instructions).
-
Using cables appropriate for your NIC cards and switch, connect each NIC to the network switch.
-
Power up each computer.
-
If Fedora or RHEL is not installed yet, install the software and reboot (as instructed). Chapter 2 tells you how to configure your Ethernet card while installing Linux.
-
If Fedora or RHEL is already installed, refer to the "Configuring TCP/IP for your LAN" section for information on configuring your Ethernet cards.
-
When the system comes up, your Ethernet card and interface ( eth0 ) should be ready to use. See the section "Checking your Ethernet connection" later in this chapter to learn how to determine whether your Ethernet connection is working.
Configuring TCP/IP for Your LAN
When you install Fedora or RHEL, you are given the opportunity to add your TCP/IP host name and IP address, as well as some other information, to your computer or choose to have that information automatically provided using Dynamic Host Configuration Protocol (DHCP). You also can set up a way to reach other computers on your LAN by name . That's typically done by adding computer names and IP addresses to your /etc/ hosts file (as described here) or (with more than a few machines) using a DNS server.
| Cross-Reference | DNS is discussed in Chapter 16. Configuring your own DNS server is described in Chapter 25. |
If you did not configure your LAN connection during installation of Linux, you can do so at any time using the Network Configuration window (run the neat command to start it). The IP address and host names can be assigned statically to an Ethernet interface or retrieved dynamically at boot time from a DHCP server.
| Note | A computer can have more than one IP address because it can have multiple network interfaces. Each network interface must have an IP address (even if the address is assigned temporarily). So, if you have two Ethernet cards (eth0 and eth1), each needs its own IP address. Also, the address 127.0.0.1 represents the local host, so users on the local computer can access services in loopback. |
To define your IP address for your Ethernet interface, follow this procedure:
-
Start the Network Configuration. From the Desktop menu, click System Administration Network or, as root user from a Terminal window, type neat . (If prompted, type the root password.) The Network Configuration window appears.
-
Click the Devices tab. A listing of your existing network interfaces appears.
-
Double-click the eth0 interface (representing your first Ethernet card). A pop-up window appears, enabling you to configure your eth0 interface. Figure 15-6 shows the Network Configuration window and the pop-up Ethernet Device window configuring eth0.
-
On the Ethernet Devices window that appears, you can enter the following information:
-
Activate device when computer starts: Check here to have eth0 start at boot time.
-
Allow all users to enable and disable the device: Check to let non-root users enable and disable the network interface.
-
Enable IPv6 configuration for this interface: Check here if you are connected to an IPV6 network. (Most networks are still IPV4.)
-
-
On the same window, you must choose whether to get your IP addresses from another computer at boot time or enter the adresses yourself:
-
Automatically obtain IP address settings with: Select this check box if you have a DHCP or BOOTP server on the network from which you can obtain your computer's IP address, netmask , and gateway. DHCP is the most common way to connect to your ISP. You should consider setting up your own DHCP server if you have more than just a few computers on your LAN. (See Chapter 23 for how to set up a DHCP server.) You can, optionally , set your own host name, which can be just a name (such as jukebox ) or a fully qualified domain name (such as jukebox.linuxtoys.net ).
-
Statically set IP addresses: If there is no DHCP, or other boot server, on your LAN, you can add necessary IP address information statically by selecting this option and adding the following information:
-
Address: Type the IP address of this computer into the Address box. This number must be unique on your network. For your private LAN, you can use private IP addresses (see the section, "Understanding IP Addresses" later in this chapter).
-
Subnet Mask: Enter the netmask to indicate what part of the IP address represents the network. (Netmask is described later in this chapter.)
-
Default Gateway Address: If a computer or router connected to your LAN is providing routing functions to the Internet or other network, type the IP address of the computer into this box. (Chapter 16 describes how to use NAT or IP masquerading and use Fedora or RHEL as a router.)
-
-
Set MTU to: The maximum transfer unit (MTU) sets the number of 8-bit bytes that are available to the Internet Protocol in a link-layer frame. Click the check box and enter a number to change from the default 1500 MTU used by default for Ethernet interfaces in Linux. Lower rates can result in fewer packets being dropped on unreliable networks (some gamers like to lower the rate slightly, so fewer small actions are dropped). Higher rates can improve performance of large data transfers on reliable networks.
-
-
Click OK in the Ethernet Device window to save the configuration and close the window.
-
Click File Save to save the information you entered.
-
Click Activate in the Network Configuration window to start your connection to the LAN.

Figure 15-6: Configure your LAN interface using the Network Configuration window.
Identifying Other Computers (Hosts and DNS)
Each time you use a name to identify a computer, as when browsing the Web or using an e-mail address, the computer name must be translated into an IP address. To resolve names to IP addresses, Fedora and RHEL go through a search order (based on the contents of three files in /etc: resolv.conf, nsswitch.conf , and host.conf ). By default, it checks:
-
Hostnames you add yourself (which end up in the /etc/hosts file).
-
Hosts available via NIS (if an NIS server is configured as described in Chapter 23).
-
Hostsnames available via DNS.
You can use the Network Configuration window to add:
-
Hostnames and IP addresses. You might do this to identify hosts on your LAN that are not configured on a DNS server.
-
DNS search path . By adding domain names to a search path (such as linuxtoys.net ), you can browse to a site by its hostname (such as jukebox ), and have Linux search the domains you added to the search path to find the host you are looking for (such as jukebox.linuxtoys.net ).
-
DNS name servers. A DNS server can resolve addresses for the domains it serves and contact other DNS servers to get addresses for all other DNS domains.
| Note | If you are configuring a DNS server, you can use that server to centrally store names and IP addresses for your LAN. This saves you the trouble of updating every computer's /etc/hosts file every time you add or change a computer on your LAN. Refer to Chapter 25 to learn how to set up a DNS server. |
To add hostnames, IP addresses, search paths, and DNS servers, do the following:
-
Start the Network Configuration. As root user from a Terminal window, type neat or from the Desktop menu, click System Settings Network. The Network Configuration window appears.
-
Click the Hosts tab. A list of IP addresses, hostnames, and aliases appears.
-
Click New. A pop-up window appears asking you to add the IP address, hostname, and aliases for a host that you can reach on your network. Figure 15-7 shows the Network Configuration window and the pop-up window for adding a host.
-
Type in the IP address number, hostname, and, optionally, the host alias.
-
Click OK.
-
Repeat this process until you have added every computer on your LAN.
-
Click the DNS tab.
-
Type the IP address of the computers that serve as your Primary and Secondary DNS servers. You get these IP addresses from your ISP or, if you created your own DNS server, you can enter that server's IP address.
-
Type the name of the domain (probably the name of your local domain) to be searched for hostnames into the DNS Search Path box.
-
Select File Save to save the changes.
-
Select File Quit to exit.

Figure 15-7: Add hosts to /etc/hosts using the Network Configuration window.
Now, when you use programs such as ftp, ssh , or other TCP/IP utilities, you can use any hostname that is identified on your local computer, exists in your search path domain, or can be resolved from the public Internet DNS servers. (Strictly speaking, you don't have to set up your /etc/hosts file. You could use IP addresses as arguments to TCP/IP commands, but names are easier to work with.)
Adding Windows Computers to Your LAN
It is likely that you have other types of computers on your LAN in addition to those running Linux systems (at least for a few more years ). If there is a DHCP server available on your LAN (or if you have configured one yourself as described in Chapter 23), Windows and most other computer systems can simply start up and begin using the network. In cases where your network card is not properly detected , or you want to set static IP addresses, you need to do some extra configuration.
The following are general steps for manually adding your Windows computers to the Ethernet LAN you just created:
-
Power down your computer and install an Ethernet card. (Most PC Ethernet cards will run on Windows.)
-
Connect an Ethernet cable from the card to your switch.
-
Reboot your computer. If your card is detected, Windows will either automatically install a driver or ask you to insert a disk that comes with the card to install the driver.
-
Open the window to configure networking. (Start Settings Control Panel; then double-click the Network icon. If you have Windows XP, you also need to click Set up or change your Internet connection.). A window to change network properties appears.
-
What you do next depends on the version of Windows you are running:
-
For Windows 98:
-
Find the Ethernet card you have just installed in the list and select it.
-
Click Add. The Select Network Component Type pop-up window appears.
-
Double-click Protocol. The Select Network Protocol window appears.
-
Click Microsoft, and then double-click TCP/IP. A new entry should appear in your Network window that looks similar to the following, depending on your card:
TCP/IP -> 3Com Etherlink III ISA
-
Double-click on that new entry. The TCP/IP Properties window should appear, similar to the one in Figure 15-8 for Windows XP.
-
-
For Windows 2000 or XP:
-
Click Switch to classic view.
-
Double-click the Network connections.
-
Double-click Local Area Connection. The Local Area Connection Status window appears.
-
Click Properties. The Local Area Connection Properties window appears.
-
Select Internet Protocol (TCP/IP), and click the Properties button. The Internet Protocol (TCP/IP) Properties window appears as shown in Figure 15-8.
-
-
-
Click Use the following IP address to configure your IP address manually.
Note If you are using a DHCP server to assign IP addresses, click Obtain an IP address automatically instead. See Chapter 23 for information on setting up Linux as a DHCP server.
-
Add the IP address, Subnet mask, and Default Gateway for this computer.
-
Add the IP addresses of up to two DNS servers.
-
Click OK. You may need to reboot Windows for the settings to take effect.

Figure 15-8: Configure TCP/IP on Windows XP for your Ethernet LAN.
At this point, your Windows computer knows to listen on the network (via its Ethernet card) for messages addressed to the IP address you have just entered.
EAN: 2147483647
Pages: 279